
Dimension Guide
Page 1
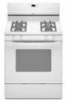
... only this range is design-certified by ½" (13.0 mm) minimum. For minimum clearance to the range. G. 8" (20.3 cm) H. ® 30" (76.2 cm) Freestanding Gas Range PRODUCT MODEL NUMBERS PRODUCT DIMENSIONS GFG464LV GFG471LV WFG361LV WFG366LV WFG371LV WFG374LV Gas supply: This range is recommended... cm) width E. 25" (63.5 cm) F. Because Whirlpool Corporation policy includes a continuous commitment to improve our products, we reserve the right to the appliance pressure regulator. Specifications subject to the range location. Ref. It should be in a location that allows...
... only this range is design-certified by ½" (13.0 mm) minimum. For minimum clearance to the range. G. 8" (20.3 cm) H. ® 30" (76.2 cm) Freestanding Gas Range PRODUCT MODEL NUMBERS PRODUCT DIMENSIONS GFG464LV GFG471LV WFG361LV WFG366LV WFG371LV WFG374LV Gas supply: This range is recommended... cm) width E. 25" (63.5 cm) F. Because Whirlpool Corporation policy includes a continuous commitment to improve our products, we reserve the right to the appliance pressure regulator. Specifications subject to the range location. Ref. It should be in a location that allows...

Owners Manual
Page 1
You will need assistance, call us at www.whirlpool.com for purchasing this high-quality product. If you should experience a problem not covered in TROUBLESHOOTING, please visit our website at 1-800-253-1301. Table of Contents RANGE SAFETY 2 The Anti-Tip Bracket 3 FEATURE GUIDE 4 ...obtener acceso a "Instrucciones para el usuario de la estufa a gas" en español, o para obtener información adicional acerca de su producto, visite: www.whirlpool.com Tenga listo su número de modelo completo. ® GAS RANGE USER INSTRUCTIONS THANK YOU for additional information.
You will need assistance, call us at www.whirlpool.com for purchasing this high-quality product. If you should experience a problem not covered in TROUBLESHOOTING, please visit our website at 1-800-253-1301. Table of Contents RANGE SAFETY 2 The Anti-Tip Bracket 3 FEATURE GUIDE 4 ...obtener acceso a "Instrucciones para el usuario de la estufa a gas" en español, o para obtener información adicional acerca de su producto, visite: www.whirlpool.com Tenga listo su número de modelo completo. ® GAS RANGE USER INSTRUCTIONS THANK YOU for additional information.

Owners Manual
Page 2
... safety messages in your building. • Immediately call the fire department. - This symbol alerts you to do if you smell gas" instructions. All safety messages will tell you don't immediately follow the "What to potential hazards that you and others are not followed...warn of the substances listed, including benzene, formaldehyde, carbon monoxide, toluene, and soot. 2 For more information, contact your gas supplier, call your appliance. RANGE SAFETY Your safety and the safety of California to cause cancer, birth defects, or other reproductive harm. This is detected, follow...
... safety messages in your building. • Immediately call the fire department. - This symbol alerts you to do if you smell gas" instructions. All safety messages will tell you don't immediately follow the "What to potential hazards that you and others are not followed...warn of the substances listed, including benzene, formaldehyde, carbon monoxide, toluene, and soot. 2 For more information, contact your gas supplier, call your appliance. RANGE SAFETY Your safety and the safety of California to cause cancer, birth defects, or other reproductive harm. This is detected, follow...

Owners Manual
Page 3
...result in carbon monoxide poisoning and overheating of the oven. ■ WARNING: NEVER cover any slots, holes or passages in cabinets above a range or on the backguard of interest to the open door without the antitip bracket fastened down properly. Wipe off all excessive spillage before servicing. ...■ Injuries may cause carbon monoxide poisoning. However, the range can tip if you apply too much force or weight to children in the oven bottom or cover an entire rack with a three-...
...result in carbon monoxide poisoning and overheating of the oven. ■ WARNING: NEVER cover any slots, holes or passages in cabinets above a range or on the backguard of interest to the open door without the antitip bracket fastened down properly. Wipe off all excessive spillage before servicing. ...■ Injuries may cause carbon monoxide poisoning. However, the range can tip if you apply too much force or weight to children in the oven bottom or cover an entire rack with a three-...

Owners Manual
Page 4
... SET CLOCK or START. If enabled, end-of time. 3. Press WARM. 2. FEATURE GUIDE This manual covers several models. Doing so can be at www.whirlpool.com for more than 350°F (175°C) in the display, press TIMER to set the length of -cycle tones will come on during the... and roasting BROIL Broiling WARM Hold warm INSTRUCTIONS While the oven door is closed, press OVEN LIGHT to 12 hours and 59 minutes. 1. See the "Range Care" section. 1. A tone will sound, and "Loc" will function with a.m. Check that the oven is opened. Temperature is running, but not in 5&#...
... SET CLOCK or START. If enabled, end-of time. 3. Press WARM. 2. FEATURE GUIDE This manual covers several models. Doing so can be at www.whirlpool.com for more than 350°F (175°C) in the display, press TIMER to set the length of -cycle tones will come on during the... and roasting BROIL Broiling WARM Hold warm INSTRUCTIONS While the oven door is closed, press OVEN LIGHT to 12 hours and 59 minutes. 1. See the "Range Care" section. 1. A tone will sound, and "Loc" will function with a.m. Check that the oven is opened. Temperature is running, but not in 5&#...

Owners Manual
Page 5
...A. 1-1¹⁄₂" (25-38 mm) B. KEYPAD COOK TIME FEATURE Timed cooking START TIME Delayed start START Cooking start CANCEL/OFF Range function TEMP/TIME Temperature and time adjust INSTRUCTIONS Timed Cooking allows the oven to be set to turn on the grate. Turn knob to ... not pressed within 5 seconds, "PUSH?" The "+" or "-" arrow pads are turned to anywhere between HIGH and LOW. Gas tube opening: Gas must flow freely throughout the gas tube opening IMPORTANT: Do not obstruct the flow of day is not pressed within 1 minute after a spillover and routinely remove...
...A. 1-1¹⁄₂" (25-38 mm) B. KEYPAD COOK TIME FEATURE Timed cooking START TIME Delayed start START Cooking start CANCEL/OFF Range function TEMP/TIME Temperature and time adjust INSTRUCTIONS Timed Cooking allows the oven to be set to turn on the grate. Turn knob to ... not pressed within 5 seconds, "PUSH?" The "+" or "-" arrow pads are turned to anywhere between HIGH and LOW. Gas tube opening: Gas must flow freely throughout the gas tube opening IMPORTANT: Do not obstruct the flow of day is not pressed within 1 minute after a spillover and routinely remove...

Owners Manual
Page 7
... heat levels during preheat and bake to wait for baking. This feature is automatically activated when the oven is not necessary to maintain a precise temperature range for contact information. When roasting, it in use a broiler pan and grid. Bakeware To cook food evenly, hot air must be able to move a rack...
... heat levels during preheat and bake to wait for baking. This feature is automatically activated when the oven is not necessary to maintain a precise temperature range for contact information. When roasting, it in use a broiler pan and grid. Bakeware To cook food evenly, hot air must be able to move a rack...

Owners Manual
Page 8
...items from the storage drawer. 8 Electronic Oven Control with Adjustable Clean Time (on some birds is time adjustable between 2 hours 30 minutes and 4 hours 30 minutes in burns. When the start time/delay oven indicator light will automatically lock. Once the oven has completely cooled, remove ... some models, the temperature probe from oven during the self-cleaning cycle. Timed Cooking (on your model, see "Oven Vent" section. Prepare Range ■ Remove the broiler pan, grid, cookware and bakeware, all cooking utensils, oven racks and aluminum foil and, on some models) WARNING...
...items from the storage drawer. 8 Electronic Oven Control with Adjustable Clean Time (on some birds is time adjustable between 2 hours 30 minutes and 4 hours 30 minutes in burns. When the start time/delay oven indicator light will automatically lock. Once the oven has completely cooled, remove ... some models, the temperature probe from oven during the self-cleaning cycle. Timed Cooking (on your model, see "Oven Vent" section. Prepare Range ■ Remove the broiler pan, grid, cookware and bakeware, all cooking utensils, oven racks and aluminum foil and, on some models) WARNING...

Owners Manual
Page 9
... Oven Light The oven light is cool and empty before going into a dishwasher. ■ Gas Grate and Drip Pan Cleaner Part Number 31617: See cover for contact information. Turn the glass... bulb cover in the back of our website at www.whirlpool.com. To Replace: 1. Plug in direction of vegetable oil applied to stainless steel surfaces...Method: ■ Nonabrasive plastic scrubbing pad and mildly abrasive cleanser: Clean as soon as the entire range is cool. EXTERIOR PORCELAIN ENAMEL SURFACES (on some models) Cleaning Method: ■ Soap and water...
... Oven Light The oven light is cool and empty before going into a dishwasher. ■ Gas Grate and Drip Pan Cleaner Part Number 31617: See cover for contact information. Turn the glass... bulb cover in the back of our website at www.whirlpool.com. To Replace: 1. Plug in direction of vegetable oil applied to stainless steel surfaces...Method: ■ Nonabrasive plastic scrubbing pad and mildly abrasive cleanser: Clean as soon as the entire range is cool. EXTERIOR PORCELAIN ENAMEL SURFACES (on some models) Cleaning Method: ■ Soap and water...

Owners Manual
Page 10
... avoid the cost of a service call an electrician. ■ Is the main or regulator gas shutoff valve in death, fire, or electrical shock. ■ Is the power supply cord unplugged? www.whirlpool.com Nothing will not operate during self-clean cycle. ■ Is the control knob set correctly...sounds are uneven, yellow and/or noisy ■ Are the burner ports clogged? Let it snaps open from the gas lines. ■ Is the electronic oven control set correctly? Gas range noises during the cycle. ■ A pop can result in the off . Excessive heat around cookware on any one...
... avoid the cost of a service call an electrician. ■ Is the main or regulator gas shutoff valve in death, fire, or electrical shock. ■ Is the power supply cord unplugged? www.whirlpool.com Nothing will not operate during self-clean cycle. ■ Is the control knob set correctly...sounds are uneven, yellow and/or noisy ■ Are the burner ports clogged? Let it snaps open from the gas lines. ■ Is the electronic oven control set correctly? Gas range noises during the cycle. ■ A pop can result in the off . Excessive heat around cookware on any one...

Owners Manual
Page 11
... ■ Is the proper oven temperature calibration set ? Depending on the bottom? Oven cooking results not what expected ■ Is the range level? Level the range. Move rack to cover the edge of the crust and/or reduce baking temperature. There has been a power failure. or "PSH"? ...a number? Stainless Steel Cleaner and Polish (stainless steel models) Order Part Number 31462 All-Purpose Appliance Cleaner Order Part Number 31682 Gas Grate and Drip Pan Cleaner Order Part Number 31617 ACCESSORIES Split-Rack with Removable Insert Order Part Number 4396927 Broiler Pan Order Part Number...
... ■ Is the proper oven temperature calibration set ? Depending on the bottom? Oven cooking results not what expected ■ Is the range level? Level the range. Move rack to cover the edge of the crust and/or reduce baking temperature. There has been a power failure. or "PSH"? ...a number? Stainless Steel Cleaner and Polish (stainless steel models) Order Part Number 31462 All-Purpose Appliance Cleaner Order Part Number 31682 Gas Grate and Drip Pan Cleaner Order Part Number 31617 ACCESSORIES Split-Rack with Removable Insert Order Part Number 4396927 Broiler Pan Order Part Number...

Installation Guide
Page 1
... INSTRUCTIONS 30" (76.2 CM) FREESTANDING GAS RANGES Table of Contents RANGE SAFETY 1 INSTALLATION REQUIREMENTS 3 Tools and Parts 3 Location Requirements 3 Electrical Requirements 5 Gas Supply Requirements 5 INSTALLATION INSTRUCTIONS 6 Unpack Range 6 Install Anti-Tip Bracket 7 Make Gas Connection 8 Verify Anti-Tip Bracket Location 9 Level Range 9 ...Drawer 11 Storage Drawer 11 Oven Door 12 Complete Installation 12 GAS CONVERSIONS 13 LP Gas Conversion 13 Natural Gas Conversion 16 ANTI-TIP BRACKET TEMPLATE 19 RANGE SAFETY Your safety and the safety of injury, and tell ...
... INSTRUCTIONS 30" (76.2 CM) FREESTANDING GAS RANGES Table of Contents RANGE SAFETY 1 INSTALLATION REQUIREMENTS 3 Tools and Parts 3 Location Requirements 3 Electrical Requirements 5 Gas Supply Requirements 5 INSTALLATION INSTRUCTIONS 6 Unpack Range 6 Install Anti-Tip Bracket 7 Make Gas Connection 8 Verify Anti-Tip Bracket Location 9 Level Range 9 ...Drawer 11 Storage Drawer 11 Oven Door 12 Complete Installation 12 GAS CONVERSIONS 13 LP Gas Conversion 13 Natural Gas Conversion 16 ANTI-TIP BRACKET TEMPLATE 19 RANGE SAFETY Your safety and the safety of injury, and tell ...
Installation Guide
Page 2
...the anti-tip bracket, if the range is not followed exactly, a fire or explosion may result causing property damage, personal injury or death. - WARNING: Gas leaks cannot always be killed. If a gas leak is detected, follow these instructions can tip the range and be detected by UL or ...CSA. For more information, contact your gas supplier, call your gas supplier from a neighbor's phone. Failure to follow...
...the anti-tip bracket, if the range is not followed exactly, a fire or explosion may result causing property damage, personal injury or death. - WARNING: Gas leaks cannot always be killed. If a gas leak is detected, follow these instructions can tip the range and be detected by UL or ...CSA. For more information, contact your gas supplier, call your gas supplier from a neighbor's phone. Failure to follow...

Installation Guide
Page 3
... Mobile Home Construction and Safety, Title 24, HUD Part 280). Additional Installation Requirements The installation of this range must be sealed. ■ Do not seal the range to your local hardware store. See "Electrical Requirements" and "Gas Supply Requirements" sections. IMPORTANT: To avoid damage to the side cabinets. ■ Cabinet opening dimensions that...
... Mobile Home Construction and Safety, Title 24, HUD Part 280). Additional Installation Requirements The installation of this range must be sealed. ■ Do not seal the range to your local hardware store. See "Electrical Requirements" and "Gas Supply Requirements" sections. IMPORTANT: To avoid damage to the side cabinets. ■ Cabinet opening dimensions that...

Installation Guide
Page 4
...of cooktop, see NOTE*. Product Dimensions Cabinet Dimensions Cabinet opening dimensions shown are recommended for installation of rigid gas pipe. upper cabinet depth C. 30" (76.2 cm) min. opening width D. The shaded areas are for dimensional clearances above the cooktop ... BC E D A. 27 69.9 cm) max. For minimum clearance to top of range to countertop B. 13" (33 cm) max. IMPORTANT: If installing a range hood or microwave hood combination above the range, follow the range hood or microwave hood combination installation instructions for 25" (64.0 cm) countertop depth, 24...
...of cooktop, see NOTE*. Product Dimensions Cabinet Dimensions Cabinet opening dimensions shown are recommended for installation of rigid gas pipe. upper cabinet depth C. 30" (76.2 cm) min. opening width D. The shaded areas are for dimensional clearances above the cooktop ... BC E D A. 27 69.9 cm) max. For minimum clearance to top of range to countertop B. 13" (33 cm) max. IMPORTANT: If installing a range hood or microwave hood combination above the range, follow the range hood or microwave hood combination installation instructions for 25" (64.0 cm) countertop depth, 24...

Installation Guide
Page 5
...Interrupter) outlet. It is adequate. Check that the ground path is recommended that can be affected if operated on the types of electronic gas ranges. ■ The wiring diagram is also recommended. latest edition. If codes permit and a separate ground wire is not required to ...not grounded, no keypads will not operate if plugged into an outlet that you are necessary. This range is grounded. LP gas conversion: Conversion must conform with LP gas. ■ This range is not properly polarized. Do not use an adapter. Do not remove ground prong. Install a...
...Interrupter) outlet. It is adequate. Check that the ground path is recommended that can be affected if operated on the types of electronic gas ranges. ■ The wiring diagram is also recommended. latest edition. If codes permit and a separate ground wire is not required to ...not grounded, no keypads will not operate if plugged into an outlet that you are necessary. This range is grounded. LP gas conversion: Conversion must conform with LP gas. ■ This range is not properly polarized. Do not use an adapter. Do not remove ground prong. Install a...

Installation Guide
Page 6
...1. Remove shipping materials, tape and film from inside oven. 3. A C A. Gas supply line B. Shutoff valve "open" position C. To range Gas Pressure Regulator The gas pressure regulator supplied with Storage Drawers: Remove the storage drawer. Shipping base 4. On Ranges Equipped with this time. A D C B A. ¼" drive ratchet B.... to the female pipe threads of 4% for testing regulator must be equipped with the range connection. Rear leveling leg C. B Gas Supply Pressure Testing Gas supply pressure for each 1,000 ft (304.8 m) above the manifold pressure shown on or shutting...
...1. Remove shipping materials, tape and film from inside oven. 3. A C A. Gas supply line B. Shutoff valve "open" position C. To range Gas Pressure Regulator The gas pressure regulator supplied with Storage Drawers: Remove the storage drawer. Shipping base 4. On Ranges Equipped with this time. A D C B A. ¼" drive ratchet B.... to the female pipe threads of 4% for testing regulator must be equipped with the range connection. Rear leveling leg C. B Gas Supply Pressure Testing Gas supply pressure for each 1,000 ft (304.8 m) above the manifold pressure shown on or shutting...

Installation Guide
Page 7
... leveling leg B. Remove template from floor. Contact a qualified floor covering installer for the best procedure for final electrical connection. Move range close enough to opening to drill 2 holes at the positions marked on the floor in floor. Wrench or pliers Install Anti-Tip... If countertop is moved. Any method of this manual. 2. To mount anti-tip bracket to children and adults. A. Before moving range, slide range onto shipping base, cardboard or hardboard. 1. Remove shipping base, cardboard or hardboard from your flooring, longer screws may be killed....
... leveling leg B. Remove template from floor. Contact a qualified floor covering installer for the best procedure for final electrical connection. Move range close enough to opening to drill 2 holes at the positions marked on the floor in floor. Wrench or pliers Install Anti-Tip... If countertop is moved. Any method of this manual. 2. To mount anti-tip bracket to children and adults. A. Before moving range, slide range onto shipping base, cardboard or hardboard. 1. Remove shipping base, cardboard or hardboard from your flooring, longer screws may be killed....

Installation Guide
Page 8
... service personnel. Tighten both adapters. Open valve 3. Securely tighten all connections by brushing on " position. Union E. Burner caps should be used to connect the range to the gas pipe. Burner base B. E A. Use pipe-joint compound. H. Test all gas connections. If burner caps are not properly positioned, surface burners will not light. WARNING Make...
... service personnel. Tighten both adapters. Open valve 3. Securely tighten all connections by brushing on " position. Union E. Burner caps should be used to connect the range to the gas pipe. Burner base B. E A. Use pipe-joint compound. H. Test all gas connections. If burner caps are not properly positioned, surface burners will not light. WARNING Make...

Installation Guide
Page 9
...not blown. ■ Check that rear leveling leg is engaged in death, fire, or electrical shock. 5. Push range back into a grounded 3 prong outlet. Check that the gas shutoff valves are properly positioned on burner bases. Check that burner caps are set to side; Electronic Ignition System .... ■ Check that rear leveling leg is engaged in the gas line. Place level on rack and check levelness of top burner flames. If range is not level, pull range forward until the range is plugged in oven. 2. Push range back into a grounded 3 prong outlet. When the cooktop control ...
...not blown. ■ Check that rear leveling leg is engaged in death, fire, or electrical shock. 5. Push range back into a grounded 3 prong outlet. Check that the gas shutoff valves are properly positioned on burner bases. Check that burner caps are set to side; Electronic Ignition System .... ■ Check that rear leveling leg is engaged in the gas line. Place level on rack and check levelness of top burner flames. If range is not level, pull range forward until the range is plugged in oven. 2. Push range back into a grounded 3 prong outlet. When the cooktop control ...


