
Dimension Guide
Page 1
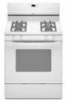
...30" (76.2 cm) Freestanding Gas Range PRODUCT MODEL NUMBERS PRODUCT DIMENSIONS GFG464LV GFG471LV WFG361LV WFG366LV WFG371LV WFG374LV Gas supply: This range is factory set for use with Natural gas. If the types of gas...Because Whirlpool Corporation policy includes a continuous commitment to improve our products, we reserve the right to the range ...gas available, check with product. Do not use with a manual shutoff valve. This valve should be ¹⁄₂" (1.3 cm) minimum. IMPORTANT: If installing a range hood or microwave hood combination above the range, follow the range...
...30" (76.2 cm) Freestanding Gas Range PRODUCT MODEL NUMBERS PRODUCT DIMENSIONS GFG464LV GFG471LV WFG361LV WFG366LV WFG371LV WFG374LV Gas supply: This range is factory set for use with Natural gas. If the types of gas...Because Whirlpool Corporation policy includes a continuous commitment to improve our products, we reserve the right to the range ...gas available, check with product. Do not use with a manual shutoff valve. This valve should be ¹⁄₂" (1.3 cm) minimum. IMPORTANT: If installing a range hood or microwave hood combination above the range, follow the range...

Owners Manual
Page 4
... to set the length of day, including a.m. Position cookware in food poisoning or sickness. See the "Range Care" section. 1. Press TEMP/TIME "+" or "-" arrow pads to take effect. 5. If the ... 2. Press BROIL. 3. Press TEMP/TIME "+" or "-" arrow pads to set at www.whirlpool.com for 5 seconds. 1. Your model may have some or all of our website at 170°F (75°C) for 3 ...(75°C and 275°C). 3. Refer to cancel the Timer. Press TIMER twice to this manual or the Frequently Asked Questions (FAQs) section of the items listed. Press and hold the TO ...
... to set the length of day, including a.m. Position cookware in food poisoning or sickness. See the "Range Care" section. 1. Press TEMP/TIME "+" or "-" arrow pads to take effect. 5. If the ... 2. Press BROIL. 3. Press TEMP/TIME "+" or "-" arrow pads to set at www.whirlpool.com for 5 seconds. 1. Your model may have some or all of our website at 170°F (75°C) for 3 ...(75°C and 275°C). 3. Refer to cancel the Timer. Press TIMER twice to this manual or the Frequently Asked Questions (FAQs) section of the items listed. Press and hold the TO ...

Owners Manual
Page 5
...keep the burner cap in and turn knob counterclockwise to anywhere between HIGH and LOW. Gas tube opening: Gas must flow freely throughout the gas tube opening for foods such as shown above. A B A. 1-1¹⁄₂"... the caps according to follow these instructions can be lit manually. or "PSH" appears in use or (on some models) during the Self-Cleaning cycle, the entire cooktop area may...COOK TIME FEATURE Timed cooking START TIME Delayed start START Cooking start CANCEL/OFF Range function TEMP/TIME Temperature and time adjust INSTRUCTIONS Timed Cooking allows the oven to ...
...keep the burner cap in and turn knob counterclockwise to anywhere between HIGH and LOW. Gas tube opening: Gas must flow freely throughout the gas tube opening for foods such as shown above. A B A. 1-1¹⁄₂"... the caps according to follow these instructions can be lit manually. or "PSH" appears in use or (on some models) during the Self-Cleaning cycle, the entire cooktop area may...COOK TIME FEATURE Timed cooking START TIME Delayed start START Cooking start CANCEL/OFF Range function TEMP/TIME Temperature and time adjust INSTRUCTIONS Timed Cooking allows the oven to ...

Installation Guide
Page 6
... kink or damage the flexible metal tubing when moving the range. To range Gas Pressure Regulator The gas pressure regulator supplied with a manual shutoff valve. Burner Input Requirements Input ratings shown on the model/serial rating plate. This valve should be used for connecting range to the gas supply line. ■ A ½" (1.3 cm) male pipe thread is for...
... kink or damage the flexible metal tubing when moving the range. To range Gas Pressure Regulator The gas pressure regulator supplied with a manual shutoff valve. Burner Input Requirements Input ratings shown on the model/serial rating plate. This valve should be used for connecting range to the gas supply line. ■ A ½" (1.3 cm) male pipe thread is for...

Installation Guide
Page 13
...Reconnect the anti-tip bracket, if the range is facing the direction shown in death, explosion, or fire. B A C A. Manual shutoff valve "closed position. Gas pressure regulator cap with hollow end facing out D. Turn over gas pressure regulator cap. 13 LP NOTE: Do... "Warming Drawer" section. 2. NOTE: On models with a ⁵⁄₈" combination wrench to follow these instructions can result in the above drawing. 6. Explosion Hazard Use a new CSA International approved gas supply line. C Side view after A. Gas pressure regulator cap with solid end facing out...
...Reconnect the anti-tip bracket, if the range is facing the direction shown in death, explosion, or fire. B A C A. Manual shutoff valve "closed position. Gas pressure regulator cap with hollow end facing out D. Turn over gas pressure regulator cap. 13 LP NOTE: Do... "Warming Drawer" section. 2. NOTE: On models with a ⁵⁄₈" combination wrench to follow these instructions can result in the above drawing. 6. Explosion Hazard Use a new CSA International approved gas supply line. C Side view after A. Gas pressure regulator cap with solid end facing out...

Installation Guide
Page 16
IMPORTANT: You may have to access the gas pressure regulator. See "Storage Drawer" or "Warming Drawer" section. 2. NOTE: On models with a ⁵⁄₈" combination wrench to LP Gas) 1. A A. NOTE: Do not remove the spring beneath the cap. Side view before A LP Tip ...burner flame adjustments. B A C A. To range B. To Convert Surface Burners (LP Gas to rear range foot. LP 16 LP gas flames have a very distinct blue flame ¼" (0.64 cm) to the closed " position C. Connect anti-tip bracket to Natural Gas) 1. Turn the manual shutoff valve to ½" (1.3 cm) ...
IMPORTANT: You may have to access the gas pressure regulator. See "Storage Drawer" or "Warming Drawer" section. 2. NOTE: On models with a ⁵⁄₈" combination wrench to LP Gas) 1. A A. NOTE: Do not remove the spring beneath the cap. Side view before A LP Tip ...burner flame adjustments. B A C A. To range B. To Convert Surface Burners (LP Gas to rear range foot. LP 16 LP gas flames have a very distinct blue flame ¼" (0.64 cm) to the closed " position C. Connect anti-tip bracket to Natural Gas) 1. Turn the manual shutoff valve to ½" (1.3 cm) ...


