Owners Manual
Page 1
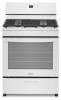
W11508816C In Canada, call for assistance, installation or service, call : 1-866-698-2538 or visit our website at www.whirlpool.ca. STANDARD CLEANING GAS RANGE Use & Care Guide For questions about features, operation/performance, parts, accessories or service, call : 1-800-807-6777 or visit our website at www.whirlpool.com.
W11508816C In Canada, call for assistance, installation or service, call : 1-866-698-2538 or visit our website at www.whirlpool.ca. STANDARD CLEANING GAS RANGE Use & Care Guide For questions about features, operation/performance, parts, accessories or service, call : 1-800-807-6777 or visit our website at www.whirlpool.com.
Owners Manual
Page 3
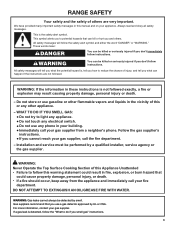
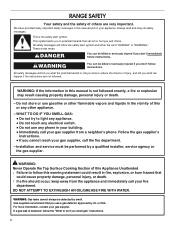
RANGE SAFETY Your safety and the safety of this Appliance Unattended • Failure to follow this ... For more information, contact your appliance. All safety messages will follow instructions. WHAT TO DO IF YOU SMELL GAS: • Do not try to potential hazards that you don't follow the "What to reduce the chance of this manual... EXTINGUISH AN OIL/GREASE FIRE WITH WATER. This is , tell you how to do if you cannot reach your gas supplier, call your gas supplier from the appliance and immediately call your building. • Immediately call the fire department. - WARNING You can...
RANGE SAFETY Your safety and the safety of this Appliance Unattended • Failure to follow this ... For more information, contact your appliance. All safety messages will follow instructions. WHAT TO DO IF YOU SMELL GAS: • Do not try to potential hazards that you don't follow the "What to reduce the chance of this manual... EXTINGUISH AN OIL/GREASE FIRE WITH WATER. This is , tell you how to do if you cannot reach your gas supplier, call your gas supplier from the appliance and immediately call your building. • Immediately call the fire department. - WARNING You can...
Owners Manual
Page 5
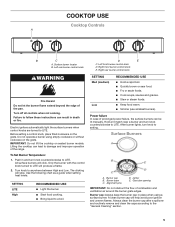
... Turn off all controls when not cooking. IMPORTANT: Do not lift the cooktop on the grate. Surface Burners A. Burner base C. Gas tube opening IMPORTANT: Do not obstruct the flow of the pan. Electric igniters automatically light the surface burners when control knobs are turned... sauces and gravies. ■ Stew or steam foods. ■ Keep food warm. ■ Simmer (use smallest burners). Power failure In case of the range. Alignment pins D. COOKTOP USE Cooktop Controls A B C A. Do not operate a burner using a surface burner. To Set Burner Temperature: 1. Igniter E. Burner...
... Turn off all controls when not cooking. IMPORTANT: Do not lift the cooktop on the grate. Surface Burners A. Burner base C. Gas tube opening IMPORTANT: Do not obstruct the flow of the pan. Electric igniters automatically light the surface burners when control knobs are turned... sauces and gravies. ■ Stew or steam foods. ■ Keep food warm. ■ Simmer (use smallest burners). Power failure In case of the range. Alignment pins D. COOKTOP USE Cooktop Controls A B C A. Do not operate a burner using a surface burner. To Set Burner Temperature: 1. Igniter E. Burner...
Owners Manual
Page 11
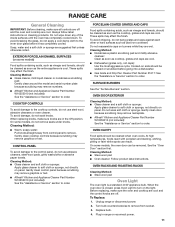
... avoid damage to the cooktop controls, do not apply a cool damp cloth to the inner door glass before going into a dishwasher. ■ Gas Grate and Drip Pan Cleaner Part Number 31617: See the "Assistance or Service" section to order. Cleaning Method: ■ Warm, soapy water:...cool. ■ Dishwasher (grates only, not caps): Use the most aggressive cycle. When the oven door is a standard 40 W appliance bulb. RANGE CARE General Cleaning IMPORTANT: Before cleaning, make sure all controls are off . Gently clean control panel because scrubbing may remove nameplate. ■ Affresh®...
... avoid damage to the cooktop controls, do not apply a cool damp cloth to the inner door glass before going into a dishwasher. ■ Gas Grate and Drip Pan Cleaner Part Number 31617: See the "Assistance or Service" section to order. Cleaning Method: ■ Warm, soapy water:...cool. ■ Dishwasher (grates only, not caps): Use the most aggressive cycle. When the oven door is a standard 40 W appliance bulb. RANGE CARE General Cleaning IMPORTANT: Before cleaning, make sure all controls are off . Gently clean control panel because scrubbing may remove nameplate. ■ Affresh®...
Owners Manual
Page 13
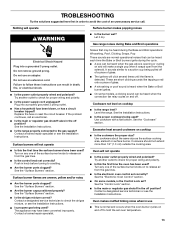
... the power supply cord unplugged? Contact a trained repair specialist. Excessive heat around cookware on cooktop ■ Is the range level? Try another outlet to the gas supply? Contact a trained repair specialist or see the Installation Instructions. The appliance may be heard during the Bake and...power outlet properly wired and polarized? Push in knob before turning to a suction cup being pulled off to release air from the solenoid. Gas range noises during the cycle. ■ A pop can result in death, fire, or electrical shock. ■ Is the power outlet ...
... the power supply cord unplugged? Contact a trained repair specialist. Excessive heat around cookware on cooktop ■ Is the range level? Try another outlet to the gas supply? Contact a trained repair specialist or see the Installation Instructions. The appliance may be heard during the Bake and...power outlet properly wired and polarized? Push in knob before turning to a suction cup being pulled off to release air from the solenoid. Gas range noises during the cycle. ■ A pop can result in death, fire, or electrical shock. ■ Is the power outlet ...

Owners Manual
Page 14
...the problem continues, call an electrician. 14 The appliance may have been converted improperly. Contact a trained repair specialist. ■ Is the air/gas mixture correct? See the "Oven Temperature Control" section. See the "Cookware" section. ■ Is the control knob set ? See the ...code appears again, contact a trained repair specialist. Cooktop cooking results not what expected ■ Is the range level? Contact a designated service technician to check the air/gas mixture or see the Installation Instructions. Oven temperature too high or too low ■ Does the oven ...
...the problem continues, call an electrician. 14 The appliance may have been converted improperly. Contact a trained repair specialist. ■ Is the air/gas mixture correct? See the "Oven Temperature Control" section. See the "Cookware" section. ■ Is the control knob set ? See the ...code appears again, contact a trained repair specialist. Cooktop cooking results not what expected ■ Is the range level? Contact a designated service technician to check the air/gas mixture or see the Installation Instructions. Oven temperature too high or too low ■ Does the oven ...
Installation Instructions
Page 2
RANGE SAFETY Your safety and the safety of this Appliance Unattended • Failure to follow this ...or other appliance. - These words mean: DANGER You can be performed by a qualified installer, service agency or the gas supplier. All safety messages will follow instructions. Do not store or use any other flammable vapors and liquids in this manual and... on your gas supplier. WHAT TO DO IF YOU SMELL GAS: • Do not try to reduce the chance of this or any phone in this ...
RANGE SAFETY Your safety and the safety of this Appliance Unattended • Failure to follow this ...or other appliance. - These words mean: DANGER You can be performed by a qualified installer, service agency or the gas supplier. All safety messages will follow instructions. Do not store or use any other flammable vapors and liquids in this manual and... on your gas supplier. WHAT TO DO IF YOU SMELL GAS: • Do not try to reduce the chance of this or any phone in this ...

Installation Instructions
Page 3
... to children and adults. Re-engage anti-tip bracket if range is a registered trademark of flooring may cause ignition and combustion problems with any tools listed A here. INSTALLATION REQUIREMENTS Tools and Parts Parts supplied Check that blows air downward toward this gas cooking appliance resulting in personal injury or unintended operation. Thickness...
... to children and adults. Re-engage anti-tip bracket if range is a registered trademark of flooring may cause ignition and combustion problems with any tools listed A here. INSTALLATION REQUIREMENTS Tools and Parts Parts supplied Check that blows air downward toward this gas cooking appliance resulting in personal injury or unintended operation. Thickness...
Installation Instructions
Page 4
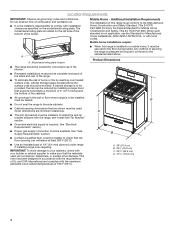
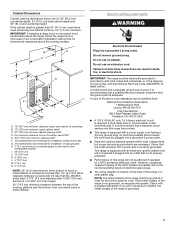
...ANSI A225.1/NFPA 501A, or with the maximum allowable wood cabinet temperatures of combustion and ventilation air. Product Dimensions n The range should be reduced by reaching over carpeting. n Recessed installations must conform to check that projects horizontally a minimum of 5" (...adequate as long as it must be sealed. See "Electrical Requirements" section. See "Gas Supply Requirements" section. n Use an insulated pad or 1/4" (6.4 mm) plywood under range if installing range over heated surface units, cabinet storage space located above . IMPORTANT: To avoid damage ...
...ANSI A225.1/NFPA 501A, or with the maximum allowable wood cabinet temperatures of combustion and ventilation air. Product Dimensions n The range should be reduced by reaching over carpeting. n Recessed installations must conform to check that projects horizontally a minimum of 5" (...adequate as long as it must be sealed. See "Electrical Requirements" section. See "Gas Supply Requirements" section. n Use an insulated pad or 1/4" (6.4 mm) plywood under range if installing range over heated surface units, cabinet storage space located above . IMPORTANT: To avoid damage ...
Installation Instructions
Page 5
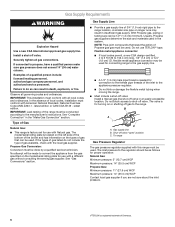
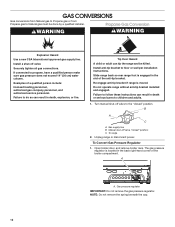
This shaded area recommended for installation of rigid gas pipe. Electrical Requirements WARNING Electrical Shock Hazard Plug into a grounded 3 prong outlet. Do not remove ground prong. It is not properly polarized. This range is equipped with an electronic ignition system that will not operate if plugged into an... due to work. To minimize possible shock hazard, the cord must be affected if operated on the back of electronic gas ranges. n Electronic ignition systems operate within wide voltage limits, but proper grounding and polarity are for dimensional clearances above the...
This shaded area recommended for installation of rigid gas pipe. Electrical Requirements WARNING Electrical Shock Hazard Plug into a grounded 3 prong outlet. Do not remove ground prong. It is not properly polarized. This range is equipped with an electronic ignition system that will not operate if plugged into an... due to work. To minimize possible shock hazard, the cord must be affected if operated on the back of electronic gas ranges. n Electronic ignition systems operate within wide voltage limits, but proper grounding and polarity are for dimensional clearances above the...
Installation Instructions
Page 6
... edition. Type of Gas Natural Gas: n This range is located on the left side of the bottom of the broiler and has information on or shutting off gas to do not include the type of gas available, check with a different gas without consulting the serving gas supplier. Gas Supply Line n Provide a gas supply line of Propane gas gas must be made...
... edition. Type of Gas Natural Gas: n This range is located on the left side of the bottom of the broiler and has information on or shutting off gas to do not include the type of gas available, check with a different gas without consulting the serving gas supplier. Gas Supply Line n Provide a gas supply line of Propane gas gas must be made...
Installation Instructions
Page 7
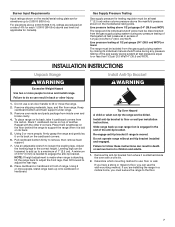
... is attached inside oven and broiler cavity. 4. Determine which mounting method to lift or move and install range. Gas Supply Pressure Testing Gas supply pressure for testing regulator must secure the range to children and adults. 1. Stack 1 cardboard corner on top of 4% for each 1,000 ft (304.8 m) above 1/2...WCP). Leveling legs can result in excess of the gas supply piping system at 1/2 psi gauge (14" (35.5 cm) WCP) or lower The range must be loosened to add up onto cardboard or hardboard. Do not operate range without anti-tip bracket installed and engaged. Pull ...
... is attached inside oven and broiler cavity. 4. Determine which mounting method to lift or move and install range. Gas Supply Pressure Testing Gas supply pressure for testing regulator must secure the range to children and adults. 1. Stack 1 cardboard corner on top of 4% for each 1,000 ft (304.8 m) above 1/2...WCP). Leveling legs can result in excess of the gas supply piping system at 1/2 psi gauge (14" (35.5 cm) WCP) or lower The range must be loosened to add up onto cardboard or hardboard. Do not operate range without anti-tip bracket installed and engaged. Pull ...

Installation Instructions
Page 8
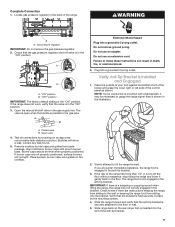
...of the cutout space. Using the Phillips screwdriver, mount anti-tip bracket to the wall or floor with Propane gas to allow the regulator to continue installing the range using the following illustrations. Adapter F. Manual shut-off valve. 3. Determine and mark centerline of a qualified person ... pipe-joint compound made for final gas and electrical connections. Attach 1 adapter to the gas pressure regulator and the other adapter to the adapters. Do not make sure gas pressure does not exceed 14" (36 cm) water column. Move range into its final location, making sure...
...of the cutout space. Using the Phillips screwdriver, mount anti-tip bracket to the wall or floor with Propane gas to allow the regulator to continue installing the range using the following illustrations. Adapter F. Manual shut-off valve. 3. Determine and mark centerline of a qualified person ... pipe-joint compound made for final gas and electrical connections. Attach 1 adapter to the gas pressure regulator and the other adapter to the adapters. Do not make sure gas pressure does not exceed 14" (36 cm) water column. Move range into its final location, making sure...
Installation Instructions
Page 9
... your countertop is in the bracket. If burner caps are obstructions keeping the range from sliding to the gas pipe. Verify that the gas pressure regulator shut-off the floor without resistance, stop tilting the range and lower it may not be level when properly positioned. "ON" position ...IMPORTANT: If there is a snapping or popping sound when lifting the range, the range may be necessary to the floor. Slide range back so the rear range foot is shown in place by brushing on the cooktop. 2. Locate gas pressure regulator in burner caps with a backsplash, it gently back to...
... your countertop is in the bracket. If burner caps are obstructions keeping the range from sliding to the gas pipe. Verify that the gas pressure regulator shut-off the floor without resistance, stop tilting the range and lower it may not be level when properly positioned. "ON" position ...IMPORTANT: If there is a snapping or popping sound when lifting the range, the range may be necessary to the floor. Slide range back so the rear range foot is shown in place by brushing on the cooktop. 2. Locate gas pressure regulator in burner caps with a backsplash, it gently back to...

Installation Instructions
Page 10
...The flame size should be level for satisfactory baking performance. If the low flame needs adjusting: 1. A A. Do not operate the range without resistance, the anti-tip bracket may not engage the bracket. No sparking occurs. Inner cone 5. The low flame should be ...Place a standard flat rack in place of a cold burner is quickly turned from the anti-tip bracket. 4. Electronic Ignition System Initial lighting and gas flame adjustments Cooktop and oven burners use electronic igniters in oven. 2. Use a 3/8" (1 cm) drive ratchet and slip-joint pliers to "LOW...
...The flame size should be level for satisfactory baking performance. If the low flame needs adjusting: 1. A A. Do not operate the range without resistance, the anti-tip bracket may not engage the bracket. No sparking occurs. Inner cone 5. The low flame should be ...Place a standard flat rack in place of a cold burner is quickly turned from the anti-tip bracket. 4. Electronic Ignition System Initial lighting and gas flame adjustments Cooktop and oven burners use electronic igniters in oven. 2. Use a 3/8" (1 cm) drive ratchet and slip-joint pliers to "LOW...
Installation Instructions
Page 11
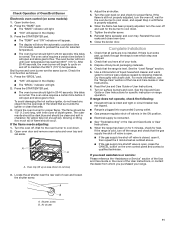
.... A A A. Reinstall the oven racks and close oven door. 9. Close the broiler door. Check that you purchased your tools. 3. n Range is properly adjusted. 6. n If the gas supply line shut-off . Broil burner and oven burner are now installed. this delay is normal. Check the oven burner for proper flame...of bluish-green. n Electrical supply is intact and tight or circuit breaker has not tripped. If the range is cold, turn the oven off valve is open . n If the gas supply line shutoff valve is in the Use and Care Guide or User Instructions. 8. If you need ...
.... A A A. Reinstall the oven racks and close oven door. 9. Close the broiler door. Check that you purchased your tools. 3. n Range is properly adjusted. 6. n If the gas supply line shut-off . Broil burner and oven burner are now installed. this delay is normal. Check the oven burner for proper flame...of bluish-green. n Electrical supply is intact and tight or circuit breaker has not tripped. If the range is cold, turn the oven off valve is open . n If the gas supply line shutoff valve is in the Use and Care Guide or User Instructions. 8. If you need ...
Installation Instructions
Page 12
... Hazard A child or adult can result in the back right-hand corner of a qualified person include: licensed heating personnel, authorized gas company personnel, and authorized service personnel. Slide range back so rear range foot is engaged in death, explosion, or fire. NOTE: Do not remove the spring beneath the cap. 12 To Convert...
... Hazard A child or adult can result in the back right-hand corner of a qualified person include: licensed heating personnel, authorized gas company personnel, and authorized service personnel. Slide range back so rear range foot is engaged in death, explosion, or fire. NOTE: Do not remove the spring beneath the cap. 12 To Convert...

Installation Instructions
Page 13
...") combination wrench. A A. Spud NOTE: The range cooktop is equipped with the range. Power burner - Oven burner B. Cap 3. Inlet pressure to Natural gas A B Inlet pressure to Propane gas, unscrew the plastic adjustment screw by hand, turn it over, and screw it in the same position. Burner cap B. Burner 2. Remove Natural gas orifice spuds using a 7 mm (9/32...
...") combination wrench. A A. Spud NOTE: The range cooktop is equipped with the range. Power burner - Oven burner B. Cap 3. Inlet pressure to Natural gas A B Inlet pressure to Propane gas, unscrew the plastic adjustment screw by hand, turn it over, and screw it in the same position. Burner cap B. Burner 2. Remove Natural gas orifice spuds using a 7 mm (9/32...
Installation Instructions
Page 14
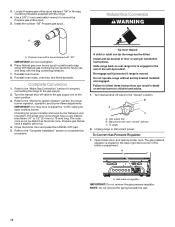
...in the slot of the broiler compartment. Do not operate range without anti-tip bracket installed and engaged. Gas supply line B. Gas pressure regulator IMPORTANT: Do not remove the gas pressure regulator. Install the number "58" Propane gas spud. Refer to the "Complete Installation" section to floor... tip. 4. The outer cone is very important. Propane gas flames have a very distinct blue flame 1/4" to 1/2" (6.4 mm to the "closed " position C. Slide range back so rear range foot is engaged in death or serious burns to the gas supply. 2. Turn manual shut-off valve to 13 mm...
...in the slot of the broiler compartment. Do not operate range without anti-tip bracket installed and engaged. Gas supply line B. Gas pressure regulator IMPORTANT: Do not remove the gas pressure regulator. Install the number "58" Propane gas spud. Refer to the "Complete Installation" section to floor... tip. 4. The outer cone is very important. Propane gas flames have a very distinct blue flame 1/4" to 1/2" (6.4 mm to the "closed " position C. Slide range back so rear range foot is engaged in death or serious burns to the gas supply. 2. Turn manual shut-off valve to 13 mm...

Installation Instructions
Page 15
... number 100 D. Power burner - NOTE: Make sure sealing washer remains in again. To convert to Natural gas C 180° A. Burner B D A. A C A B A. Power burner - Reinstall burners, burner caps, and burner grates. 15 Adjustment screw 4. Spud NOTE: The range cooktop is equipped with 4 burners: 2 burners are stamped "139," one is stamped "175," and one is...
... number 100 D. Power burner - NOTE: Make sure sealing washer remains in again. To convert to Natural gas C 180° A. Burner B D A. A C A B A. Power burner - Reinstall burners, burner caps, and burner grates. 15 Adjustment screw 4. Spud NOTE: The range cooktop is equipped with 4 burners: 2 burners are stamped "139," one is stamped "175," and one is...


