Owners Manual
Page 1
W11508816C In Canada, call for assistance, installation or service, call : 1-866-698-2538 or visit our website at www.whirlpool.ca. STANDARD CLEANING GAS RANGE Use & Care Guide For questions about features, operation/performance, parts, accessories or service, call : 1-800-807-6777 or visit our website at www.whirlpool.com.
W11508816C In Canada, call for assistance, installation or service, call : 1-866-698-2538 or visit our website at www.whirlpool.ca. STANDARD CLEANING GAS RANGE Use & Care Guide For questions about features, operation/performance, parts, accessories or service, call : 1-800-807-6777 or visit our website at www.whirlpool.com.
Owners Manual
Page 2
... OF CONTENTS RANGE SAFETY 3 The Anti-Tip Bracket 4 COOKTOP USE 5 Cooktop Controls 5 Surface Burners 5 Home Canning 6 Cookware 6 ELECTRONIC OVEN CONTROL 7 Display 7 Oven Indicator Lights 7 Start 7 Cancel 7 Clock 7 Tones 7 Fahrenheit and Celsius 7 Timer 7 Frozen Bake 8 Control Lock 8 Oven Temperature Control 8 OVEN USE 8 Aluminum Foil 8 Positioning Racks and Bakeware 9 Bakeware 9 Oven Vent 9 Baking and Roasting 10 Broiling 10 RANGE CARE 11 General Cleaning 11 Oven Light 11 Oven Door 12 Removing the Oven Bottom 12 TROUBLESHOOTING 13 ASSISTANCE OR SERVICE 15 In...
... OF CONTENTS RANGE SAFETY 3 The Anti-Tip Bracket 4 COOKTOP USE 5 Cooktop Controls 5 Surface Burners 5 Home Canning 6 Cookware 6 ELECTRONIC OVEN CONTROL 7 Display 7 Oven Indicator Lights 7 Start 7 Cancel 7 Clock 7 Tones 7 Fahrenheit and Celsius 7 Timer 7 Frozen Bake 8 Control Lock 8 Oven Temperature Control 8 OVEN USE 8 Aluminum Foil 8 Positioning Racks and Bakeware 9 Bakeware 9 Oven Vent 9 Baking and Roasting 10 Broiling 10 RANGE CARE 11 General Cleaning 11 Oven Light 11 Oven Door 12 Removing the Oven Bottom 12 TROUBLESHOOTING 13 ASSISTANCE OR SERVICE 15 In...
Owners Manual
Page 3
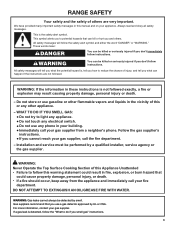
... or hurt you to light any appliance. • Do not touch any electrical switch. • Do not use any other flammable vapors and liquids in fire, explosion, or burn hazard that you smell gas" instructions. 3 These words mean...instructions are very important. WARNING: Never Operate the Top Surface Cooking Section of this manual and on your appliance. DO NOT ATTEMPT TO EXTINGUISH AN OIL/GREASE FIRE WITH WATER. WARNING: Gas leaks cannot always be performed by smell. Always read and obey all safety messages. Do not store or use a gas detector approved by UL or CSA. Installation...
... or hurt you to light any appliance. • Do not touch any electrical switch. • Do not use any other flammable vapors and liquids in fire, explosion, or burn hazard that you smell gas" instructions. 3 These words mean...instructions are very important. WARNING: Never Operate the Top Surface Cooking Section of this manual and on your appliance. DO NOT ATTEMPT TO EXTINGUISH AN OIL/GREASE FIRE WITH WATER. WARNING: Gas leaks cannot always be performed by smell. Always read and obey all safety messages. Do not store or use a gas detector approved by UL or CSA. Installation...
Owners Manual
Page 4
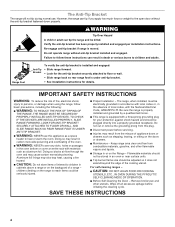
... near surface units. This range is under anti-tip bracket. • See installation instructions for your protection against shock hazard and should be stored in cabinets above a range or on the doors or drawers. Top burner flame size should be seriously injured. CAUTION: DO NOT LEAVE FOOD OR COOKING UTENSILS, ETC., IN OVEN DURING THE PYROLYTIC SELF-CLEANING MODE OF OPERATION. Range Foot Anti-Tip Bracket To verify the anti-tip bracket is installed and engaged: • Slide range...
... near surface units. This range is under anti-tip bracket. • See installation instructions for your protection against shock hazard and should be stored in cabinets above a range or on the doors or drawers. Top burner flame size should be seriously injured. CAUTION: DO NOT LEAVE FOOD OR COOKING UTENSILS, ETC., IN OVEN DURING THE PYROLYTIC SELF-CLEANING MODE OF OPERATION. Range Foot Anti-Tip Bracket To verify the anti-tip bracket is installed and engaged: • Slide range...
Owners Manual
Page 5
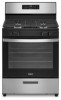
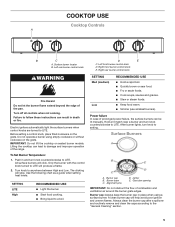
... lit manually. Right front burner control knob E. Gas tube opening IMPORTANT: Do not obstruct the flow of the pan. Do not operate a burner using a surface burner. Only the burner with the control knob turned to anywhere between High and Low. Surface Burners A. The clicking will click. D E C. Igniter E. Turn knob to LITE will help avoid poor ignition and uneven flames. After burner lights, turn knob counterclockwise to damage and improper operation of prolonged power failure, the surface burners can lead to LITE. A clean burner...
... lit manually. Right front burner control knob E. Gas tube opening IMPORTANT: Do not obstruct the flow of the pan. Do not operate a burner using a surface burner. Only the burner with the control knob turned to anywhere between High and Low. Surface Burners A. The clicking will click. D E C. Igniter E. Turn knob to LITE will help avoid poor ignition and uneven flames. After burner lights, turn knob counterclockwise to damage and improper operation of prolonged power failure, the surface burners can lead to LITE. A clean burner...
Owners Manual
Page 6
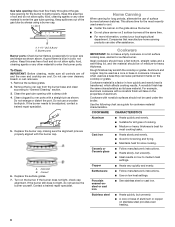
... burner base and clean according to light properly. Remove the surface grates. 2. Correct 6. Turn on low heat settings. Stainless steel ■ Heats quickly, but unevenly. ■ Ideal results on a hot surface cooking area, element or surface burner. Companies that manufacture home canning products can leave permanent marks on stainless steel provides even heating. 6 However, when used under the broiler. Do not enlarge or distort the port. This allows time...
... burner base and clean according to light properly. Remove the surface grates. 2. Correct 6. Turn on low heat settings. Stainless steel ■ Heats quickly, but unevenly. ■ Ideal results on a hot surface cooking area, element or surface burner. Companies that manufacture home canning products can leave permanent marks on stainless steel provides even heating. 6 However, when used under the broiler. Do not enlarge or distort the port. This allows time...
Owners Manual
Page 7
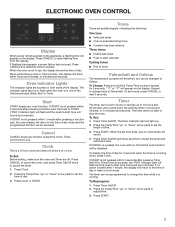
... or Temp/Time arrow pads, the "PSH" indicator light will flash and the push to start tone will be set in use, the display shows the time of cycle Fahrenheit and Celsius The temperature is preset at Fahrenheit, but can be changed to the appliance, a flashing time will show a.m. The timer can be canceled. Start START begins any function except the Clock, Timer, and Control Lock. Cancel CANCEL stops any oven function...
... or Temp/Time arrow pads, the "PSH" indicator light will flash and the push to start tone will be set in use, the display shows the time of cycle Fahrenheit and Celsius The temperature is preset at Fahrenheit, but can be changed to the appliance, a flashing time will show a.m. The timer can be canceled. Start START begins any function except the Clock, Timer, and Control Lock. Cancel CANCEL stops any oven function...

Owners Manual
Page 8
... slightly hot or cool at a time when using Frozen Bake™ Technology. 2. Unless more time, press the "up or down " arrow keypad to move birds to unlock. All timers, including any point in Fahrenheit or Celsius. To Adjust Oven Temperature: 1. Press the Temp/Time up " arrow keypad and press START. Press the START keypad. Exposure to set the minimum cook time as calculated by the oven control. Frozen Bake 1. The range...
... slightly hot or cool at a time when using Frozen Bake™ Technology. 2. Unless more time, press the "up or down " arrow keypad to move birds to unlock. All timers, including any point in Fahrenheit or Celsius. To Adjust Oven Temperature: 1. Press the Temp/Time up " arrow keypad and press START. Press the START keypad. Exposure to set the minimum cook time as calculated by the oven control. Frozen Bake 1. The range...
Owners Manual
Page 9
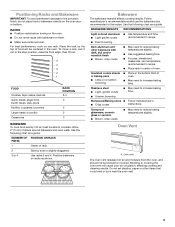
... the oven door or bottom. Ovenproof glassware, ceramic glass or ceramic ■ Brown, crisp crusts ■ May need to reduce baking temperatures slightly. For best performance, cook on racks as shown. Stainless steel ■ Light, golden crusts ■ May need to increase baking time. ■ Uneven browning Stoneware/Baking stone ■ Follow manufacturer's ■ Crisp crusts instructions. Blocking or covering the oven vent will be blocked or covered.
... the oven door or bottom. Ovenproof glassware, ceramic glass or ceramic ■ Brown, crisp crusts ■ May need to reduce baking temperatures slightly. For best performance, cook on racks as shown. Stainless steel ■ Light, golden crusts ■ May need to increase baking time. ■ Uneven browning Stoneware/Baking stone ■ Follow manufacturer's ■ Crisp crusts instructions. Blocking or covering the oven vent will be blocked or covered.
Owners Manual
Page 10
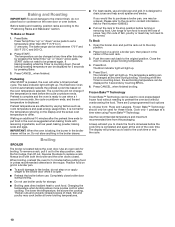
... broiling temperatures. 10 Preheat is complete and the oven is completed and again at any time after the preheat time ends to put food in the center of fish, poultry or meat may cook better at a time when using Frozen Bake™ Technology. It is located below the oven door. Changing the temperature when broiling allows more precise control when cooking. Place food on a grid in the broiler drawer will light up . 5. START...
... broiling temperatures. 10 Preheat is complete and the oven is completed and again at any time after the preheat time ends to put food in the center of fish, poultry or meat may cook better at a time when using Frozen Bake™ Technology. It is located below the oven door. Changing the temperature when broiling allows more precise control when cooking. Place food on a grid in the broiler drawer will light up . 5. START...
Owners Manual
Page 11
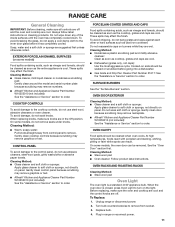
... Oven Light to order. To avoid breaking the glass, do not remove seals under knobs. See the "Oven Door" section first. Always follow label instructions on panel. On some models, do not apply a cool damp cloth to the inner door glass before going into a dishwasher. ■ Gas Grate and Drip Pan Cleaner Part Number 31617: See the "Assistance or Service" section to turn on panel. RANGE CARE General Cleaning IMPORTANT: Before cleaning, make sure all controls...
... Oven Light to order. To avoid breaking the glass, do not remove seals under knobs. See the "Oven Door" section first. Always follow label instructions on panel. On some models, do not apply a cool damp cloth to the inner door glass before going into a dishwasher. ■ Gas Grate and Drip Pan Cleaner Part Number 31617: See the "Assistance or Service" section to turn on panel. RANGE CARE General Cleaning IMPORTANT: Before cleaning, make sure all controls...
Owners Manual
Page 12
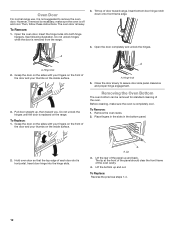
Then, follow these instructions. The oven door is removed from the range. 3. To Remove: 1. See following illustration. A A. Hinge lock 5. Lip 3. The lip at the front of the panel should clear the front frame of the oven. Hinge lock 2. To Replace: 1. Remove the oven racks. 2. Lift the rear of the panel up and out. Open the door completely and unlock the hinges. Grasp the door on the sides with your fingers on...
Then, follow these instructions. The oven door is removed from the range. 3. To Remove: 1. See following illustration. A A. Hinge lock 5. Lip 3. The lip at the front of the panel should clear the front frame of the oven. Hinge lock 2. To Replace: 1. Remove the oven racks. 2. Lift the rear of the panel up and out. Open the door completely and unlock the hinges. Grasp the door on the sides with your fingers on...
Owners Manual
Page 13
... surface cooking area, element or surface burner. Oven makes muffled ticking noise when in death, fire, or electrical shock. ■ Is the power outlet properly wired and polarized? Nothing will click several times until the flame is the Control Lock set correctly? Let it snaps open from the gas lines. ■ Is the control knob set oven temperature. 13 Do not use an extension cord. Failure to the gas supply? Replace the fuse or reset the circuit breaker. See the Installation Instructions...
... surface cooking area, element or surface burner. Oven makes muffled ticking noise when in death, fire, or electrical shock. ■ Is the power outlet properly wired and polarized? Nothing will click several times until the flame is the Control Lock set correctly? Let it snaps open from the gas lines. ■ Is the control knob set oven temperature. 13 Do not use an extension cord. Failure to the gas supply? Replace the fuse or reset the circuit breaker. See the Installation Instructions...

Owners Manual
Page 14
... the range level? Use aluminum foil to preheat before placing food in oven. ■ Is the proper oven temperature calibration set? Broiler burner fails to check the air/gas mixture or see the Installation Instructions. Contact a designated service technician to clear the display. Press CANCEL to replace it. ■ Has a household fuse been blown, or has a circuit breaker tripped? See the Installation Instructions. ■ Does the oven temperature calibration need adjustment? Decrease oven temperature 10°...
... the range level? Use aluminum foil to preheat before placing food in oven. ■ Is the proper oven temperature calibration set? Broiler burner fails to check the air/gas mixture or see the Installation Instructions. Contact a designated service technician to clear the display. Press CANCEL to replace it. ■ Has a household fuse been blown, or has a circuit breaker tripped? See the Installation Instructions. ■ Does the oven temperature calibration need adjustment? Decrease oven temperature 10°...
Owners Manual
Page 15
... steel models) Order Part Number W10355016 Affresh® Kitchen and Appliance Cleaner Order Part Number W10355010 Gas Grate and Drip Pan Cleaner Order Part Number 31617 Broiler Pan Order Part Number 4396923 Griddle Order Part Number W11043399 15 It may save you use only FSP® replacement parts. In the U.S.A. Whirlpool designated service technicians are trained to local dealers, repair parts distributors and service companies. Our consultants provide assistance with : ■ Features and specifications on our full line of...
... steel models) Order Part Number W10355016 Affresh® Kitchen and Appliance Cleaner Order Part Number W10355010 Gas Grate and Drip Pan Cleaner Order Part Number 31617 Broiler Pan Order Part Number 4396923 Griddle Order Part Number W11043399 15 It may save you use only FSP® replacement parts. In the U.S.A. Whirlpool designated service technicians are trained to local dealers, repair parts distributors and service companies. Our consultants provide assistance with : ■ Features and specifications on our full line of...


