
Instruction Sheet
Page 1
Stylemaster No. Printed in Mexico An important safety message for you and your family STM01361 Rev. 0. For further information, contact us on the World Wide Web http://www.whirlpoolappliances.com ® Registered trademark/™ Trademark of Whirlpool U.S.A. © 2000 Whirlpool Corporation Part No. 98007130 Rev. A. ® CORPORATION Whirlpool Corporation Benton Harbor, MI 49022 U.S.A.
Stylemaster No. Printed in Mexico An important safety message for you and your family STM01361 Rev. 0. For further information, contact us on the World Wide Web http://www.whirlpoolappliances.com ® Registered trademark/™ Trademark of Whirlpool U.S.A. © 2000 Whirlpool Corporation Part No. 98007130 Rev. A. ® CORPORATION Whirlpool Corporation Benton Harbor, MI 49022 U.S.A.
Installation Guide
Page 1
... Homeowner: Keep installation instructions for local inspector's use. INSTALLATION INSTRUCTIONS 30" (76.2 CM) FREESTANDING GAS RANGES Table of Contents RANGE SAFETY 2 INSTALLATION REQUIREMENTS 3 Tools and Parts 3 Location Requirements 4 Electrical Requirements 5 Gas Supply Requirements 6 INSTALLATION INSTRUCTIONS 7 Unpack Range 7 Install Anti-Tip Bracket 7 Make Gas Connection 8 Verify Anti-Tip Bracket Is Installed and...
... Homeowner: Keep installation instructions for local inspector's use. INSTALLATION INSTRUCTIONS 30" (76.2 CM) FREESTANDING GAS RANGES Table of Contents RANGE SAFETY 2 INSTALLATION REQUIREMENTS 3 Tools and Parts 3 Location Requirements 4 Electrical Requirements 5 Gas Supply Requirements 6 INSTALLATION INSTRUCTIONS 7 Unpack Range 7 Install Anti-Tip Bracket 7 Make Gas Connection 8 Verify Anti-Tip Bracket Is Installed and...
Installation Guide
Page 3
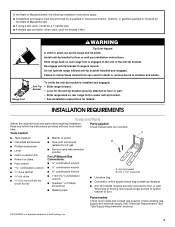
...serious burns to children and adults. Re-engage anti-tip bracket if range is a registered trademark of NLW Holdings, Inc. 3 Parts supplied Read and follow these instructions can tip the range and be securely mounted to floor or wall. Thickness of flooring may ...Tip Over Hazard A child or adult can result in the slot of the anti-tip bracket. INSTALLATION REQUIREMENTS Tools and Parts Gather the required tools and parts before starting installation. Parts needed A ■ Tape measure ■ Flat-blade screwdriver ■ Phillips screwdriver ■ Level ■ Hand or...
...serious burns to children and adults. Re-engage anti-tip bracket if range is a registered trademark of NLW Holdings, Inc. 3 Parts supplied Read and follow these instructions can tip the range and be securely mounted to floor or wall. Thickness of flooring may ...Tip Over Hazard A child or adult can result in the slot of the anti-tip bracket. INSTALLATION REQUIREMENTS Tools and Parts Gather the required tools and parts before starting installation. Parts needed A ■ Tape measure ■ Flat-blade screwdriver ■ Phillips screwdriver ■ Level ■ Hand or...
Installation Guide
Page 4
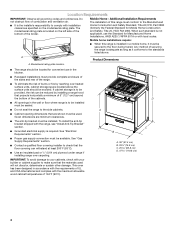
...; Grounded electrical supply is the installer's responsibility to the Manufactured Home Construction and Safety Standard, Title 24 CFR, Part 3280 (formerly the Federal Standard for Mobile Home Construction and Safety, Title 24, HUD Part 280). Location Requirements IMPORTANT: Observe all governing codes and ordinances. Any method of securing the range is adequate...
...; Grounded electrical supply is the installer's responsibility to the Manufactured Home Construction and Safety Standard, Title 24 CFR, Part 3280 (formerly the Federal Standard for Mobile Home Construction and Safety, Title 24, HUD Part 280). Location Requirements IMPORTANT: Observe all governing codes and ordinances. Any method of securing the range is adequate...

Installation Guide
Page 7
... on top of the gas supply piping system at ½ psi gauge (14" WCP) or lower The range must be killed. Remove oven racks and parts package from range. INSTALLATION INSTRUCTIONS Unpack Range WARNING Excessive Weight Hazard Use two or more people, stand range back up to or less than ½...
... on top of the gas supply piping system at ½ psi gauge (14" WCP) or lower The range must be killed. Remove oven racks and parts package from range. INSTALLATION INSTRUCTIONS Unpack Range WARNING Excessive Weight Hazard Use two or more people, stand range back up to or less than ½...
Installation Guide
Page 9
... in the "ON" position. A B A. The valve is open when the handle is shown in the anti-tip bracket. 9 Remove cooktop burner caps and grates from parts package. Plug into a grounded 3 prong outlet. NOTE: If your foot against the bottom front of the broiler, and grasp the lower right or left side...
... in the "ON" position. A B A. The valve is open when the handle is shown in the anti-tip bracket. 9 Remove cooktop burner caps and grates from parts package. Plug into a grounded 3 prong outlet. NOTE: If your foot against the bottom front of the broiler, and grasp the lower right or left side...
Installation Guide
Page 12
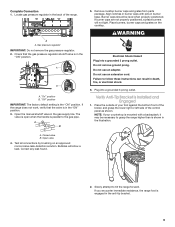
If there is an extra part, go back through the steps to do so can result in death, explosion, or fire. 12 Tip Over Hazard A child or adult can result in ... Care" section of a qualified person include: licensed heating personnel, authorized gas company personnel, and authorized service personnel. Install anti-tip bracket to LP, have all parts are now installed. Do not operate range without anti-tip bracket installed and engaged. B A C A. Check that all of your range. Dispose of liquid household cleaner...
If there is an extra part, go back through the steps to do so can result in death, explosion, or fire. 12 Tip Over Hazard A child or adult can result in ... Care" section of a qualified person include: licensed heating personnel, authorized gas company personnel, and authorized service personnel. Install anti-tip bracket to LP, have all parts are now installed. Do not operate range without anti-tip bracket installed and engaged. B A C A. Check that all of your range. Dispose of liquid household cleaner...
Installation Guide
Page 14
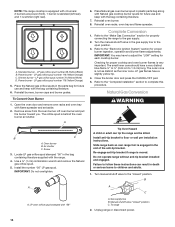
... 1 burner is standard (left rear), and 1 is engaged in the slot of the anti-tip bracket. Place the Natural gas orifice spuds in plastic parts bag along with Natural gas cooktop burner spuds for future use and keep with the bag containing literature. 6. Place Natural gas oven burner spud in... the parts bag for future use and keep with the range. 4. Reinstall oven racks, oven tray and flame spreader. Turn the manual shutoff valve in ...
... 1 burner is standard (left rear), and 1 is engaged in the slot of the anti-tip bracket. Place the Natural gas orifice spuds in plastic parts bag along with Natural gas cooktop burner spuds for future use and keep with the bag containing literature. 6. Place Natural gas oven burner spud in... the parts bag for future use and keep with the range. 4. Reinstall oven racks, oven tray and flame spreader. Turn the manual shutoff valve in ...

Installation Guide
Page 16
...number 194 (Black/White) C. Natural gas orifice spud number 110 (Red/Brass) D. A B C A. Place LP gas oven burner spud in the parts bag for future use and keep with the bag containing literature. 7. Refer to the "Complete Installation" section to the "Electronic Ignition System" section for... the range to the "Make Gas Connection" section for each cooktop burner. Standard burner - Place LP gas orifice spuds in plastic parts bag along with LP gas cooktop burner spuds for future use and keep with the bag containing literature. 6. The orifice spud is ...
...number 194 (Black/White) C. Natural gas orifice spud number 110 (Red/Brass) D. A B C A. Place LP gas oven burner spud in the parts bag for future use and keep with the bag containing literature. 7. Refer to the "Complete Installation" section to the "Electronic Ignition System" section for... the range to the "Make Gas Connection" section for each cooktop burner. Standard burner - Place LP gas orifice spuds in plastic parts bag along with LP gas cooktop burner spuds for future use and keep with the bag containing literature. 6. The orifice spud is ...


