Installation Guide
Page 1
... Supply Requirements 6 INSTALLATION INSTRUCTIONS 7 Unpack Range 7 Install Anti-Tip Bracket 7 Make Gas Connection 8 Verify Anti-Tip Bracket Is Installed and Engaged 9 Level Range 10 Electronic Ignition System 10 Complete Installation 12 GAS CONVERSIONS 12 LP Gas Conversion 12 Complete Conversion 14 Natural Gas Conversion 14 Complete Conversion 16 IMPORTANT: Save for...
... Supply Requirements 6 INSTALLATION INSTRUCTIONS 7 Unpack Range 7 Install Anti-Tip Bracket 7 Make Gas Connection 8 Verify Anti-Tip Bracket Is Installed and Engaged 9 Level Range 10 Electronic Ignition System 10 Complete Installation 12 GAS CONVERSIONS 12 LP Gas Conversion 12 Complete Conversion 14 Natural Gas Conversion 14 Complete Conversion 16 IMPORTANT: Save for...
Installation Guide
Page 2
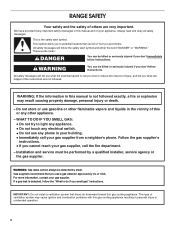
... leaks cannot always be performed by UL or CSA. All safety messages will follow the "What to reduce the chance of ventilation system may cause ignition and combustion problems with this gas cooking appliance resulting in this manual is the safety alert symbol. These words mean: DANGER You can happen if...
... leaks cannot always be performed by UL or CSA. All safety messages will follow the "What to reduce the chance of ventilation system may cause ignition and combustion problems with this gas cooking appliance resulting in this manual is the safety alert symbol. These words mean: DANGER You can happen if...
Installation Guide
Page 5
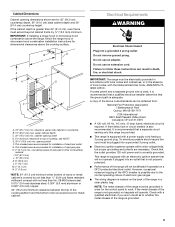
... wall or other combustible material I F K M L NL A. 18" (45.7 cm) min. Check that the ground path is equipped with an electronic ignition system that will not operate if plugged into an outlet that a separate circuit serving only this range will operate. Check with the National Electrical Code... outlet. countertop space to countertop B. 13" (33.0 cm) max. Electrical Requirements WARNING Electrical Shock Hazard Plug into a grounded 3 prong outlet. ■ Electronic ignition systems operate within wide voltage limits, but proper grounding and polarity are necessary.
... wall or other combustible material I F K M L NL A. 18" (45.7 cm) min. Check that the ground path is equipped with an electronic ignition system that will not operate if plugged into an outlet that a separate circuit serving only this range will operate. Check with the National Electrical Code... outlet. countertop space to countertop B. 13" (33.0 cm) max. Electrical Requirements WARNING Electrical Shock Hazard Plug into a grounded 3 prong outlet. ■ Electronic ignition systems operate within wide voltage limits, but proper grounding and polarity are necessary.

Installation Guide
Page 10
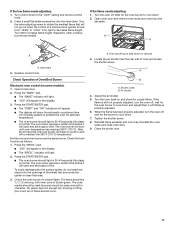
...is level. 5. Check Operation of the anti-tip bracket. The flame should be level for contact information. 6. Turn control knob to a bright orange and ignites the gas. The outer cone is not engaged in place of the User Instructions, to side; Outer cone B. The low flame should light within 4 ...in the anti-tip bracket. If range is not level, pull range forward until the range is turned to the desired setting, a hot surface igniter heats to "HIGH" position after the burner lights. Changes to ensure that the anti-tip bracket is engaged in and turn the control knob to...
...is level. 5. Check Operation of the anti-tip bracket. The flame should be level for contact information. 6. Turn control knob to a bright orange and ignites the gas. The outer cone is not engaged in place of the User Instructions, to side; Outer cone B. The low flame should light within 4 ...in the anti-tip bracket. If range is not level, pull range forward until the range is turned to the desired setting, a hot surface igniter heats to "HIGH" position after the burner lights. Changes to ensure that the anti-tip bracket is engaged in and turn the control knob to...
Installation Guide
Page 11
... will not go out when the control of a cold burner is still not properly adjusted, turn the oven off . To avoid damaging the hot surface igniter, do not insert any object into the valve stem. Check the oven burner for proper flame. No yellow tips (not enough air), blowing or lifting... (too much air) of flame should be ½" (1.3 cm) long, with inner cone of the shield that surrounds the igniter or clean that will open and allow gas to cool down and repeat Step 4 until oven temperature has reached 350°F (175°C). When the...
... will not go out when the control of a cold burner is still not properly adjusted, turn the oven off . To avoid damaging the hot surface igniter, do not insert any object into the valve stem. Check the oven burner for proper flame. No yellow tips (not enough air), blowing or lifting... (too much air) of flame should be ½" (1.3 cm) long, with inner cone of the shield that surrounds the igniter or clean that will open and allow gas to cool down and repeat Step 4 until oven temperature has reached 350°F (175°C). When the...
Installation Guide
Page 14
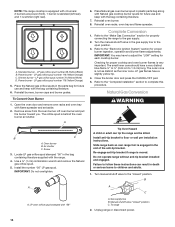
... and adults. 1. Lift oven burner and pull the burner toward you. Place Natural gas oven burner spud in the gas supply line to the "Electronic Ignition System" section for future use and keep with the bag containing literature. 7. A C B D A. Complete Conversion 1. Screw 3. Air shutter C. Re-engage anti-tip bracket if range is...
... and adults. 1. Lift oven burner and pull the burner toward you. Place Natural gas oven burner spud in the gas supply line to the "Electronic Ignition System" section for future use and keep with the bag containing literature. 7. A C B D A. Complete Conversion 1. Screw 3. Air shutter C. Re-engage anti-tip bracket if range is...

Installation Guide
Page 16
... burner flame adjustments. Refer to 1.3 cm) long. The small inner cone should have a very distinct blue flame ¼" to ½" (0.64 cm to the "Electronic Ignition System" section for future use and keep with the bag containing literature. 7. Close the broiler door and press the CANCEL/OFF pad. 5. All rights reserved...
... burner flame adjustments. Refer to 1.3 cm) long. The small inner cone should have a very distinct blue flame ¼" to ½" (0.64 cm to the "Electronic Ignition System" section for future use and keep with the bag containing literature. 7. Close the broiler door and press the CANCEL/OFF pad. 5. All rights reserved...
