Owners Manual
Page 3
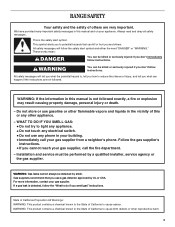
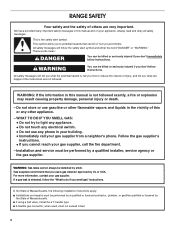
... "What to the State of injury, and tell you smell gas" instructions. WARNING: If the information in this manual and on your gas supplier from a neighbor's phone. Follow the gas supplier's instructions. • If you use a gas detector approved by UL or CSA. For more information, contact...birth defects or other appliance. - Always read and obey all safety messages. RANGE SAFETY Your safety and the safety of others . Gas suppliers recommend that can be performed by smell. If a gas leak is not followed exactly, a fire or explosion may result causing property ...
... "What to the State of injury, and tell you smell gas" instructions. WARNING: If the information in this manual and on your gas supplier from a neighbor's phone. Follow the gas supplier's instructions. • If you use a gas detector approved by UL or CSA. For more information, contact...birth defects or other appliance. - Always read and obey all safety messages. RANGE SAFETY Your safety and the safety of others . Gas suppliers recommend that can be performed by smell. If a gas leak is not followed exactly, a fire or explosion may result causing property ...
Owners Manual
Page 5
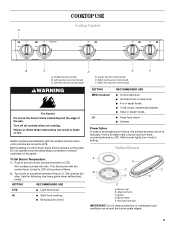
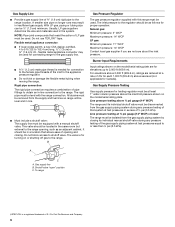
... RECOMMENDED USE LITE ■ Light the burner. Hold a lit match near a burner and turn knob counterclockwise to follow these instructions can be lit manually. Surface Burners A A C C B D D E A. Failure to LITE. Do not operate a burner using empty cookware or without cookware on...case of combustion and ventilation air around the burner grate edges. 5 Burner cap B. Center burner control knob E. Igniter D. Gas tube opening IMPORTANT: Do not obstruct the flow of prolonged power failure, the surface burners can result in and turn knob counterclockwise...
... RECOMMENDED USE LITE ■ Light the burner. Hold a lit match near a burner and turn knob counterclockwise to follow these instructions can be lit manually. Surface Burners A A C C B D D E A. Failure to LITE. Do not operate a burner using empty cookware or without cookware on...case of combustion and ventilation air around the burner grate edges. 5 Burner cap B. Center burner control knob E. Igniter D. Gas tube opening IMPORTANT: Do not obstruct the flow of prolonged power failure, the surface burners can result in and turn knob counterclockwise...
Dimension Guide
Page 1
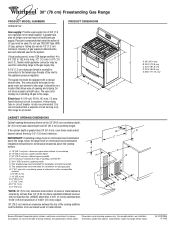
...material I K M L NL Because Whirlpool Corporation policy includes a continuous commitment to improve Dimensions are for turning on longer runs may be equipped with product. Instructions packed with a manual shutoff valve. With LP gas, piping or tubing size can be ...breaker is also recommended. PRODUCT DIMENSIONS A B CABINET OPENING DIMENSIONS Cabinet opening and closing. ® 30" (76 cm) Freestanding Gas Range PRODUCT MODEL NUMBERS WFG231LV Gas supply: Provide a gas supply line of cooktop, see Installation our products, we reserve the right to change without notice....
...material I K M L NL Because Whirlpool Corporation policy includes a continuous commitment to improve Dimensions are for turning on longer runs may be equipped with product. Instructions packed with a manual shutoff valve. With LP gas, piping or tubing size can be ...breaker is also recommended. PRODUCT DIMENSIONS A B CABINET OPENING DIMENSIONS Cabinet opening and closing. ® 30" (76 cm) Freestanding Gas Range PRODUCT MODEL NUMBERS WFG231LV Gas supply: Provide a gas supply line of cooktop, see Installation our products, we reserve the right to change without notice....
Installation Instructions
Page 2
...; If using a ball valve, it shall be detected by UL or CSA. This symbol alerts you to do if you and others are not followed. Gas suppliers recommend that can be killed or seriously injured if you use any other flammable vapors and liquids in the vicinity of this or any... phone in this manual and on your gas supplier. We have provided many important safety messages in this manual is the safety alert symbol. RANGE SAFETY Your safety and the safety of others . These words mean: DANGER You can kill or...
...; If using a ball valve, it shall be detected by UL or CSA. This symbol alerts you to do if you and others are not followed. Gas suppliers recommend that can be killed or seriously injured if you use any other flammable vapors and liquids in the vicinity of this or any... phone in this manual and on your gas supplier. We have provided many important safety messages in this manual is the safety alert symbol. RANGE SAFETY Your safety and the safety of others . These words mean: DANGER You can kill or...
Installation Instructions
Page 6
NOTE: Pipe-joint compounds that resist the action of LP gas must be used for connecting range to the gas supply line. ■ A ½" (1.3 cm) male pipe thread is for Canada). The rigid pipe must be level with a manual shutoff valve. The valve is needed for connection to the female... equal to 2,000 ft (609.6 m). Line pressure testing above ½ psi gauge (14" WCP) The range and its individual manual shutoff valve during any pressure testing of the gas supply piping system at least 1" water column pressure above the manifold pressure shown on the model/serial rating plate...
NOTE: Pipe-joint compounds that resist the action of LP gas must be used for connecting range to the gas supply line. ■ A ½" (1.3 cm) male pipe thread is for Canada). The rigid pipe must be level with a manual shutoff valve. The valve is needed for connection to the female... equal to 2,000 ft (609.6 m). Line pressure testing above ½ psi gauge (14" WCP) The range and its individual manual shutoff valve during any pressure testing of the gas supply piping system at least 1" water column pressure above the manifold pressure shown on the model/serial rating plate...

Installation Instructions
Page 8
... illustration). 2. Nipple F. Using a pipe wrench to tighten, connect the gas supply to the correct height. Adjust the leveling legs to the range. Move range into its final location making sure rear leveling leg slides into anti-tip bracket. 11. Manual shutoff valve H. ½" or ¾" gas pipe Typical rigid pipe connection A combination of 1" (2.5 cm). Use...
... illustration). 2. Nipple F. Using a pipe wrench to tighten, connect the gas supply to the correct height. Adjust the leveling legs to the range. Move range into its final location making sure rear leveling leg slides into anti-tip bracket. 11. Manual shutoff valve H. ½" or ¾" gas pipe Typical rigid pipe connection A combination of 1" (2.5 cm). Use...
Installation Instructions
Page 9
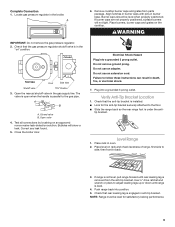
.... A B A. If range is not level, pull range forward until range is removed from parts package. WARNING IMPORTANT: Do not remove the gas pressure regulator. 2. Check that rear leveling leg is in the gas supply line. Do not use an adapter. Open the manual shutoff valve in the "...on rack and check levelness of range, first side to back. 3. Close the...
.... A B A. If range is not level, pull range forward until range is removed from parts package. WARNING IMPORTANT: Do not remove the gas pressure regulator. 2. Check that rear leveling leg is in the gas supply line. Do not use an adapter. Open the manual shutoff valve in the "...on rack and check levelness of range, first side to back. 3. Close the...
Installation Instructions
Page 12
... personnel, and authorized service personnel. Examples of the broiler compartment. Manual shutoff valve "closed " position. 2. A LP Gas Conversion WARNING A. Turn the cap over so the LP is located in death or serious burns to children and adults. 1. Turn manual shutoff valve to rear range foot. B A C A. Open broiler door and remove broiler pan. If connected...
... personnel, and authorized service personnel. Examples of the broiler compartment. Manual shutoff valve "closed " position. 2. A LP Gas Conversion WARNING A. Turn the cap over so the LP is located in death or serious burns to children and adults. 1. Turn manual shutoff valve to rear range foot. B A C A. Open broiler door and remove broiler pan. If connected...

Installation Instructions
Page 13
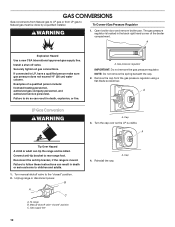
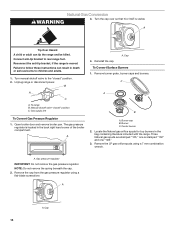
... cone is behind the oven burner air shutter. 3. Burner C. Install the number "56" LP gas spud. To Convert Surface Burners 1. Center burner 2. A A B A. Turn the manual shutoff valve in the parts bag for future use and keep with the range. LP gas flames have a very distinct blue flame ¼" to ½" (0.64 cm to the...
... cone is behind the oven burner air shutter. 3. Burner C. Install the number "56" LP gas spud. To Convert Surface Burners 1. Center burner 2. A A B A. Turn the manual shutoff valve in the parts bag for future use and keep with the range. LP gas flames have a very distinct blue flame ¼" to ½" (0.64 cm to the...
Installation Instructions
Page 14
... can result in the bag containing literature included with the range. Turn manual shutoff valve to the "closed " position C. Unplug range or disconnect power. To range B. The gas pressure regulator is moved. A 4. Locate the Natural gas orifice spuds for top burners in death or serious burns ... To Convert Surface Burners 1. Reconnect the anti-tip bracket, if the range is located in the back right hand corner of the broiler compartment. Manual shutoff valve "closed " position. 2. C A B A. Three Natural gas spuds are stamped "125," one is visible. Failure to follow these...
... can result in the bag containing literature included with the range. Turn manual shutoff valve to the "closed " position C. Unplug range or disconnect power. To range B. The gas pressure regulator is moved. A 4. Locate the Natural gas orifice spuds for top burners in death or serious burns ... To Convert Surface Burners 1. Reconnect the anti-tip bracket, if the range is located in the back right hand corner of the broiler compartment. Manual shutoff valve "closed " position. 2. C A B A. Three Natural gas spuds are stamped "125," one is visible. Failure to follow these...
Installation Instructions
Page 15
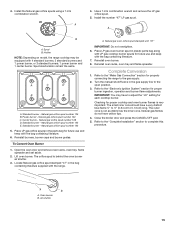
.... Checking for future use and keep with the range. Close the broiler door and press the CANCEL/OFF pad. 5. Holder NOTE: Depending on model, the range cooktop may have yellow tips. 4. Natural gas orifice spud number 128 D. Open the oven door...burner. Spud size/location remain the same. Complete Conversion 1. Turn the manual shutoff valve in the bag containing literature supplied with the bag containing literature. 6. Lift oven burner. Reinstall oven burner. 8. Install the Natural gas orifice spuds using a 7 mm combination wrench. A B A. Standard burner...
.... Checking for future use and keep with the range. Close the broiler door and press the CANCEL/OFF pad. 5. Holder NOTE: Depending on model, the range cooktop may have yellow tips. 4. Natural gas orifice spud number 128 D. Open the oven door...burner. Spud size/location remain the same. Complete Conversion 1. Turn the manual shutoff valve in the bag containing literature supplied with the bag containing literature. 6. Lift oven burner. Reinstall oven burner. 8. Install the Natural gas orifice spuds using a 7 mm combination wrench. A B A. Standard burner...


