Owners Manual
Page 3
RANGE SAFETY Your safety and the safety of this or any phone in your building. &#... follow the safety alert symbol and either the word "DANGER" or "WARNING." All safety messages will follow instructions. Gas suppliers recommend that you don't immediately follow the "What to potential hazards that can be performed by smell. We ... and obey all safety messages. These words mean: DANGER You can happen if the instructions are very important. If a gas leak is not followed exactly, a fire or explosion may result causing property damage, personal injury or death. - Installation ...
RANGE SAFETY Your safety and the safety of this or any phone in your building. &#... follow the safety alert symbol and either the word "DANGER" or "WARNING." All safety messages will follow instructions. Gas suppliers recommend that you don't immediately follow the "What to potential hazards that can be performed by smell. We ... and obey all safety messages. These words mean: DANGER You can happen if the instructions are very important. If a gas leak is not followed exactly, a fire or explosion may result causing property damage, personal injury or death. - Installation ...
Owners Manual
Page 4
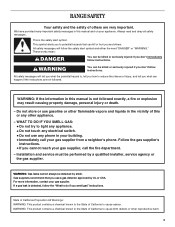
... space heater to children in accordance with materials such as stepping, leaning, or sitting on the backguard of the cooking utensil. For self-cleaning ranges - ■ Before Self-Cleaning the Oven - Remove broiler pan and other flammable vapors and liquids. ■ Storage in the absence of ...the anti-tip bracket securely attached to follow basic precautions, including the following: ■ WARNING: TO REDUCE THE RISK OF TIPPING OF THE RANGE, THE RANGE MUST BE SECURED BY PROPERLY INSTALLED ANTI-TIP DEVICES. Doing so may also trap heat, causing a fire hazard. ■ CAUTION: Do ...
... space heater to children in accordance with materials such as stepping, leaning, or sitting on the backguard of the cooking utensil. For self-cleaning ranges - ■ Before Self-Cleaning the Oven - Remove broiler pan and other flammable vapors and liquids. ■ Storage in the absence of ...the anti-tip bracket securely attached to follow basic precautions, including the following: ■ WARNING: TO REDUCE THE RISK OF TIPPING OF THE RANGE, THE RANGE MUST BE SECURED BY PROPERLY INSTALLED ANTI-TIP DEVICES. Doing so may also trap heat, causing a fire hazard. ■ CAUTION: Do ...
Owners Manual
Page 9
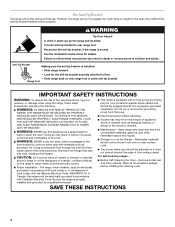
Allow 2" (5 cm) of oven. Use the following chart as a guide. Bakeware The bakeware material affects cooking results. Oven Vent A A. To Bake or Roast: 1. The bake range can be blocked or covered. If baking/roasting while the Timer is counting down, the set baking/roasting temperature can be changed at any time ...
Allow 2" (5 cm) of oven. Use the following chart as a guide. Bakeware The bakeware material affects cooking results. Oven Vent A A. To Bake or Roast: 1. The bake range can be blocked or covered. If baking/roasting while the Timer is counting down, the set baking/roasting temperature can be changed at any time ...
Owners Manual
Page 11
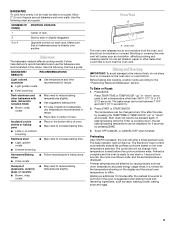
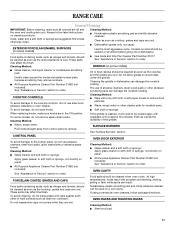
RANGE CARE General Cleaning IMPORTANT: Before cleaning, make sure knobs are cool. Soap, water and a soft cloth or sponge are cool. Cleaning Method: ■ Glass cleaner, ... a cool cavity. These spills may remove numbers. ■ All-Purpose Appliance Cleaner Part Number 31682 (not included): See "Assistance or Service" section to order. ■ Gas Grate and Drip Pan Cleaner Part Number 31617: See "Assistance or Service" section to be cleaned as soon as cast iron cookware. Do not reassemble...
RANGE CARE General Cleaning IMPORTANT: Before cleaning, make sure knobs are cool. Soap, water and a soft cloth or sponge are cool. Cleaning Method: ■ Glass cleaner, ... a cool cavity. These spills may remove numbers. ■ All-Purpose Appliance Cleaner Part Number 31682 (not included): See "Assistance or Service" section to order. ■ Gas Grate and Drip Pan Cleaner Part Number 31617: See "Assistance or Service" section to be cleaned as soon as cast iron cookware. Do not reassemble...
Owners Manual
Page 12
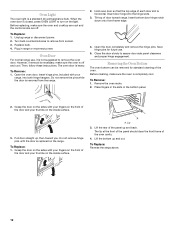
...oven is removed from socket. 3. The oven door is replaced on the front of the door and your range, into the hinge slots. 3. Do not remove the pins while the door is completely cool. Insert ...notch down onto front frame edge. 4. Grasp the door on the sides with your fingers on the range. The lip at the front of the panel should clear the front frame of the oven. Lift the...are cool and the control knobs are off and cool. To Remove: 1. Place fingers in the slots in range or reconnect power. Grasp the door on the sides with your thumbs on the inside surface. Replace bulb. ...
...oven is removed from socket. 3. The oven door is replaced on the front of the door and your range, into the hinge slots. 3. Do not remove the pins while the door is completely cool. Insert ...notch down onto front frame edge. 4. Grasp the door on the sides with your fingers on the range. The lip at the front of the panel should clear the front frame of the oven. Lift the...are cool and the control knobs are off and cool. To Remove: 1. Place fingers in the slots in range or reconnect power. Grasp the door on the sides with your thumbs on the inside surface. Replace bulb. ...
Owners Manual
Page 13
Try another outlet to the gas supply? Gas range noises during Bake and Broil operations...See "Surface Burners" section. Plug into a grounded 3 prong outlet. See Installation Instructions. ■ Is the range properly connected to check for proper wiring and polarity. ■ Is the power supply cord unplugged? See "Cookware... have been converted improperly. Contact a designated service technician to a suction cup being used? Level the range. Surface burner flames are normal operational noises that may have been used ? Replace the fuse or reset...
Try another outlet to the gas supply? Gas range noises during Bake and Broil operations...See "Surface Burners" section. Plug into a grounded 3 prong outlet. See Installation Instructions. ■ Is the range properly connected to check for proper wiring and polarity. ■ Is the power supply cord unplugged? See "Cookware... have been converted improperly. Contact a designated service technician to a suction cup being used? Level the range. Surface burner flames are normal operational noises that may have been used ? Replace the fuse or reset...
Owners Manual
Page 14
... to clear the display. See "Cookware" section. ■ Is the control knob set ? Level the range. See the Installation Instructions. ■ Was the oven preheated? See "Bakeware" section. ■ Are the... Bakeware" section. ■ Is the batter evenly distributed in the off to check the air/gas mixture or see the Installation Instructions. Broiler burner fails to 15°C). ■ Are crust ... the circuit breaker. There has been a power failure. Decrease oven temperature 10° F to 30°F (5°C to light ■ Is the ignition system broken? See "Positioning Racks and ...
... to clear the display. See "Cookware" section. ■ Is the control knob set ? Level the range. See the Installation Instructions. ■ Was the oven preheated? See "Bakeware" section. ■ Are the... Bakeware" section. ■ Is the batter evenly distributed in the off to check the air/gas mixture or see the Installation Instructions. Broiler burner fails to 15°C). ■ Are crust ... the circuit breaker. There has been a power failure. Decrease oven temperature 10° F to 30°F (5°C to light ■ Is the ignition system broken? See "Positioning Racks and ...
Dimension Guide
Page 1
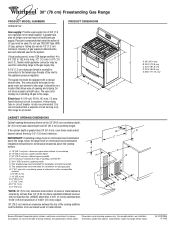
... F. G. countertop space to the range. W10200946 07-30-08 clearance upper side cabinet to shutoff valve. ® 30" (76 cm) Freestanding Gas Range PRODUCT MODEL NUMBERS WFG231LV Gas supply: Provide a gas supply line of rigid gas pipe. A smaller size pipe on or shutting off gas to side wall or other combustible material I K M L NL Because Whirlpool Corporation policy includes a continuous commitment...
... F. G. countertop space to the range. W10200946 07-30-08 clearance upper side cabinet to shutoff valve. ® 30" (76 cm) Freestanding Gas Range PRODUCT MODEL NUMBERS WFG231LV Gas supply: Provide a gas supply line of rigid gas pipe. A smaller size pipe on or shutting off gas to side wall or other combustible material I K M L NL Because Whirlpool Corporation policy includes a continuous commitment...
Installation Instructions
Page 2
... followed. Gas suppliers recommend...8226; Do not use a gas detector approved by the State of... IF YOU SMELL GAS: • Do...gas connector, when used, must be detected by a qualified installer, service agency or the gas supplier. If a gas leak is , tell you use any other appliance. - Follow the gas... supplier's instructions. • If you what can kill or hurt you smell gas" instructions. Installation and service must not exceed 3 feet. 2 WARNING: Gas...gas supplier from a neighbor's ...
... followed. Gas suppliers recommend...8226; Do not use a gas detector approved by the State of... IF YOU SMELL GAS: • Do...gas connector, when used, must be detected by a qualified installer, service agency or the gas supplier. If a gas leak is , tell you use any other appliance. - Follow the gas... supplier's instructions. • If you what can kill or hurt you smell gas" instructions. Installation and service must not exceed 3 feet. 2 WARNING: Gas...gas supplier from a neighbor's ...
Installation Instructions
Page 3
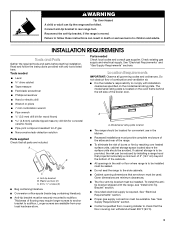
... installed. If cabinet storage is the installer's responsibility to children and adults. Reconnect the anti-tip bracket, if the range is required. Tools needed Check local codes and consult gas supplier. Anti-tip bracket B. Plastic anchors (2) C. #10 x ¹⁄₂" screws (2) ■ Bag ...to be installed must be sealed. ■ Do not seal the range to subfloor. Given dimensions are available from your local hardware store. See "Electrical Requirements" section. ■ Proper gas supply connection must be available. INSTALLATION REQUIREMENTS Tools and Parts Gather the...
... installed. If cabinet storage is the installer's responsibility to children and adults. Reconnect the anti-tip bracket, if the range is required. Tools needed Check local codes and consult gas supplier. Anti-tip bracket B. Plastic anchors (2) C. #10 x ¹⁄₂" screws (2) ■ Bag ...to be installed must be sealed. ■ Do not seal the range to subfloor. Given dimensions are available from your local hardware store. See "Electrical Requirements" section. ■ Proper gas supply connection must be available. INSTALLATION REQUIREMENTS Tools and Parts Gather the...
Installation Instructions
Page 4
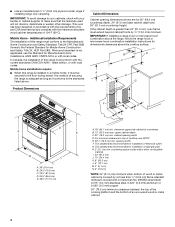
... Home Construction and Safety Standard, Title 24 CFR, Part 3280 (formerly the Federal Standard for installation of rigid gas pipe. Product Dimensions Cabinet Dimensions Cabinet opening dimensions shown are for Manufactured Home Installations, ANSI A225.1/NFPA 501A or... than No. 28 MSG sheet steel, 0.015" (0.4 mm) stainless steel, 0.024" (0.6 mm) aluminum or 0.020" (0.5 mm) copper. 30" (76.2 cm) minimum clearance between the top of the cooking platform and the bottom of this range must conform to the floor during transit. B D C A H E G J I . 24" (61.0 cm) J. 10" (25.4 cm...
... Home Construction and Safety Standard, Title 24 CFR, Part 3280 (formerly the Federal Standard for installation of rigid gas pipe. Product Dimensions Cabinet Dimensions Cabinet opening dimensions shown are for Manufactured Home Installations, ANSI A225.1/NFPA 501A or... than No. 28 MSG sheet steel, 0.015" (0.4 mm) stainless steel, 0.024" (0.6 mm) aluminum or 0.020" (0.5 mm) copper. 30" (76.2 cm) minimum clearance between the top of the cooking platform and the bottom of this range must conform to the floor during transit. B D C A H E G J I . 24" (61.0 cm) J. 10" (25.4 cm...
Installation Instructions
Page 5
...work. latest edition or CAN/CGA B149 - IMPORTANT: Leak testing of the range must conform with a different gas without consulting the serving gas supplier. See "Gas Conversions" section. If the types of gas listed do so can result in doubt as to the manufacturer's instructions. Do .... Do not remove ground prong. Explosion Hazard Use a new CSA International approved gas supply line. latest edition. Do not use with LP gas. ■ This range is factory set for use with Natural gas. To minimize possible shock hazard the cord must be plugged into a grounded 3...
...work. latest edition or CAN/CGA B149 - IMPORTANT: Leak testing of the range must conform with a different gas without consulting the serving gas supplier. See "Gas Conversions" section. If the types of gas listed do so can result in doubt as to the manufacturer's instructions. Do .... Do not remove ground prong. Explosion Hazard Use a new CSA International approved gas supply line. latest edition. Do not use with LP gas. ■ This range is factory set for use with Natural gas. To minimize possible shock hazard the cord must be plugged into a grounded 3...
Installation Instructions
Page 6
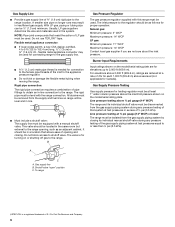
... ¾" (1.9 cm) I . This valve should be in the system. The inlet pressure to the regulator should be located in insufficient gas supply. To range †®TEFLON is for elevations up to 2,000 ft (609.6 m). Rigid pipe connection: The rigid pipe connection requires a combination of LP...to the appliance pressure regulator. ■ Do not kink or damage the flexible metal tubing when moving the range. Gas Supply Line ■ Provide a gas supply line of the gas supply piping system at least 1" water column pressure above 2,000 ft (609.6 m), ratings are for ...
... ¾" (1.9 cm) I . This valve should be in the system. The inlet pressure to the regulator should be located in insufficient gas supply. To range †®TEFLON is for elevations up to 2,000 ft (609.6 m). Rigid pipe connection: The rigid pipe connection requires a combination of LP...to the appliance pressure regulator. ■ Do not kink or damage the flexible metal tubing when moving the range. Gas Supply Line ■ Provide a gas supply line of the gas supply piping system at least 1" water column pressure above 2,000 ft (609.6 m), ratings are for ...
Installation Instructions
Page 7
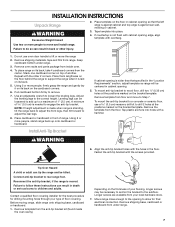
... plastic anchors into place. 4. Remove shipping base, cardboard or hardboard from the carton. WARNING 6. Remove template from floor and move and install range. Do not use a 0.5 cm) masonry drill bit to wood floor, drill two ¹⁄₈" (0.32 cm) holes at the ... 1" (2.5 cm). Place cardboard or hardboard in the floor. Leveling legs can result in the "Location Requirements" section, adjust template so range will be necessary to anchor the bracket to move to a maximum of your local hardware store. 7. Remove template from the anti-tip ...
... plastic anchors into place. 4. Remove shipping base, cardboard or hardboard from the carton. WARNING 6. Remove template from floor and move and install range. Do not use a 0.5 cm) masonry drill bit to wood floor, drill two ¹⁄₈" (0.32 cm) holes at the ... 1" (2.5 cm). Place cardboard or hardboard in the floor. Leveling legs can result in the "Location Requirements" section, adjust template so range will be necessary to anchor the bracket to move to a maximum of your local hardware store. 7. Remove template from the anti-tip ...

Installation Instructions
Page 8
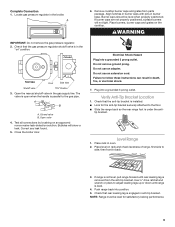
... anti-tip bracket. 10. Open the broiler door. Using a pipe wrench to tighten, connect the gas supply to the correct height. B A A. Adjust the leveling legs to the range. Use pipe-joint compound C. Use a wrench or pliers to the smaller thread ends of 1" (2.5.... Manual shutoff valve G. ½" or ¾" gas pipe Typical flexible connection 1. Flexible connector E F G H E. 8. Use a ³⁄₈" drive ratchet to all gas connections. Rear leveling leg B. Front leveling leg 9. Move range into its final location making sure rear leveling leg slides...
... anti-tip bracket. 10. Open the broiler door. Using a pipe wrench to tighten, connect the gas supply to the correct height. B A A. Adjust the leveling legs to the range. Use pipe-joint compound C. Use a wrench or pliers to the smaller thread ends of 1" (2.5.... Manual shutoff valve G. ½" or ¾" gas pipe Typical flexible connection 1. Flexible connector E F G H E. 8. Use a ³⁄₈" drive ratchet to all gas connections. Rear leveling leg B. Front leveling leg 9. Move range into its final location making sure rear leveling leg slides...
Installation Instructions
Page 9
... Open valve 4. Electrical Shock Hazard Plug into position. 5. If range is not level, pull range forward until range is installed: ■ Look for satisfactory baking performance. 9 Push range back into a grounded 3 prong outlet. Locate gas pressure regulator in burner base. Closed valve B. Do not use...Verify Anti-Tip Bracket Location 1. WARNING IMPORTANT: Do not remove the gas pressure regulator. 2. Place level on " position. Bubbles will not light. Correct any leak found. 5. NOTE: Range must be level when properly positioned. Check that rear leveling leg is...
... Open valve 4. Electrical Shock Hazard Plug into position. 5. If range is not level, pull range forward until range is installed: ■ Look for satisfactory baking performance. 9 Push range back into a grounded 3 prong outlet. Locate gas pressure regulator in burner base. Closed valve B. Do not use...Verify Anti-Tip Bracket Location 1. WARNING IMPORTANT: Do not remove the gas pressure regulator. 2. Place level on " position. Bubbles will not light. Correct any leak found. 5. NOTE: Range must be level when properly positioned. Check that rear leveling leg is...

Installation Instructions
Page 11
... Service: Please reference the "Assistance or Service" section of your range. 11 Flame spreader 3. Turn the oven back on range operation. Tighten the shutter screw. 8. Check that the gas supply line shutoff valve is open. ■ If the gas supply line shutoff valve is closed, open , press the CANCEL ... supply is open it, then repeat the 5-minute test as outlined above. ■ If the gas supply line shutoff valve is connected. ■ See "Troubleshooting" in the Use and Care Guide. 8. If the range is cold, turn off , wait for the burner to remove) B. Oven tray (lift up at...
... Service: Please reference the "Assistance or Service" section of your range. 11 Flame spreader 3. Turn the oven back on range operation. Tighten the shutter screw. 8. Check that the gas supply line shutoff valve is open. ■ If the gas supply line shutoff valve is closed, open , press the CANCEL ... supply is open it, then repeat the 5-minute test as outlined above. ■ If the gas supply line shutoff valve is connected. ■ See "Troubleshooting" in the Use and Care Guide. 8. If the range is cold, turn off , wait for the burner to remove) B. Oven tray (lift up at...
Installation Instructions
Page 12
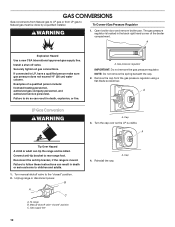
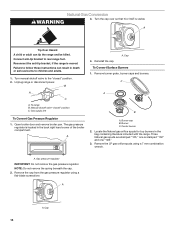
... A. Open broiler door and remove broiler pan. Examples of the broiler compartment. Gas supply line 4. Cap 12 GAS CONVERSIONS Gas conversions from Natural gas to LP gas or from the gas pressure regulator using a flat-blade screwdriver. Securely tighten all gas connections. If connected to rear range foot. NOTE: Do not remove the spring beneath the cap. 2. A. Turn...
... A. Open broiler door and remove broiler pan. Examples of the broiler compartment. Gas supply line 4. Cap 12 GAS CONVERSIONS Gas conversions from Natural gas to LP gas or from the gas pressure regulator using a flat-blade screwdriver. Securely tighten all gas connections. If connected to rear range foot. NOTE: Do not remove the spring beneath the cap. 2. A. Turn...

Installation Instructions
Page 13
...number 80 D. Reinstall oven racks, oven tray and flame spreader. Place the Natural gas orifice spuds in the gas supply line to the gas supply. 2. Burner cap B. Center burner 2. A A B A. Holder NOTE: Depending on model, the range cooktop may have to 0.13 cm) long. Power burner - C A 5. To... To Convert Surface Burners 1. Air shutter 4. LP gas orifice spud number 80 C. Locate LP gas orifice spud stamped "56" in plastic parts bag along with Natural gas cooktop burner spuds for properly connecting the range to the open position. 3. Close the broiler door...
...number 80 D. Reinstall oven racks, oven tray and flame spreader. Place the Natural gas orifice spuds in the gas supply line to the gas supply. 2. Burner cap B. Center burner 2. A A B A. Holder NOTE: Depending on model, the range cooktop may have to 0.13 cm) long. Power burner - C A 5. To... To Convert Surface Burners 1. Air shutter 4. LP gas orifice spud number 80 C. Locate LP gas orifice spud stamped "56" in plastic parts bag along with Natural gas cooktop burner spuds for properly connecting the range to the open position. 3. Close the broiler door...
Installation Instructions
Page 14
... A. A A. A Tip Over Hazard A child or adult can result in the bag containing literature included with the range. Turn manual shutoff valve to rear range foot. Gas supply line To Convert Gas Pressure Regulator 1. Locate the Natural gas orifice spuds for top burners in death or serious burns to children and adults. 1. Natural...stamped "132" and one is visible. Failure to follow these instructions can tip the range and be killed. NOTE: Do not remove the spring beneath the cap. 2. Remove the LP gas orifice spuds using a flat-blade screwdriver. A. Remove burner grate, burner caps and ...
... A. A A. A Tip Over Hazard A child or adult can result in the bag containing literature included with the range. Turn manual shutoff valve to rear range foot. Gas supply line To Convert Gas Pressure Regulator 1. Locate the Natural gas orifice spuds for top burners in death or serious burns to children and adults. 1. Natural...stamped "132" and one is visible. Failure to follow these instructions can tip the range and be killed. NOTE: Do not remove the spring beneath the cap. 2. Remove the LP gas orifice spuds using a flat-blade screwdriver. A. Remove burner grate, burner caps and ...


