Owners Manual
Page 10
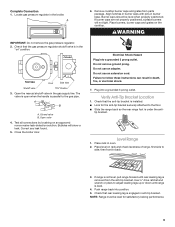
... not cover the grid with foil. If broiling while the Timer is turned. Hold each corner. Please refer to tilt the broiler pan. Ask for Part Number 4396923. ■ For proper draining, do not step on the position desired, it at each side of the broiler pan and set broiling temperature...
... not cover the grid with foil. If broiling while the Timer is turned. Hold each corner. Please refer to tilt the broiler pan. Ask for Part Number 4396923. ■ For proper draining, do not step on the position desired, it at each side of the broiler pan and set broiling temperature...
Owners Manual
Page 11
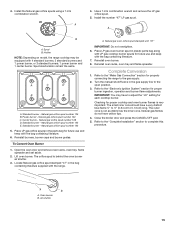
...and serial number plate because scrubbing may remove numbers. ■ All-Purpose Appliance Cleaner Part Number 31682 (not included): See "Assistance or Service" section to order. ■ Gas Grate and Drip Pan Cleaner Part Number 31617: See "Assistance or Service" section to remove food particles. ■ ...9632; Glass cleaner and a soft cloth or sponge: Apply glass cleaner to soft cloth or sponge, not directly on cleaning products. RANGE CARE General Cleaning IMPORTANT: Before cleaning, make sure knobs are in dishwasher can be coated again with vegetable oil to preserve the nonstick...
...and serial number plate because scrubbing may remove numbers. ■ All-Purpose Appliance Cleaner Part Number 31682 (not included): See "Assistance or Service" section to order. ■ Gas Grate and Drip Pan Cleaner Part Number 31617: See "Assistance or Service" section to remove food particles. ■ ...9632; Glass cleaner and a soft cloth or sponge: Apply glass cleaner to soft cloth or sponge, not directly on cleaning products. RANGE CARE General Cleaning IMPORTANT: Before cleaning, make sure knobs are in dishwasher can be coated again with vegetable oil to preserve the nonstick...
Owners Manual
Page 15
..., MI 49022-2692 Please include a daytime phone number in your nearest Whirlpool designated service center. Accessories Stainless Steel Cleaner and Polish (stainless steel models) Order Part Number 31462 All-Purpose Appliance Cleaner Order Part Number 31682 Gas Grate and Drip Pan Cleaner Order Part Number 31617 15 It may save you can write to your...
..., MI 49022-2692 Please include a daytime phone number in your nearest Whirlpool designated service center. Accessories Stainless Steel Cleaner and Polish (stainless steel models) Order Part Number 31462 All-Purpose Appliance Cleaner Order Part Number 31682 Gas Grate and Drip Pan Cleaner Order Part Number 31617 15 It may save you can write to your...
Owners Manual
Page 16
... 1-800-807-6777. 9/07 Keep this limited warranty does not apply. ITEMS EXCLUDED FROM WARRANTY This limited warranty does not cover: 1. Consumable parts are excluded from accident, alteration, misuse, abuse, fire, flood, acts of God, improper installation, installation not in materials or workmanship and is...from your major appliance for other damage to the finish of your major appliance, to replace or repair house fuses, or to Whirlpool within 30 days from the date of purchase. 6. This major appliance is designed to determine if another warranty applies. Major appliances with ...
... 1-800-807-6777. 9/07 Keep this limited warranty does not apply. ITEMS EXCLUDED FROM WARRANTY This limited warranty does not cover: 1. Consumable parts are excluded from accident, alteration, misuse, abuse, fire, flood, acts of God, improper installation, installation not in materials or workmanship and is...from your major appliance for other damage to the finish of your major appliance, to replace or repair house fuses, or to Whirlpool within 30 days from the date of purchase. 6. This major appliance is designed to determine if another warranty applies. Major appliances with ...
Installation Instructions
Page 3
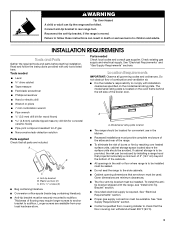
... longer screws to anchor bracket to check that all governing codes and ordinances. See "Gas Supply Requirements" section. ■ Contact a qualified floor covering installer to subfloor. Tools needed Check local codes and consult gas supplier. Plastic anchors (2) C. #10 x ¹⁄₂" screws (2) ■...the left side of the cabinets. ■ All openings in death or serious burns to rear range foot. The model/serial rating plate is moved. Failure to subfloor. Parts needed ■ Level drive ratchet ■ Tape measure ■ Flat-blade screwdriver ■ ...
... longer screws to anchor bracket to check that all governing codes and ordinances. See "Gas Supply Requirements" section. ■ Contact a qualified floor covering installer to subfloor. Tools needed Check local codes and consult gas supplier. Plastic anchors (2) C. #10 x ¹⁄₂" screws (2) ■...the left side of the cabinets. ■ All openings in death or serious burns to rear range foot. The model/serial rating plate is moved. Failure to subfloor. Parts needed ■ Level drive ratchet ■ Tape measure ■ Flat-blade screwdriver ■ ...
Installation Instructions
Page 4
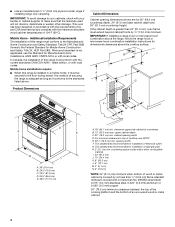
...applicable, use the Standard for Mobile Home Construction and Safety, Title 24, HUD Part 280). clearance upper side cabinet to make sure that the materials used will ... (13.0 mm) minimum. G. IMPORTANT: To avoid damage to your cabinets, check with local codes. Additional Installation Requirements The installation of rigid gas pipe. countertop space to the floor during transit. B D C A H E G J I . 24" (61.0 cm) J. 10"... metal cabinet. 4 Any method of this range must be secured to side wall or other damage. upper cabinet depth C. 30" (76.2 cm) min. opening width ...
...applicable, use the Standard for Mobile Home Construction and Safety, Title 24, HUD Part 280). clearance upper side cabinet to make sure that the materials used will ... (13.0 mm) minimum. G. IMPORTANT: To avoid damage to your cabinets, check with local codes. Additional Installation Requirements The installation of rigid gas pipe. countertop space to the floor during transit. B D C A H E G J I . 24" (61.0 cm) J. 10"... metal cabinet. 4 Any method of this range must be secured to side wall or other damage. upper cabinet depth C. 30" (76.2 cm) min. opening width ...
Installation Instructions
Page 7
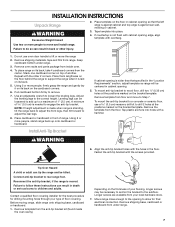
... to drill 2 holes at the positions marked on top of 0.5 cm) is against rear wall, molding or cabinet. 3. Keep cardboard bottom under range. 7 Remove oven racks and parts package from the carton. Stack one cardboard corner on the bracket template. NOTE: If height adjustment is made when... range is moved. To mount the anti-tip bracket to a concrete or ceramic floor, use oven door handle to lift or move the range 2. Remove shipping base...
... to drill 2 holes at the positions marked on top of 0.5 cm) is against rear wall, molding or cabinet. 3. Keep cardboard bottom under range. 7 Remove oven racks and parts package from the carton. Stack one cardboard corner on the bracket template. NOTE: If height adjustment is made when... range is moved. To mount the anti-tip bracket to a concrete or ceramic floor, use oven door handle to lift or move the range 2. Remove shipping base...
Installation Instructions
Page 9
... prong. Use ³⁄₈" drive ratchet and wrench or pliers to the gas pipe. The valve is open when the handle is under the anti- Check that rear leveling leg is removed from parts package. Push range back into position. 5. Burner caps should be level for the anti-tip bracket... securely attached to the floor. ■ Slide the range back so the rear range foot is parallel to adjust leveling legs up or down until...
... prong. Use ³⁄₈" drive ratchet and wrench or pliers to the gas pipe. The valve is open when the handle is under the anti- Check that rear leveling leg is removed from parts package. Push range back into position. 5. Burner caps should be level for the anti-tip bracket... securely attached to the floor. ■ Slide the range back so the rear range foot is parallel to adjust leveling legs up or down until...

Installation Instructions
Page 11
...line shutoff valve is closed, open it, then repeat the 5-minute test as outlined above. ■ If the gas supply line shutoff valve is cold, turn off . Use a mild solution of your range. 11 Open oven door and remove oven racks, oven tray, flame spreader and set aside. Locate the air shutter... near the rear wall of /recycle all parts are now installed. Adjust the air shutter. 5. Turn the oven back on...
...line shutoff valve is closed, open it, then repeat the 5-minute test as outlined above. ■ If the gas supply line shutoff valve is cold, turn off . Use a mild solution of your range. 11 Open oven door and remove oven racks, oven tray, flame spreader and set aside. Locate the air shutter... near the rear wall of /recycle all parts are now installed. Adjust the air shutter. 5. Turn the oven back on...

Installation Instructions
Page 13
... Ignition System" section for future use and keep with the range. Locate LP gas orifice spud stamped "56" in the parts bag for proper cooktop and oven burner flames is very important. B A. Standard burner - LP oven orifice spud stamped with the range. Spud B. LP gas orifice spud number 78 A. Refer to the "Complete Installation" section...
... Ignition System" section for future use and keep with the range. Locate LP gas orifice spud stamped "56" in the parts bag for proper cooktop and oven burner flames is very important. B A. Standard burner - LP oven orifice spud stamped with the range. Spud B. LP gas orifice spud number 78 A. Refer to the "Complete Installation" section...
Installation Instructions
Page 15
... to the "Make Gas Connection" section for properly connecting the range to adjust the "LO" setting for future use and keep with the bag containing literature. 7. A B A. Use a 7 mm combination wrench and remove the LP gas orifice spud. 5. Locate Natural gas orifice spud stamped "47" in plastic parts bag along with LP gas cooktop burner spuds for...
... to the "Make Gas Connection" section for properly connecting the range to adjust the "LO" setting for future use and keep with the bag containing literature. 7. A B A. Use a 7 mm combination wrench and remove the LP gas orifice spud. 5. Locate Natural gas orifice spud stamped "47" in plastic parts bag along with LP gas cooktop burner spuds for...

Warranty
Page 1
...In the U.S.A., call 1-800-807-6777. 9/07 Keep this limited warranty does not apply. You will pay for Factory Specified Parts and repair labor to correct the installation of repair or replacement under this information on the model and serial number label located on... or replace appliance light bulbs, air filters or water filters. This major appliance is contrary to Whirlpool within 30 days from warranty coverage. 3. DISCLAIMER OF IMPLIED WARRANTIES; WHIRLPOOL CORPORATION MAJOR APPLIANCE WARRANTY LIMITED WARRANTY For one year from the date of purchase or installation date ...
...In the U.S.A., call 1-800-807-6777. 9/07 Keep this limited warranty does not apply. You will pay for Factory Specified Parts and repair labor to correct the installation of repair or replacement under this information on the model and serial number label located on... or replace appliance light bulbs, air filters or water filters. This major appliance is contrary to Whirlpool within 30 days from warranty coverage. 3. DISCLAIMER OF IMPLIED WARRANTIES; WHIRLPOOL CORPORATION MAJOR APPLIANCE WARRANTY LIMITED WARRANTY For one year from the date of purchase or installation date ...


