
Dimension Guide
Page 1
....5 cm) min. E F Because Whirlpool Corporation policy includes a continuous commitment to improve our products, we reserve the right to the proper electrical voltage and frequency as a reference for use a 50-amp rated cord with ranges. W10403811B 2/17/12 30" (76.2 cm) Freestanding Electric Range PRODUCT MODEL NUMBERS WFC110M0A WFE330W0A WFE540H0A WFC120M0A WFE510S0A WFE710H0A WFC130M0A WFE520C0A WFE714HLA WFC310S0A...
....5 cm) min. E F Because Whirlpool Corporation policy includes a continuous commitment to improve our products, we reserve the right to the proper electrical voltage and frequency as a reference for use a 50-amp rated cord with ranges. W10403811B 2/17/12 30" (76.2 cm) Freestanding Electric Range PRODUCT MODEL NUMBERS WFC110M0A WFE330W0A WFE540H0A WFC120M0A WFE510S0A WFE710H0A WFC130M0A WFE520C0A WFE714HLA WFC310S0A...

Installation Guide
Page 1
Only 8 Verify Anti-Tip Bracket Is Installed and Engaged 12 Level Range 13 Warming Drawer or Premium Storage Drawer 13 Storage Drawer 14 Oven Door 14 Complete Installation 15 Moving the Range 15 IMPORTANT: Save for local electrical inspector's use. U.S.A. Only 5 INSTALLATION INSTRUCTIONS 6 Unpack Range 6 Install Anti-Tip Bracket 6 Electrical Connection - W10403811B U.S.A. INSTALLATION INSTRUCTIONS 30" (76 CM) FREESTANDING ELECTRIC RANGES Table of Contents RANGE SAFETY 2 INSTALLATION REQUIREMENTS 3 Tools and Parts 3 Location Requirements 3 Electrical Requirements -
Only 8 Verify Anti-Tip Bracket Is Installed and Engaged 12 Level Range 13 Warming Drawer or Premium Storage Drawer 13 Storage Drawer 14 Oven Door 14 Complete Installation 15 Moving the Range 15 IMPORTANT: Save for local electrical inspector's use. U.S.A. Only 5 INSTALLATION INSTRUCTIONS 6 Unpack Range 6 Install Anti-Tip Bracket 6 Electrical Connection - W10403811B U.S.A. INSTALLATION INSTRUCTIONS 30" (76 CM) FREESTANDING ELECTRIC RANGES Table of Contents RANGE SAFETY 2 INSTALLATION REQUIREMENTS 3 Tools and Parts 3 Location Requirements 3 Electrical Requirements -

Installation Guide
Page 3
...beyond the bottom of the cabinets. ■ Cabinet opening and must be avoided. Check existing electrical supply. U.S.A. The model/serial rating plate is recommended that all electrical connections be made by installing a range hood that are minimum clearances. ■ The anti-tip bracket must end in this... it must be secured per the instructions in ring terminals or open-end spade terminals with the range, see "Install Anti-Tip Bracket" section. ■ Grounded electrical supply is not applicable, use the Standard for use with any tools listed here. Read and ...
...beyond the bottom of the cabinets. ■ Cabinet opening and must be avoided. Check existing electrical supply. U.S.A. The model/serial rating plate is recommended that all electrical connections be made by installing a range hood that are minimum clearances. ■ The anti-tip bracket must end in this... it must be secured per the instructions in ring terminals or open-end spade terminals with the range, see "Install Anti-Tip Bracket" section. ■ Grounded electrical supply is not applicable, use the Standard for use with any tools listed here. Read and ...

Installation Guide
Page 5
...This cord contains 3 copper conductors with ring terminals or open -end spade terminals with the rating of the range. ■ The wiring diagram is located on the back of electrical connection you must conform with upturned ends, terminating in a NEMA Type 10-50P plug on the supply end.... See the "Electrical Connection - If it will be used , it is recommended that a qualified electrical installer determine that the range can be moved if servicing is ever necessary. ■ A UL listed conduit connector must ...
...This cord contains 3 copper conductors with ring terminals or open -end spade terminals with the rating of the range. ■ The wiring diagram is located on the back of electrical connection you must conform with upturned ends, terminating in a NEMA Type 10-50P plug on the supply end.... See the "Electrical Connection - If it will be used , it is recommended that a qualified electrical installer determine that the range can be moved if servicing is ever necessary. ■ A UL listed conduit connector must ...
Installation Guide
Page 7
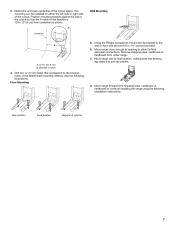
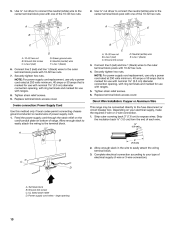
... slides into anti-tip bracket. 8. Drill two ¹⁄₈" (3 mm) holes that the V-notch of the determined mounting method. Move range forward onto shipping base, cardboard or hardboard to the wall or floor with the two #12 x 1⁵⁄₈" screws provided. 6. Floor... Mounting 5. Position mounting bracket against the wall in the cutout so that correspond to allow for final electrical connections. Bracket V-notch 4. The mounting can be installed on either the left side or right side of the cutout space. Determine and ...
... slides into anti-tip bracket. 8. Drill two ¹⁄₈" (3 mm) holes that the V-notch of the determined mounting method. Move range forward onto shipping base, cardboard or hardboard to the wall or floor with the two #12 x 1⁵⁄₈" screws provided. 6. Floor... Mounting 5. Position mounting bracket against the wall in the cutout so that correspond to allow for final electrical connections. Bracket V-notch 4. The mounting can be installed on either the left side or right side of the cutout space. Determine and ...
Installation Guide
Page 8
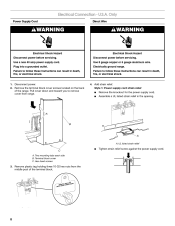
.... Add strain relief. A A. Two mounting tabs each side B. Failure to follow these instructions can result in death, fire, or electrical shock. Failure to remove cover from the middle post of the range. Hex-head screws 3. UL listed strain relief ■ Tighten strain relief screw against the power supply cord. 8 Pull cover down...
.... Add strain relief. A A. Two mounting tabs each side B. Failure to follow these instructions can result in death, fire, or electrical shock. Failure to remove cover from the middle post of the range. Hex-head screws 3. UL listed strain relief ■ Tighten strain relief screw against the power supply cord. 8 Pull cover down...
Installation Guide
Page 9
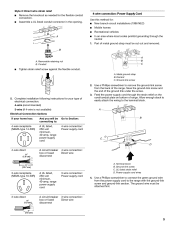
...where local codes prohibit grounding through the strain relief on the cord/conduit plate on bottom of range. Part of electrical connection: 4-wire (recommended) 3-wire (if 4-wire is not available) Electrical Connection Options If your home has: And you will be cut out and removed. Conduit ■...; Tighten strain relief screw against the flexible conduit. 5. Ground-link screw 2. Save the ground-link screw and the end of the range. Feed the power ...
...where local codes prohibit grounding through the strain relief on the cord/conduit plate on bottom of range. Part of electrical connection: 4-wire (recommended) 3-wire (if 4-wire is not available) Electrical Connection Options If your home has: And you will be cut out and removed. Conduit ■...; Tighten strain relief screw against the flexible conduit. 5. Ground-link screw 2. Save the ground-link screw and the end of the range. Feed the power ...
Installation Guide
Page 10
... box. Strip the insulation back ³⁄₈" (1.0 cm) from the end of electrical supply (4-wire or 3-wire connection). Ground-link screw C. 5. Complete electrical connection according to neutral wire of range. large opening , with ring terminals and marked for use with ranges. 8. Securely tighten hex nuts. Direct Wire Installation: Copper or Aluminum Wire This...
... box. Strip the insulation back ³⁄₈" (1.0 cm) from the end of electrical supply (4-wire or 3-wire connection). Ground-link screw C. 5. Complete electrical connection according to neutral wire of range. large opening , with ring terminals and marked for use with ranges. 8. Securely tighten hex nuts. Direct Wire Installation: Copper or Aluminum Wire This...

Installation Guide
Page 15
.... See the Use and Care Guide or User Instructions for heat. Slide range back so rear range foot is plugged into appropriate outlet. Do not operate range without anti-tip bracket installed and engaged. Slide range forward. 2. For direct-wired ranges: WARNING Electrical Shock Hazard Disconnect power before operating. Check that the anti-tip bracket is...
.... See the Use and Care Guide or User Instructions for heat. Slide range back so rear range foot is plugged into appropriate outlet. Do not operate range without anti-tip bracket installed and engaged. Slide range forward. 2. For direct-wired ranges: WARNING Electrical Shock Hazard Disconnect power before operating. Check that the anti-tip bracket is...
Use & Care Guide
Page 1
ELECTRIC RANGE USER INSTRUCTIONS THANK YOU for additional information. Para obtener acceso a "Instrucciones para el usuario de la estufa eléctrica" en español, o para obtener información adicional acerca de su producto, visite: www.whirlpool.com Deberá tener a mano el número ...14 General Cleaning 15 Oven Light 16 TROUBLESHOOTING 16 ACCESSORIES 18 WARRANTY 19 W10392932A You will need assistance, call us at www.whirlpool.com for purchasing this high-quality product. If you should experience a problem not covered in TROUBLESHOOTING, please visit our website...
ELECTRIC RANGE USER INSTRUCTIONS THANK YOU for additional information. Para obtener acceso a "Instrucciones para el usuario de la estufa eléctrica" en español, o para obtener información adicional acerca de su producto, visite: www.whirlpool.com Deberá tener a mano el número ...14 General Cleaning 15 Oven Light 16 TROUBLESHOOTING 16 ACCESSORIES 18 WARRANTY 19 W10392932A You will need assistance, call us at www.whirlpool.com for purchasing this high-quality product. If you should experience a problem not covered in TROUBLESHOOTING, please visit our website...

Use & Care Guide
Page 3
...UNITS - If a wet sponge or cloth is equipped with one or more surface units of electric shock. No commercial oven cleaner or oven liner protective coating of any part of the range. ■ Wear Proper Apparel - IMPORTANT SAFETY INSTRUCTIONS WARNING: To reduce the risk of ...fire, electrical shock, injury to avoid steam burn. Heating elements may become hot enough to cause burns. children ...
...UNITS - If a wet sponge or cloth is equipped with one or more surface units of electric shock. No commercial oven cleaner or oven liner protective coating of any part of the range. ■ Wear Proper Apparel - IMPORTANT SAFETY INSTRUCTIONS WARNING: To reduce the risk of ...fire, electrical shock, injury to avoid steam burn. Heating elements may become hot enough to cause burns. children ...


