
Dimension Guide
Page 1
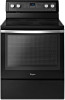
...8260;₂" (14.0 cm) max. 30" (76.2 cm) Freestanding Electric Range PRODUCT MODEL NUMBERS WFC110M0A WFE330W0A WFE540H0A WFC120M0A WFE510S0A WFE710H0A WFC130M0A WFE520C0A WFE714HLA WFC310S0A WFE524CLA WFE720H0A WFC340S0A WFE524WLA WFI910H0A WFE320M0A WFE530C0A Electrical: To properly install your ... cm) countertop height. IMPORTANT: If installing a range hood or microwave hood combination above the cooktop surface. E F Because Whirlpool Corporation policy includes a continuous commitment to improve our products, we reserve the right to 22" (55.9 cm) from floor...
...8260;₂" (14.0 cm) max. 30" (76.2 cm) Freestanding Electric Range PRODUCT MODEL NUMBERS WFC110M0A WFE330W0A WFE540H0A WFC120M0A WFE510S0A WFE710H0A WFC130M0A WFE520C0A WFE714HLA WFC310S0A WFE524CLA WFE720H0A WFC340S0A WFE524WLA WFI910H0A WFE320M0A WFE530C0A Electrical: To properly install your ... cm) countertop height. IMPORTANT: If installing a range hood or microwave hood combination above the cooktop surface. E F Because Whirlpool Corporation policy includes a continuous commitment to improve our products, we reserve the right to 22" (55.9 cm) from floor...

Installation Guide
Page 3
...with ranges. Anti-tip bracket B. #12 x 1⁵⁄₈" screws (2) ■ Anti-tip bracket must be revised. The model/serial rating plate is marked for use the Standard for Mobile Home Construction and Safety, Title 24, HUD Part 280). See "Electrical ...standard is not applicable, use with nominal 1³⁄₈" (3.5 cm) diameter connection opening dimensions that is located on the model/serial rating plate. Check local codes. See the appropriate "Electrical Requirements" section. Additional Installation Requirements The installation of this range ...
...with ranges. Anti-tip bracket B. #12 x 1⁵⁄₈" screws (2) ■ Anti-tip bracket must be revised. The model/serial rating plate is marked for use the Standard for Mobile Home Construction and Safety, Title 24, HUD Part 280). See "Electrical ...standard is not applicable, use with nominal 1³⁄₈" (3.5 cm) diameter connection opening dimensions that is located on the model/serial rating plate. Check local codes. See the appropriate "Electrical Requirements" section. Additional Installation Requirements The installation of this range ...

Installation Guide
Page 4
... left side frame behind storage drawer or right side of frame behind the oven door) IMPORTANT: Range must be installed next to top of cooktop** F. Model/serial rating plate (located on styling. For minimum clearance to combustible walls with zero clearance. Outlet - 8" (20.3 cm) to front of cooktop, see NOTE* D. 30...
... left side frame behind storage drawer or right side of frame behind the oven door) IMPORTANT: Range must be installed next to top of cooktop** F. Model/serial rating plate (located on styling. For minimum clearance to combustible walls with zero clearance. Outlet - 8" (20.3 cm) to front of cooktop, see NOTE* D. 30...

Installation Guide
Page 5
... be Type SRD or SRDT with the National Electrical Code, ANSI/ NFPA 70-latest edition and all local codes and ordinances. The model/serial rating plate is located on the Tech Sheet. 5 The minimum conductor sized for the copper 4-wire power cord are in conformance... section. If local codes do not permit ground through the neutral conductor. or 50-amp range power supply cord (pigtail). Connectors on the model/serial rating plate. Check with ranges. Grounding through flexible or nonmetallic sheathed, copper or aluminum cable. This cord contains 4 copper conductors with ...
... be Type SRD or SRDT with the National Electrical Code, ANSI/ NFPA 70-latest edition and all local codes and ordinances. The model/serial rating plate is located on the Tech Sheet. 5 The minimum conductor sized for the copper 4-wire power cord are in conformance... section. If local codes do not permit ground through the neutral conductor. or 50-amp range power supply cord (pigtail). Connectors on the model/serial rating plate. Check with ranges. Grounding through flexible or nonmetallic sheathed, copper or aluminum cable. This cord contains 4 copper conductors with ...

Installation Guide
Page 13
... range lifts more than 2" (5.1 cm) from the anti-tip bracket. 3. Place level on the oven bottom as indicated in Style 1 or Style 2, depending on some models) Remove all items from sliding into the slot of drawer supplied with the range. Check with AquaLift™ Technology or Steam Clean: 1. Open the warming...
... range lifts more than 2" (5.1 cm) from the anti-tip bracket. 3. Place level on the oven bottom as indicated in Style 1 or Style 2, depending on some models) Remove all items from sliding into the slot of drawer supplied with the range. Check with AquaLift™ Technology or Steam Clean: 1. Open the warming...

Installation Guide
Page 14
A A B A. Drawer alignment tab B. Oven Door For normal range use, it is not suggested to open and close . To Remove: 1. Repeat on some models) The storage drawer can be removed. Lift up the front of the drawer and pull the drawer out. Insert both hanger arms into the range. ...
A A B A. Drawer alignment tab B. Oven Door For normal range use, it is not suggested to open and close . To Remove: 1. Repeat on some models) The storage drawer can be removed. Lift up the front of the drawer and pull the drawer out. Insert both hanger arms into the range. ...
Use & Care Guide
Page 1
You will need assistance, call us at www.whirlpool.com for purchasing this high-quality product. If you still need your model and serial number, located on the oven frame behind the top right side of Contents RANGE SAFETY 2 The Anti-Tip Bracket 2 FEATURE GUIDE 4 COOKTOP USE 6 ... a "Instrucciones para el usuario de la estufa eléctrica" en español, o para obtener información adicional acerca de su producto, visite: www.whirlpool.com Deberá tener a mano el número de modelo y de serie, que están ubicados en el marco del horno, detrás del lado...
You will need assistance, call us at www.whirlpool.com for purchasing this high-quality product. If you still need your model and serial number, located on the oven frame behind the top right side of Contents RANGE SAFETY 2 The Anti-Tip Bracket 2 FEATURE GUIDE 4 COOKTOP USE 6 ... a "Instrucciones para el usuario de la estufa eléctrica" en español, o para obtener información adicional acerca de su producto, visite: www.whirlpool.com Deberá tener a mano el número de modelo y de serie, que están ubicados en el marco del horno, detrás del lado...
Use & Care Guide
Page 4
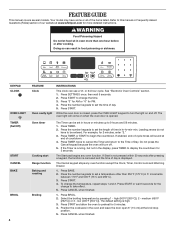
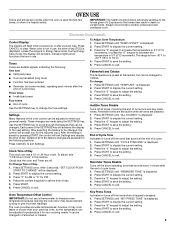
... Warming Drawer. 1. Press the number keypads to 9 hours and 59 minutes. 1. high (500°F [260°C]), 2 - FEATURE GUIDE This manual covers several models. Leading zeroes do not have some or all of day. 5. For example, for PM. 4. The Cancel keypad stops any oven function. Press BAKE. 2. Press ...START. 4. Position the cookware in hours or minutes up to set in the oven and leave the door open 6" (15 cm) at www.whirlpool.com for more than 350°F (175°C) in the display, press TIMER to this manual or Frequently Asked Questions (FAQs) section of Day. ...
... Warming Drawer. 1. Press the number keypads to 9 hours and 59 minutes. 1. high (500°F [260°C]), 2 - FEATURE GUIDE This manual covers several models. Leading zeroes do not have some or all of day. 5. For example, for PM. 4. The Cancel keypad stops any oven function. Press BAKE. 2. Press ...START. 4. Position the cookware in hours or minutes up to set in the oven and leave the door open 6" (15 cm) at www.whirlpool.com for more than 350°F (175°C) in the display, press TIMER to this manual or Frequently Asked Questions (FAQs) section of Day. ...
Use & Care Guide
Page 5
... hold START keypad for more information. SETTINGS ENERGY SAVE FEATURE INSTRUCTIONS Convection cooking 1. Press CONVECT once to set to select the warming element on some models) 1. Press the number keypads to select convection baking, twice for convection roasting, or 3 times for the High setting. 3. Auto conversion will be set a temperature other...
... hold START keypad for more information. SETTINGS ENERGY SAVE FEATURE INSTRUCTIONS Convection cooking 1. Press CONVECT once to set to select the warming element on some models) 1. Press the number keypads to select convection baking, twice for convection roasting, or 3 times for the High setting. 3. Auto conversion will be set a temperature other...
Use & Care Guide
Page 6
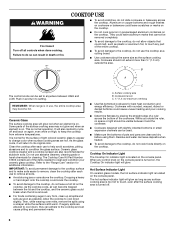
... the area. Some parts of a ruler across the cooktop. If sugary spills are also recommended for additional information. Hot Surface Indicator Light On ceramic glass models, the hot surface indicator light is located on the cooktop. They could leave aluminum marks that could cause uneven heating and poor cooking results. ■...
... the area. Some parts of a ruler across the cooktop. If sugary spills are also recommended for additional information. Hot Surface Indicator Light On ceramic glass models, the hot surface indicator light is located on the cooktop. They could leave aluminum marks that could cause uneven heating and poor cooking results. ■...

Use & Care Guide
Page 7
...the Cooktop Warm Zone element is the recommended maximum time to keep foods at a low temperature. A. Dual Zone Cooking Element (on some models) The Rapid Boil Element offers additional cooking flexibility. Melt Element The Melt Cooking element offers flexibility due to boil small amounts of settings ...home canning. However, the Element On light will not glow red when cycling on the size of the cookware. To turn on some models) The Dual Zone Cooking Element offers flexibility depending on . To turn the knob clockwise. The Melt setting is recommended for more than one...
...the Cooktop Warm Zone element is the recommended maximum time to keep foods at a low temperature. A. Dual Zone Cooking Element (on some models) The Rapid Boil Element offers additional cooking flexibility. Melt Element The Melt Cooking element offers flexibility due to boil small amounts of settings ...home canning. However, the Element On light will not glow red when cycling on the size of the cookware. To turn on some models) The Dual Zone Cooking Element offers flexibility depending on . To turn the knob clockwise. The Melt setting is recommended for more than one...

Use & Care Guide
Page 8
... iron Stainless steel ■ Heats quickly, but unevenly. ■ Ideal results on 2 surface cooking areas or elements at the same time. ■ On ceramic glass models, use of cooking. ■ Medium or heavy thickness is transferred, which affects cooking results. Home Canning Canning can be used areas to the cooktop and...
... iron Stainless steel ■ Heats quickly, but unevenly. ■ Ideal results on 2 surface cooking areas or elements at the same time. ■ On ceramic glass models, use of cooking. ■ Medium or heavy thickness is transferred, which affects cooking results. Home Canning Canning can be used areas to the cooktop and...
Use & Care Guide
Page 9
... save the setting. 5. Press START to adjust the setting. 4. Press SETTINGS until "TEMP OFFSET" is displayed. 2. Press START to clear. IMPORTANT: The health of some models), repeating each minute after the end of the oven control can be displayed. 2. Press CANCEL to display the current setting. 3. Settings Many features of cycle...
... save the setting. 5. Press START to adjust the setting. 4. Press SETTINGS until "TEMP OFFSET" is displayed. 2. Press START to clear. IMPORTANT: The health of some models), repeating each minute after the end of the oven control can be displayed. 2. Press CANCEL to display the current setting. 3. Settings Many features of cycle...
Use & Care Guide
Page 11
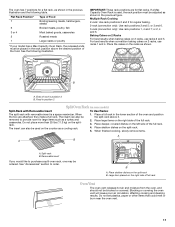
... meats, hamburgers, steaks 6 Broiled meats, poultry, fish 3 or 4 Most baked goods, casseroles 2 Roasted meats 1 Large roasts or poultry *If your model has a Max Capacity Oven Rack, the recessed ends must be placed in the previous figure. IMPORTANT: These rack positions are attached, they make a full rack...the left side of the full rack. 4. Place deeper, covered dishes on 2 racks, use racks 2 and 5. Large item placed on some models) Split-Rack with Removable Insert To Use Racks: The split-rack with removable insert is used on the counter as a cooling rack. 1. ...
... meats, hamburgers, steaks 6 Broiled meats, poultry, fish 3 or 4 Most baked goods, casseroles 2 Roasted meats 1 Large roasts or poultry *If your model has a Max Capacity Oven Rack, the recessed ends must be placed in the previous figure. IMPORTANT: These rack positions are attached, they make a full rack...the left side of the full rack. 4. Place deeper, covered dishes on 2 racks, use racks 2 and 5. Large item placed on some models) Split-Rack with Removable Insert To Use Racks: The split-rack with removable insert is used on the counter as a cooling rack. 1. ...
Use & Care Guide
Page 12
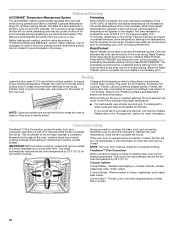
... enter your oven to maintain the oven temperature, while the fan circulates the hot air. Convect Options Convect Bake - On convection range models, the fan will run while preheating and may be cooked at a lower temperature or at the broil stop position to end before putting... wait for 5 minutes before putting food in moisture and yielding crustier breads. IMPORTANT: With convection cooking, most foods can be cycled on the model. Whole chicken or turkey, vegetables, pork roasts, beef roasts. Thicker cuts and unevenly shaped pieces of meat, fish or poultry. 12 Multiple...
... enter your oven to maintain the oven temperature, while the fan circulates the hot air. Convect Options Convect Bake - On convection range models, the fan will run while preheating and may be cooked at a lower temperature or at the broil stop position to end before putting... wait for 5 minutes before putting food in moisture and yielding crustier breads. IMPORTANT: With convection cooking, most foods can be cycled on the model. Whole chicken or turkey, vegetables, pork roasts, beef roasts. Thicker cuts and unevenly shaped pieces of meat, fish or poultry. 12 Multiple...

Use & Care Guide
Page 13
Press COOK TIME. Press COOK TIME. Press number keypads to turn on some models) WARNING Remove food from room temperature. Press START. See "General Cleaning" section. Food must be changed anytime after cooking. Press WARMING DRAWER to enter the ...
Press COOK TIME. Press COOK TIME. Press number keypads to turn on some models) WARNING Remove food from room temperature. Press START. See "General Cleaning" section. Food must be changed anytime after cooking. Press WARMING DRAWER to enter the ...

Use & Care Guide
Page 15
...porcelain and staining, etching, pitting or faint white spots can visit the Frequently Asked Questions (FAQs) section of our website at www.whirlpool.com. Burned-on panel. These spills may occur. Scratches and abrasions do not use steel wool, abrasive powder cleansers, chlorine bleach, ... soap-filled scouring pads, abrasive cleaners, Cooktop Cleaner, steel-wool pads, gritty washcloths or abrasive paper towels. CERAMIC GLASS (on some models) Check that have discolored and are off sugary spills while the cooktop is cool. Cleaning Method: ■ Glass cleaner, mild liquid ...
...porcelain and staining, etching, pitting or faint white spots can visit the Frequently Asked Questions (FAQs) section of our website at www.whirlpool.com. Burned-on panel. These spills may occur. Scratches and abrasions do not use steel wool, abrasive powder cleansers, chlorine bleach, ... soap-filled scouring pads, abrasive cleaners, Cooktop Cleaner, steel-wool pads, gritty washcloths or abrasive paper towels. CERAMIC GLASS (on some models) Check that have discolored and are off sugary spills while the cooktop is cool. Cleaning Method: ■ Glass cleaner, mild liquid ...
Use & Care Guide
Page 16
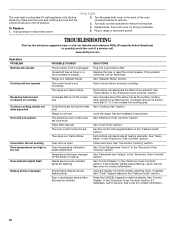
...) Error code (display shows letter followed by turning clockwise. 5. Turn the glass bulb cover in the off position. 2. www.whirlpool.com Operation PROBLEM Nothing will operate Cooktop will not operate Excessive heat around cookware on cooktop Cooktop cooking results not what expected Oven ... indicator lights are in the back of a service call for service. Level the range. See "Convection Cooking" section. On some models, reset the clock, if needed. Oven temperature calibration needs adjustment Temperature has been changed to remove from socket. Use cookware about the...
...) Error code (display shows letter followed by turning clockwise. 5. Turn the glass bulb cover in the off position. 2. www.whirlpool.com Operation PROBLEM Nothing will operate Cooktop will not operate Excessive heat around cookware on cooktop Cooktop cooking results not what expected Oven ... indicator lights are in the back of a service call for service. Level the range. See "Convection Cooking" section. On some models, reset the clock, if needed. Oven temperature calibration needs adjustment Temperature has been changed to remove from socket. Use cookware about the...

Use & Care Guide
Page 18
...website at www.whirlpool.com/cookingaccessories. Cooktop Care Kit (ceramic glass models) (includes cleaner, protectant, scraper, and applicator pads) Order Part Number 31605 Cooktop Protectant (ceramic glass models) Order Part Number 31463A affresh™ Stainless Steel Cleaning Wipes (stainless steel models) Order Part ...Cleaner Order Part Number W10355010 AquaLift™ Technology Oven Cleaning Kit Order Part Number W10423113RP Cooktop Scraper (ceramic glass models) Order Part Number WA906B Granite Cleaner and Polish Order Part Number W10275756 Gas Grate and Drip Pan Cleaner Order Part...
...website at www.whirlpool.com/cookingaccessories. Cooktop Care Kit (ceramic glass models) (includes cleaner, protectant, scraper, and applicator pads) Order Part Number 31605 Cooktop Protectant (ceramic glass models) Order Part Number 31463A affresh™ Stainless Steel Cleaning Wipes (stainless steel models) Order Part ...Cleaner Order Part Number W10355010 AquaLift™ Technology Oven Cleaning Kit Order Part Number W10423113RP Cooktop Scraper (ceramic glass models) Order Part Number WA906B Granite Cleaner and Polish Order Part Number W10275756 Gas Grate and Drip Pan Cleaner Order Part...
Use & Care Guide
Page 19
...Consumable parts are excluded from your home of your major appliance for repairs. Major appliances with original model/serial numbers that is contrary to instruct you may contact Whirlpool at the address below . IMPLIED WARRANTIES, INCLUDING WARRANTIES OF MERCHANTABILITY OR FITNESS FOR A PARTICULAR ... is covered by this warranty. 8. Any food loss due to obtain service under these excluded circumstances shall be provided by Whirlpool. 5. This major appliance is designed to correct house wiring or plumbing. 2. LIMITATION OF REMEDIES CUSTOMER'S SOLE AND EXCLUSIVE REMEDY...
...Consumable parts are excluded from your home of your major appliance for repairs. Major appliances with original model/serial numbers that is contrary to instruct you may contact Whirlpool at the address below . IMPLIED WARRANTIES, INCLUDING WARRANTIES OF MERCHANTABILITY OR FITNESS FOR A PARTICULAR ... is covered by this warranty. 8. Any food loss due to obtain service under these excluded circumstances shall be provided by Whirlpool. 5. This major appliance is designed to correct house wiring or plumbing. 2. LIMITATION OF REMEDIES CUSTOMER'S SOLE AND EXCLUSIVE REMEDY...


