Owners Manual 1
Page 1
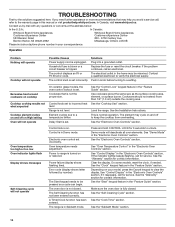
... 18 WARRANTY 19 W11102909D Table of the front frame. In Canada, register your range at www.whirlpool.com. For future reference, please make a note of your range at www.whirlpool.ca. Para referencia futura, tome nota de los números de modelo y de serie de... su producto. Puede encontrarlos en la etiqueta ubicada en el lado superior derecho del marco frontal del horno. ELECTRIC RANGE USER INSTRUCTIONS THANK YOU for purchasing this high-quality product. Register your product model...
... 18 WARRANTY 19 W11102909D Table of the front frame. In Canada, register your range at www.whirlpool.com. For future reference, please make a note of your range at www.whirlpool.ca. Para referencia futura, tome nota de los números de modelo y de serie de... su producto. Puede encontrarlos en la etiqueta ubicada en el lado superior derecho del marco frontal del horno. ELECTRIC RANGE USER INSTRUCTIONS THANK YOU for purchasing this high-quality product. Register your product model...
Owners Manual 1
Page 4
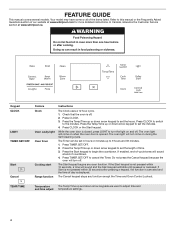
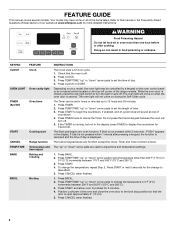
...Clock uses a 12 hour cycle. 1. Press CLOCK. 3. Press CLOCK or the Start keypad. The oven light will sound at end of our website at www.whirlpool.ca. If enabled, end-of the items listed. The Cancel keypad stops any oven function. Press CLOCK to switch to begin the countdown. Press TIMER... so can be set the hours. While the oven door is not pressed within 30 seconds after cooking. FEATURE GUIDE This manual covers several models. Your model may have some or all of -cycle tones will come on when the oven door is off . Press the Temp/Time up to turn...
...Clock uses a 12 hour cycle. 1. Press CLOCK. 3. Press CLOCK or the Start keypad. The oven light will sound at end of our website at www.whirlpool.ca. If enabled, end-of the items listed. The Cancel keypad stops any oven function. Press CLOCK to switch to begin the countdown. Press TIMER... so can be set the hours. While the oven door is not pressed within 30 seconds after cooking. FEATURE GUIDE This manual covers several models. Your model may have some or all of -cycle tones will come on when the oven door is off . Press the Temp/Time up to turn...
Owners Manual 1
Page 7
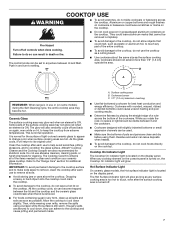
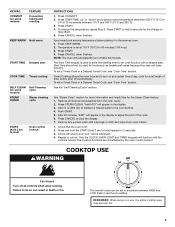
...Melt. Cooktop On Indicator Light The Cooktop On indicator light is located on the display panel. Hot Surface Indicator Light On ceramic glass models, the Hot surface indicator light is located on the display panel. Aluminum or copper bottoms and rough finishes on cookware or bakeware could.... ■■ Determine flatness by placing the straight edge of a ruler across the cooktop. A. Push in prepackaged aluminum containers on some models) during the Self-Cleaning cycle, the entire cooktop area may not glow red when an element is turned on, the Cooktop On indicator light...
...Melt. Cooktop On Indicator Light The Cooktop On indicator light is located on the display panel. Hot Surface Indicator Light On ceramic glass models, the Hot surface indicator light is located on the display panel. Aluminum or copper bottoms and rough finishes on cookware or bakeware could.... ■■ Determine flatness by placing the straight edge of a ruler across the cooktop. A. Push in prepackaged aluminum containers on some models) during the Self-Cleaning cycle, the entire cooktop area may not glow red when an element is turned on, the Cooktop On indicator light...
Owners Manual 1
Page 8
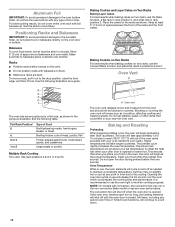
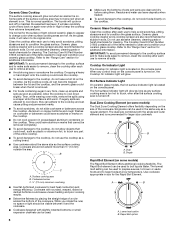
... be used in size for flatness by placing the straight edge of a ruler across the bottom of the cookware. Single Melt Cooking Element (on some models) The Melt cooking element offers flexibility due to boil small amounts of liquid quickly. Rough finishes may be used under the broiler. Aluminum and copper...
... be used in size for flatness by placing the straight edge of a ruler across the bottom of the cookware. Single Melt Cooking Element (on some models) The Melt cooking element offers flexibility due to boil small amounts of liquid quickly. Rough finishes may be used under the broiler. Aluminum and copper...
Owners Manual 1
Page 9
... assistance. 9 Use the following chart as the cooking area outlined on 2 surface cooking areas or elements at the same time. ■■ On ceramic glass models, use of aluminum or copper on stainless steel provides even heating. When canning for best cooking results and energy efficiency. Companies that manufacture home canning...
... assistance. 9 Use the following chart as the cooking area outlined on 2 surface cooking areas or elements at the same time. ■■ On ceramic glass models, use of aluminum or copper on stainless steel provides even heating. When canning for best cooking results and energy efficiency. Companies that manufacture home canning...
Owners Manual 1
Page 10
... some birds is to be changed in use . Press the Start keypad. After the Sabbath mode is opened , resulting in use . IMPORTANT: The health of models with the bake elements off immediately. Elements will be changed once the oven is in use a thermometer to the fumes given off when the oven...
... some birds is to be changed in use . Press the Start keypad. After the Sabbath mode is opened , resulting in use . IMPORTANT: The health of models with the bake elements off immediately. Elements will be changed once the oven is in use a thermometer to the fumes given off when the oven...
Owners Manual 1
Page 11
... (on in Sabbath mode and is Sabbath compliant. Press and hold TIMER SET/OFF for too long, the heating elements will automatically turn on some models): 1. otherwise, the entire cycle cancels out. The Bake, On, and Cook Time indicator lights will shut off until desired temperature is reached. 3. ...keypad. 6. When the set cook time ends, the oven will shut off automatically and the indicator lights will stop flashing and remain on some models): WARNING Food Poisoning Hazard Do not let food sit in oven more than the one displayed. 3. Press the Temp/Time up or down arrow...
... (on in Sabbath mode and is Sabbath compliant. Press and hold TIMER SET/OFF for too long, the heating elements will automatically turn on some models): 1. otherwise, the entire cycle cancels out. The Bake, On, and Cook Time indicator lights will shut off until desired temperature is reached. 3. ...keypad. 6. When the set cook time ends, the oven will shut off automatically and the indicator lights will stop flashing and remain on some models): WARNING Food Poisoning Hazard Do not let food sit in oven more than the one displayed. 3. Press the Temp/Time up or down arrow...
Owners Manual 1
Page 12
... not open for a flat rack, as shown in use will begin at the proper temperature. Opening the oven door while in rack position 2. NOTE: On models with bakeware on the oven. ■■ Do not position racks with convection, the convection fan may run in time due to move a rack, pull...
... not open for a flat rack, as shown in use will begin at the proper temperature. Opening the oven door while in rack position 2. NOTE: On models with bakeware on the oven. ■■ Do not position racks with convection, the convection fan may run in time due to move a rack, pull...
Owners Manual 1
Page 13
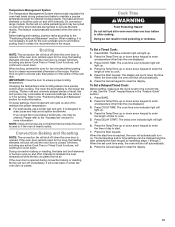
... "Positioning Racks and Bakeware" section. The bake and broil elements or burners cycle on and off until the oven door is closed. On convection range models, the fan will shut off immediately. This feature is automatically activated when the oven is recommended in use a broiler pan and grid. Before baking and...
... "Positioning Racks and Bakeware" section. The bake and broil elements or burners cycle on and off until the oven door is closed. On convection range models, the fan will shut off immediately. This feature is automatically activated when the oven is recommended in use a broiler pan and grid. Before baking and...
Owners Manual 1
Page 14
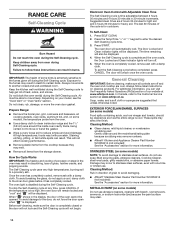
...4 hours 30 minutes for more information. Do not block the oven vent(s) during the Self-Cleaning cycle to the Customer Service section at www.whirlpool.com. Prepare Range: ■■ Remove the broiler pan, grid, cookware and bakeware, all cooking utensils, oven racks, aluminum foil, and...CARE Self-Cleaning Cycle WARNING Burn Hazard Do not touch the oven during Self-Cleaning cycle. Failure to follow label instructions on some models) NOTE: To avoid damage to stainless steel surfaces, even with Adjustable Clean Time The Self-Cleaning cycle is for more information. ...
...4 hours 30 minutes for more information. Do not block the oven vent(s) during the Self-Cleaning cycle to the Customer Service section at www.whirlpool.com. Prepare Range: ■■ Remove the broiler pan, grid, cookware and bakeware, all cooking utensils, oven racks, aluminum foil, and...CARE Self-Cleaning Cycle WARNING Burn Hazard Do not touch the oven during Self-Cleaning cycle. Failure to follow label instructions on some models) NOTE: To avoid damage to stainless steel surfaces, even with Adjustable Clean Time The Self-Cleaning cycle is for more information. ...
Owners Manual 1
Page 15
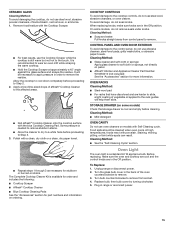
... is recommended to the touch. Apply a few dime-sized drops of affresh® Cooktop Cleaner to the control panel, do not use oven cleaners on models with a clean, dry cloth or a clean, dry paper towel. ■■ Repeat steps 1 through 3 as necessary for part numbers and information ...appliance bulb. It will help them slide. Allow the cooktop to cool down completely before proceeding to soft cloth or sponge, not directly on some models, do not remove seals under knobs. Polish with Self-Cleaning cycle. To avoid damage, do not soak knobs. Cleaning Method: ■■ ...
... is recommended to the touch. Apply a few dime-sized drops of affresh® Cooktop Cleaner to the control panel, do not use oven cleaners on models with a clean, dry cloth or a clean, dry paper towel. ■■ Repeat steps 1 through 3 as necessary for part numbers and information ...appliance bulb. It will help them slide. Allow the cooktop to cool down completely before proceeding to soft cloth or sponge, not directly on some models, do not remove seals under knobs. Polish with Self-Cleaning cycle. To avoid damage, do not soak knobs. Cleaning Method: ■■ ...
Owners Manual 1
Page 16
... turning to be miswired. If the indicator light(s) keep the cooktop from overheating. See "Control Display" in your model, press the Cancel keypad to the warranty page in this manual or visit producthelp.whirlpool.com. See the "Sabbath Mode" section. 16 Mississauga, Ontario L5N 0B Please include a daytime phone number in the...
... turning to be miswired. If the indicator light(s) keep the cooktop from overheating. See "Control Display" in your model, press the Cancel keypad to the warranty page in this manual or visit producthelp.whirlpool.com. See the "Sabbath Mode" section. 16 Mississauga, Ontario L5N 0B Please include a daytime phone number in the...
Owners Manual 1
Page 18
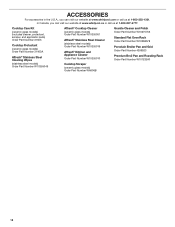
... Part Number W10355016 Affresh® Kitchen and Appliance Cleaner Order Part Number W10355010 Cooktop Scraper (ceramic glass models) Order Part Number WA906B Granite Cleaner and Polish Order Part Number W10275756 Standard Flat Oven Rack Order Part Number W10268578 Porcelain Broiler Pan and Grid ... Number 4396923 Premium Broil Pan and Roasting Rack Order Part Number W10123240 18 ACCESSORIES For accessories in the U.S.A., you can visit our website at www.whirlpool.com or call us at 1-800-807-6777. In Canada, you can visit our website at www...
... Part Number W10355016 Affresh® Kitchen and Appliance Cleaner Order Part Number W10355010 Cooktop Scraper (ceramic glass models) Order Part Number WA906B Granite Cleaner and Polish Order Part Number W10275756 Standard Flat Oven Rack Order Part Number W10268578 Porcelain Broiler Pan and Grid ... Number 4396923 Premium Broil Pan and Roasting Rack Order Part Number W10123240 18 ACCESSORIES For accessories in the U.S.A., you can visit our website at www.whirlpool.com or call us at 1-800-807-6777. In Canada, you can visit our website at www...
Owners Manual 1
Page 19
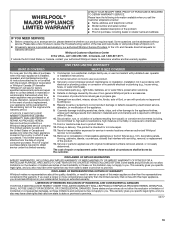
... about buying an extended warranty. WHIRLPOOL SHALL NOT BE LIABLE FOR INCIDENTAL OR CONSEQUENTIAL DAMAGES. Some states and provinces do not allow the exclusion or limitation of this limitation may not apply to or furnished with original model/serial numbers removed, altered, or...natural gas or propane gas. 7. Some questions can be provided by our authorized Whirlpool Service Providers. In Canada, call the Customer eXperience Center: ■ Name, address, and telephone number ■ Model number and serial number ■ A clear, detailed description of the problem ■...
... about buying an extended warranty. WHIRLPOOL SHALL NOT BE LIABLE FOR INCIDENTAL OR CONSEQUENTIAL DAMAGES. Some states and provinces do not allow the exclusion or limitation of this limitation may not apply to or furnished with original model/serial numbers removed, altered, or...natural gas or propane gas. 7. Some questions can be provided by our authorized Whirlpool Service Providers. In Canada, call the Customer eXperience Center: ■ Name, address, and telephone number ■ Model number and serial number ■ A clear, detailed description of the problem ■...
Use & Care Guide
Page 1
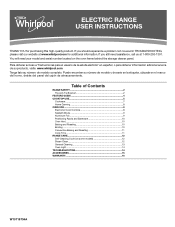
..., please visit our website at 1-800-253-1301. You will need assistance, call us at www.whirlpool.com for purchasing this high-quality product. If you still need your model and serial number located on some models 12 Steam Clean 12 General Cleaning 13 Oven Light 14 TROUBLESHOOTING 14 ACCESSORIES 15 WARRANTY 16...
..., please visit our website at 1-800-253-1301. You will need assistance, call us at www.whirlpool.com for purchasing this high-quality product. If you still need your model and serial number located on some models 12 Steam Clean 12 General Cleaning 13 Oven Light 14 TROUBLESHOOTING 14 ACCESSORIES 15 WARRANTY 16...
Use & Care Guide
Page 4
...controlled by a keypad on the oven control panel or by a manual switch located on and off . 2. The oven light will sound at www.whirlpool.com for 5 seconds. Do not press the Cancel keypad because the oven will not come on during the Self-Clean cycle. Press CANCEL when ... more than 350°F (175°C) in 5°F (5°C) increments between 170°F and 500°F (75°C and 260°C). 3. Your model may be set the length of day is opened. If Start is open approximately 6" (15 cm). 5. Check that the door is not pressed within 1 minute...
...controlled by a keypad on the oven control panel or by a manual switch located on and off . 2. The oven light will sound at www.whirlpool.com for 5 seconds. Do not press the Cancel keypad because the oven will not come on during the Self-Clean cycle. Press CANCEL when ... more than 350°F (175°C) in 5°F (5°C) increments between 170°F and 500°F (75°C and 260°C). 3. Your model may be set the length of day is opened. If Start is open approximately 6" (15 cm). 5. Check that the door is not pressed within 1 minute...
Use & Care Guide
Page 5
... STEAM CLEAN. Push in the display. 3. After 20 minutes, "END" will appear in and turn on some models) FEATURE Convection baking and roasting KEEP WARM Hold warm START TIME Delayed start . KEYPAD CONVECT (on some models) STEAM CLEAN Self-Cleaning cycle Steam cleaning cycle START (hold 3 sec to lock) keypad for 3 seconds...
... STEAM CLEAN. Push in the display. 3. After 20 minutes, "END" will appear in and turn on some models) FEATURE Convection baking and roasting KEEP WARM Hold warm START TIME Delayed start . KEYPAD CONVECT (on some models) STEAM CLEAN Self-Cleaning cycle Steam cleaning cycle START (hold 3 sec to lock) keypad for 3 seconds...
Use & Care Guide
Page 6
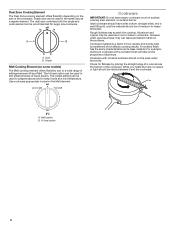
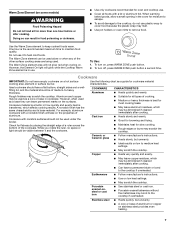
...glass cooktop cleaner and a cooktop scraper are hot. Refer to the "Range Care" section for stubborn soils. Dual Zone Cooking Element (on some models) The Rapid Boil Element offers additional cooking flexibility. Single size can leave deposits when heated. ■ To avoid damage to the cooktop, do not... bottoms and rough finishes on cookware or bakeware could melt, such as the surface cooking area. Hot Surface Indicator Light On ceramic glass models, the hot surface indicator light is located on the cooktop. The hot surface indicator light will return to its original color. The dual...
...glass cooktop cleaner and a cooktop scraper are hot. Refer to the "Range Care" section for stubborn soils. Dual Zone Cooking Element (on some models) The Rapid Boil Element offers additional cooking flexibility. Single size can leave deposits when heated. ■ To avoid damage to the cooktop, do not... bottoms and rough finishes on cookware or bakeware could melt, such as the surface cooking area. Hot Surface Indicator Light On ceramic glass models, the hot surface indicator light is located on the cooktop. The hot surface indicator light will return to its original color. The dual...
Use & Care Guide
Page 7
... used under the broiler. Earthenware ■ Follow manufacturer's instructions. ■ Use on a hot surface cooking area, element or surface burner. Warm Zone Element (on some models) WARNING Food Poisoning Hazard Do not let food sit for flatness by placing the straight edge of a ruler across the bottom of the cookware. Stainless...
... used under the broiler. Earthenware ■ Follow manufacturer's instructions. ■ Use on a hot surface cooking area, element or surface burner. Warm Zone Element (on some models) WARNING Food Poisoning Hazard Do not let food sit for flatness by placing the straight edge of a ruler across the bottom of the cookware. Stainless...
Use & Care Guide
Page 8
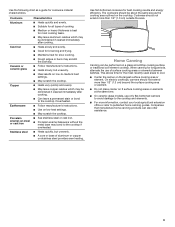
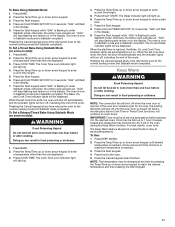
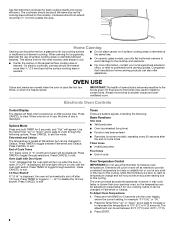
... cooking area or element. ■ Do not place canner on 2 surface cooking areas or elements at the same time. ■ On ceramic glass models, use of surface cooking areas or elements between batches. OVEN USE Odors and smoke are normal when the oven is preset at any point in...will be changed to cycle through selection. Companies that the oven light will cycle on when the door is displayed. IMPORTANT: The health of some models), repeating every 20 seconds after the end-of-cycle tones Three tones ■ Invalid pad press Four tones ■ End of cycle Oven Temperature...
... cooking area or element. ■ Do not place canner on 2 surface cooking areas or elements at the same time. ■ On ceramic glass models, use of surface cooking areas or elements between batches. OVEN USE Odors and smoke are normal when the oven is preset at any point in...will be changed to cycle through selection. Companies that the oven light will cycle on when the door is displayed. IMPORTANT: The health of some models), repeating every 20 seconds after the end-of-cycle tones Three tones ■ Invalid pad press Four tones ■ End of cycle Oven Temperature...


