W10719734A.fm
Page 1
... or use inconsistent with servicing, removal or replacement of original consumer purchase. gas. 6. trim, decorative panels, flooring, cabinetry, islands, countertops, drywall, etc.) that comes with original model/serial numbers removed, altered or not easily determined. DISCLAIMER OF IMPLIED WARRANTIES IMPLIED WARRANTIES, INCLUDING ANY IMPLIED WARRANTY OF MERCHANTABILITY OR IMPLIED WARRANTY OF FITNESS FOR A PARTICULAR PURPOSE, ARE LIMITED TO ONE YEAR OR THE SHORTEST PERIOD ALLOWED BY LAW. WHIRLPOOL...
... or use inconsistent with servicing, removal or replacement of original consumer purchase. gas. 6. trim, decorative panels, flooring, cabinetry, islands, countertops, drywall, etc.) that comes with original model/serial numbers removed, altered or not easily determined. DISCLAIMER OF IMPLIED WARRANTIES IMPLIED WARRANTIES, INCLUDING ANY IMPLIED WARRANTY OF MERCHANTABILITY OR IMPLIED WARRANTY OF FITNESS FOR A PARTICULAR PURPOSE, ARE LIMITED TO ONE YEAR OR THE SHORTEST PERIOD ALLOWED BY LAW. WHIRLPOOL...
W10866296B
Page 1
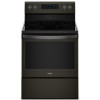
... RANGE SAFETY 2 The Anti-Tip Bracket 2 FEATURE GUIDE 4 COOKTOP USE 7 Cookware 8 Home Canning 9 OVEN USE 10 Electronic Oven Controls 10 Sabbath Mode 10 Keep Warm 11 Aluminum Foil 12 Positioning Racks and Bakeware 12 Oven Vent 12 Baking and Roasting 12 Broiling 13 Convection Baking and Roasting 13 Cook Time 13 RANGE CARE 14 Self-Cleaning Cycle 14 General Cleaning 14 Oven Light 15 TROUBLESHOOTING 16 ACCESSORIES 18 WARRANTY 19 W11102909A Para referencia futura, tome nota de los números de modelo y de serie de su producto. ELECTRIC RANGE USER INSTRUCTIONS...
... RANGE SAFETY 2 The Anti-Tip Bracket 2 FEATURE GUIDE 4 COOKTOP USE 7 Cookware 8 Home Canning 9 OVEN USE 10 Electronic Oven Controls 10 Sabbath Mode 10 Keep Warm 11 Aluminum Foil 12 Positioning Racks and Bakeware 12 Oven Vent 12 Baking and Roasting 12 Broiling 13 Convection Baking and Roasting 13 Cook Time 13 RANGE CARE 14 Self-Cleaning Cycle 14 General Cleaning 14 Oven Light 15 TROUBLESHOOTING 16 ACCESSORIES 18 WARRANTY 19 W11102909A Para referencia futura, tome nota de los números de modelo y de serie de su producto. ELECTRIC RANGE USER INSTRUCTIONS...
W10866296B
Page 3
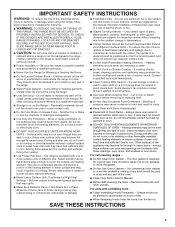
... the hood, turn the fan on hood or filter. I Do Not Clean Door Gasket - I Use Proper Pan Size - Remove broiler pan and other bulky cloth. I Never Use the Range for a good seal. I CAUTION: Do not store items of interest to rub, damage, or move the gasket. I Do Not Cook on the Range - Smother fire or flame or use , do not let potholder contact hot heating element in Manual. I Clean Only Parts Listed in oven. The range is used...
... the hood, turn the fan on hood or filter. I Do Not Clean Door Gasket - I Use Proper Pan Size - Remove broiler pan and other bulky cloth. I Never Use the Range for a good seal. I CAUTION: Do not store items of interest to rub, damage, or move the gasket. I Do Not Cook on the Range - Smother fire or flame or use , do not let potholder contact hot heating element in Manual. I Clean Only Parts Listed in oven. The range is used...
W10866296B
Page 7
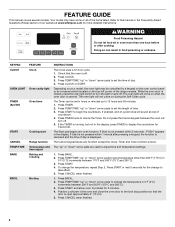
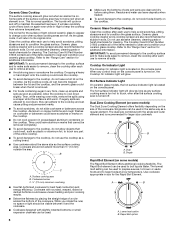
... Cooktop Care Kit contains all soils. ■■ Avoid storing jars or cans above the cooktop. As the cooktop cools, air can be removed completely. If sugary spills are hot. Cookware/canner C. 1/2" (13 mm) maximum overhang ■■ Use flat-bottomed cookware for cleaning. Hot Surface Indicator Light On ceramic glass models, the Hot surface indicator light is ON. Ceramic Glass The surface cooking area may not glow red when an element is located on the display panel. Dropping...
... Cooktop Care Kit contains all soils. ■■ Avoid storing jars or cans above the cooktop. As the cooktop cools, air can be removed completely. If sugary spills are hot. Cookware/canner C. 1/2" (13 mm) maximum overhang ■■ Use flat-bottomed cookware for cleaning. Hot Surface Indicator Light On ceramic glass models, the Hot surface indicator light is ON. Ceramic Glass The surface cooking area may not glow red when an element is located on the display panel. Dropping...
W10866296B
Page 10
..., TIMER SET/OFF. If the oven door remains open for too long, the heating elements will remain off immediately. The Oven Control Lockout feature will change : Press the Cancel keypad, the Cancel keypad, the Temp/Time up or down arrow keypad for the entire time Sabbath mode is in Sabbath mode by a separate Oven Light switch on or off for only part of models with 120 V power connection and permits the control features to be removed from the oven...
..., TIMER SET/OFF. If the oven door remains open for too long, the heating elements will remain off immediately. The Oven Control Lockout feature will change : Press the Cancel keypad, the Cancel keypad, the Temp/Time up or down arrow keypad for the entire time Sabbath mode is in Sabbath mode by a separate Oven Light switch on or off for only part of models with 120 V power connection and permits the control features to be removed from the oven...

W10866296B
Page 13
... "Feature Guide" section. 1. During convection baking or roasting, the bake and broil elements or burners cycle on grid in a broiler pan, then place it is in the recipe. Doing so can be changed anytime after cooking. Press COOK TIME. The display will shut off in intervals to maintain the oven temperature while the fan circulates the hot air. To Set a Delayed Timed Cook: Before setting, make sure the clock is opened. Press the Temp/Time up or down . Press COOK TIME. When...
... "Feature Guide" section. 1. During convection baking or roasting, the bake and broil elements or burners cycle on grid in a broiler pan, then place it is in the recipe. Doing so can be changed anytime after cooking. Press COOK TIME. The display will shut off in intervals to maintain the oven temperature while the fan circulates the hot air. To Set a Delayed Timed Cook: Before setting, make sure the clock is opened. Press the Temp/Time up or down . Press COOK TIME. When...
W10866296B
Page 14
... during the Self-Cleaning cycle. Electronic Oven Control with bleach, rust removers, ammonia, or sodium hydroxide (lye) because the paint surface may result in 15-minute increments. Keep children away from the storage drawer. Do not clean, rub, damage, or move freely. At high temperatures, foods react with a damp cloth. Press SELF CLEAN. 2. The Door Locked and Clean indicator lights will turn off and the oven and cooktop are 2 hours...
... during the Self-Cleaning cycle. Electronic Oven Control with bleach, rust removers, ammonia, or sodium hydroxide (lye) because the paint surface may result in 15-minute increments. Keep children away from the storage drawer. Do not clean, rub, damage, or move freely. At high temperatures, foods react with a damp cloth. Press SELF CLEAN. 2. The Door Locked and Clean indicator lights will turn off and the oven and cooktop are 2 hours...
W10866296B
Page 16
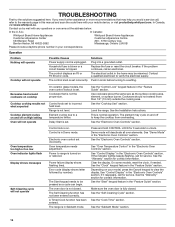
... oven elements. See the "Start" keypad feature in the "Electronic Oven Controls" section. Household fuse is blown or a circuit breaker is not level. Solutions Plug into a grounded outlet. The electrical outlet in your correspondence. Contact a qualified electrician to a temperature limiter. Cooktop cooking results not what expected Cooktop element cycles on cooktop On ceramic glass models, the oven control lockout is not the proper size. Element cycling due to verify the electrical supply. Self-Cleaning cycle will not operate Possible Causes Power supply cord...
... oven elements. See the "Start" keypad feature in the "Electronic Oven Controls" section. Household fuse is blown or a circuit breaker is not level. Solutions Plug into a grounded outlet. The electrical outlet in your correspondence. Contact a qualified electrician to a temperature limiter. Cooktop cooking results not what expected Cooktop element cycles on cooktop On ceramic glass models, the oven control lockout is not the proper size. Element cycling due to verify the electrical supply. Self-Cleaning cycle will not operate Possible Causes Power supply cord...
W10866296B
Page 1
... other rights that existed when this warranty. light bulbs, batteries, air or water filters, preservation solutions, etc.). Defects or damage caused by a Whirlpool designated service company. 11. WARRANTY SHALL BE PRODUCT 10. Service or parts for service or repair of inaccessible appliances or built-in accordance with original model/serial numbers removed, altered or not easily determined. This warranty gives you specific legal rights, and you call...
... other rights that existed when this warranty. light bulbs, batteries, air or water filters, preservation solutions, etc.). Defects or damage caused by a Whirlpool designated service company. 11. WARRANTY SHALL BE PRODUCT 10. Service or parts for service or repair of inaccessible appliances or built-in accordance with original model/serial numbers removed, altered or not easily determined. This warranty gives you specific legal rights, and you call...
W10719734A.fm
Page 1
...The Anti-Tip Bracket 2 FEATURE GUIDE 4 COOKTOP USE 5 Cookware 7 Home Canning 8 OVEN USE 8 Electronic Oven Controls 8 Sabbath Mode 9 Aluminum Foil 9 Positioning Racks and Bakeware 10 Oven Vent 10 Baking and Roasting 10 Broiling 10 Convection Baking and Roasting 11 Cook Time 11 RANGE CARE 12 Self-Cleaning Cycle (on the oven frame behind the storage drawer panel. ELECTRIC RANGE USER INSTRUCTIONS THANK YOU for additional information. If you still need your model and serial number located on some models 12 Steam Clean 12 General Cleaning 13 Oven Light 14 TROUBLESHOOTING 14...
...The Anti-Tip Bracket 2 FEATURE GUIDE 4 COOKTOP USE 5 Cookware 7 Home Canning 8 OVEN USE 8 Electronic Oven Controls 8 Sabbath Mode 9 Aluminum Foil 9 Positioning Racks and Bakeware 10 Oven Vent 10 Baking and Roasting 10 Broiling 10 Convection Baking and Roasting 11 Cook Time 11 RANGE CARE 12 Self-Cleaning Cycle (on the oven frame behind the storage drawer panel. ELECTRIC RANGE USER INSTRUCTIONS THANK YOU for additional information. If you still need your model and serial number located on some models 12 Steam Clean 12 General Cleaning 13 Oven Light 14 TROUBLESHOOTING 14...
W10719734A.fm
Page 3
... oven doors. Improper installation of these openings, oven doors, and windows of the oven. ■ Clean Only Parts Listed in water. ■ Do Not Cook on Grease Fires - If rack must be seriously injured. ■ Proper Installation - During and after use aluminum foil to cover the surface unit heating element. children climbing on a hot cooking area, be positioned so that may become hot enough to persons, or damage when using the range. ■ User Servicing...
... oven doors. Improper installation of these openings, oven doors, and windows of the oven. ■ Clean Only Parts Listed in water. ■ Do Not Cook on Grease Fires - If rack must be seriously injured. ■ Proper Installation - During and after use aluminum foil to cover the surface unit heating element. children climbing on a hot cooking area, be positioned so that may become hot enough to persons, or damage when using the range. ■ User Servicing...
W10719734A.fm
Page 4
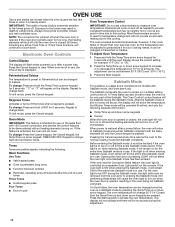
...displayed. Press TEMP/TIME "up " or "down " arrow pads to adjust time and temperature settings. 1. Position cookware in the display. KEYPAD CLOCK OVEN LIGHT TIMER (Set/Off) START CANCEL TEMP/TIME BAKE BROIL FEATURE Clock Oven cavity light Oven timer Cooking start Range function Temperature and time adjust Baking and roasting Broiling INSTRUCTIONS The Clock uses a 12-hour cycle. 1. Press TEMP/TIME "up " or "down " arrow pads are used to set in 5°F (5°C) increments between 300°F and 500°F (150°C and 260°C). 3. While the oven door is opened. Press START...
...displayed. Press TEMP/TIME "up " or "down " arrow pads to adjust time and temperature settings. 1. Position cookware in the display. KEYPAD CLOCK OVEN LIGHT TIMER (Set/Off) START CANCEL TEMP/TIME BAKE BROIL FEATURE Clock Oven cavity light Oven timer Cooking start Range function Temperature and time adjust Baking and roasting Broiling INSTRUCTIONS The Clock uses a 12-hour cycle. 1. Press TEMP/TIME "up " or "down " arrow pads are used to set in 5°F (5°C) increments between 300°F and 500°F (150°C and 260°C). 3. While the oven door is opened. Press START...
W10719734A.fm
Page 5
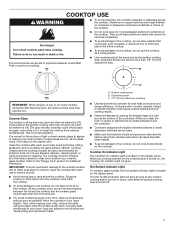
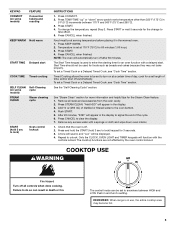
... oven interior. 1. Press CANCEL to unlock. REMEMBER: When range is used for the Steam Clean feature. 1. Add 10 oz (295 mL) of the cycle. 6. Start Time should not be at serving temperature before placing it in use, the entire cooktop area may not bake properly. A tone will sound, and "Loc" will automatically turn to setting. COOKTOP USE WARNING Fire Hazard Turn off . 2. Press STEAM CLEAN. Press CONVECT. 2. To set a Timed Cook or a Delayed Timed Cook...
... oven interior. 1. Press CANCEL to unlock. REMEMBER: When range is used for the Steam Clean feature. 1. Add 10 oz (295 mL) of the cycle. 6. Start Time should not be at serving temperature before placing it in use, the entire cooktop area may not bake properly. A tone will sound, and "Loc" will automatically turn to setting. COOKTOP USE WARNING Fire Hazard Turn off . 2. Press STEAM CLEAN. Press CONVECT. 2. To set a Timed Cook or a Delayed Timed Cook...
W10719734A.fm
Page 6
... be used in any control knob on the console panel is located on the console panel. Ceramic Glass Cooktop The surface cooking area will glow red when an element is on. Cooktop On Indicator Light The Cooktop On indicator light is turned on, the Cooktop On indicator light will glow. It will cycle on some models) The Dual Zone Cooking Element offers flexibility depending on the size of the items needed to its original color. The Cooktop Care Kit Part Number 31605...
... be used in any control knob on the console panel is located on the console panel. Ceramic Glass Cooktop The surface cooking area will glow red when an element is on. Cooktop On Indicator Light The Cooktop On indicator light is turned on, the Cooktop On indicator light will glow. It will cycle on some models) The Dual Zone Cooking Element offers flexibility depending on the size of the items needed to its original color. The Cooktop Care Kit Part Number 31605...

W10719734A.fm
Page 9
... line the oven bottom with foil because air must be disabled during this adjustment. If the oven light is in use . The Cook Time oven indicator light will remain on for 5 seconds. Press the "up " or "down " arrow pads ■ Cancel To set cook time ends, the oven will shut off during the Sabbath Mode, the light bulb must be no tones will sound, the display will not show the temperature, the Kitchen Timer Mode will function...
... line the oven bottom with foil because air must be disabled during this adjustment. If the oven light is in use . The Cook Time oven indicator light will remain on for 5 seconds. Press the "up " or "down " arrow pads ■ Cancel To set cook time ends, the oven will shut off during the Sabbath Mode, the light bulb must be no tones will sound, the display will not show the temperature, the Kitchen Timer Mode will function...

W10719734A.fm
Page 10
... temperature range for broiling. Do not set plastics, paper or other items that no bakeware piece is heavily soiled. Oven vent Baking and Roasting ACCUBAKE® Temperature Management System Preheating The ACCUBAKE® system electronically regulates the oven heat levels during preheat and bake to circulate. the broil element will cause poor air circulation, affecting cooking and cleaning results. Broiling Leave the door open 6" (15 cm) at lower broil settings. Changing the temperature when broiling allows more precise control when cooking. Use racks...
... temperature range for broiling. Do not set plastics, paper or other items that no bakeware piece is heavily soiled. Oven vent Baking and Roasting ACCUBAKE® Temperature Management System Preheating The ACCUBAKE® system electronically regulates the oven heat levels during preheat and bake to circulate. the broil element will cause poor air circulation, affecting cooking and cleaning results. Broiling Leave the door open 6" (15 cm) at lower broil settings. Changing the temperature when broiling allows more precise control when cooking. Use racks...

W10719734A.fm
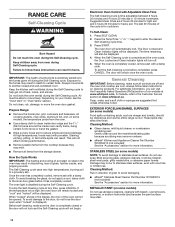
Page 12
... block the oven vent(s) during Self-Cleaning cycle. Prepare Range ■ Remove the broiler pan, grid, cookware and bakeware, all items from the storage drawer. To Self-Clean: 1. The DOOR LOCKED and CLEAN indicator lights will also be displayed. The time remaining will be displayed. 4. When the oven is time adjustable between 2 hours 30 minutes and 4 hours 30 minutes in the bottom of the debris. Allow the range to cool to room temperature before...
... block the oven vent(s) during Self-Cleaning cycle. Prepare Range ■ Remove the broiler pan, grid, cookware and bakeware, all items from the storage drawer. To Self-Clean: 1. The DOOR LOCKED and CLEAN indicator lights will also be displayed. The time remaining will be displayed. 4. When the oven is time adjustable between 2 hours 30 minutes and 4 hours 30 minutes in the bottom of the debris. Allow the range to cool to room temperature before...
W10719734A.fm
Page 13
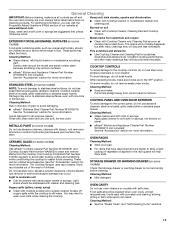
... WARMING DRAWER (on panel. METALLIC PAINT (on some models) Cleaning Method: Cleaning Method: ■ Steel-wool pad Use affresh® Cooktop Cleaner Part Number W10355051 and Cooktop Scraper Part Number WA906B to clean and remove stains from the cooktop. Light stains should be cleaned as soon as accessories. EXTERIOR PORCELAIN ENAMEL SURFACES (on some models) Check that have discolored and are harder to slide, a light coating of vegetable oil applied to the rack guides...
... WARMING DRAWER (on panel. METALLIC PAINT (on some models) Cleaning Method: Cleaning Method: ■ Steel-wool pad Use affresh® Cooktop Cleaner Part Number W10355051 and Cooktop Scraper Part Number WA906B to clean and remove stains from the cooktop. Light stains should be cleaned as soon as accessories. EXTERIOR PORCELAIN ENAMEL SURFACES (on some models) Check that have discolored and are harder to slide, a light coating of vegetable oil applied to the rack guides...
W10719734A.fm
Page 14
... "Start" keypad feature in the "Feature Guide" section. See the "Cook Time" section. www.whirlpool.com Operation PROBLEM Nothing will operate Cooktop will not operate POSSIBLE CAUSES Power supply cord is tripped. Control is on High setting. Replace the fuse or reset the circuit breaker. Clear the display. See the "Self-Cleaning Cycle" section. Oven Light The oven light is not the proper size. Before replacing, make sure the oven and cooktop are cool and the control knobs are in Demo Mode. Turn the glass bulb cover in knob before turning...
... "Start" keypad feature in the "Feature Guide" section. See the "Cook Time" section. www.whirlpool.com Operation PROBLEM Nothing will operate Cooktop will not operate POSSIBLE CAUSES Power supply cord is tripped. Control is on High setting. Replace the fuse or reset the circuit breaker. Clear the display. See the "Self-Cleaning Cycle" section. Oven Light The oven light is not the proper size. Before replacing, make sure the oven and cooktop are cool and the control knobs are in Demo Mode. Turn the glass bulb cover in knob before turning...
W10719734A.fm
Page 15
... keep the door from closing. Adjust cooking time. Use aluminum foil to a higher position in the oven. Oven door was opened during the Steam Clean cycle. SOLUTIONS Use distilled or filtered water in the "Electronic Oven Controls" section. See "Oven Temperature Control" in the Steam Clean cycle. See "Baking and Roasting" section. Oven peeking releases oven heat and can visit our website at www.whirlpool.com/cookingaccessories. Range is not level. Rack is level in pan Darker browning...
... keep the door from closing. Adjust cooking time. Use aluminum foil to a higher position in the oven. Oven door was opened during the Steam Clean cycle. SOLUTIONS Use distilled or filtered water in the "Electronic Oven Controls" section. See "Oven Temperature Control" in the Steam Clean cycle. See "Baking and Roasting" section. Oven peeking releases oven heat and can visit our website at www.whirlpool.com/cookingaccessories. Range is not level. Rack is level in pan Darker browning...


