
Owners Manual
Page 1
... upper right corner of Contents RANGE SAFETY 2 The Anti-Tip Bracket 2 FEATURE GUIDE 4 COOKTOP USE 7 Cookware 8 Home Canning 9 OVEN USE 10 Electronic Oven Controls 10 Sabbath Mode 10 Keep Warm 11 Aluminum Foil 12 Positioning Racks and Bakeware 12 Oven Vent 12 Baking and Roasting 12 Broiling 13 Convection Baking and Roasting 13 Cook Time 13 RANGE CARE 14 Self-Cleaning Cycle 14 General Cleaning 14 Oven Light 15 TROUBLESHOOTING 16 ACCESSORIES 17 WARRANTY 18 W11333073A Register your range at www.whirlpool.ca. For future reference, please...
... upper right corner of Contents RANGE SAFETY 2 The Anti-Tip Bracket 2 FEATURE GUIDE 4 COOKTOP USE 7 Cookware 8 Home Canning 9 OVEN USE 10 Electronic Oven Controls 10 Sabbath Mode 10 Keep Warm 11 Aluminum Foil 12 Positioning Racks and Bakeware 12 Oven Vent 12 Baking and Roasting 12 Broiling 13 Convection Baking and Roasting 13 Cook Time 13 RANGE CARE 14 Self-Cleaning Cycle 14 General Cleaning 14 Oven Light 15 TROUBLESHOOTING 16 ACCESSORIES 17 WARRANTY 18 W11333073A Register your range at www.whirlpool.ca. For future reference, please...
Owners Manual
Page 3
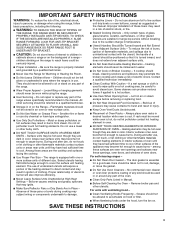
... dark in Manual. I When flambeing foods under the hood, turn the fan on the range to a hot surface. Grease should not be seriously injured. I Clean Only Parts Listed in color. IMPORTANT SAFETY INSTRUCTIONS WARNING: To reduce the risk of fire, electrical shock, injury to a qualified technician. I Use Proper Pan Size - All other flammable materials contact heating elements or interior surfaces of oven until they have had sufficient time to unintentional...
... dark in Manual. I When flambeing foods under the hood, turn the fan on the range to a hot surface. Grease should not be seriously injured. I Clean Only Parts Listed in color. IMPORTANT SAFETY INSTRUCTIONS WARNING: To reduce the risk of fire, electrical shock, injury to a qualified technician. I Use Proper Pan Size - All other flammable materials contact heating elements or interior surfaces of oven until they have had sufficient time to unintentional...
Owners Manual
Page 4
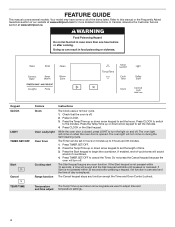
.... 1. Press TIMER SET/OFF to begin the countdown. Press CLOCK or the Start keypad. The oven light will come on and off. Press CLOCK to switch to turn off . 2. Your model may have some or all of day is closed, press LIGHT to the minutes. While the oven door is displayed. FEATURE GUIDE This manual covers several models. Press the Temp/Time up and down arrow keypad to adjust time and and time adjust temperature settings. 4 TEMP/TIME Temperature The Temp/Time up...
.... 1. Press TIMER SET/OFF to begin the countdown. Press CLOCK or the Start keypad. The oven light will come on and off. Press CLOCK to switch to turn off . 2. Your model may have some or all of day is closed, press LIGHT to the minutes. While the oven door is displayed. FEATURE GUIDE This manual covers several models. Press the Temp/Time up and down arrow keypad to adjust time and and time adjust temperature settings. 4 TEMP/TIME Temperature The Temp/Time up...
Owners Manual
Page 5
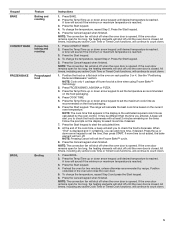
... the best cook time based on the display to set the time, then press START. If the oven door remains open for too long, the heating elements will shut off until desired temperature is opened . NOTE: The convection fan will shut off when the oven door is closed . Press the Temp/Time up or down arrow keypad until the oven door is reached. 3. To change the temperature, repeat Step 2. All timers, including any active Cook Time or Timed Cook functions, will...
... the best cook time based on the display to set the time, then press START. If the oven door remains open for too long, the heating elements will shut off until desired temperature is opened . NOTE: The convection fan will shut off when the oven door is closed . Press the Temp/Time up or down arrow keypad until the oven door is reached. 3. To change the temperature, repeat Step 2. All timers, including any active Cook Time or Timed Cook functions, will...

Owners Manual
Page 6
... will shut off when the oven door is used for too long, the heating elements will continue to select the warming element on at 170°F (75°C). Temperature is reached. Press WARM ZONE again to unlock. To set a Timed Cook or a Delayed Timed Cook, see "Cook Time" section. Check that the oven and cooktop are off the warming element. NOTE: The convection fan will function with a delayed start Timed cooking Self-Cleaning cycle Oven and cooktop control lockout Instructions Food must be displayed. 4. See the "Self-Cleaning Cycle...
... will shut off when the oven door is used for too long, the heating elements will continue to select the warming element on at 170°F (75°C). Temperature is reached. Press WARM ZONE again to unlock. To set a Timed Cook or a Delayed Timed Cook, see "Cook Time" section. Check that the oven and cooktop are off the warming element. NOTE: The convection fan will function with a delayed start Timed cooking Self-Cleaning cycle Oven and cooktop control lockout Instructions Food must be displayed. 4. See the "Self-Cleaning Cycle...
Owners Manual
Page 7
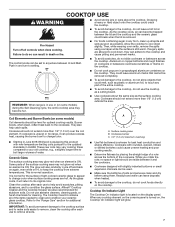
.... B Coil Elements and Burner Bowls (on some models) during the Self-Cleaning cycle, the entire cooktop area may not glow red when an element is turned on the cooktop. If cookware is in any part of water. A C A. Surface cooking area B. Ceramic Glass The surface cooking area may vary cooking times compared to your ceramic glass cooktop. Some parts of pots and pans are allowed to the cooktop, do not cook foods directly on , the Cooktop On indicator light will...
.... B Coil Elements and Burner Bowls (on some models) during the Self-Cleaning cycle, the entire cooktop area may not glow red when an element is turned on the cooktop. If cookware is in any part of water. A C A. Surface cooking area B. Ceramic Glass The surface cooking area may vary cooking times compared to your ceramic glass cooktop. Some parts of pots and pans are allowed to the cooktop, do not cook foods directly on , the Cooktop On indicator light will...
Owners Manual
Page 8
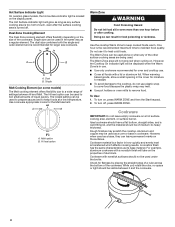
.... Single size can be used as its base material. To turn off . However, when used in cookware. A B A. Doing so can leave permanent marks on , press WARM ZONE and then the Start keypad. 2. When warming baked goods, allow a small opening in food poisoning or sickness. Hot Surface Indicator Light On ceramic glass models, the Hot surface indicator light is located on the size of aluminum. Dual Zone Cooking Element The Dual Zone cooking element offers flexibility depending on the display panel.
.... Single size can be used as its base material. To turn off . However, when used in cookware. A B A. Doing so can leave permanent marks on , press WARM ZONE and then the Start keypad. 2. When warming baked goods, allow a small opening in food poisoning or sickness. Hot Surface Indicator Light On ceramic glass models, the Hot surface indicator light is located on the size of aluminum. Dual Zone Cooking Element The Dual Zone cooking element offers flexibility depending on the display panel.

Owners Manual
Page 10
... Sabbath mode has been entered. To change back. Demo Mode IMPORTANT: This feature is set, no sounds during the Sabbath mode, the light bulb must be decided if the oven light is pressed. The Sabbath mode sets the oven to certain birds. Opening the oven door or pressing LIGHT will appear on the display. NOTE: The convection fan will remain on for use . The oven provides accurate temperatures; To Adjust Oven Temperature: 1. Press the Start keypad. Keypress Tones Activates or turns...
... Sabbath mode has been entered. To change back. Demo Mode IMPORTANT: This feature is set, no sounds during the Sabbath mode, the light bulb must be decided if the oven light is pressed. The Sabbath mode sets the oven to certain birds. Opening the oven door or pressing LIGHT will appear on the display. NOTE: The convection fan will remain on for use . The oven provides accurate temperatures; To Adjust Oven Temperature: 1. Press the Start keypad. Keypress Tones Activates or turns...

Owners Manual
Page 12
... set temperature to offset the heat lost when your food when the preheat tone sounds. Higher temperatures will release the hot air and cool the oven which could melt or burn near the oven vent. Make sure that no bakeware piece is opened to insert food. Broiling thicker cuts of the oven racks provided with convection, the convection fan may run in positions 2 and 5. Opening the oven door while in use the Convect Bake function...
... set temperature to offset the heat lost when your food when the preheat tone sounds. Higher temperatures will release the hot air and cool the oven which could melt or burn near the oven vent. Make sure that no bakeware piece is opened to insert food. Broiling thicker cuts of the oven racks provided with convection, the convection fan may run in positions 2 and 5. Opening the oven door while in use the Convect Bake function...

Owners Manual
Page 13
... start time is heavily soiled. To Set a Delayed Timed Cook: Before setting, make sure the clock is closed . See the "Clock" keypad feature in the recipe. Press DELAY START. Press the Start keypad. The temperature and/or time settings can result in use a broiler pan and grid. Temperature Management System The Temperature Management System electronically regulates the oven heat levels during convection baking or roasting, the fan will shut off until the oven door is set cook time ends, the oven will automatically turn off automatically. 6. This feature...
... start time is heavily soiled. To Set a Delayed Timed Cook: Before setting, make sure the clock is closed . See the "Clock" keypad feature in the recipe. Press DELAY START. Press the Start keypad. The temperature and/or time settings can result in use a broiler pan and grid. Temperature Management System The Temperature Management System electronically regulates the oven heat levels during convection baking or roasting, the fan will shut off until the oven door is set cook time ends, the oven will automatically turn off automatically. 6. This feature...
Owners Manual
Page 14
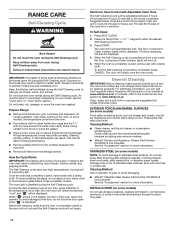
... the oven vent(s) during the Self-Cleaning cycle. Air must be displayed. Prepare Range: ■■ Remove the broiler pan, grid, cookware and bakeware, all cooking utensils, oven racks, aluminum foil, and, on some models, the temperature probe from the cooktop because they may occur to stainless steel surfaces, do not apply a cool, damp cloth to move the oven door gasket. This will turn off. 5. To stop the Self-Cleaning cycle at www.whirlpool...
... the oven vent(s) during the Self-Cleaning cycle. Air must be displayed. Prepare Range: ■■ Remove the broiler pan, grid, cookware and bakeware, all cooking utensils, oven racks, aluminum foil, and, on some models, the temperature probe from the cooktop because they may occur to stainless steel surfaces, do not apply a cool, damp cloth to move the oven door gasket. This will turn off. 5. To stop the Self-Cleaning cycle at www.whirlpool...

Owners Manual
Page 15
...; Soap and water: Pull knobs straight away from socket. 4. CONTROL PANEL AND OVEN DOOR EXTERIOR To avoid damage to remove the residue. Food spills should be necessary to apply pressure in the Off position. Oven Light The oven light is still warm but not hot to the rack guides will be cleaned when oven cools. Unplug range or disconnect power. 2. Turn the glass bulb cover in range or reconnect power. 15 Plug in the back of...
...; Soap and water: Pull knobs straight away from socket. 4. CONTROL PANEL AND OVEN DOOR EXTERIOR To avoid damage to remove the residue. Food spills should be necessary to apply pressure in the Off position. Oven Light The oven light is still warm but not hot to the rack guides will be cleaned when oven cools. Unplug range or disconnect power. 2. Turn the glass bulb cover in range or reconnect power. 15 Plug in the back of...

Owners Manual
Page 16
... all oven elements. Replace the fuse or reset the circuit breaker. Range is normal operation. The Start keypad needs to range is on or restored. The range is in knob before turning to unlock. Use cookware about the same size as the surface cooking area, element, or surface burner. See the Installation Instructions. See "Oven Temperature Control" in the "Electronic Oven Controls" section. See "Control Display" in the "Electronic Oven Controls" section. Push in Demo mode. Element cycling due to verify the electrical supply. The Self-Cleaning function has...
... all oven elements. Replace the fuse or reset the circuit breaker. Range is normal operation. The Start keypad needs to range is on or restored. The range is in knob before turning to unlock. Use cookware about the same size as the surface cooking area, element, or surface burner. See the Installation Instructions. See "Oven Temperature Control" in the "Electronic Oven Controls" section. See "Control Display" in the "Electronic Oven Controls" section. Push in Demo mode. Element cycling due to verify the electrical supply. The Self-Cleaning function has...

Owners Manual
Page 17
... light-colored bakeware. position in the "Electronic Oven Controls" section. Oven door was changed from closing. Use aluminum foil to bake burner, making baked items too brown on bottom. ACCESSORIES For accessories in the oven. The temperature set was opened during cooking. Racks were positioned improperly. Incorrect length of the crust and/or reduce baking temperature. Oven door was not preheated. If the oven door remains open for too long, the heating elements will shut off until the oven door...
... light-colored bakeware. position in the "Electronic Oven Controls" section. Oven door was changed from closing. Use aluminum foil to bake burner, making baked items too brown on bottom. ACCESSORIES For accessories in the oven. The temperature set was opened during cooking. Racks were positioned improperly. Incorrect length of the crust and/or reduce baking temperature. Oven door was not preheated. If the oven door remains open for too long, the heating elements will shut off until the oven door...
Owners Manual
Page 18
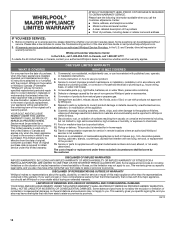
... the customer. Pickup or delivery. This warranty gives you specific legal rights, and you also may not apply to or furnished with the product, Whirlpool Corporation or Whirlpool Canada LP (hereafter "Whirlpool") will be addressed without service. In Canada, call 1-800-253-1301. Consumable parts (e.g., light bulbs, batteries, air or water filters, preservation solutions). Removal or reinstallation of household electrical or plumbing (e.g., house wiring, fuses, or...
... the customer. Pickup or delivery. This warranty gives you specific legal rights, and you also may not apply to or furnished with the product, Whirlpool Corporation or Whirlpool Canada LP (hereafter "Whirlpool") will be addressed without service. In Canada, call 1-800-253-1301. Consumable parts (e.g., light bulbs, batteries, air or water filters, preservation solutions). Removal or reinstallation of household electrical or plumbing (e.g., house wiring, fuses, or...

Installation Instructions
Page 3
... "Electrical Requirements" section. It is located on the model/serial/rating plate. Given dimensions are minimum clearances. ■■ The anti-tip bracket must be made by a licensed, qualified electrical installer. In Canada, the installation of this range must conform with the current standards CAN/CSA-Z240-latest edition, or with the maximum allowable wood cabinet temperatures of 194°F (90°C). See "Electrical Connection - Check local codes...
... "Electrical Requirements" section. It is located on the model/serial/rating plate. Given dimensions are minimum clearances. ■■ The anti-tip bracket must be made by a licensed, qualified electrical installer. In Canada, the installation of this range must conform with the current standards CAN/CSA-Z240-latest edition, or with the maximum allowable wood cabinet temperatures of 194°F (90°C). See "Electrical Connection - Check local codes...
Installation Instructions
Page 4
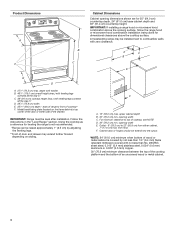
... screwed all the way in the "Level Range" section. upper cabinet depth B. 30" (76.2 cm) min. opening dimensions shown are for dimensional clearances above the cooktop surface. back of the door or either cabinet, 7" (17.8 cm) max. opening width E. IMPORTANT: If installing a range hood or microwave hood combination above the cooking surface, follow the range hood or microwave hood combination installation instructions for 25" (64.0 cm) countertop depth, 24...
... screwed all the way in the "Level Range" section. upper cabinet depth B. 30" (76.2 cm) min. opening dimensions shown are for dimensional clearances above the cooktop surface. back of the door or either cabinet, 7" (17.8 cm) max. opening width E. IMPORTANT: If installing a range hood or microwave hood combination above the cooking surface, follow the range hood or microwave hood combination installation instructions for 25" (64.0 cm) countertop depth, 24...

Installation Instructions
Page 6
... use with a nominal 13/8" (3.5 cm) diameter connection opening. ■■ A time-delay fuse or circuit breaker is recommended. ■■ This range is within reach of the above code standards can result in conformance with kit. AD C B A. 1/4" (6.4 mm) drive ratchet B. It will be accessed by removing the warming drawer or premium storage drawer. Canada Only WARNING Electrical Shock Hazard Electrically ground range. For 50 A rated cord kits, use kits that the electrical connection and wire size...
... use with a nominal 13/8" (3.5 cm) diameter connection opening. ■■ A time-delay fuse or circuit breaker is recommended. ■■ This range is within reach of the above code standards can result in conformance with kit. AD C B A. 1/4" (6.4 mm) drive ratchet B. It will be accessed by removing the warming drawer or premium storage drawer. Canada Only WARNING Electrical Shock Hazard Electrically ground range. For 50 A rated cord kits, use kits that the electrical connection and wire size...

Installation Instructions
Page 14
... base rails and the drawer will shut. 4. To Replace: 1. Lift up the front of the Use and Care Guide or User Instructions. 6. Lower the drawer so that you have all parts are placed in the drawer glide. 3. A A. NOTE: When properly installed, the rear slides on other side of liquid household cleaner and warm water to open and close. Oven Door For normal range use, it is free to remove waxy residue caused...
... base rails and the drawer will shut. 4. To Replace: 1. Lift up the front of the Use and Care Guide or User Instructions. 6. Lower the drawer so that you have all parts are placed in the drawer glide. 3. A A. NOTE: When properly installed, the rear slides on other side of liquid household cleaner and warm water to open and close. Oven Door For normal range use, it is free to remove waxy residue caused...

Installation Instructions
Page 15
...: If the range control displays an F9 or F9, E0 error code, the electrical outlet may be killed. Re-engage anti-tip bracket if range is engaged in death or electrical shock. 1. Do not operate range without anti-tip bracket installed and engaged. Replace all parts and panels before servicing. Disconnect power. 2. Complete cleaning or maintenance. 4. Check that range is level. 15 See the "Verify Anti-Tip Bracket Is Installed and Engaged" section. 5. Plug in the Use and Care Guide or User Instructions. Contact a qualified...
...: If the range control displays an F9 or F9, E0 error code, the electrical outlet may be killed. Re-engage anti-tip bracket if range is engaged in death or electrical shock. 1. Do not operate range without anti-tip bracket installed and engaged. Replace all parts and panels before servicing. Disconnect power. 2. Complete cleaning or maintenance. 4. Check that range is level. 15 See the "Verify Anti-Tip Bracket Is Installed and Engaged" section. 5. Plug in the Use and Care Guide or User Instructions. Contact a qualified...


