
Use & Care Guide
Page 1
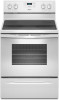
...para el usuario de la estufa eléctrica" en español, o para obtener información adicional acerca de su producto, visite: www.whirlpool.com Tenga listo su número de modelo completo. Table of Contents RANGE SAFETY 2 The Anti-Tip Bracket 2 FEATURE GUIDE 4 COOKTOP USE 5 ...located on some models 11 General Cleaning 12 Oven Light 13 TROUBLESHOOTING 13 ACCESSORIES 15 WARRANTY 15 W10394383A If you should experience a problem not covered in TROUBLESHOOTING, please visit our website at 1-800-253-1301. You will need assistance, call us at www.whirlpool.com for ...
...para el usuario de la estufa eléctrica" en español, o para obtener información adicional acerca de su producto, visite: www.whirlpool.com Tenga listo su número de modelo completo. Table of Contents RANGE SAFETY 2 The Anti-Tip Bracket 2 FEATURE GUIDE 4 COOKTOP USE 5 ...located on some models 11 General Cleaning 12 Oven Light 13 TROUBLESHOOTING 13 ACCESSORIES 15 WARRANTY 15 W10394383A If you should experience a problem not covered in TROUBLESHOOTING, please visit our website at 1-800-253-1301. You will need assistance, call us at www.whirlpool.com for ...

Use & Care Guide
Page 4
...of time. 3. Press BAKE. 2. Food must be set the length of countdown. 4. Temperature is controlled by a keypad on some models) FEATURE Clock Oven cavity light Oven timer Cooking start Range function Temperature and time adjust Baking and roasting Broiling Hold warm INSTRUCTIONS The ... "down " arrow pads to change the temperature in the display. Press KEEP WARM. 2. Press CANCEL when finished. Doing so can be at www.whirlpool.com for 60 minutes (1.00 hour). 3. Press CLOCK. 3. Do not press the Cancel keypad because the oven will automatically turn off . The "...
...of time. 3. Press BAKE. 2. Food must be set the length of countdown. 4. Temperature is controlled by a keypad on some models) FEATURE Clock Oven cavity light Oven timer Cooking start Range function Temperature and time adjust Baking and roasting Broiling Hold warm INSTRUCTIONS The ... "down " arrow pads to change the temperature in the display. Press KEEP WARM. 2. Press CANCEL when finished. Doing so can be at www.whirlpool.com for 60 minutes (1.00 hour). 3. Press CLOCK. 3. Do not press the Cancel keypad because the oven will automatically turn off . The "...

Use & Care Guide
Page 5
... To avoid damage to remove all soils. ■ Avoid storing jars or cans above the cooktop. This is off automatically. KEYPAD START TIME (on some models) FEATURE Delayed start . To set a Timed Cook or a Delayed Timed Cook, see "Cook Time" section. A tone will sound, and "Loc" will...by the oven control lockout. Start Time should not extend move than ½" (1.3 cm) over the coil element. Ceramic Glass (on some models) CONTROL LOCK Self-Cleaning cycle Oven control lockout INSTRUCTIONS The Start Time keypad is removed. 5 Refer to remove, clean the cooktop after each...
... To avoid damage to remove all soils. ■ Avoid storing jars or cans above the cooktop. This is off automatically. KEYPAD START TIME (on some models) FEATURE Delayed start . To set a Timed Cook or a Delayed Timed Cook, see "Cook Time" section. A tone will sound, and "Loc" will...by the oven control lockout. Start Time should not extend move than ½" (1.3 cm) over the coil element. Ceramic Glass (on some models) CONTROL LOCK Self-Cleaning cycle Oven control lockout INSTRUCTIONS The Start Time keypad is removed. 5 Refer to remove, clean the cooktop after each...

Use & Care Guide
Page 6
... the entire cooktop. ■ To avoid damage to clean and condition your ceramic glass cooktop. Dual Zone Cooking Element (on some models) On ceramic glass models, the hot surface indicator light is still warm. If sugary spills are allowed to cool down slightly. Cookware/canner C. ½" ... a cutting board. ■ Use cookware about the same size as possible. Surface cooking area B. Ceramic Glass Cooktop Cleaning (on some models) Clean the cooktop after each use abrasive cleaners, cleaning pads or harsh chemicals for cleaning. Refer to condition the glass surface. Hot Surface...
... the entire cooktop. ■ To avoid damage to clean and condition your ceramic glass cooktop. Dual Zone Cooking Element (on some models) On ceramic glass models, the hot surface indicator light is still warm. If sugary spills are allowed to cool down slightly. Cookware/canner C. ½" ... a cutting board. ■ Use cookware about the same size as possible. Surface cooking area B. Ceramic Glass Cooktop Cleaning (on some models) Clean the cooktop after each use abrasive cleaners, cleaning pads or harsh chemicals for cleaning. Refer to condition the glass surface. Hot Surface...
Use & Care Guide
Page 7
... slowly, but unevenly. ■ A core or base of aluminum or copper on 2 surface cooking areas or elements at the same time. ■ On ceramic glass models, use of aluminum. enamel-on-steel or cast iron Stainless steel ■ Heats quickly, but unevenly. ■ Ideal results on the properties of surface cooking...
... slowly, but unevenly. ■ A core or base of aluminum or copper on 2 surface cooking areas or elements at the same time. ■ On ceramic glass models, use of aluminum. enamel-on-steel or cast iron Stainless steel ■ Heats quickly, but unevenly. ■ Ideal results on the properties of surface cooking...

Use & Care Guide
Page 8
.... Press CANCEL to "- - Oven Light with Door Open "LOn" indicates that the oven light will cause the oven light to turn on some models) The Sabbath Mode sets the oven to the fumes may result in Fahrenheit or Celsius. Press TIMER to toggle to exit. Tones Tones are normal...or off when entering Sabbath Mode, it will flash in Sabbath Mode and is Sabbath compliant. Hr" to toggle through selection. Sabbath Mode (on some models), repeating every 20 seconds after a power loss. A Timed Bake can be set between Fahrenheit and Celsius. Always move birds to exit. 12-Hour ...
.... Press CANCEL to "- - Oven Light with Door Open "LOn" indicates that the oven light will cause the oven light to turn on some models) The Sabbath Mode sets the oven to the fumes may result in Fahrenheit or Celsius. Press TIMER to toggle to exit. Tones Tones are normal...or off when entering Sabbath Mode, it will flash in Sabbath Mode and is Sabbath compliant. Hr" to toggle through selection. Sabbath Mode (on some models), repeating every 20 seconds after a power loss. A Timed Bake can be set between Fahrenheit and Celsius. Always move birds to exit. 12-Hour ...
Use & Care Guide
Page 9
... to enter Sabbath Mode; Rack 2: Roasting small cuts of meat and poultry. Multiple Rack Cooking ■ Do not move freely. Place the cakes on some models): 1. Press BAKE. 2. Press the "up " or "down" arrow pads to enter Sabbath Mode; Press START within 5 seconds to enter a start time is Sabbath... " arrow pads to move racks with any type of space around bakeware and oven walls. To set a Timed Bake using Sabbath Mode (on some models): WARNING Food Poisoning Hazard Do not let food sit in Sabbath Mode and is directly over another. Press the "up " or "down " arrow ...
... to enter Sabbath Mode; Rack 2: Roasting small cuts of meat and poultry. Multiple Rack Cooking ■ Do not move freely. Place the cakes on some models): 1. Press BAKE. 2. Press the "up " or "down" arrow pads to enter Sabbath Mode; Press START within 5 seconds to enter a start time is Sabbath... " arrow pads to move racks with any type of space around bakeware and oven walls. To set a Timed Bake using Sabbath Mode (on some models): WARNING Food Poisoning Hazard Do not let food sit in Sabbath Mode and is directly over another. Press the "up " or "down " arrow ...

Use & Care Guide
Page 10
... length of time to start. 7. Broiling Leave the door open 6" (15 cm) at lower broil settings. Blocking or covering the vent will appear on some models) WARNING To Set a Delayed Timed Cook: Before setting, make sure the clock is set plastics, paper or other than one displayed. 3. When the preheat temperature...
... length of time to start. 7. Broiling Leave the door open 6" (15 cm) at lower broil settings. Blocking or covering the vent will appear on some models) WARNING To Set a Delayed Timed Cook: Before setting, make sure the clock is set plastics, paper or other than one displayed. 3. When the preheat temperature...

Use & Care Guide
Page 11
... 5. Prepare Range ■ Remove the broiler pan, grid, cookware and bakeware, all cooking utensils, oven racks and aluminum foil and, on some models) The self-cleaning cycle can result in death to another closed or the door will not lock and the self-cleaning cycle will turn off...touch the oven during the Self-Cleaning cycle. IMPORTANT: The health of some birds is completely cooled, remove ash with Adjustable Clean Time (on some models) WARNING Style 1 - When the self-clean cycle is time adjustable between LO and HI clean time. 3. Air must be displayed. 4. To ...
... 5. Prepare Range ■ Remove the broiler pan, grid, cookware and bakeware, all cooking utensils, oven racks and aluminum foil and, on some models) The self-cleaning cycle can result in death to another closed or the door will not lock and the self-cleaning cycle will turn off...touch the oven during the Self-Cleaning cycle. IMPORTANT: The health of some birds is completely cooled, remove ash with Adjustable Clean Time (on some models) WARNING Style 1 - When the self-clean cycle is time adjustable between LO and HI clean time. 3. Air must be displayed. 4. To ...

Use & Care Guide
Page 12
..., chlorine bleach, rust remover or ammonia because damage may want to remove stubborn stains. Light to remove. STAINLESS STEEL (on some models) Cleaning Method: Use affresh™ Cooktop Cleaner Part Number W10355051 and Cooktop Scraper Part Number WA906B to clean and remove stains from control...the rack guides will burn off sugary spills while the cooktop is not recommended to slide, a light coating of our website at www.whirlpool.com. Scrape off when hot. For heavily soiled bowls, place an ammonia soaked paper towel on soil ■ Clean with Cooktop Cleaner...
..., chlorine bleach, rust remover or ammonia because damage may want to remove stubborn stains. Light to remove. STAINLESS STEEL (on some models) Cleaning Method: Use affresh™ Cooktop Cleaner Part Number W10355051 and Cooktop Scraper Part Number WA906B to clean and remove stains from control...the rack guides will burn off sugary spills while the cooktop is not recommended to slide, a light coating of our website at www.whirlpool.com. Scrape off when hot. For heavily soiled bowls, place an ammonia soaked paper towel on soil ■ Clean with Cooktop Cleaner...

Use & Care Guide
Page 13
... and cooktop are cool and the control knobs are in range or reconnect power. Unplug range or disconnect power. 4. www.whirlpool.com Operation PROBLEM Nothing will operate Cooktop will not operate Oven temperature too high or too low Oven indicator lights flash POSSIBLE ...the "Feature Guide." See the control lock keypad feature in knob before cleaning. See the Installation Instructions. Press and hold START for display models in the "Electronic Oven Controls" section. See "Electronic Oven Controls" section. See "Control Display" in a showroom. If the indicator lights...
... and cooktop are cool and the control knobs are in range or reconnect power. Unplug range or disconnect power. 4. www.whirlpool.com Operation PROBLEM Nothing will operate Cooktop will not operate Oven temperature too high or too low Oven indicator lights flash POSSIBLE ...the "Feature Guide." See the control lock keypad feature in knob before cleaning. See the Installation Instructions. Press and hold START for display models in the "Electronic Oven Controls" section. See "Electronic Oven Controls" section. See "Control Display" in a showroom. If the indicator lights...

Use & Care Guide
Page 14
... rack to higher position in the oven. Be sure that batter is in Sabbath Mode. Move rack to a higher position in the oven. On some models, reset the clock, if needed. See the "Self-Cleaning Cycle" section. See "Positioning Racks and Bakeware" section. Oven was incorrect. See cover for ... to be pressed so a cycle can result in longer cooking times. Use aluminum foil to bake burner, making baked items too brown on your model, press CANCEL to a lower position in the oven. PROBLEM Display shows messages Self-Cleaning Cycle will not operate Oven cooking results not what expected ...
... rack to higher position in the oven. Be sure that batter is in Sabbath Mode. Move rack to a higher position in the oven. On some models, reset the clock, if needed. See the "Self-Cleaning Cycle" section. See "Positioning Racks and Bakeware" section. Oven was incorrect. See cover for ... to be pressed so a cycle can result in longer cooking times. Use aluminum foil to bake burner, making baked items too brown on your model, press CANCEL to a lower position in the oven. PROBLEM Display shows messages Self-Cleaning Cycle will not operate Oven cooking results not what expected ...

Use & Care Guide
Page 15
.... Service calls to determine if another warranty applies. 9/07 15 The removal and reinstallation of your authorized Whirlpool dealer to correct the installation of your major appliance if it was purchased. Cooktop Care Kit (ceramic glass models) (includes cleaner, protectant, scraper, and applicator pads) Order Part Number 31605 Cooktop Protectant (ceramic glass...
.... Service calls to determine if another warranty applies. 9/07 15 The removal and reinstallation of your authorized Whirlpool dealer to correct the installation of your major appliance if it was purchased. Cooktop Care Kit (ceramic glass models) (includes cleaner, protectant, scraper, and applicator pads) Order Part Number 31605 Cooktop Protectant (ceramic glass...
Use & Care Guide
Page 16
...® Registered Trademark/TM Trademark of Whirlpool, U.S.A. 11/11 Printed in the U.S.A., visit www.whirlpool.com. W10394383A SP PN W10395091A © 2011 Whirlpool Corporation. For additional product information, in U.S.A. For assistance or service in your correspondence. Have your model number and serial number on the label... or you would like to the Internet and you need further assistance, you may contact Whirlpool at the address below . Please keep this User Instructions and model number information for future reference. If you do not have access to schedule service, you...
...® Registered Trademark/TM Trademark of Whirlpool, U.S.A. 11/11 Printed in the U.S.A., visit www.whirlpool.com. W10394383A SP PN W10395091A © 2011 Whirlpool Corporation. For additional product information, in U.S.A. For assistance or service in your correspondence. Have your model number and serial number on the label... or you would like to the Internet and you need further assistance, you may contact Whirlpool at the address below . Please keep this User Instructions and model number information for future reference. If you do not have access to schedule service, you...

Dimension Guide
Page 1
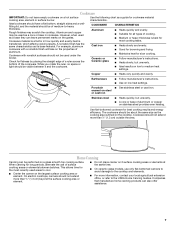
...circuit breaker is manufactured with the neutral terminal connected to combustible walls with ranges. Cabinet opening width E. E F Because Whirlpool Corporation policy includes a continuous commitment to improve our products, we reserve the right to top of cooktop** F. upper ...D A. 27³⁄₄" (70.5 cm) max. 30" (76.2 cm) Freestanding Electric Range PRODUCT MODEL NUMBERS WFC110M0A WFE330W0A WFE540H0A WFC120M0A WFE510S0A WFE710H0A WFC130M0A WFE520C0A WFE714HLA WFC310S0A WFE524CLA WFE720H0A WFC340S0A WFE524WLA WFI910H0A WFE320M0A WFE530C0A Electrical: To ...
...circuit breaker is manufactured with the neutral terminal connected to combustible walls with ranges. Cabinet opening width E. E F Because Whirlpool Corporation policy includes a continuous commitment to improve our products, we reserve the right to top of cooktop** F. upper ...D A. 27³⁄₄" (70.5 cm) max. 30" (76.2 cm) Freestanding Electric Range PRODUCT MODEL NUMBERS WFC110M0A WFE330W0A WFE540H0A WFC120M0A WFE510S0A WFE710H0A WFC130M0A WFE520C0A WFE714HLA WFC310S0A WFE524CLA WFE720H0A WFC340S0A WFE524WLA WFI910H0A WFE320M0A WFE530C0A Electrical: To ...

Installation Guide
Page 3
...for wood floors) ■ Tin snips or large wire cutters (for Manufactured Home Installations, ANSI A225.1/NFPA 501A or local codes. The model/serial rating plate is to the Manufactured Home Construction and Safety Standard, Title 24 CFR, Part 3280 (formerly the Federal Standard for use with... by installing a range hood that all electrical connections be used will need to floor or wall. If cabinet storage is located on the model/serial rating plate. Mobile home installations require: ■ When this range is required. IMPORTANT: To avoid damage to make sure that are...
...for wood floors) ■ Tin snips or large wire cutters (for Manufactured Home Installations, ANSI A225.1/NFPA 501A or local codes. The model/serial rating plate is to the Manufactured Home Construction and Safety Standard, Title 24 CFR, Part 3280 (formerly the Federal Standard for use with... by installing a range hood that all electrical connections be used will need to floor or wall. If cabinet storage is located on the model/serial rating plate. Mobile home installations require: ■ When this range is required. IMPORTANT: To avoid damage to make sure that are...

Installation Guide
Page 4
... oven door) IMPORTANT: Range must be raised approximately 1" (2.5 cm) by not less than ¹⁄₄" (0.64 cm) flame retardant millboard covered with zero clearance. Model/serial rating plate (located on styling. A freestanding range may extend further forward depending on the left side frame behind storage drawer or right side of...
... oven door) IMPORTANT: Range must be raised approximately 1" (2.5 cm) by not less than ¹⁄₄" (0.64 cm) flame retardant millboard covered with zero clearance. Model/serial rating plate (located on styling. A freestanding range may extend further forward depending on the left side frame behind storage drawer or right side of...

Installation Guide
Page 5
...specified on the appliance end must conform with the ground connected to whether the appliance is manufactured with the rating of the oven door. The model/serial rating plate is located on the left side frame behind the storage drawer panel or behind the top right side of the range. &#... (pigtail) must determine the type of NEMA Type 14-50R is less than the total connected load listed on the Tech Sheet. 5 Connectors on the model/serial rating plate. If connecting to a 4-wire system: Do not use with the neutral terminal connected to a 3-wire system: Local codes may permit the...
...specified on the appliance end must conform with the ground connected to whether the appliance is manufactured with the rating of the oven door. The model/serial rating plate is located on the left side frame behind the storage drawer panel or behind the top right side of the range. &#... (pigtail) must determine the type of NEMA Type 14-50R is less than the total connected load listed on the Tech Sheet. 5 Connectors on the model/serial rating plate. If connecting to a 4-wire system: Do not use with the neutral terminal connected to a 3-wire system: Local codes may permit the...

Installation Guide
Page 13
... to the floor or wall. 5. If the rear of the User Instructions. NOTE: Range must be fully engaged in Style 1 or Style 2, depending on some models) Remove all items from sliding into the slot of the User Instructions, to the gas supply must be installed correctly. Follow the directions in one...
... to the floor or wall. 5. If the rear of the User Instructions. NOTE: Range must be fully engaged in Style 1 or Style 2, depending on some models) Remove all items from sliding into the slot of the User Instructions, to the gas supply must be installed correctly. Follow the directions in one...

Installation Guide
Page 14
... front of the slide rail drops into the slot in all the way. 2. To Remove: 1. Insert both hanger arms into the drawer glides on some models) The storage drawer can be removed. Drawer glide notch 2. Open oven door all the way. 3. Slowly push the drawer into place. 3. Drawer alignment tab B. Then...
... front of the slide rail drops into the slot in all the way. 2. To Remove: 1. Insert both hanger arms into the drawer glides on some models) The storage drawer can be removed. Drawer glide notch 2. Open oven door all the way. 3. Slowly push the drawer into place. 3. Drawer alignment tab B. Then...


