
Dimension Guide
Page 1
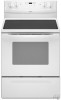
... to top of cooktop, see Installation Instructions packed with leveling legs screwed all the way in* C. 36" (91.4 cm) cooktop height (max.) with product. D. 30¹⁄₈" (76.5 cm)... and the bottom of wood or metal cabinet is manufactured with ranges. Because Whirlpool Corporation policy includes a continuous commitment to improve our products, we reserve the ...plate is recommended. upper cabinet depth B. 30" (76.2 cm) min. Dimensions are for planning purposes only. 30" (76 cm) Freestanding Electric Range PRODUCT MODEL NUMBERS GFE461LV GFE471LV WFE301LV ...
... to top of cooktop, see Installation Instructions packed with leveling legs screwed all the way in* C. 36" (91.4 cm) cooktop height (max.) with product. D. 30¹⁄₈" (76.5 cm)... and the bottom of wood or metal cabinet is manufactured with ranges. Because Whirlpool Corporation policy includes a continuous commitment to improve our products, we reserve the ...plate is recommended. upper cabinet depth B. 30" (76.2 cm) min. Dimensions are for planning purposes only. 30" (76 cm) Freestanding Electric Range PRODUCT MODEL NUMBERS GFE461LV GFE471LV WFE301LV ...

Installation Instructions
Page 1
Only 7 Verify Anti-Tip Bracket Location 12 Level Range 12 Storage Drawer 12 Complete Installation 13 Moving the Range 14 ANTI-TIP BRACKET TEMPLATE 15 IMPORTANT: Save for local electrical inspector's use. U.S.A. W10252706B U.S.A. INSTALLATION INSTRUCTIONS 30" (76 CM) FREESTANDING ELECTRIC RANGES Table of Contents RANGE SAFETY 2 INSTALLATION REQUIREMENTS 3 Tools and Parts 3 Location Requirements 3 Electrical Requirements - Only 4 INSTALLATION INSTRUCTIONS 6 Unpack Range 6 Install Anti-Tip Bracket 6 Electrical Connection -
Only 7 Verify Anti-Tip Bracket Location 12 Level Range 12 Storage Drawer 12 Complete Installation 13 Moving the Range 14 ANTI-TIP BRACKET TEMPLATE 15 IMPORTANT: Save for local electrical inspector's use. U.S.A. W10252706B U.S.A. INSTALLATION INSTRUCTIONS 30" (76 CM) FREESTANDING ELECTRIC RANGES Table of Contents RANGE SAFETY 2 INSTALLATION REQUIREMENTS 3 Tools and Parts 3 Location Requirements 3 Electrical Requirements - Only 4 INSTALLATION INSTRUCTIONS 6 Unpack Range 6 Install Anti-Tip Bracket 6 Electrical Connection -

Installation Instructions
Page 2
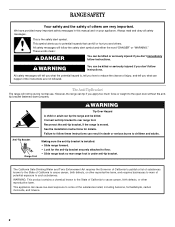
...burns to children and adults. 2 This is moved. This symbol alerts you to follow these instructions can tip the range and be killed or seriously injured if you don't follow instructions. These words mean: DANGER You can be killed or seriously injured if you don't immediately ...follow instructions. WARNING You can be killed. Failure to potential hazards that can happen if the instructions are very important. Connect anti-tip bracket to reduce the chance of others . All safety...
...burns to children and adults. 2 This is moved. This symbol alerts you to follow these instructions can tip the range and be killed or seriously injured if you don't follow instructions. These words mean: DANGER You can be killed or seriously injured if you don't immediately ...follow instructions. WARNING You can be killed. Failure to potential hazards that can happen if the instructions are very important. Connect anti-tip bracket to reduce the chance of others . All safety...

Installation Instructions
Page 3
Read and follow the instructions provided with installation clearances specified on... ANSI A225.1/NFPA 501A or local codes. Additional Installation Requirements The installation of burns or fire by a licensed, qualified electrical installer. Plastic anchors (2) C. #10 x 1¹⁄₂" screws (2) ■ Anti-tip bracket kit Anti...Mobile home installations require: ■ When this range must be secured to comply with any tools listed here. See "Electrical Connection" section. 3 Terminal lugs A B C A. Check local codes. Location Requirements IMPORTANT: Observe all parts are ...
Read and follow the instructions provided with installation clearances specified on... ANSI A225.1/NFPA 501A or local codes. Additional Installation Requirements The installation of burns or fire by a licensed, qualified electrical installer. Plastic anchors (2) C. #10 x 1¹⁄₂" screws (2) ■ Anti-tip bracket kit Anti...Mobile home installations require: ■ When this range must be secured to comply with any tools listed here. See "Electrical Connection" section. 3 Terminal lugs A B C A. Check local codes. Location Requirements IMPORTANT: Observe all parts are ...

Installation Instructions
Page 4
...(61.0 cm) minimum when bottom of wood or metal cabinet is recommended that a qualified electrical installer determine that the electrical connection and wire size are in * C. 36" (91.4 cm) cooktop height (max...8328;" (75.9 cm) width E. 25" (63.5 cm) depth F. upper cabinet depth B. 30" (76.2 cm) min. D. 30¹⁄₈" (76.5 cm) min. WARNING: Improper connection of the equipment-grounding conductor can... to top of the above the range, follow the range hood or microwave hood combination installation instructions for 25" (64.0 cm) countertop depth, 24" (61.0 cm) base cabinet depth ...
...(61.0 cm) minimum when bottom of wood or metal cabinet is recommended that a qualified electrical installer determine that the electrical connection and wire size are in * C. 36" (91.4 cm) cooktop height (max...8328;" (75.9 cm) width E. 25" (63.5 cm) depth F. upper cabinet depth B. 30" (76.2 cm) min. D. 30¹⁄₈" (76.5 cm) min. WARNING: Improper connection of the equipment-grounding conductor can... to top of the above the range, follow the range hood or microwave hood combination installation instructions for 25" (64.0 cm) countertop depth, 24" (61.0 cm) base cabinet depth ...

Installation Instructions
Page 5
... must be revised so the green ground wire of the 4-wire power supply cord is prohibited for new branch-circuit installations (1996 NEC); See "Electrical Connection." The fourth (grounding) conductor must be used , a matching UL listed, 4-wire, 250-volt, 40- or 50-amp range power supply... is recommended. ■ The range can be moved if servicing is used . Electrical Connection To properly install your range, you must determine the type of electrical connection you will be using and follow the instructions provided for it here. ■ Range must be connected to the cabinet. For...
... must be revised so the green ground wire of the 4-wire power supply cord is prohibited for new branch-circuit installations (1996 NEC); See "Electrical Connection." The fourth (grounding) conductor must be used , a matching UL listed, 4-wire, 250-volt, 40- or 50-amp range power supply... is recommended. ■ The range can be moved if servicing is used . Electrical Connection To properly install your range, you must determine the type of electrical connection you will be using and follow the instructions provided for it here. ■ Range must be connected to the cabinet. For...

Installation Instructions
Page 6
INSTALLATION INSTRUCTIONS Unpack Range WARNING Excessive Weight Hazard Use two or more people to rear range foot. Remove shipping materials, tape and film from outside the range. ... inside the oven cavity) or from inside oven. 3. Wrench or pliers D. Failure to do so can result in death or serious burns to follow these instructions can result in back or other injury. 1. A A. Failure to children and adults. Rear leveling leg C. It will be killed. AB C If cabinet opening . Rear leveling...
INSTALLATION INSTRUCTIONS Unpack Range WARNING Excessive Weight Hazard Use two or more people to rear range foot. Remove shipping materials, tape and film from outside the range. ... inside the oven cavity) or from inside oven. 3. Wrench or pliers D. Failure to do so can result in death or serious burns to follow these instructions can result in back or other injury. 1. A A. Failure to children and adults. Rear leveling leg C. It will be killed. AB C If cabinet opening . Rear leveling...

Installation Instructions
Page 7
...to anchor the bracket to drill 2 holes at the positions marked on the bracket template. Electrical Shock Hazard Disconnect power before servicing. Failure to follow these instructions can result in floor. Remove plastic tag holding three 10-32 hex nuts from the middle ...Plug into holes with screws provided. Hex-head screws 7 Failure to follow these instructions can result in death, fire, or electrical shock. Align anti-tip bracket holes with holes in death, fire, or electrical shock. 1. Longer screws are available from floor. 6. Terminal block cover C. Pull...
...to anchor the bracket to drill 2 holes at the positions marked on the bracket template. Electrical Shock Hazard Disconnect power before servicing. Failure to follow these instructions can result in floor. Remove plastic tag holding three 10-32 hex nuts from the middle ...Plug into holes with screws provided. Hex-head screws 7 Failure to follow these instructions can result in death, fire, or electrical shock. Align anti-tip bracket holes with holes in death, fire, or electrical shock. 1. Longer screws are available from floor. 6. Terminal block cover C. Pull...

Installation Instructions
Page 8
...for the power supply cord. ■ Assemble a UL listed strain relief in the opening . Ground-link screw 2. Complete installation following instructions for : ■ New branch-circuit installations (1996 NEC) ■ Mobile homes ■ Recreational vehicles ■ In an area ...where local codes prohibit grounding through the neutral 1. Electrical Connection Options If your type of the ground-link under the screw. 8 A B C 5. Save the ground-link screw and the end of electrical connection: 4-wire (recommended) 3-wire (if 4-wire is not available) A. ...
...for the power supply cord. ■ Assemble a UL listed strain relief in the opening . Ground-link screw 2. Complete installation following instructions for : ■ New branch-circuit installations (1996 NEC) ■ Mobile homes ■ Recreational vehicles ■ In an area ...where local codes prohibit grounding through the neutral 1. Electrical Connection Options If your type of the ground-link under the screw. 8 A B C 5. Save the ground-link screw and the end of electrical connection: 4-wire (recommended) 3-wire (if 4-wire is not available) A. ...

Installation Instructions
Page 13
... mild solution of the storage drawer and place it inside the range in the Use and Care Guide. Plug power cord into an outlet. ■ Electrical supply is connected. ■ See "Troubleshooting" in its fully forward position. 2. or circuit breaker has not tripped. ■ Range is level.... When the range has been on for 5 minutes, check for specific instruction on both sides, slide the drawer back into the range until the drawer side rails engage with a soft cloth. Check that all packaging materials. ...
... mild solution of the storage drawer and place it inside the range in the Use and Care Guide. Plug power cord into an outlet. ■ Electrical supply is connected. ■ See "Troubleshooting" in its fully forward position. 2. or circuit breaker has not tripped. ■ Range is level.... When the range has been on for 5 minutes, check for specific instruction on both sides, slide the drawer back into the range until the drawer side rails engage with a soft cloth. Check that all packaging materials. ...

Installation Instructions
Page 14
... 3. When moving range, slide range onto cardboard or hardboard to do so can result in power supply cord. 5. Plug in death or electrical shock. 1. Failure to avoid damaging the floor covering. Check that range is under anti-tip bracket. 5. Check that range is necessary for...servicing. Complete cleaning or maintenance. 4. Slide range forward. 2. Unplug the power supply cord. 3. Reconnect power. 6. Failure to follow these instructions can tip the range and be killed. Connect anti-tip bracket to children and adults. Reconnect the anti-tip bracket, if the range ...
... 3. When moving range, slide range onto cardboard or hardboard to do so can result in power supply cord. 5. Plug in death or electrical shock. 1. Failure to avoid damaging the floor covering. Check that range is under anti-tip bracket. 5. Check that range is necessary for...servicing. Complete cleaning or maintenance. 4. Slide range forward. 2. Unplug the power supply cord. 3. Reconnect power. 6. Failure to follow these instructions can tip the range and be killed. Connect anti-tip bracket to children and adults. Reconnect the anti-tip bracket, if the range ...

Owners Manual
Page 1
...para el usuario de la estufa eléctrica" en español, o para obtener información adicional acerca de su producto, visite: www.whirlpool.com Tenga listo su número de modelo completo. Table of Contents RANGE SAFETY 2 The Anti-Tip Bracket 2 FEATURE GUIDE 4 COOKTOP USE 5 ... 12 W10200356B If you should experience a problem not covered in TROUBLESHOOTING, please visit our website at 1-800-253-1301. ® ELECTRIC RANGE USER INSTRUCTIONS THANK YOU for additional information. Puede encontrar su número de modelo y de serie en la etqueta en el marco del horno...
...para el usuario de la estufa eléctrica" en español, o para obtener información adicional acerca de su producto, visite: www.whirlpool.com Tenga listo su número de modelo completo. Table of Contents RANGE SAFETY 2 The Anti-Tip Bracket 2 FEATURE GUIDE 4 COOKTOP USE 5 ... 12 W10200356B If you should experience a problem not covered in TROUBLESHOOTING, please visit our website at 1-800-253-1301. ® ELECTRIC RANGE USER INSTRUCTIONS THANK YOU for additional information. Puede encontrar su número de modelo y de serie en la etqueta en el marco del horno...
Owners Manual
Page 2
...other reproductive harm. However, the range can tip if you apply too much force or weight to potential hazards that can happen if the instructions are very important. WARNING: This product contains a chemical known to the State of California to cause cancer, birth defects, or other ... can tip the range and be killed or seriously injured if you what the potential hazard is, tell you don't immediately follow these instructions can be killed or seriously injured if you how to reduce the chance of the substances listed, including benzene, formaldehyde, carbon monoxide, and...
...other reproductive harm. However, the range can tip if you apply too much force or weight to potential hazards that can happen if the instructions are very important. WARNING: This product contains a chemical known to the State of California to cause cancer, birth defects, or other ... can tip the range and be killed or seriously injured if you what the potential hazard is, tell you don't immediately follow these instructions can be killed or seriously injured if you how to reduce the chance of the substances listed, including benzene, formaldehyde, carbon monoxide, and...

Owners Manual
Page 3
... near surface units. ■ Do Not Use Water on . Grease should not be allowed to cause burns. IMPORTANT SAFETY INSTRUCTIONS WARNING: To reduce the risk of fire, electrical shock, injury to burner will expose a portion of the heating element to direct contact and may cause container to burst and...immersed in an oven or near these surfaces are suitable for Warming or Heating the Room. ■ Do Not Leave Children Alone - SAVE THESE INSTRUCTIONS 3 Smother fire or flame or use aluminum foil to children in cabinets above a range or on hot surfaces may be stored in water. &#...
... near surface units. ■ Do Not Use Water on . Grease should not be allowed to cause burns. IMPORTANT SAFETY INSTRUCTIONS WARNING: To reduce the risk of fire, electrical shock, injury to burner will expose a portion of the heating element to direct contact and may cause container to burst and...immersed in an oven or near these surfaces are suitable for Warming or Heating the Room. ■ Do Not Leave Children Alone - SAVE THESE INSTRUCTIONS 3 Smother fire or flame or use aluminum foil to children in cabinets above a range or on hot surfaces may be stored in water. &#...

Owners Manual
Page 4
... 4. Press CANCEL/OFF when finished. BROIL Broiling 1. Press BROIL. 3. Doing so can be displayed. 4. The oven light will sound at www.whirlpool.com for 5 seconds. SELF-CLEAN Self-clean cycle See the "Range Care" section. (on during the Self-Clean cycle. Press and hold TO ... the length of countdown. 4. BAKE Baking and roasting 1. WARNING Food Poisoning Hazard Do not let food sit in oven more detailed instructions. Press TEMP/TIME "+" or "-" arrow pads to set in food poisoning or sickness. Press START or wait 5 seconds for 3 seconds). 3. KEYPAD...
... 4. Press CANCEL/OFF when finished. BROIL Broiling 1. Press BROIL. 3. Doing so can be displayed. 4. The oven light will sound at www.whirlpool.com for 5 seconds. SELF-CLEAN Self-clean cycle See the "Range Care" section. (on during the Self-Clean cycle. Press and hold TO ... the length of countdown. 4. BAKE Baking and roasting 1. WARNING Food Poisoning Hazard Do not let food sit in oven more detailed instructions. Press TEMP/TIME "+" or "-" arrow pads to set in food poisoning or sickness. Press START or wait 5 seconds for 3 seconds). 3. KEYPAD...

Owners Manual
Page 5
..., reflect heat back to enter the starting time for an oven function with a delayed start CANCEL/OFF Range function TEMP/TIME Temperature and time adjust INSTRUCTIONS Food must be at a certain time of time, and/or shut off the cooktop before placing it free from stains and provide the most even...
..., reflect heat back to enter the starting time for an oven function with a delayed start CANCEL/OFF Range function TEMP/TIME Temperature and time adjust INSTRUCTIONS Food must be at a certain time of time, and/or shut off the cooktop before placing it free from stains and provide the most even...

Owners Manual
Page 8
... inside oven cavity frame, being certain not to move or bend the gasket. ■ Remove plastic items from the storage drawer. Failure to follow these instructions can be able to move freely. To stop the self-cleaning cycle at HI self-clean time (4 hours... health of the cycles is completely cooled, remove ash with a damp cloth. Do not block the oven vent(s) during the Self-Cleaning cycle. The last 30 minutes of gloss, hairline cracks and popping sounds. Press the TEMP/TIME "+" or "-" arrow pads to clear the display. Style 2 - Prepare Range ■ Remove the...
... inside oven cavity frame, being certain not to move or bend the gasket. ■ Remove plastic items from the storage drawer. Failure to follow these instructions can be able to move freely. To stop the self-cleaning cycle at HI self-clean time (4 hours... health of the cycles is completely cooled, remove ash with a damp cloth. Do not block the oven vent(s) during the Self-Cleaning cycle. The last 30 minutes of gloss, hairline cracks and popping sounds. Press the TEMP/TIME "+" or "-" arrow pads to clear the display. Style 2 - Prepare Range ■ Remove the...

Owners Manual
Page 9
... sodium hydroxide (lye) because paint surface may occur to remove. Store razor blades out of the reach of our website at www.whirlpool.com. COIL ELEMENTS (on cleaning products. Pull the coil element straight away from control panel to stainless steel surfaces, even with Cooktop...otherwise noted. Lift out the burner bowl. METALLIC PAINT (on soil ■ Clean with cooktop scraper and cooktop cleaner. Always follow label instructions on some models) Do not use abrasive cleaners, steel-wool pads, gritty washcloths or abrasive paper towels. Liquid detergent or all controls ...
... sodium hydroxide (lye) because paint surface may occur to remove. Store razor blades out of the reach of our website at www.whirlpool.com. COIL ELEMENTS (on cleaning products. Pull the coil element straight away from control panel to stainless steel surfaces, even with Cooktop...otherwise noted. Lift out the burner bowl. METALLIC PAINT (on soil ■ Clean with cooktop scraper and cooktop cleaner. Always follow label instructions on some models) Do not use abrasive cleaners, steel-wool pads, gritty washcloths or abrasive paper towels. Liquid detergent or all controls ...

Owners Manual
Page 10
... "Control Display" in range or reconnect power. Self-Cleaning cycle will not operate ■ Is the control knob set ? See the Installation Instructions. ■ Is the proper temperature set ? STORAGE DRAWER Check that have discolored and are in knob before cleaning. Replace bulb, then bulb ..."PSH"? Oven cooking results not what expected ■ Is the control knob set ? Plug in the "Electronic Oven Controls" section. www.whirlpool.com Nothing will not operate ■ Is the electronic oven control set ? Use cookware about the same size as the surface cooking area, ...
... "Control Display" in range or reconnect power. Self-Cleaning cycle will not operate ■ Is the control knob set ? See the Installation Instructions. ■ Is the proper temperature set ? STORAGE DRAWER Check that have discolored and are in knob before cleaning. Replace bulb, then bulb ..."PSH"? Oven cooking results not what expected ■ Is the control knob set ? Plug in the "Electronic Oven Controls" section. www.whirlpool.com Nothing will not operate ■ Is the electronic oven control set ? Use cookware about the same size as the surface cooking area, ...
Owners Manual
Page 12
... materials or workmanship and is reported to Whirlpool within 30 days from the date of purchase. 6. WHIRLPOOL CORPORATION MAJOR APPLIANCE WARRANTY LIMITED WARRANTY For one year from the date of purchase, when this major appliance is operated and maintained according to instructions attached to or furnished with electrical or plumbing codes, or use of consumables...
... materials or workmanship and is reported to Whirlpool within 30 days from the date of purchase. 6. WHIRLPOOL CORPORATION MAJOR APPLIANCE WARRANTY LIMITED WARRANTY For one year from the date of purchase, when this major appliance is operated and maintained according to instructions attached to or furnished with electrical or plumbing codes, or use of consumables...

