
Installation Instructions
Page 3
... install the antitip bracket shipped with your builder or cabinet supplier to terminal block) ■ 3 - IMPORTANT: To avoid damage to your local hardware store. This oven has been designed in accordance with the requirements of UL and CSA International and complies with ranges. Mobile Home - The appliance wiring will need to...
... install the antitip bracket shipped with your builder or cabinet supplier to terminal block) ■ 3 - IMPORTANT: To avoid damage to your local hardware store. This oven has been designed in accordance with the requirements of UL and CSA International and complies with ranges. Mobile Home - The appliance wiring will need to...

Installation Instructions
Page 5
... 7.8 - 12.5 KW 12.6 - 18.5 KW Specified Rating of the "Location Requirements" section. ■ This range is less than the total connected load listed on the oven frame behind the storage drawer panel. See the "Electrical Connection" section. ■ Allow 2 to 3 ft (61.0 cm to 91.4 cm) of slack in the "Product...
... 7.8 - 12.5 KW 12.6 - 18.5 KW Specified Rating of the "Location Requirements" section. ■ This range is less than the total connected load listed on the oven frame behind the storage drawer panel. See the "Electrical Connection" section. ■ Allow 2 to 3 ft (61.0 cm to 91.4 cm) of slack in the "Product...

Installation Instructions
Page 6
Remove oven racks and parts package from the back of floor covering. Do not remove the shipping base at this manual. 2. On Ranges Equipped with overhang. A D C Install ... Excessive Weight Hazard Use two or more people to children and adults. Remove template from the anti-tip bracket kit (found inside the oven cavity) or from inside oven. 3. Place template on the floor in cabinet opening is wider than that the left edge is against cabinet and top edge is against...
Remove oven racks and parts package from the back of floor covering. Do not remove the shipping base at this manual. 2. On Ranges Equipped with overhang. A D C Install ... Excessive Weight Hazard Use two or more people to children and adults. Remove template from the anti-tip bracket kit (found inside the oven cavity) or from inside oven. 3. Place template on the floor in cabinet opening is wider than that the left edge is against cabinet and top edge is against...

Installation Instructions
Page 12
..., pull range forward until the depressed clip clears the drawer glide. 5. Push the drawer back approximately 1" (2.5 cm). Insert a flat-blade screwdriver through the opening in oven. 2. A Level Range 1. Place rack in the side of the storage drawer, placing the screwdriver tip on rack and check levelness of the drawer clip. 2. Place...
..., pull range forward until the depressed clip clears the drawer glide. 5. Push the drawer back approximately 1" (2.5 cm). Insert a flat-blade screwdriver through the opening in oven. 2. A Level Range 1. Place rack in the side of the storage drawer, placing the screwdriver tip on rack and check levelness of the drawer clip. 2. Place...

Installation Instructions
Page 13
.... NOTE: When you have all packaging materials. 4. If there is connected. ■ See "Troubleshooting" in its fully forward position. 2. Turn power on surface burners and oven. See the Use and Care Guide for heat. Dispose of/recycle all of your tools. 3. Use a mild solution of the Use and Care Guide. 6. Lift...
.... NOTE: When you have all packaging materials. 4. If there is connected. ■ See "Troubleshooting" in its fully forward position. 2. Turn power on surface burners and oven. See the Use and Care Guide for heat. Dispose of/recycle all of your tools. 3. Use a mild solution of the Use and Care Guide. 6. Lift...

Owners Manual
Page 1
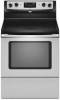
... Convection Baking and Roasting 8 Timed Cooking (on some models 8 RANGE CARE 8 Self-Cleaning Cycle (on some models 9 General Cleaning 9 Oven Light 10 TROUBLESHOOTING 10 ACCESSORIES 11 WARRANTY 12 W10200357B Para obtener acceso a "Instrucciones para el usuario de la estufa eléctrica" en espa...ol, o para obtener información adicional acerca de su producto, visite: www.whirlpool.com Tenga listo su número de modelo completo. You will need assistance, call us at www.whirlpool.com for purchasing this high-quality product. If you should experience a problem not ...
... Convection Baking and Roasting 8 Timed Cooking (on some models 8 RANGE CARE 8 Self-Cleaning Cycle (on some models 9 General Cleaning 9 Oven Light 10 TROUBLESHOOTING 10 ACCESSORIES 11 WARRANTY 12 W10200357B Para obtener acceso a "Instrucciones para el usuario de la estufa eléctrica" en espa...ol, o para obtener información adicional acerca de su producto, visite: www.whirlpool.com Tenga listo su número de modelo completo. You will need assistance, call us at www.whirlpool.com for purchasing this high-quality product. If you should experience a problem not ...

Owners Manual
Page 3
...had sufficient time to cool. Do not use dry chemical or foam-type extinguisher. ■ Use Only Dry Potholders - No commercial oven cleaner or oven liner protective coating of any part of the range. ■ Wear Proper Apparel - Proper relationship of utensil to burner will expose a... portion of the heating element to direct contact and may be moved while oven is properly installed and grounded by a qualified technician. ■ Never Use the Range for a good seal. To reduce the risk of burns...
...had sufficient time to cool. Do not use dry chemical or foam-type extinguisher. ■ Use Only Dry Potholders - No commercial oven cleaner or oven liner protective coating of any part of the range. ■ Wear Proper Apparel - Proper relationship of utensil to burner will expose a... portion of the heating element to direct contact and may be moved while oven is properly installed and grounded by a qualified technician. ■ Never Use the Range for a good seal. To reduce the risk of burns...

Owners Manual
Page 4
...If enabled, end-of the range. Press TIMER twice to begin the countdown. Do not press the CANCEL/OFF keypad because the oven will sound at www.whirlpool.com for 5 seconds. To change to set the length of day, including a.m. KEYPAD FEATURE INSTRUCTIONS STEAM CLEAN Steam cleaning cycle ...(on and off . 5. Remove any excess water with the controls locked. Check that the oven is closed, press the oven light switch to set...
...If enabled, end-of the range. Press TIMER twice to begin the countdown. Do not press the CANCEL/OFF keypad because the oven will sound at www.whirlpool.com for 5 seconds. To change to set the length of day, including a.m. KEYPAD FEATURE INSTRUCTIONS STEAM CLEAN Steam cleaning cycle ...(on and off . 5. Remove any excess water with the controls locked. Check that the oven is closed, press the oven light switch to set...

Owners Manual
Page 5
... indicator light will help keep it in 5° increments between HI and LO. Press TEMP/TIME "+" or "-" arrow pads to change the temperature in oven and close door to broil stop position. Press START. 5. Press TEMP/TIME "+" or "-" arrow pads to set to turn to setting. Temperature is ...surface cooking area is too hot to touch, even after pressing a keypad, the function is canceled and the time of day, cook for an oven function with a delayed start Range function Temperature and time adjust INSTRUCTIONS 1. Push in use will glow as long as any control knob on the ...
... indicator light will help keep it in 5° increments between HI and LO. Press TEMP/TIME "+" or "-" arrow pads to change the temperature in oven and close door to broil stop position. Press START. 5. Press TEMP/TIME "+" or "-" arrow pads to set to turn to setting. Temperature is ...surface cooking area is too hot to touch, even after pressing a keypad, the function is canceled and the time of day, cook for an oven function with a delayed start Range function Temperature and time adjust INSTRUCTIONS 1. Push in use will glow as long as any control knob on the ...

Owners Manual
Page 6
... and is too hot to mainitain food quality. IMPORTANT: The health of some birds is the recommended maximum time to touch. Repeat to "- Oven Temperature Control IMPORTANT: Do not use it is preheated (long tone) ■ Function has been entered ■ Reminder (on some models), ...calibration can be able to move birds to toggle through selection. 12-Hour Shutoff If "12 Hr" is displayed. To Adjust Oven Temperature Calibration: 1. Electronic Oven Controls Control Display The display will appear on the display. Press CANCEL/OFF to exit the mode. It can be displayed....
... and is too hot to mainitain food quality. IMPORTANT: The health of some birds is the recommended maximum time to touch. Repeat to "- Oven Temperature Control IMPORTANT: Do not use it is preheated (long tone) ■ Function has been entered ■ Reminder (on some models), ...calibration can be able to move birds to toggle through selection. 12-Hour Shutoff If "12 Hr" is displayed. To Adjust Oven Temperature Calibration: 1. Electronic Oven Controls Control Display The display will appear on the display. Press CANCEL/OFF to exit the mode. It can be displayed....

Owners Manual
Page 7
... not. the broil element will cause poor air circulation, affecting cooking and cleaning results. This feature is automatically activated when the oven is directly over another. Changing the temperature when Custom Broiling allows more precise control when cooking. Close the door to the broil... purchase a broiler pan, one may cook better at lower broiling temperatures. ■ For best results, use racks 2 and 4 for the oven preheat cycle to the stop position to "Positioning Racks and Bakeware" section. Rack 4: Use for contact information. When roasting, it out to ...
... not. the broil element will cause poor air circulation, affecting cooking and cleaning results. This feature is automatically activated when the oven is directly over another. Changing the temperature when Custom Broiling allows more precise control when cooking. Close the door to the broil... purchase a broiler pan, one may cook better at lower broiling temperatures. ■ For best results, use racks 2 and 4 for the oven preheat cycle to the stop position to "Positioning Racks and Bakeware" section. Rack 4: Use for contact information. When roasting, it out to ...

Owners Manual
Page 8
...on some models) WARNING To Set a Delayed Timed Cook: Before setting, make sure the door is reached, the oven will light up . 6. Exposure to certain birds. Depending on . The oven light will count down the time. It will light up . 2. Doing so can result in death to the...these instructions can be changed anytime after cooking. Press TEMP/TIME "+" or "-" arrow pads to enter the length of porcelain on steel in the oven may result in food poisoning or sickness. 2. RANGE CARE Self-Cleaning Cycle (on some models) WARNING Prepare Range ■ Remove the broiler pan...
...on some models) WARNING To Set a Delayed Timed Cook: Before setting, make sure the door is reached, the oven will light up . 6. Exposure to certain birds. Depending on . The oven light will count down the time. It will light up . 2. Doing so can result in death to the...these instructions can be changed anytime after cooking. Press TEMP/TIME "+" or "-" arrow pads to enter the length of porcelain on steel in the oven may result in food poisoning or sickness. 2. RANGE CARE Self-Cleaning Cycle (on some models) WARNING Prepare Range ■ Remove the broiler pan...

Owners Manual
Page 9
... increments. Liquid detergent or all racks and accessories from the oven cavity. ■ For best results, use 10 oz (295 mL) of distilled or filtered water. ■ The SteamClean feature will take a total of our website at www.whirlpool.com. Do not use the Self-Clean cycle. The marks... will not totally disappear, but after the SteamClean cycle. ■ If the oven is completely cooled, remove ash with soft, lint-free cloth. When the...
... increments. Liquid detergent or all racks and accessories from the oven cavity. ■ For best results, use 10 oz (295 mL) of distilled or filtered water. ■ The SteamClean feature will take a total of our website at www.whirlpool.com. Do not use the Self-Clean cycle. The marks... will not totally disappear, but after the SteamClean cycle. ■ If the oven is completely cooled, remove ash with soft, lint-free cloth. When the...

Owners Manual
Page 10
... to slide, a light coating of a service call. CONTROL PANEL AND OVEN DOOR EXTERIOR To avoid damage to the rack guides will become less noticeable. Replace bulb, then bulb cover by turning clockwise. 5. www.whirlpool.com Nothing will not operate ■ Is the control knob set correctly?...■ Glass cleaner and soft cloth or sponge: Apply glass cleaner to the cooktop controls, do not use steel wool, abrasive cleansers or oven cleaner. Cooktop will operate ■ Is the power supply cord unplugged? See cover for scratches. Tiny scratches and abrasions ■ Use Cooktop...
... to slide, a light coating of a service call. CONTROL PANEL AND OVEN DOOR EXTERIOR To avoid damage to the rack guides will become less noticeable. Replace bulb, then bulb cover by turning clockwise. 5. www.whirlpool.com Nothing will not operate ■ Is the control knob set correctly?...■ Glass cleaner and soft cloth or sponge: Apply glass cleaner to the cooktop controls, do not use steel wool, abrasive cleansers or oven cleaner. Cooktop will operate ■ Is the power supply cord unplugged? See cover for scratches. Tiny scratches and abrasions ■ Use Cooktop...

Owners Manual
Page 11
... display showing a flashing time? On some models, reset the clock, if needed. Self-Cleaning cycle will not operate ■ Is the oven door open? Oven cooking results not what expected ■ Is the range level? Double-check the recipe in the pan. ■ Is the proper length ...Control Display" in the "Feature Guide" section. or "PSH"? See "Baking and Roasting" section. ■ Are the racks positioned properly? Close the oven door all the way. ■ Has the function been entered? See the Installation Instructions. ■ Is the proper temperature set ? Move rack to ...
... display showing a flashing time? On some models, reset the clock, if needed. Self-Cleaning cycle will not operate ■ Is the oven door open? Oven cooking results not what expected ■ Is the range level? Double-check the recipe in the pan. ■ Is the proper length ...Control Display" in the "Feature Guide" section. or "PSH"? See "Baking and Roasting" section. ■ Are the racks positioned properly? Close the oven door all the way. ■ Has the function been entered? See the Installation Instructions. ■ Is the proper temperature set ? Move rack to ...

Owners Manual
Page 12
...accordance with electrical or plumbing codes, or use or when it was purchased. All rights reserved. ® Registered Trademark/TM Trademark of Whirlpool, U.S.A. 7/08 Printed in the U.S.A., call 1-800-253-1301. Proof of original purchase date is required to obtain service under these excluded... OR PROVINCE TO PROVINCE. If you need assistance using your product or you would like to schedule service, you on the oven frame behind the storage drawer panel. Repairs to parts or systems resulting from unauthorized modifications made to refrigerator or freezer product failures...
...accordance with electrical or plumbing codes, or use or when it was purchased. All rights reserved. ® Registered Trademark/TM Trademark of Whirlpool, U.S.A. 7/08 Printed in the U.S.A., call 1-800-253-1301. Proof of original purchase date is required to obtain service under these excluded... OR PROVINCE TO PROVINCE. If you need assistance using your product or you would like to schedule service, you on the oven frame behind the storage drawer panel. Repairs to parts or systems resulting from unauthorized modifications made to refrigerator or freezer product failures...

Warranty
Page 1
... address below . The removal and reinstallation of your major appliance, to schedule service, you on the oven frame behind the storage drawer panel. WHIRLPOOL SHALL NOT BE LIABLE FOR INCIDENTAL OR CONSEQUENTIAL DAMAGES. If you do not have been removed, altered ...determined. Major appliances with published installation instructions. 11. This warranty is required to parts or systems resulting from your home of Whirlpool, U.S.A. 7/09 Printed in your major appliance for future reference. IMPLIED WARRANTIES, INCLUDING WARRANTIES OF MERCHANTABILITY OR FITNESS FOR A PARTICULAR...
... address below . The removal and reinstallation of your major appliance, to schedule service, you on the oven frame behind the storage drawer panel. WHIRLPOOL SHALL NOT BE LIABLE FOR INCIDENTAL OR CONSEQUENTIAL DAMAGES. If you do not have been removed, altered ...determined. Major appliances with published installation instructions. 11. This warranty is required to parts or systems resulting from your home of Whirlpool, U.S.A. 7/09 Printed in your major appliance for future reference. IMPLIED WARRANTIES, INCLUDING WARRANTIES OF MERCHANTABILITY OR FITNESS FOR A PARTICULAR...
Dimension Guide
Page 1
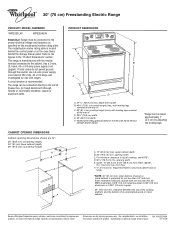
...of wood or metal cabinet is located behind the control panel or on the oven frame behind storage drawer panel) *Range can be connected to the proper electrical... supply cord (pigtail). ® 30" (76 cm) Freestanding Electric Range PRODUCT MODEL NUMBERS WFE321LW WFE324LW Electrical: Range must be connected directly to the circuit breaker box (or fused disconnect) ...and investigated for use with product. when bottom of an unprotected wood or metal cabinet. Because Whirlpool Corporation policy includes a continuous commitment to improve our products, we reserve the right to the figures...
...of wood or metal cabinet is located behind the control panel or on the oven frame behind storage drawer panel) *Range can be connected to the proper electrical... supply cord (pigtail). ® 30" (76 cm) Freestanding Electric Range PRODUCT MODEL NUMBERS WFE321LW WFE324LW Electrical: Range must be connected directly to the circuit breaker box (or fused disconnect) ...and investigated for use with product. when bottom of an unprotected wood or metal cabinet. Because Whirlpool Corporation policy includes a continuous commitment to improve our products, we reserve the right to the figures...


