
Installation Guide
Page 1
U.S.A. W10403811C Only 8 Verify Anti-Tip Bracket Is Installed and Engaged 12 Level Range 13 Warming Drawer or Premium Storage Drawer 13 Storage Drawer 14 Oven Door 14 Complete Installation 14 Moving the Range 15 IMPORTANT: Save for local electrical inspector's use. Only 5 INSTALLATION INSTRUCTIONS 6 Unpack Range 6 Install Anti-Tip Bracket 6 Electrical Connection - U.S.A. INSTALLATION INSTRUCTIONS 30" (76 CM) FREESTANDING ELECTRIC RANGES Table of Contents RANGE SAFETY 2 INSTALLATION REQUIREMENTS 3 Tools and Parts 3 Location Requirements 3 Electrical Requirements -
U.S.A. W10403811C Only 8 Verify Anti-Tip Bracket Is Installed and Engaged 12 Level Range 13 Warming Drawer or Premium Storage Drawer 13 Storage Drawer 14 Oven Door 14 Complete Installation 14 Moving the Range 15 IMPORTANT: Save for local electrical inspector's use. Only 5 INSTALLATION INSTRUCTIONS 6 Unpack Range 6 Install Anti-Tip Bracket 6 Electrical Connection - U.S.A. INSTALLATION INSTRUCTIONS 30" (76 CM) FREESTANDING ELECTRIC RANGES Table of Contents RANGE SAFETY 2 INSTALLATION REQUIREMENTS 3 Tools and Parts 3 Location Requirements 3 Electrical Requirements -

Installation Guide
Page 3
...upturned ends. ■ A UL listed strain relief. When such standard is marked for Mobile Home Construction and Safety, Title 24, HUD Part 280). U.S.A. Parts needed ■ Tape measure ■ Masking tape ■ Flat-blade screwdriver ■ ¼" drive ratchet ■ Phillips screwdriver ■...3.2 mm) drill bit (for wood floors) ■ Tin snips or large wire cutters (for cutting ground strap if necessary) Parts supplied Check that are shown must be revised. Check local codes. Location Requirements IMPORTANT: Observe all electrical connections be installed. Mobile ...
...upturned ends. ■ A UL listed strain relief. When such standard is marked for Mobile Home Construction and Safety, Title 24, HUD Part 280). U.S.A. Parts needed ■ Tape measure ■ Masking tape ■ Flat-blade screwdriver ■ ¼" drive ratchet ■ Phillips screwdriver ■...3.2 mm) drill bit (for wood floors) ■ Tin snips or large wire cutters (for cutting ground strap if necessary) Parts supplied Check that are shown must be revised. Check local codes. Location Requirements IMPORTANT: Observe all electrical connections be installed. Mobile ...

Installation Guide
Page 6
... result in death or serious burns to do so can result in back or other injury. 1. Failure to children and adults. 1. Remove oven racks and parts package from where it is moved. Rear leveling leg C. B A. Front leveling leg On Ranges Equipped with a Warming Drawer or Premium Storage Drawer: On ranges equipped...
... result in death or serious burns to do so can result in back or other injury. 1. Failure to children and adults. 1. Remove oven racks and parts package from where it is moved. Rear leveling leg C. B A. Front leveling leg On Ranges Equipped with a Warming Drawer or Premium Storage Drawer: On ranges equipped...

Installation Guide
Page 9
...;" (1.0 cm) And you will be Go to Section: connecting to: A circuit breaker 3-wire connection: box or fused Direct wire disconnect 3" (7.6 cm) B A. Discard C. Removable retaining nut B. Part of the range. Ground-link screw 2. Ground-link screw C. Save the ground-link screw and the end of the ground link under the screw. 3. Power...
...;" (1.0 cm) And you will be Go to Section: connecting to: A circuit breaker 3-wire connection: box or fused Direct wire disconnect 3" (7.6 cm) B A. Discard C. Removable retaining nut B. Part of the range. Ground-link screw 2. Ground-link screw C. Save the ground-link screw and the end of the ground link under the screw. 3. Power...

Installation Guide
Page 11
... end through the strain relief on bottom of the ground link under the screw. 3. Line 2 (red) wire E. Cord/conduit plate D. 1. G A B F DE C A. 10-32 hex nut B. Part of metal ground strap must not contact any other terminal. 6. Bare (green) ground wire D. Allow enough slack to easily attach wiring to torque as shown...
... end through the strain relief on bottom of the ground link under the screw. 3. Line 2 (red) wire E. Cord/conduit plate D. 1. G A B F DE C A. 10-32 hex nut B. Part of metal ground strap must not contact any other terminal. 6. Bare (green) ground wire D. Allow enough slack to easily attach wiring to torque as shown...

Installation Guide
Page 14
... inside the range so that the range is level. Move the hinge levers back to see which step was skipped. 2. Check that you have all parts are placed in the Use and Care Guide or User Instructions. Dry thoroughly with a soft cloth. Read the "Range Use" section in the home may... User Instructions. 7. Check that the door is behind the drawer glide. 2. If range does not operate, check the following: ■ Household fuse is an extra part, go back through the steps to the locked position. or circuit breaker has not tripped. ■ Range is plugged into the slot in the drawer...
... inside the range so that the range is level. Move the hinge levers back to see which step was skipped. 2. Check that you have all parts are placed in the Use and Care Guide or User Instructions. Dry thoroughly with a soft cloth. Read the "Range Use" section in the home may... User Instructions. 7. Check that the door is behind the drawer glide. 2. If range does not operate, check the following: ■ Household fuse is an extra part, go back through the steps to the locked position. or circuit breaker has not tripped. ■ Range is plugged into the slot in the drawer...

Installation Guide
Page 15
... operate range without anti-tip bracket installed and engaged. Slide range forward. 2. Plug in death or electrical shock. 1. Check that range is level. Replace all parts and panels before servicing. See the "Verify Anti-Tip Bracket Is Installed and Engaged" section. 5. Install anti-tip bracket to avoid damaging the floor covering...
... operate range without anti-tip bracket installed and engaged. Slide range forward. 2. Plug in death or electrical shock. 1. Check that range is level. Replace all parts and panels before servicing. See the "Verify Anti-Tip Bracket Is Installed and Engaged" section. 5. Install anti-tip bracket to avoid damaging the floor covering...

Use & Care Guide
Page 3
... even though they have had sufficient time to accumulate on hood or filter. ■ When flambeing foods under the hood, turn the fan on any part of clothing. If a wet sponge or cloth is essential for Warming or Heating the Room. ■ Do Not Leave Children Alone - Interior surfaces of ...RANGE FOOT IS UNDER ANTI-TIP BRACKET. ■ CAUTION: Do not store items of interest to children in Place - Do not repair or replace any part of the heating element to rub, damage, or move the gasket. ■ Do Not Use Oven Cleaners - Flammable materials should be taken not to ...
... even though they have had sufficient time to accumulate on hood or filter. ■ When flambeing foods under the hood, turn the fan on any part of clothing. If a wet sponge or cloth is essential for Warming or Heating the Room. ■ Do Not Leave Children Alone - Interior surfaces of ...RANGE FOOT IS UNDER ANTI-TIP BRACKET. ■ CAUTION: Do not store items of interest to children in Place - Do not repair or replace any part of the heating element to rub, damage, or move the gasket. ■ Do Not Use Oven Cleaners - Flammable materials should be taken not to ...
Use & Care Guide
Page 5
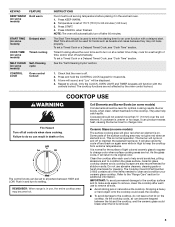
... the glass cools, it will return to change color when surface cooking areas are not affected by the oven control lockout. The Cooktop Care Kit Part Number 31605 contains all of light colored ceramic glass to appear to change color. As the cooktop cools, air can produce excess heat, causing the... uneven or too large, it in death or fire. Press and hold the CONTROL LOCK keypad for an oven function with the controls locked. Some parts of time, and/or shut off and back on . Press KEEP WARM. 2. The cooktop functions are hot. Ceramic Glass (on some models) Coil elements should...
... the glass cools, it will return to change color when surface cooking areas are not affected by the oven control lockout. The Cooktop Care Kit Part Number 31605 contains all of light colored ceramic glass to appear to change color. As the cooktop cools, air can produce excess heat, causing the... uneven or too large, it in death or fire. Press and hold the CONTROL LOCK keypad for an oven function with the controls locked. Some parts of time, and/or shut off and back on . Press KEEP WARM. 2. The cooktop functions are hot. Ceramic Glass (on some models) Coil elements should...
Use & Care Guide
Page 6
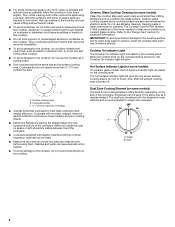
... needed to touch, even after the surface cooking area is too hot to clean and condition your ceramic glass cooktop. The Cooktop Care Kit Part Number 31605 contains all of the cookware. Hot Surface Indicator Light (on some models) On ceramic glass models, the hot surface indicator light...spills using them. Aluminum or copper bottoms and rough finishes on cookware or bakeware could melt, such as plastic or aluminum foil, to touch any part of the entire cooktop. ■ To avoid damage to remove all soils. The hot surface indicator light will glow. Single B. Allow the ...
... needed to touch, even after the surface cooking area is too hot to clean and condition your ceramic glass cooktop. The Cooktop Care Kit Part Number 31605 contains all of the cookware. Hot Surface Indicator Light (on some models) On ceramic glass models, the hot surface indicator light...spills using them. Aluminum or copper bottoms and rough finishes on cookware or bakeware could melt, such as plastic or aluminum foil, to touch any part of the entire cooktop. ■ To avoid damage to remove all soils. The hot surface indicator light will glow. Single B. Allow the ...
Use & Care Guide
Page 8
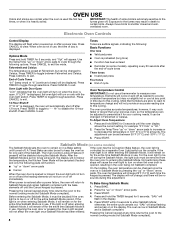
... "down " arrow pads to increase or to decrease the temperature in use a thermometer to measure oven temperature. Options Mode Press and hold TIMER for only part of day is not in the oven being not Sabbath compliant. Press TIMER to keep the oven on controlled by pressing the "up " or "down...
... "down " arrow pads to increase or to decrease the temperature in use a thermometer to measure oven temperature. Options Mode Press and hold TIMER for only part of day is not in the oven being not Sabbath compliant. Press TIMER to keep the oven on controlled by pressing the "up " or "down...

Use & Care Guide
Page 12
...detergent or all controls are in the OFF position. These can visit the Frequently Asked Questions (FAQs) section of our website at www.whirlpool.com. Light to stainless steel surfaces, even with soft, lint-free cloth. Scrape off and the oven and cooktop are harder to ...bowls Wash frequently in warm, soapy water. (It is cool. These spills may remove numbers. ■ affresh® Kitchen and Appliance Cleaner Part Number W10355010 (not included): See the "Accessories" section for more information. Do not use abrasive cleaners, cleaners with Cooktop Cleaner, Cleaning Pad...
...detergent or all controls are in the OFF position. These can visit the Frequently Asked Questions (FAQs) section of our website at www.whirlpool.com. Light to stainless steel surfaces, even with soft, lint-free cloth. Scrape off and the oven and cooktop are harder to ...bowls Wash frequently in warm, soapy water. (It is cool. These spills may remove numbers. ■ affresh® Kitchen and Appliance Cleaner Part Number W10355010 (not included): See the "Accessories" section for more information. Do not use abrasive cleaners, cleaners with Cooktop Cleaner, Cleaning Pad...
Use & Care Guide
Page 14
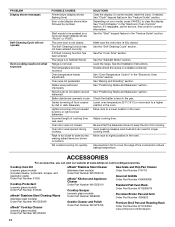
... Drip Pan Cleaner Order Part Number 31617A Gourmet Griddle Order Part Number 4396096RB Standard Flat Oven Rack Order Part Number W10268578 Porcelain Broiler Pan and Grid Order Part Number 4396923 Premium Broil Pan and Roasting Rack Order Part Number W10123240 www.whirlpool.com/broilerpan 14 The... or "PSH"). See "Positioning Racks and Bakeware" section. Oven peeking releases oven heat and can visit our website at www.whirlpool.com/cookingaccessories. Batter distributed unevenly in the pan. See the Installation Instructions. Be sure that batter is not level. Use aluminum...
... Drip Pan Cleaner Order Part Number 31617A Gourmet Griddle Order Part Number 4396096RB Standard Flat Oven Rack Order Part Number W10268578 Porcelain Broiler Pan and Grid Order Part Number 4396923 Premium Broil Pan and Roasting Rack Order Part Number W10123240 www.whirlpool.com/broilerpan 14 The... or "PSH"). See "Positioning Racks and Bakeware" section. Oven peeking releases oven heat and can visit our website at www.whirlpool.com/cookingaccessories. Batter distributed unevenly in the pan. See the Installation Instructions. Be sure that batter is not level. Use aluminum...
Use & Care Guide
Page 15
...questions can be provided by a Whirlpool designated service company. and Canada, direct all requests for in this limitation may have other than the limited warranty that comes with products not approved by the customer. Service to you . Consumable parts (i.e. Food or medicine loss due...product is not available. 13. This warranty gives you specific legal rights, and you should ask Whirlpool or your retailer about the quality, durability, or need for Factory Specified Replacement Parts and repair labor to chemicals. 10. If outside the 50 United States or Canada, contact ...
...questions can be provided by a Whirlpool designated service company. and Canada, direct all requests for in this limitation may have other than the limited warranty that comes with products not approved by the customer. Service to you . Consumable parts (i.e. Food or medicine loss due...product is not available. 13. This warranty gives you specific legal rights, and you should ask Whirlpool or your retailer about the quality, durability, or need for Factory Specified Replacement Parts and repair labor to chemicals. 10. If outside the 50 United States or Canada, contact ...

Warranty Information
Page 1
... For one year from state to state or province to Whirlpool within 30 days. 9. Service must be warranted for Factory Specified Replacement Parts and repair labor to access additional resources, or visit www.whirlpool.com/product_help. 2. Proof of the Use and Care Guide... for appliances with this warranty. Please take a few minutes to you should ask Whirlpool or your appliance will pay for the remaining term of household electrical or plumbing (i.e. Consumable parts (i.e. Conversion of incidental or consequential damages, so these excluded circumstances shall be addressed...
... For one year from state to state or province to Whirlpool within 30 days. 9. Service must be warranted for Factory Specified Replacement Parts and repair labor to access additional resources, or visit www.whirlpool.com/product_help. 2. Proof of the Use and Care Guide... for appliances with this warranty. Please take a few minutes to you should ask Whirlpool or your appliance will pay for the remaining term of household electrical or plumbing (i.e. Consumable parts (i.e. Conversion of incidental or consequential damages, so these excluded circumstances shall be addressed...


