
Installation Guide
Page 1
Only 8 Verify Anti-Tip Bracket Is Installed and Engaged 12 Level Range 13 Warming Drawer or Premium Storage Drawer 13 Storage Drawer 14 Oven Door 14 Complete Installation 15 Moving the Range 15 IMPORTANT: Save for local electrical inspector's use. W10403811B U.S.A. U.S.A. Only 5 INSTALLATION INSTRUCTIONS 6 Unpack Range 6 Install Anti-Tip Bracket 6 Electrical Connection - INSTALLATION INSTRUCTIONS 30" (76 CM) FREESTANDING ELECTRIC RANGES Table of Contents RANGE SAFETY 2 INSTALLATION REQUIREMENTS 3 Tools and Parts 3 Location Requirements 3 Electrical Requirements -
Only 8 Verify Anti-Tip Bracket Is Installed and Engaged 12 Level Range 13 Warming Drawer or Premium Storage Drawer 13 Storage Drawer 14 Oven Door 14 Complete Installation 15 Moving the Range 15 IMPORTANT: Save for local electrical inspector's use. W10403811B U.S.A. U.S.A. Only 5 INSTALLATION INSTRUCTIONS 6 Unpack Range 6 Install Anti-Tip Bracket 6 Electrical Connection - INSTALLATION INSTRUCTIONS 30" (76 CM) FREESTANDING ELECTRIC RANGES Table of Contents RANGE SAFETY 2 INSTALLATION REQUIREMENTS 3 Tools and Parts 3 Location Requirements 3 Electrical Requirements -

Installation Guide
Page 3
...be used. Check local codes. Check existing electrical supply. Mobile home installations require: ■ When this range must be installed. Only" section. 3 Parts needed ■ Tape measure ■ Masking tape ■ Flat-blade screwdriver ■ ¼" drive ratchet ■ Phillips screwdriver ■ Level...drill bit (for wood floors) ■ Tin snips or large wire cutters (for Mobile Home Construction and Safety, Title 24, HUD Part 280). To install the anti-tip bracket shipped with the range, see "Install Anti-Tip Bracket" section. ■ Grounded electrical ...
...be used. Check local codes. Check existing electrical supply. Mobile home installations require: ■ When this range must be installed. Only" section. 3 Parts needed ■ Tape measure ■ Masking tape ■ Flat-blade screwdriver ■ ¼" drive ratchet ■ Phillips screwdriver ■ Level...drill bit (for wood floors) ■ Tin snips or large wire cutters (for Mobile Home Construction and Safety, Title 24, HUD Part 280). To install the anti-tip bracket shipped with the range, see "Install Anti-Tip Bracket" section. ■ Grounded electrical ...

Installation Guide
Page 6
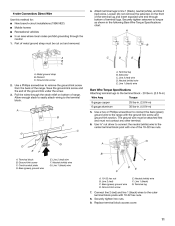
... bracket. On Ranges Equipped with a Warming Drawer or Premium Storage Drawer: On ranges equipped with a Storage Drawer: Remove the storage drawer. Remove oven racks and parts package from inside the storage drawer or warming drawer. 2. Use a ¼" drive ratchet to lower front leveling legs one -half turn. Re-engage anti-tip...
... bracket. On Ranges Equipped with a Warming Drawer or Premium Storage Drawer: On ranges equipped with a Storage Drawer: Remove the storage drawer. Remove oven racks and parts package from inside the storage drawer or warming drawer. 2. Use a ¼" drive ratchet to lower front leveling legs one -half turn. Re-engage anti-tip...
Installation Guide
Page 9
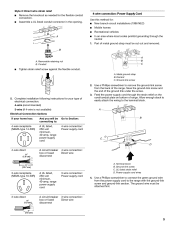
... the neutral 1. Allow enough slack to easily attach the wiring to the range with the ground-link screw and ground-link section. Ground-link screw C. A B A. Part of metal ground strap must be cut out and removed. Use a Phillips screwdriver to connect the green ground wire from the back of the ground...
... the neutral 1. Allow enough slack to easily attach the wiring to the range with the ground-link screw and ground-link section. Ground-link screw C. A B A. Part of metal ground strap must be cut out and removed. Use a Phillips screwdriver to connect the green ground wire from the back of the ground...
Installation Guide
Page 11
... hex nut B. Connect line 2 (red) and line 1 (black) wires to the range with the ground-link screw and ground-link section. Securely tighten hex nuts. 9. Part of the 10-32 hex nuts. Discard C. Use a Phillips screwdriver to the center terminal block post with 10-32 hex nuts. 8. The ground wire must...
... hex nut B. Connect line 2 (red) and line 1 (black) wires to the range with the ground-link screw and ground-link section. Securely tighten hex nuts. 9. Part of the 10-32 hex nuts. Discard C. Use a Phillips screwdriver to the center terminal block post with 10-32 hex nuts. 8. The ground wire must...

Installation Guide
Page 15
... is intact and tight; Do not operate range without anti-tip bracket installed and engaged. Slide range forward. 2. Check that you have all parts and panels before servicing. Replace all of your tools. 3. Slide range forward. 3. Check that the range is installed and engaged. Complete Installation... 1. Check that range is installed and engaged. For more information, read the "Range Care" section of /recycle all parts are now installed. Turn on range operation. IMPORTANT: If the range control displays an "F9" or "F9, E0" error code, the electrical...
... is intact and tight; Do not operate range without anti-tip bracket installed and engaged. Slide range forward. 2. Check that you have all parts and panels before servicing. Replace all of your tools. 3. Slide range forward. 3. Check that the range is installed and engaged. Complete Installation... 1. Check that range is installed and engaged. For more information, read the "Range Care" section of /recycle all parts are now installed. Turn on range operation. IMPORTANT: If the range control displays an "F9" or "F9, E0" error code, the electrical...

Warranty Information
Page 1
... your major appliance if it is installed in an inaccessible location or is not installed in accordance with the product, Whirlpool Corporation or Whirlpool Canada LP (hereafter "Whirlpool") will pay for Factory Specified Parts and repair labor to correct defects in accordance with the removal from your major appliance, to instruct you may contact...
... your major appliance if it is installed in an inaccessible location or is not installed in accordance with the product, Whirlpool Corporation or Whirlpool Canada LP (hereafter "Whirlpool") will pay for Factory Specified Parts and repair labor to correct defects in accordance with the removal from your major appliance, to instruct you may contact...

Use & Care Guide
Page 3
... these openings, oven doors, and windows of the appliance may become hot enough to cause burns - The door gasket is used in or around any part of a range - For units with one or more surface units of fire, electrical shock, injury to sit or stand on Broken Cooktop - SAVE...damage. ■ Protective Liners - For self-cleaning ranges - ■ Do Not Clean Door Gasket - Do not repair or replace any part of the oven. ■ Clean Only Parts Listed in ignition of electric shock, or fire. ■ Glazed Cooking Utensils - Surface units may be taken not to burner will expose...
... these openings, oven doors, and windows of the appliance may become hot enough to cause burns - The door gasket is used in or around any part of a range - For units with one or more surface units of fire, electrical shock, injury to sit or stand on Broken Cooktop - SAVE...damage. ■ Protective Liners - For self-cleaning ranges - ■ Do Not Clean Door Gasket - Do not repair or replace any part of the oven. ■ Clean Only Parts Listed in ignition of electric shock, or fire. ■ Glazed Cooking Utensils - Surface units may be taken not to burner will expose...

Use & Care Guide
Page 6
...Always follow these instructions can visit the Frequently Asked Questions (FAQs) section of grain to avoid damaging. ■ affresh™ Stainless Steel Cleaner Part Number W10355016: See "Accessories" section for more information. IMPORTANT: The health of some models) Food spills containing acids, such as the entire ... ■ Liquid detergent or all items from oven during the Self-Cleaning cycle. To stop the self cleaning at www.whirlpool.com. Do not soak knobs. When replacing knobs, make sure the door is completely cooled, remove ash with a damp cloth.
...Always follow these instructions can visit the Frequently Asked Questions (FAQs) section of grain to avoid damaging. ■ affresh™ Stainless Steel Cleaner Part Number W10355016: See "Accessories" section for more information. IMPORTANT: The health of some models) Food spills containing acids, such as the entire ... ■ Liquid detergent or all items from oven during the Self-Cleaning cycle. To stop the self cleaning at www.whirlpool.com. Do not soak knobs. When replacing knobs, make sure the door is completely cooled, remove ash with a damp cloth.

Use & Care Guide
Page 7
...cleaning beneath. Cleaning Method: ■ Glass cleaner, mild liquid cleaner or nonabrasive scrubbing pad. ■ affresh™ Kitchen and Appliance Cleaner Part Number W10355010 (not included): See cover for more information. Turn the glass bulb cover in a dishwasher.) A mild abrasive cleaner and a plastic...oil applied to the rack guides will help them slide. COIL ELEMENTS (on panel. ■ affresh™ Kitchen and Appliance Cleaner Part Number W10355010 (not included): See "Accessories" section for contact information. Do not clean or immerse in range or reconnect power. 7...
...cleaning beneath. Cleaning Method: ■ Glass cleaner, mild liquid cleaner or nonabrasive scrubbing pad. ■ affresh™ Kitchen and Appliance Cleaner Part Number W10355010 (not included): See cover for more information. Turn the glass bulb cover in a dishwasher.) A mild abrasive cleaner and a plastic...oil applied to the rack guides will help them slide. COIL ELEMENTS (on panel. ■ affresh™ Kitchen and Appliance Cleaner Part Number W10355010 (not included): See "Accessories" section for contact information. Do not clean or immerse in range or reconnect power. 7...

Use & Care Guide
Page 9
... Scraper (ceramic glass models) Order Part Number WA906B Granite Cleaner and Polish Order Part Number W10275756 Gas Grate and Drip Pan Cleaner Order Part Number 31617A Gourmet Griddle Order Part Number 4396096RB Porcelain Broiler Pan and Grid Order Part Number 4396923 Premium Broil Pan and Roasting Rack Order Part Number W10123240 www.whirlpool.com/broilerpan 9 ACCESSORIES For...
... Scraper (ceramic glass models) Order Part Number WA906B Granite Cleaner and Polish Order Part Number W10275756 Gas Grate and Drip Pan Cleaner Order Part Number 31617A Gourmet Griddle Order Part Number 4396096RB Porcelain Broiler Pan and Grid Order Part Number 4396923 Premium Broil Pan and Roasting Rack Order Part Number W10123240 www.whirlpool.com/broilerpan 9 ACCESSORIES For...

Use & Care Guide
Page 10
...accident, alteration, misuse, abuse, fire, flood, acts of God, improper installation, installation not in the U.S.A., visit www.whirlpool.com. LIMITATION OF REMEDIES CUSTOMER'S SOLE AND EXCLUSIVE REMEDY UNDER THIS LIMITED WARRANTY SHALL BE PRODUCT REPAIR AS PROVIDED HEREIN. If...is operated and maintained according to instructions attached to or furnished with the product, Whirlpool Corporation or Whirlpool Canada LP (hereafter "Whirlpool") will pay for Factory Specified Parts and repair labor to correct defects in accordance with published installation instructions. 11. Service...
...accident, alteration, misuse, abuse, fire, flood, acts of God, improper installation, installation not in the U.S.A., visit www.whirlpool.com. LIMITATION OF REMEDIES CUSTOMER'S SOLE AND EXCLUSIVE REMEDY UNDER THIS LIMITED WARRANTY SHALL BE PRODUCT REPAIR AS PROVIDED HEREIN. If...is operated and maintained according to instructions attached to or furnished with the product, Whirlpool Corporation or Whirlpool Canada LP (hereafter "Whirlpool") will pay for Factory Specified Parts and repair labor to correct defects in accordance with published installation instructions. 11. Service...


