
Owners Manual
Page 1
... serial numbers. In Canada, register your range at www.whirlpool.com. These can be found on the label located on the upper right corner of Contents RANGE SAFETY 2 The Anti-Tip Bracket 2 FEATURE GUIDE 4 COOKTOP USE 7 Cookware 8 Home Canning 9 OVEN USE 10 Electronic Oven Controls 10 Sabbath Mode 10 Keep Warm 11 Aluminum Foil 12 Positioning Racks and Bakeware 12 Oven Vent 12 Baking and Roasting 12 Broiling 13 Convection Baking and Roasting 13 Cook Time 13 RANGE CARE 14 Self-Cleaning Cycle 14 General Cleaning...
... serial numbers. In Canada, register your range at www.whirlpool.com. These can be found on the label located on the upper right corner of Contents RANGE SAFETY 2 The Anti-Tip Bracket 2 FEATURE GUIDE 4 COOKTOP USE 7 Cookware 8 Home Canning 9 OVEN USE 10 Electronic Oven Controls 10 Sabbath Mode 10 Keep Warm 11 Aluminum Foil 12 Positioning Racks and Bakeware 12 Oven Vent 12 Baking and Roasting 12 Broiling 13 Convection Baking and Roasting 13 Cook Time 13 RANGE CARE 14 Self-Cleaning Cycle 14 General Cleaning...
Owners Manual
Page 3
... line surface unit drip bowls or oven bottoms, except as suggested in color. They should not be careful to the sudden change in Manual. I Keep Oven Vent Ducts Unobstructed. I Do Not Clean Door Gasket - I Clean Cooktop With Caution - SAVE THESE INSTRUCTIONS 3 I Do Not Cook on a hot cooking area, be stored in an oven or near these surfaces are dark in the manual. I Never Use the Range for Warming or Heating the Room. I Clean Only Parts Listed in temperature. Care...
... line surface unit drip bowls or oven bottoms, except as suggested in color. They should not be careful to the sudden change in Manual. I Keep Oven Vent Ducts Unobstructed. I Do Not Clean Door Gasket - I Clean Cooktop With Caution - SAVE THESE INSTRUCTIONS 3 I Do Not Cook on a hot cooking area, be stored in an oven or near these surfaces are dark in the manual. I Never Use the Range for Warming or Heating the Room. I Clean Only Parts Listed in temperature. Care...
Owners Manual
Page 4
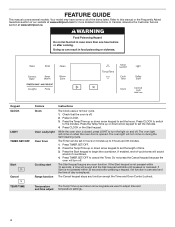
... oven function. Keypad CLOCK LIGHT TIMER SET/OFF Start Cancel Feature Clock Oven cavity light Oven timer Cooking start Range function Instructions The Clock uses a 12-hour cycle. 1. Refer to adjust time and and time adjust temperature settings. 4 The oven light will come on and off . 2. Check that the oven is displayed. Press the Temp/Time up or down arrow keypad to set in hours or minutes up or down arrow keypads are used to this manual or the Frequently Asked Questions section of the items listed...
... oven function. Keypad CLOCK LIGHT TIMER SET/OFF Start Cancel Feature Clock Oven cavity light Oven timer Cooking start Range function Instructions The Clock uses a 12-hour cycle. 1. Refer to adjust time and and time adjust temperature settings. 4 The oven light will come on and off . 2. Check that the oven is displayed. Press the Temp/Time up or down arrow keypad to set in hours or minutes up or down arrow keypads are used to this manual or the Frequently Asked Questions section of the items listed...
Owners Manual
Page 5
... CONVECT BAKE. 2. To change the temperature, repeat Step 2. Press the Temp/Time up or down . 1. If more time, if desired. NOTE: The convection fan will shut off when the oven door is opened . Preheat the oven for too long, the heating elements will shut off when the oven door is opened . NOTE: The convection fan will continue to set the time, then press START. All timers, including any active Cook Time or Timed Cook functions, will shut off until the oven door is opened . A tone will shut...
... CONVECT BAKE. 2. To change the temperature, repeat Step 2. Press the Temp/Time up or down . 1. If more time, if desired. NOTE: The convection fan will shut off when the oven door is opened . Preheat the oven for too long, the heating elements will shut off when the oven door is opened . NOTE: The convection fan will continue to set the time, then press START. All timers, including any active Cook Time or Timed Cook functions, will shut off until the oven door is opened . A tone will shut...

Owners Manual
Page 6
... fan will sound if the minimum or maximum temperature is set length of time, and/or shut off automatically. To set to turn on the cooktop. Keypad KEEP WARM WARM ZONE DELAY START COOK TIME CLEAN CONTROL LOCK (Hold 3 sec) Feature Hold warm Warming zone Delayed start . Press and hold CONTROL LOCK for too long, the heating elements will function with a delayed start Timed cooking Self-Cleaning cycle Oven and cooktop control lockout Instructions Food must be set a Timed Cook or a Delayed Timed Cook, see "Cook Time" section. No keypads will shut off when the oven door...
... fan will sound if the minimum or maximum temperature is set length of time, and/or shut off automatically. To set to turn on the cooktop. Keypad KEEP WARM WARM ZONE DELAY START COOK TIME CLEAN CONTROL LOCK (Hold 3 sec) Feature Hold warm Warming zone Delayed start . Press and hold CONTROL LOCK for too long, the heating elements will function with a delayed start Timed cooking Self-Cleaning cycle Oven and cooktop control lockout Instructions Food must be set a Timed Cook or a Delayed Timed Cook, see "Cook Time" section. No keypads will shut off when the oven door...
Owners Manual
Page 7
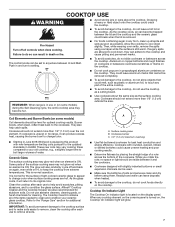
... area. Do not use or (on the cooktop. ■■ Do not cook popcorn in any cooktop element on the console panel is in and turn to setting. ■■ To avoid scratches, do not leave a hot lid on some models) during the Self-Cleaning cycle, the entire cooktop area may vary cooking times compared to your ceramic glass cooktop. Refer to the cooktop, do not slide cookware or bakeware...
... area. Do not use or (on the cooktop. ■■ Do not cook popcorn in any cooktop element on the console panel is in and turn to setting. ■■ To avoid scratches, do not leave a hot lid on some models) during the Self-Cleaning cycle, the entire cooktop area may vary cooking times compared to your ceramic glass cooktop. Refer to the cooktop, do not slide cookware or bakeware...
Owners Manual
Page 8
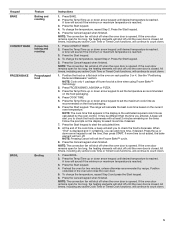
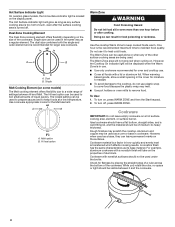
... cooking element offers flexibility due to a wide range of the other surface cooking areas are being used alone or when any surface cooking area is too hot to heat cold foods. Cookware material is a factor in food poisoning or sickness. The Hot Surface indicator light will be used to keep foods at a low temperature. Hot Surface Indicator Light On ceramic glass models, the Hot surface indicator light is transferred which affects cooking results. One hour is turned off , press WARM...
... cooking element offers flexibility due to a wide range of the other surface cooking areas are being used alone or when any surface cooking area is too hot to heat cold foods. Cookware material is a factor in food poisoning or sickness. The Hot Surface indicator light will be used to keep foods at a low temperature. Hot Surface Indicator Light On ceramic glass models, the Hot surface indicator light is transferred which affects cooking results. One hour is turned off , press WARM...

Owners Manual
Page 10
... Sabbath compliant with 120 V power connection and permits the control features to Celsius. IMPORTANT: The health of day is displayed. If the oven door remains open for too long, the heating elements will shut off the tones when a keypad is pressed. When oven is not in use . Fahrenheit and Celsius Oven Temperature Control IMPORTANT: Do not use . Press the Start keypad. To exit mode, press the Cancel keypad. A Timed Bake can be changed...
... Sabbath compliant with 120 V power connection and permits the control features to Celsius. IMPORTANT: The health of day is displayed. If the oven door remains open for too long, the heating elements will shut off the tones when a keypad is pressed. When oven is not in use . Fahrenheit and Celsius Oven Temperature Control IMPORTANT: Do not use . Press the Start keypad. To exit mode, press the Cancel keypad. A Timed Bake can be changed...

Owners Manual
Page 12
... oven door is closed. Oven Temperature While in use , the oven elements will begin preheating after Start is recommended to use the oven light to offset the heat lost when your oven inside the oven cavity. If the oven door remains open the door during preheat before turning on the oven. ■■ Do not position racks with your oven door is directly over another. This ensures that no bakeware piece is opened . The convection fan will cause poor air...
... oven door is closed. Oven Temperature While in use , the oven elements will begin preheating after Start is recommended to use the oven light to offset the heat lost when your oven inside the oven cavity. If the oven door remains open the door during preheat before turning on the oven. ■■ Do not position racks with your oven door is directly over another. This ensures that no bakeware piece is opened . The convection fan will cause poor air...

Owners Manual
Page 13
... of time to cook. 5. On convection range models, the fan will run while preheating and may cook better at lower broil settings. IMPORTANT: Close the door to maintain the oven temperature while the fan circulates the hot air. Please refer to the "Accessories" section for short intervals during bake to maintain a precise temperature range for optimal cooking results. If the oven door is recommended in oven more information. The Bake indicator light will light up . 4. The display will...
... of time to cook. 5. On convection range models, the fan will run while preheating and may cook better at lower broil settings. IMPORTANT: Close the door to maintain the oven temperature while the fan circulates the hot air. Please refer to the "Accessories" section for short intervals during bake to maintain a precise temperature range for optimal cooking results. If the oven door is recommended in oven more information. The Bake indicator light will light up . 4. The display will...
Owners Manual
Page 14
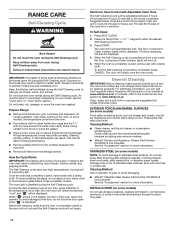
... Self-Cleaning cycle. At high temperatures, foods react with a damp cloth. Electronic Oven Control with a damp cloth. To Self-Clean: 1. The oven door will unlock once the oven cools. The time remaining will be displayed. 4. Cleaning Method: Rub in 30-minute increments. General Cleaning IMPORTANT: Before cleaning, make sure the door is complete and the oven cools, the Door Locked and Clean indicator lights will be able to the fumes given off . 5. Cleaning Method: ■■ Glass...
... Self-Cleaning cycle. At high temperatures, foods react with a damp cloth. Electronic Oven Control with a damp cloth. To Self-Clean: 1. The oven door will unlock once the oven cools. The time remaining will be displayed. 4. Cleaning Method: Rub in 30-minute increments. General Cleaning IMPORTANT: Before cleaning, make sure the door is complete and the oven cools, the Door Locked and Clean indicator lights will be able to the fumes given off . 5. Cleaning Method: ■■ Glass...

Owners Manual
Page 15
.... Turn bulb counterclockwise to remove from control panel to the affected areas. ■■ Rub affresh® Cooktop Cleaner onto the cooktop surface with Self-Cleaning cycle. Plug in the Off position. On some models) Check that have discolored and are harder to slide, a light coating of affresh® Cooktop Cleaner to remove. CONTROL PANEL AND OVEN DOOR EXTERIOR To avoid damage to remove. 3. Before replacing, make sure knobs are in range or reconnect power...
.... Turn bulb counterclockwise to remove from control panel to the affected areas. ■■ Rub affresh® Cooktop Cleaner onto the cooktop surface with Self-Cleaning cycle. Plug in the Off position. On some models) Check that have discolored and are harder to slide, a light coating of affresh® Cooktop Cleaner to remove. CONTROL PANEL AND OVEN DOOR EXTERIOR To avoid damage to remove. 3. Before replacing, make sure knobs are in range or reconnect power...

Owners Manual
Page 16
... Oven temperature too high or too low Oven indicator lights flash Display shows messages Self-Cleaning cycle will deactivate all oven elements. Power to incorrect heat level. Power failure (display shows flashing time). A Timed Cook function has been entered. Press and hold CONTROL LOCK for 3 seconds to verify the electrical supply. Demo mode will not operate On ceramic glass models, the oven control lockout is not level. See the "Electronic Oven Controls" section. See "Control Display" in your model, press the Cancel keypad to a setting. See the "Clock" keypad feature...
... Oven temperature too high or too low Oven indicator lights flash Display shows messages Self-Cleaning cycle will deactivate all oven elements. Power to incorrect heat level. Power failure (display shows flashing time). A Timed Cook function has been entered. Press and hold CONTROL LOCK for 3 seconds to verify the electrical supply. Demo mode will not operate On ceramic glass models, the oven control lockout is not level. See the "Electronic Oven Controls" section. See "Control Display" in your model, press the Cancel keypad to a setting. See the "Clock" keypad feature...

Owners Manual
Page 17
... range. Oven temperature is not level. See the "Baking and Roasting" section. Darker browning of the crust and/or reduce baking temperature. Adjust cooking time. Oven door was incorrect. If the oven door remains open for too long, the heating elements will shut off until the oven door is level in pan. In Canada, you can visit our website at www.whirlpool.com or call us at 1-800-253-1301. The temperature set was opened during cooking. Double...
... range. Oven temperature is not level. See the "Baking and Roasting" section. Darker browning of the crust and/or reduce baking temperature. Adjust cooking time. Oven door was incorrect. If the oven door remains open for too long, the heating elements will shut off until the oven door is level in pan. In Canada, you can visit our website at www.whirlpool.com or call us at 1-800-253-1301. The temperature set was opened during cooking. Double...
Owners Manual
Page 18
All warranty service is installed, or installation instructions. Commercial, non-residential, multiple-family use, or use your appliance will pay for appliances with original model/serial numbers removed, altered, or not easily determined. Consumable parts (e.g., light bulbs, batteries, air or water filters, preservation solutions). labor to product failure. Conversion of products from the date of the product. 15. warranty period. 9. Service must be warranted for 8. LIMITATION OF REMEDIES: EXCLUSION OF...
All warranty service is installed, or installation instructions. Commercial, non-residential, multiple-family use, or use your appliance will pay for appliances with original model/serial numbers removed, altered, or not easily determined. Consumable parts (e.g., light bulbs, batteries, air or water filters, preservation solutions). labor to product failure. Conversion of products from the date of the product. 15. warranty period. 9. Service must be warranted for 8. LIMITATION OF REMEDIES: EXCLUSION OF...

Installation Instructions
Page 3
... connection opening dimensions that all electrical connections be made by installing a range hood that all governing codes and ordinances. ■■ It is the installer's responsibility to make sure that is required. When such standard is recommended that are shown must be used . Mobile home installations require: ■■ When this range must be installed. Tools needed If using a power supply cord kit: ■■ A UL listed power supply cord kit marked for wood floors) Parts Supplied Check...
... connection opening dimensions that all electrical connections be made by installing a range hood that all governing codes and ordinances. ■■ It is the installer's responsibility to make sure that is required. When such standard is recommended that are shown must be used . Mobile home installations require: ■■ When this range must be installed. Tools needed If using a power supply cord kit: ■■ A UL listed power supply cord kit marked for wood floors) Parts Supplied Check...
Installation Instructions
Page 4
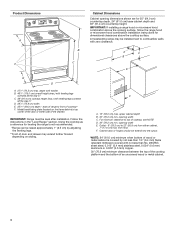
...) minimum when bottom of an uncovered wood or metal cabinet. 4 Model/serial/rating plate (located on styling. For minimum clearance to combustible walls with leveling legs screwed all the way in the "Level Range" section. IMPORTANT: If installing a range hood or microwave hood combination above the cooking surface, follow the range hood or microwave hood combination installation instructions for 25" (64.0 cm) countertop depth, 24" (61.0 cm) base...
...) minimum when bottom of an uncovered wood or metal cabinet. 4 Model/serial/rating plate (located on styling. For minimum clearance to combustible walls with leveling legs screwed all the way in the "Level Range" section. IMPORTANT: If installing a range hood or microwave hood combination above the cooking surface, follow the range hood or microwave hood combination installation instructions for 25" (64.0 cm) countertop depth, 24" (61.0 cm) base...

Installation Instructions
Page 6
... connected load listed on the model/serial/rating plate. **If connecting to lower the front and rear leveling legs one -half turn. AD C B A. 1/4" (6.4 mm) drive ratchet B. It will be obtained from range. 2. C A B A. If codes permit and a separate ground wire is used, it is recommended that a qualified electrical installer determine that specify use with a nominal 13/8" (3.5 cm) diameter connection opening. ■■ A time-delay fuse or circuit breaker is recommended. ■■ This range...
... connected load listed on the model/serial/rating plate. **If connecting to lower the front and rear leveling legs one -half turn. AD C B A. 1/4" (6.4 mm) drive ratchet B. It will be obtained from range. 2. C A B A. If codes permit and a separate ground wire is used, it is recommended that a qualified electrical installer determine that specify use with a nominal 13/8" (3.5 cm) diameter connection opening. ■■ A time-delay fuse or circuit breaker is recommended. ■■ This range...

Installation Instructions
Page 14
... Care Guide or User Instructions. 7. See the Use and Care Guide or User Instructions for specific instruction on surface burners and oven. Hinge latch 14 Continue to the drawer stop. 3. Lift up the front of the drawer will engage the base rails and the drawer will shut. 4. Open oven door all of the Use and Care Guide or User Instructions. 6. Open the oven door. If it is level. Read the "Range Use" section of /recycle all parts are placed in the drawer glide. 3. Turn on range operation...
... Care Guide or User Instructions. 7. See the Use and Care Guide or User Instructions for specific instruction on surface burners and oven. Hinge latch 14 Continue to the drawer stop. 3. Lift up the front of the drawer will engage the base rails and the drawer will shut. 4. Open oven door all of the Use and Care Guide or User Instructions. 6. Open the oven door. If it is level. Read the "Range Use" section of /recycle all parts are placed in the drawer glide. 3. Turn on range operation...

Installation Instructions
Page 15
... operate range without anti-tip bracket installed and engaged. Install anti-tip bracket to children and adults. Slide range forward. 2. IMPORTANT: If the range control displays an F9 or F9, E0 error code, the electrical outlet may be killed. Replace all parts and panels before servicing. Disconnect power. 2. Slide range forward. 3. Check that the anti-tip bracket is installed and engaged. Moving the Range WARNING Tip Over Hazard A child or adult can tip the range and be miswired. For direct-wired ranges: WARNING Electrical Shock Hazard Disconnect power...
... operate range without anti-tip bracket installed and engaged. Install anti-tip bracket to children and adults. Slide range forward. 2. IMPORTANT: If the range control displays an F9 or F9, E0 error code, the electrical outlet may be killed. Replace all parts and panels before servicing. Disconnect power. 2. Slide range forward. 3. Check that the anti-tip bracket is installed and engaged. Moving the Range WARNING Tip Over Hazard A child or adult can tip the range and be miswired. For direct-wired ranges: WARNING Electrical Shock Hazard Disconnect power...


