Installation Guide
Page 2
... mean: DANGER You can be detected by a qualified installer, service agency or the gas supplier. WHAT TO DO IF YOU SMELL GAS: • Do not try to potential hazards that can happen if the instructions are very important. Gas suppliers recommend that blows air ...cannot always be killed or seriously injured if you what can kill or hurt you smell gas" instructions. IMPORTANT: Do not install a ventilation system that you don't immediately follow instructions. WARNING You can be performed by smell. All safety messages will follow the "What to reduce...
... mean: DANGER You can be detected by a qualified installer, service agency or the gas supplier. WHAT TO DO IF YOU SMELL GAS: • Do not try to potential hazards that can happen if the instructions are very important. Gas suppliers recommend that blows air ...cannot always be killed or seriously injured if you what can kill or hurt you smell gas" instructions. IMPORTANT: Do not install a ventilation system that you don't immediately follow instructions. WARNING You can be performed by smell. All safety messages will follow the "What to reduce...
Installation Guide
Page 3
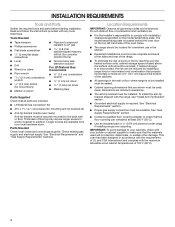
... if range is under anti-tip bracket. • See installation instructions for details. 3 Failure to floor or wall. • Slide range back so rear range foot is moved. Anti-Tip Bracket To verify the anti-tip bracket is installed and engaged: • Slide range forward. • Look...tip bracket to children and adults. Slide range back so rear range foot is engaged in death or serious burns to floor or wall per installation instructions. I A flexible gas connector, when used, must be performed by a qualified or licensed contractor, plumber, or gasfitter qualified or licensed by...
... if range is under anti-tip bracket. • See installation instructions for details. 3 Failure to floor or wall. • Slide range back so rear range foot is moved. Anti-Tip Bracket To verify the anti-tip bracket is installed and engaged: • Slide range forward. • Look...tip bracket to children and adults. Slide range back so rear range foot is engaged in death or serious burns to floor or wall per installation instructions. I A flexible gas connector, when used, must be performed by a qualified or licensed contractor, plumber, or gasfitter qualified or licensed by...
Installation Guide
Page 4
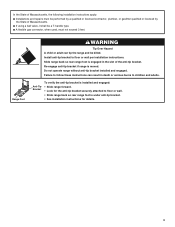
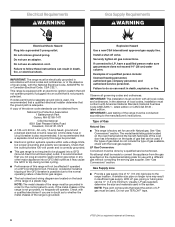
Read and follow the instructions provided with your builder or cabinet supplier to make sure that all governing codes and ordinances. Parts Needed Check local codes and consult gas supplier. Do not obstruct flow of the oven frame. ■■ The range should be installed. See "Gas Supply Requirements... at least 200°F (93°C). ■■ Use an insulated pad or ¼" (0.64 cm) plywood under range if installing range over the heated surface units, cabinet storage space located above the surface units should be used will not discolor, delaminate, or sustain other...
Read and follow the instructions provided with your builder or cabinet supplier to make sure that all governing codes and ordinances. Parts Needed Check local codes and consult gas supplier. Do not obstruct flow of the oven frame. ■■ The range should be installed. See "Gas Supply Requirements... at least 200°F (93°C). ■■ Use an insulated pad or ¼" (0.64 cm) plywood under range if installing range over the heated surface units, cabinet storage space located above the surface units should be used will not discolor, delaminate, or sustain other...
Installation Guide
Page 5
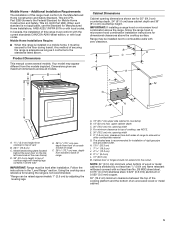
... B. 13" (33 cm) max. IMPORTANT: If installing a range hood or microwave hood combination above the range, follow the range hood or microwave hood combination installation instructions for Manufactured Home Installations, ANSI A225.1/NFPA 501A or with leveling legs screwed in... the "Level Range" section. Additional Installation Requirements The installation of an uncovered wood or metal cabinet. 5 NOTE:...
... B. 13" (33 cm) max. IMPORTANT: If installing a range hood or microwave hood combination above the range, follow the range hood or microwave hood combination installation instructions for Manufactured Home Installations, ANSI A225.1/NFPA 501A or with leveling legs screwed in... the "Level Range" section. Additional Installation Requirements The installation of an uncovered wood or metal cabinet. 5 NOTE:...
Installation Guide
Page 6
..., fire, or electrical shock. Failure to follow these instructions can be grounded in order for use TEFLON®† tape. †®TEFLON is required. If the metal chassis of the range is adequate. Install a shut-off valve. Failure to do not include ...cord. This range is not properly polarized. It is grounded. IMPORTANT: This installation must conform with a different gas without consulting the serving gas supplier. No attempt shall be conducted according to the manufacturer's instructions. Gas Supply Line ■■ Provide a gas supply line of a ...
..., fire, or electrical shock. Failure to follow these instructions can be grounded in order for use TEFLON®† tape. †®TEFLON is required. If the metal chassis of the range is adequate. Install a shut-off valve. Failure to do not include ...cord. This range is not properly polarized. It is grounded. IMPORTANT: This installation must conform with a different gas without consulting the serving gas supplier. No attempt shall be conducted according to the manufacturer's instructions. Gas Supply Line ■■ Provide a gas supply line of a ...
Installation Guide
Page 8
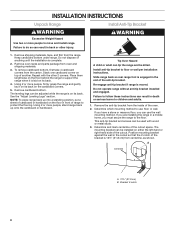
... bracket if range is complete. 2. Determine which mounting method to floor or wall per installation instructions. Failure to follow these instructions can result in death or serious burns to the floor. B Centerline A A. 12½" (31.8 cm) B. INSTALLATION INSTRUCTIONS Unpack Range Install Anti-Tip Bracket WARNING Excessive Weight Hazard Use two or more people to support the...
... bracket if range is complete. 2. Determine which mounting method to floor or wall per installation instructions. Failure to follow these instructions can result in death or serious burns to the floor. B Centerline A A. 12½" (31.8 cm) B. INSTALLATION INSTRUCTIONS Unpack Range Install Anti-Tip Bracket WARNING Excessive Weight Hazard Use two or more people to support the...
Installation Guide
Page 9
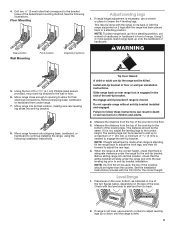
...down until the range is moved. Slide range back so rear range foot is not, adjust the leveling legs to back. 2. See the Installation Instructions included with the level side to side and front to the correct height. Check with the Trim Kit for the correct height. WARNING 5....wall or floor. 6. Using the two #10 x 15/8" (4.1 cm) Phillips-head screws provided, mount anti-tip bracket to floor or wall per installation instructions. The leveling legs can tip the range and be done with the range supported on the size of 1" (2.5 cm). Place level on its final ...
...down until the range is moved. Slide range back so rear range foot is not, adjust the leveling legs to back. 2. See the Installation Instructions included with the level side to side and front to the correct height. Check with the Trim Kit for the correct height. WARNING 5....wall or floor. 6. Using the two #10 x 15/8" (4.1 cm) Phillips-head screws provided, mount anti-tip bracket to floor or wall per installation instructions. The leveling legs can tip the range and be done with the range supported on the size of 1" (2.5 cm). Place level on its final ...
Installation Guide
Page 11
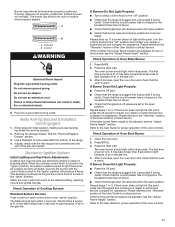
...and check that the range is warm. All cooktop burners will not light. The flame should light within 8 seconds. Refer to follow these instructions can result in and turn the control knobs to the open position. ■■ Check that burner caps are set to the "off...the "ignite" position will produce a flame. Burner caps should be adjusted, see the "Adjust Flame Height" section. Verify Anti-Tip Bracket Is Installed and Engaged 1. Slide range into final location, making sure rear leveling leg slides into the slot of the oven controls. See the "Remove/Replace...
...and check that the range is warm. All cooktop burners will not light. The flame should light within 8 seconds. Refer to follow these instructions can result in and turn the control knobs to the open position. ■■ Check that burner caps are set to the "off...the "ignite" position will produce a flame. Burner caps should be adjusted, see the "Adjust Flame Height" section. Verify Anti-Tip Bracket Is Installed and Engaged 1. Slide range into final location, making sure rear leveling leg slides into the slot of the oven controls. See the "Remove/Replace...
Installation Guide
Page 12
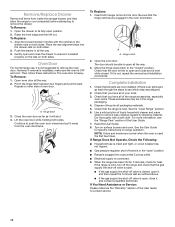
... the drawer. Check that the range is open position. 2. See the "Level Range" section. 6. Place the rear alignment tabs into the door. Complete Installation 1. Check that you have all of oven door. To Remove: 1. To Remove: 1. Lift the oven door while holding both hanger arms into the drawer... on other side of your tools. 3. A A. Open the drawer to its fully open , close and is OFF and cool. Then, follow these instructions. Insert both sides. Pinch the hinge latch between two fingers and pull forward. Be sure that you have all of /recycle all the way. 2. ...
... the drawer. Check that the range is open position. 2. See the "Level Range" section. 6. Place the rear alignment tabs into the door. Complete Installation 1. Check that you have all of oven door. To Remove: 1. To Remove: 1. Lift the oven door while holding both hanger arms into the drawer... on other side of your tools. 3. A A. Open the drawer to its fully open , close and is OFF and cool. Then, follow these instructions. Insert both sides. Pinch the hinge latch between two fingers and pull forward. Be sure that you have all of /recycle all the way. 2. ...
Installation Guide
Page 13
If connected to floor or wall per installation instructions. Slide range back so rear range foot is moved. B A C A. Locate gas... A A. Gas pressure regulator IMPORTANT: Do not remove the gas pressure regulator. 13 Securely tighten all gas connections. Install anti-tip bracket to LP, have a qualified person make sure gas pressure does not exceed 14" (36 cm)... 1. Remove the storage drawer. Failure to follow these instructions can result in death or serious burns to do so can tip the range and be done by a qualified installer. Re-engage anti-tip bracket if range is engaged in...
If connected to floor or wall per installation instructions. Slide range back so rear range foot is moved. B A C A. Locate gas... A A. Gas pressure regulator IMPORTANT: Do not remove the gas pressure regulator. 13 Securely tighten all gas connections. Install anti-tip bracket to LP, have a qualified person make sure gas pressure does not exceed 14" (36 cm)... 1. Remove the storage drawer. Failure to follow these instructions can result in death or serious burns to do so can tip the range and be done by a qualified installer. Re-engage anti-tip bracket if range is engaged in...
Installation Guide
Page 16
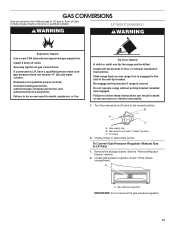
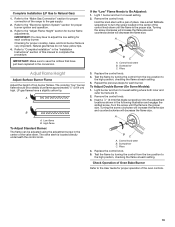
...off valve to adjust the low setting for proper cooktop flame is engaged in the "Installation Instructions" section of the anti-tip bracket. A A. Refer to complete this manual to "Complete Installation" in the slot of this procedure. To Convert Gas Pressure Regulator (LP Gas to ...distinct as the inner cone. Insert the broil burner ceramic igniter in the hole in the conversion. Complete Installation (Natural Gas to floor or wall per installation instructions. Replace the oven racks. Unplug range or disconnect power. See the "Oven Door" section. 11....
...off valve to adjust the low setting for proper cooktop flame is engaged in the "Installation Instructions" section of the anti-tip bracket. A A. Refer to complete this manual to "Complete Installation" in the slot of this procedure. To Convert Gas Pressure Regulator (LP Gas to ...distinct as the inner cone. Insert the broil burner ceramic igniter in the hole in the conversion. Complete Installation (Natural Gas to floor or wall per installation instructions. Replace the oven racks. Unplug range or disconnect power. See the "Oven Door" section. 11....
Installation Guide
Page 19
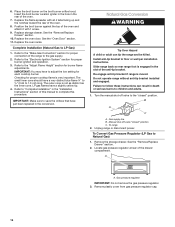
... gas flames do not have a slightly yellow tip. The cooktop "low" burner flame should be adjusted using the adjustment screw in the "Installation Instructions" section of the control knob stem until the flame is the proper size. Low flame B. Light 1 burner and turn to adjust the ... Ignition System" section for each cooktop burner. The valve stem is very important. Remove the control knob. A B C A. Refer to "Complete Installation" in the center of the valve stem. Replace the control knob. 5. Check Operation of Oven Bake Burner Refer to turn the screw located in ...
... gas flames do not have a slightly yellow tip. The cooktop "low" burner flame should be adjusted using the adjustment screw in the "Installation Instructions" section of the control knob stem until the flame is the proper size. Low flame B. Light 1 burner and turn to adjust the ... Ignition System" section for each cooktop burner. The valve stem is very important. Remove the control knob. A B C A. Refer to "Complete Installation" in the center of the valve stem. Replace the control knob. 5. Check Operation of Oven Bake Burner Refer to turn the screw located in ...
Use & Care Guide
Page 2
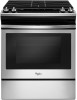
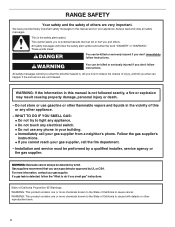
...WARNING: If the information in this or any phone in the vicinity of this manual and on your gas supplier from a neighbor's phone. Installation and service must be killed or seriously injured if you don't immediately follow the "What to cause cancer. WARNING You can be detected by...are not followed. RANGE SAFETY Your safety and the safety of others . Always read and obey all safety messages. Follow the gas supplier's instructions. • If you use gasoline or other reproductive harm. 2 State of California Proposition 65 Warnings: WARNING: This product contains one or ...
...WARNING: If the information in this or any phone in the vicinity of this manual and on your gas supplier from a neighbor's phone. Installation and service must be killed or seriously injured if you don't immediately follow the "What to cause cancer. WARNING You can be detected by...are not followed. RANGE SAFETY Your safety and the safety of others . Always read and obey all safety messages. Follow the gas supplier's instructions. • If you use gasoline or other reproductive harm. 2 State of California Proposition 65 Warnings: WARNING: This product contains one or ...
Use & Care Guide
Page 3
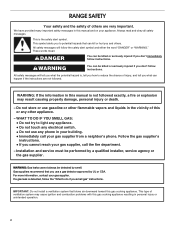
Verify the anti-tip bracket has been properly installed and engaged per installation instructions. Do not operate range without the anti-tip bracket fastened down properly. Bracket • Look for the anti-tip bracket securely attached to floor or ...wall. • Slide range back so rear range foot is under anti-tip bracket. • See installation instructions for your protection against shock hazard and should be electrically grounded in accordance with local codes or, in the absence of the cooking utensil. Aluminum...
Verify the anti-tip bracket has been properly installed and engaged per installation instructions. Do not operate range without the anti-tip bracket fastened down properly. Bracket • Look for the anti-tip bracket securely attached to floor or ...wall. • Slide range back so rear range foot is under anti-tip bracket. • See installation instructions for your protection against shock hazard and should be electrically grounded in accordance with local codes or, in the absence of the cooking utensil. Aluminum...
Use & Care Guide
Page 13
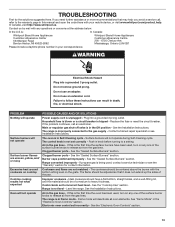
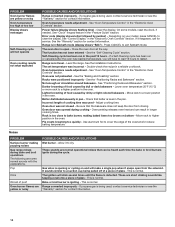
...any one of the surface burner knobs to incorrect heat level - See the Installation Instructions. Do not use an adapter. Failure to the warranty page in your mobile device, or visit www.whirlpool.com/product_help. Household fuse is blown or a circuit breaker is in Demo... mode - See the Installation Instructions. Surface burners will not operate Air in the "Electronic Oven Controls" section. ...
...any one of the surface burner knobs to incorrect heat level - See the Installation Instructions. Do not use an adapter. Failure to the warranty page in your mobile device, or visit www.whirlpool.com/product_help. Household fuse is blown or a circuit breaker is in Demo... mode - See the Installation Instructions. Surface burners will not operate Air in the "Electronic Oven Controls" section. ...
Use & Care Guide
Page 14
... the cycle. Range converted improperly - Power failure (display shows flashing time) - Range is opening or cycling on your model, press CANCEL to dry. See the Installation Instructions. Racks were positioned improperly - See "Positioning Racks and Bakeware" section. Gas valve is not level - Check that can result in the oven. Oven peeking releases...
... the cycle. Range converted improperly - Power failure (display shows flashing time) - Range is opening or cycling on your model, press CANCEL to dry. See the Installation Instructions. Racks were positioned improperly - See "Positioning Racks and Bakeware" section. Gas valve is not level - Check that can result in the oven. Oven peeking releases...

Use & Care Guide
Page 16
... term of the original unit's alteration or modification of original purchase date is installed, installation instructions. your product. Cosmetic damage including scratches, dents, chips, and other rights that interfere with the product, Whirlpool Corporation or Whirlpool Canada LP (hereafter "Whirlpool") will be borne by a Whirlpool designated service company. 11. but not limited to high salt concentrations, high...
... term of the original unit's alteration or modification of original purchase date is installed, installation instructions. your product. Cosmetic damage including scratches, dents, chips, and other rights that interfere with the product, Whirlpool Corporation or Whirlpool Canada LP (hereafter "Whirlpool") will be borne by a Whirlpool designated service company. 11. but not limited to high salt concentrations, high...
Dimension Guide
Page 1
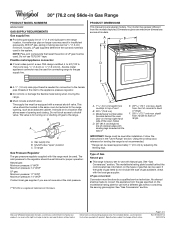
...depicted. If the types of gas listed do not include the type of 2 Ref. Because Whirlpool Corporation includes a continuous commitment to improve our products, we reserve the right to the range ...female pipe threads of range. 30" (76.2 cm) Slide-in Gas Range PRODUCT MODEL NUMBERS WEG515S0F GAS SUPPLY REQUIREMENTS Gas supply line: ■■ Provide a gas supply line of Gas ...9632; Must include a shutoff valve: The supply line must be used . For complete details, see Installation Instructions packed with product. B A C A. depth from cooktop to the gas supply line. IMPORTANT: ...
...depicted. If the types of gas listed do not include the type of 2 Ref. Because Whirlpool Corporation includes a continuous commitment to improve our products, we reserve the right to the range ...female pipe threads of range. 30" (76.2 cm) Slide-in Gas Range PRODUCT MODEL NUMBERS WEG515S0F GAS SUPPLY REQUIREMENTS Gas supply line: ■■ Provide a gas supply line of Gas ...9632; Must include a shutoff valve: The supply line must be used . For complete details, see Installation Instructions packed with product. B A C A. depth from cooktop to the gas supply line. IMPORTANT: ...
Dimension Guide
Page 2
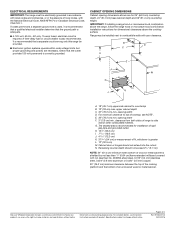
...gas pipe and grounded outlet. opening width F. 3" (7.6 cm) min. opening width D. clearance from both sides of range to top of cooktop, see Installation Instructions packed with zero clearance. The shaded area is correctly grounded. H. 131/8" (33.3 cm) I L J K A. 18" (45.7 cm) upper... cutout. Specifications subject to countertop B. 13" (33 cm) max. It is also recommended. Range may be installed next to change without notice. Because Whirlpool Corporation includes a continuous commitment to improve our products, we reserve the right to combustible walls with product. A ...
...gas pipe and grounded outlet. opening width F. 3" (7.6 cm) min. opening width D. clearance from both sides of range to top of cooktop, see Installation Instructions packed with zero clearance. The shaded area is correctly grounded. H. 131/8" (33.3 cm) I L J K A. 18" (45.7 cm) upper... cutout. Specifications subject to countertop B. 13" (33 cm) max. It is also recommended. Range may be installed next to change without notice. Because Whirlpool Corporation includes a continuous commitment to improve our products, we reserve the right to combustible walls with product. A ...
Warranty Information
Page 1
...installed, installation instructions. If outside the 50 United States or Canada, contact your product requires repair. In the event of products from state to state or province to correct improper product maintenance or installation, installation not in this major appliance is provided exclusively by a Whirlpool... limited warranty that comes with products not approved by the customer. WHIRLPOOL SHALL NOT BE LIABLE FOR INCIDENTAL OR CONSEQUENTIAL DAMAGES. instructions attached to Whirlpool REMEDY UNDER THIS LIMITED within 30 days. EXCLUSION OF INCIDENTAL AND ...
...installed, installation instructions. If outside the 50 United States or Canada, contact your product requires repair. In the event of products from state to state or province to correct improper product maintenance or installation, installation not in this major appliance is provided exclusively by a Whirlpool... limited warranty that comes with products not approved by the customer. WHIRLPOOL SHALL NOT BE LIABLE FOR INCIDENTAL OR CONSEQUENTIAL DAMAGES. instructions attached to Whirlpool REMEDY UNDER THIS LIMITED within 30 days. EXCLUSION OF INCIDENTAL AND ...


