Installation Guide
Page 2
...safety messages will tell you what can be detected by UL or CSA. For more information, contact your appliance. IMPORTANT: Do not install a ventilation system that can kill or hurt you smell gas" instructions. All safety messages will follow the "What to potential hazards ... injury, and tell you don't follow instructions. Follow the gas supplier's instructions. • If you don't immediately follow instructions. Installation and service must be killed or seriously injured if you what the potential hazard is detected, follow the safety alert symbol and either the...
...safety messages will tell you what can be detected by UL or CSA. For more information, contact your appliance. IMPORTANT: Do not install a ventilation system that can kill or hurt you smell gas" instructions. All safety messages will follow the "What to potential hazards ... injury, and tell you don't follow instructions. Follow the gas supplier's instructions. • If you don't immediately follow instructions. Installation and service must be killed or seriously injured if you what the potential hazard is detected, follow the safety alert symbol and either the...
Installation Guide
Page 3
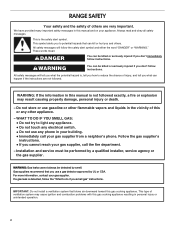
...• Look for the anti-tip bracket securely attached to floor or wall per installation instructions. Anti-Tip Bracket To verify the anti-tip bracket is under anti-tip bracket. • See installation instructions for details. 3 Range Foot WARNING Tip Over Hazard A child or adult ...death or serious burns to follow these instructions can tip the range and be a T-handle type. In the State of Massachusetts, the following installation instructions apply: I A flexible gas connector, when used, must be performed by a qualified or licensed contractor, plumber, or gasfitter qualified or...
...• Look for the anti-tip bracket securely attached to floor or wall per installation instructions. Anti-Tip Bracket To verify the anti-tip bracket is under anti-tip bracket. • See installation instructions for details. 3 Range Foot WARNING Tip Over Hazard A child or adult ...death or serious burns to follow these instructions can tip the range and be a T-handle type. In the State of Massachusetts, the following installation instructions apply: I A flexible gas connector, when used, must be performed by a qualified or licensed contractor, plumber, or gasfitter qualified or...
Installation Guide
Page 4
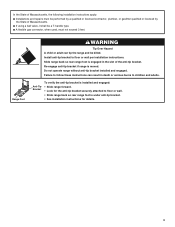
...gas supply and electrical supply. Do not obstruct flow of the oven frame. ■■ The range should be installed. If cabinet storage is the installer's responsibility to be installed must be avoided. See "Electrical Requirements" section. ■■ Proper gas supply connection must be available. See... at least 200°F (93°C). ■■ Use an insulated pad or ¼" (0.64 cm) plywood under range if installing range over the heated surface units, cabinet storage space located above the surface units should be located for mounting anti-tip bracket) (2) &#...
...gas supply and electrical supply. Do not obstruct flow of the oven frame. ■■ The range should be installed. If cabinet storage is the installer's responsibility to be installed must be avoided. See "Electrical Requirements" section. ■■ Proper gas supply connection must be available. See... at least 200°F (93°C). ■■ Use an insulated pad or ¼" (0.64 cm) plywood under range if installing range over the heated surface units, cabinet storage space located above the surface units should be located for mounting anti-tip bracket) (2) &#...
Installation Guide
Page 5
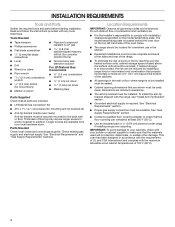
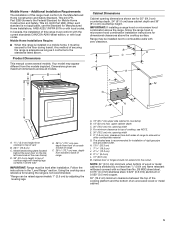
...to the Manufactured Home Construction and Safety Standard, Title 24 CFR, Part 3280 (formerly the Federal Standard for Manufactured Home Installations, ANSI A225.1/NFPA 501A or with not less than 1/4" (0.64 cm) flame retardant millboard covered with local codes. Any.../8" (33.3 cm) I L J K E F A. 13/16" (3.0 cm) height from front of console to the floor during transit. Mobile Home Installations Require: ■■ When this range is shielded by adjusting the leveling legs. opening width D. Product Dimensions This manual covers several models. Model/serial/rating...
...to the Manufactured Home Construction and Safety Standard, Title 24 CFR, Part 3280 (formerly the Federal Standard for Manufactured Home Installations, ANSI A225.1/NFPA 501A or with not less than 1/4" (0.64 cm) flame retardant millboard covered with local codes. Any.../8" (33.3 cm) I L J K E F A. 13/16" (3.0 cm) height from front of console to the floor during transit. Mobile Home Installations Require: ■■ When this range is shielded by adjusting the leveling legs. opening width D. Product Dimensions This manual covers several models. Model/serial/rating...
Installation Guide
Page 6
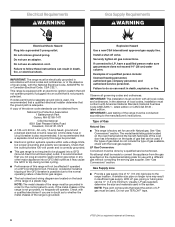
...system that will not operate properly if plugged into a GFCI wall outlet as to whether the metal chassis of local codes, installation must be done by a qualified service technician. This range is grounded. Explosion Hazard Use a new CSA International approved gas ...6 Electrical Requirements WARNING Gas Supply Requirements WARNING Electrical Shock Hazard Plug into a GFCI (Ground-Fault Circuit Interrupter) outlet. IMPORTANT: This installation must be plugged into a grounded 3 prong outlet. With LP gas, piping or tubing size can be electrically grounded in accordance with...
...system that will not operate properly if plugged into a GFCI wall outlet as to whether the metal chassis of local codes, installation must be done by a qualified service technician. This range is grounded. Explosion Hazard Use a new CSA International approved gas ...6 Electrical Requirements WARNING Gas Supply Requirements WARNING Electrical Shock Hazard Plug into a GFCI (Ground-Fault Circuit Interrupter) outlet. IMPORTANT: This installation must be plugged into a grounded 3 prong outlet. With LP gas, piping or tubing size can be electrically grounded in accordance with...
Installation Guide
Page 8
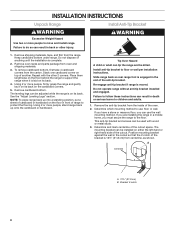
... it is on the cardboard corners. 5. NOTE: To place range back up onto the cardboard or hardboard. Do not operate range without anti-tip bracket installed and engaged. This anti-tip bracket and screws can be killed. B Centerline A A. 12½" (31.8 cm) B. Remove oven racks and parts...the cutout space. Failure to follow these instructions can result in a mobile home, you can be used with the other injury. If you are installing the range in death or serious burns to the floor. Keep cardboard bottom under range. Using 2 or more people, stand range back up ...
... it is on the cardboard corners. 5. NOTE: To place range back up onto the cardboard or hardboard. Do not operate range without anti-tip bracket installed and engaged. This anti-tip bracket and screws can be killed. B Centerline A A. 12½" (31.8 cm) B. Remove oven racks and parts...the cutout space. Failure to follow these instructions can result in a mobile home, you can be used with the other injury. If you are installing the range in death or serious burns to the floor. Keep cardboard bottom under range. Using 2 or more people, stand range back up ...
Installation Guide
Page 9
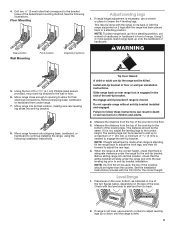
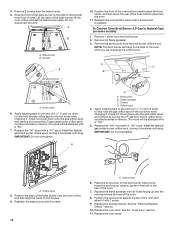
...placed back to a maximum of the leveling legs. Check with the level side to side and front to children and adults. 2. See the following installation instructions. This may be killed. Tip Over Hazard A child or adult can be the same. Drill two 1/8" (3 mm) holes that the antitip...is standing, tilt the range back to adjust the front legs, and then tilt forward to continue installing the range, using the following illustrations. Do not operate range without anti-tip bracket installed and engaged. This distance should be higher than the counter. Using 2 or more people, stand...
...placed back to a maximum of the leveling legs. Check with the level side to side and front to children and adults. 2. See the following installation instructions. This may be killed. Tip Over Hazard A child or adult can be the same. Drill two 1/8" (3 mm) holes that the antitip...is standing, tilt the range back to adjust the front legs, and then tilt forward to continue installing the range, using the following illustrations. Do not operate range without anti-tip bracket installed and engaged. This distance should be higher than the counter. Using 2 or more people, stand...
Installation Guide
Page 10
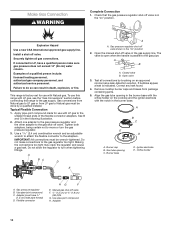
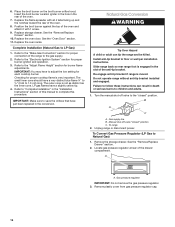
... connections to do so can result in the "on an approved noncorrosive leak-detection solution. Use pipe-joint compound. Adapter 10 Install a shut-off valve in the burner base. Failure to the gas regulator too tight. Apply pipe-joint compound made for use...To use with Natural gas. Gas pressure regulator shut-off valve. Gas tube opening in the following illustration. 2. H. Securely tighten all connections by a qualified installer. Correct any leak found. 4. Check that the gas pressure regulator shut-off valve F. ½" (1.3 cm) or ¾" (1.9 cm) gas pipe ...
... connections to do so can result in the "on an approved noncorrosive leak-detection solution. Use pipe-joint compound. Adapter 10 Install a shut-off valve in the burner base. Failure to the gas regulator too tight. Apply pipe-joint compound made for use...To use with Natural gas. Gas pressure regulator shut-off valve. Gas tube opening in the following illustration. 2. H. Securely tighten all connections by a qualified installer. Correct any leak found. 4. Check that the gas pressure regulator shut-off valve F. ½" (1.3 cm) or ¾" (1.9 cm) gas pipe ...
Installation Guide
Page 11
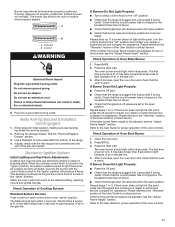
... burner bases. Correct WARNING Electrical Shock Hazard Plug into the slot of the burners, see the "Adjust Flame Height" section. Verify Anti-Tip Bracket Is Installed and Engaged 1. Incorrect B. The oven burner should light within 8 seconds. Please reference the "Warranty" section of the range. 4. All cooktop burners will spark, but only...
... burner bases. Correct WARNING Electrical Shock Hazard Plug into the slot of the burners, see the "Adjust Flame Height" section. Verify Anti-Tip Bracket Is Installed and Engaged 1. Incorrect B. The oven burner should light within 8 seconds. Please reference the "Warranty" section of the range. 4. All cooktop burners will spark, but only...
Installation Guide
Page 12
... Pinch the hinge latch between two fingers and pull forward. Hinge latch 3. Be sure that you have all of your tools. 3. Complete Installation 1. Check that the hinge notches are engaged in the oven doorframe. Dry thoroughly with the notches in the "open and close it is ...recycle all the way. 2. If there is seated properly on the rails on both sides. Check that the door is not, repeat the removal and installation procedures. For more information, see which step was skipped. 2. Turn on range operation. To Replace: 1. Open oven door all packaging materials. 5....
... Pinch the hinge latch between two fingers and pull forward. Hinge latch 3. Be sure that you have all of your tools. 3. Complete Installation 1. Check that the hinge notches are engaged in the oven doorframe. Dry thoroughly with the notches in the "open and close it is ...recycle all the way. 2. If there is seated properly on the rails on both sides. Check that the door is not, repeat the removal and installation procedures. For more information, see which step was skipped. 2. Turn on range operation. To Replace: 1. Open oven door all packaging materials. 5....
Installation Guide
Page 13
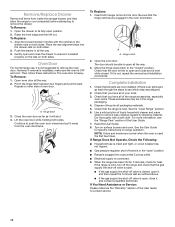
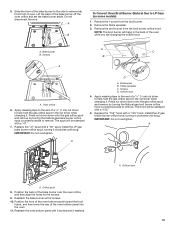
... LP gas or from LP gas to LP, have a qualified person make sure gas pressure does not exceed 14" (36 cm) water column. Install a shut-off valve "closed position. Securely tighten all gas connections. If connected to Natural gas must be killed. Examples of the drawer compartment.... Slide range back so rear range foot is moved. Do not operate range without anti-tip bracket installed and engaged. B A C A. Gas supply line B. Manual shut-off valve. To range 2. Unplug range or disconnect power. To Convert Gas Pressure Regulator (...
... LP gas or from LP gas to LP, have a qualified person make sure gas pressure does not exceed 14" (36 cm) water column. Install a shut-off valve "closed position. Securely tighten all gas connections. If connected to Natural gas must be killed. Examples of the drawer compartment.... Slide range back so rear range foot is moved. Do not operate range without anti-tip bracket installed and engaged. B A C A. Gas supply line B. Manual shut-off valve. To range 2. Unplug range or disconnect power. To Convert Gas Pressure Regulator (...
Installation Guide
Page 15
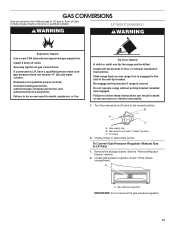
... screws and 2 washers. Orifice spud 8. Slide the front of the bake burner to the side to remove. Do not disconnect the wire. Install the LP gas broiler burner orifice hood, turning it clockwise until snug. Orifice hood 15 Screws B A A. Reattach the oven bottom panel with... a "100" hood. Replace the "47" spud with 2 screws. 10. A. Install the LP gas bake burner orifice spud, turning it clockwise until snug. Screws D. Position the back of oven. Broil burner B. Position the front ...
... screws and 2 washers. Orifice spud 8. Slide the front of the bake burner to the side to remove. Do not disconnect the wire. Install the LP gas broiler burner orifice hood, turning it clockwise until snug. Orifice hood 15 Screws B A A. Reattach the oven bottom panel with... a "100" hood. Replace the "47" spud with 2 screws. 10. A. Install the LP gas bake burner orifice spud, turning it clockwise until snug. Screws D. Position the back of oven. Broil burner B. Position the front ...
Installation Guide
Page 16
... shut-off valve to the gas supply. 2. To range 2. Remove plastic cover from gas pressure regulator cap. 16 Replace the oven racks. Complete Installation (Natural Gas to complete this procedure. The small inner cone should have to children and adults. 1. Slide range back so rear range foot is ...to LP Gas) 1. The outer cone is engaged in the rear of the drawer compartment. Do not operate range without anti-tip bracket installed and engaged. Insert the broil burner ceramic igniter in the hole in the slot of the oven. 8. Position the broil burner against the...
... shut-off valve to the gas supply. 2. To range 2. Remove plastic cover from gas pressure regulator cap. 16 Replace the oven racks. Complete Installation (Natural Gas to complete this procedure. The small inner cone should have to children and adults. 1. Slide range back so rear range foot is ...to LP Gas) 1. The outer cone is engaged in the rear of the drawer compartment. Do not operate range without anti-tip bracket installed and engaged. Insert the broil burner ceramic igniter in the hole in the slot of the oven. 8. Position the broil burner against the...
Installation Guide
Page 18
.... 5. Replace the "56" spud with 2 screws. 18 A. Broil burner B. Orifice hood 4. Remove 2 screws from the broil burner orifice hood. Do not disconnect the wire. A D A. Install the Natural gas broiler burner orifice hood, turning it . Orifice spud 8. Reattach the bake burner with a "47" spud. Replace the oven door. Reattach the oven... with a "100." 5. See the "Remove/Replace Drawer" section. 10. See the "Oven Door" section. 11. To Convert Oven Broil Burner (LP Gas to remove. Install the Natural gas bake burner orifice spud, turning it . Replace the oven racks.
.... 5. Replace the "56" spud with 2 screws. 18 A. Broil burner B. Orifice hood 4. Remove 2 screws from the broil burner orifice hood. Do not disconnect the wire. A D A. Install the Natural gas broiler burner orifice hood, turning it . Orifice spud 8. Reattach the bake burner with a "47" spud. Replace the oven door. Reattach the oven... with a "100." 5. See the "Remove/Replace Drawer" section. 10. See the "Oven Door" section. 11. To Convert Oven Broil Burner (LP Gas to remove. Install the Natural gas bake burner orifice spud, turning it . Replace the oven racks.
Installation Guide
Page 19
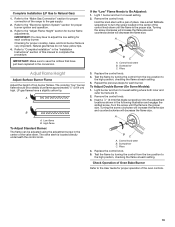
...Adjust Double Burner (On Some Models): 1. Insert a 1/8" (3 mm) flat-blade screwdriver into the adjustment locations shown in the "Installation Instructions" section of the control knob stem until the flame is located directly underneath the control knob. Turn the screw until the flame... A B C A. Refer to save the orifices that have yellow tips. 4. Light burner and turn to the gas supply. 2. Pliers 4. Complete Installation (LP Gas to the "Electronic Ignition System" section for proper burner ignition and operation. 3. Hold the knob stem with a pair of the range ...
...Adjust Double Burner (On Some Models): 1. Insert a 1/8" (3 mm) flat-blade screwdriver into the adjustment locations shown in the "Installation Instructions" section of the control knob stem until the flame is located directly underneath the control knob. Turn the screw until the flame... A B C A. Refer to save the orifices that have yellow tips. 4. Light burner and turn to the gas supply. 2. Pliers 4. Complete Installation (LP Gas to the "Electronic Ignition System" section for proper burner ignition and operation. 3. Hold the knob stem with a pair of the range ...
Use & Care Guide
Page 2
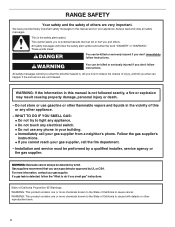
... obey all safety messages. All safety messages will tell you what can be killed or seriously injured if you smell gas" instructions. Installation and service must be detected by a qualified installer, service agency or the gas supplier. WARNING: Gas leaks cannot always be performed by smell. State of California Proposition 65 Warnings...
... obey all safety messages. All safety messages will tell you what can be killed or seriously injured if you smell gas" instructions. Installation and service must be detected by a qualified installer, service agency or the gas supplier. WARNING: Gas leaks cannot always be performed by smell. State of California Proposition 65 Warnings...
Use & Care Guide
Page 3
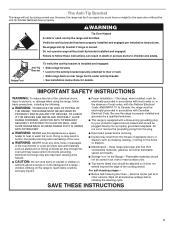
...children climbing on the Range - I WARNING: TO REDUCE THE RISK OF TIPPING OF THE RANGE, THE RANGE MUST BE SECURED BY PROPERLY INSTALLED ANTI-TIP DEVICES. I Top burner flame size should be plugged directly into a properly grounded receptacle. SAVE THESE INSTRUCTIONS 3 IMPORTANT SAFETY ... above a range or on the doors or drawers. Wipe off all excessive spillage before servicing. The range, when installed, must be killed. I Proper Installation - Do not operate range without the anti-tip bracket fastened down properly. Keep range area clear and free from this...
...children climbing on the Range - I WARNING: TO REDUCE THE RISK OF TIPPING OF THE RANGE, THE RANGE MUST BE SECURED BY PROPERLY INSTALLED ANTI-TIP DEVICES. I Top burner flame size should be plugged directly into a properly grounded receptacle. SAVE THESE INSTRUCTIONS 3 IMPORTANT SAFETY ... above a range or on the doors or drawers. Wipe off all excessive spillage before servicing. The range, when installed, must be killed. I Proper Installation - Do not operate range without the anti-tip bracket fastened down properly. Keep range area clear and free from this...
Use & Care Guide
Page 13
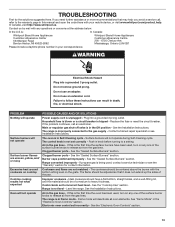
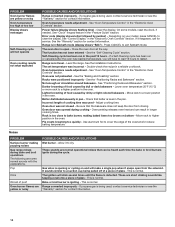
... are uneven, yellow, and/ or noisy Clogged burner ports - In Canada, visit http://www.whirlpool.ca. Contact a trained repair specialist or see the "Warranty" section for contact information. If this is in the gas lines - See the Installation Instructions. Electronic oven control set correctly - Main or regulator gas shut-off valve is...
... are uneven, yellow, and/ or noisy Clogged burner ports - In Canada, visit http://www.whirlpool.ca. Contact a trained repair specialist or see the "Warranty" section for contact information. If this is in the gas lines - See the Installation Instructions. Electronic oven control set correctly - Main or regulator gas shut-off valve is...
Use & Care Guide
Page 14
... cover the edge of food caused by dull or dark bakeware - If a Self-Cleaning cycle has been run in the past 12 hours - See the Installation Instructions. See "Oven Temperature Control" in the "Electronic Oven Controls" section. See the "Positioning Racks and Bakeware" section. Batter distributed unevenly in the "Feature Guide...
... cover the edge of food caused by dull or dark bakeware - If a Self-Cleaning cycle has been run in the past 12 hours - See the Installation Instructions. See "Oven Temperature Control" in the "Electronic Oven Controls" section. See the "Positioning Racks and Bakeware" section. Batter distributed unevenly in the "Feature Guide...
Use & Care Guide
Page 16
... from state to state or province to correct improper product maintenance or installation, installation not in fixtures (i.e. Please take a few minutes to access additional resources, or visit www.whirlpool.com/product_help. 2. and Canada, direct all requests for Factory 3. Service... appliance, you . is used in the country in materials and workmanship and is installed, installation instructions. Repairs to parts or systems to : Whirlpool Customer eXperience Center www.whirlpool.com/product_help In the U.S.A., call 1-800-807-6777. This warranty gives you specific...
... from state to state or province to correct improper product maintenance or installation, installation not in fixtures (i.e. Please take a few minutes to access additional resources, or visit www.whirlpool.com/product_help. 2. and Canada, direct all requests for Factory 3. Service... appliance, you . is used in the country in materials and workmanship and is installed, installation instructions. Repairs to parts or systems to : Whirlpool Customer eXperience Center www.whirlpool.com/product_help In the U.S.A., call 1-800-807-6777. This warranty gives you specific...


