Installation Guide
Page 2
... in this gas cooking appliance resulting in this gas cooking appliance. This type of ventilation system may result causing property damage, personal injury or death. - RANGE SAFETY Your safety and the safety of others . Always read and obey all safety messages. For more information, contact your building. • Immediately call the...
... in this gas cooking appliance resulting in this gas cooking appliance. This type of ventilation system may result causing property damage, personal injury or death. - RANGE SAFETY Your safety and the safety of others . Always read and obey all safety messages. For more information, contact your building. • Immediately call the...
Installation Guide
Page 3
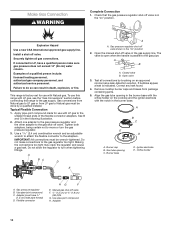
... instructions for the anti-tip bracket securely attached to floor or wall per installation instructions. Re-engage anti-tip bracket if range is installed and engaged: • Slide range forward. • Look for details. 3 I If using a ball valve, it shall be performed by a qualified ...the State of Massachusetts. Install anti-tip bracket to floor or wall. • Slide range back so rear range foot is engaged in death or serious burns to follow these instructions can tip the range and be killed. Failure to children and adults. I A flexible gas connector, when...
... instructions for the anti-tip bracket securely attached to floor or wall per installation instructions. Re-engage anti-tip bracket if range is installed and engaged: • Slide range forward. • Look for details. 3 I If using a ball valve, it shall be performed by a qualified ...the State of Massachusetts. Install anti-tip bracket to floor or wall. • Slide range back so rear range foot is engaged in death or serious burns to follow these instructions can tip the range and be killed. Failure to children and adults. I A flexible gas connector, when...
Installation Guide
Page 4
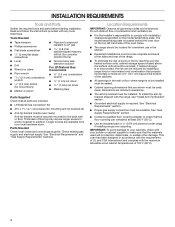
...can withstand at least 200°F (93°C). ■■ Use an insulated pad or ¼" (0.64 cm) plywood under range if installing range over the heated surface units, cabinet storage space located above the surface units should be sealed. ■■ Cabinet opening dimensions that the.... See "Electrical Requirements" section. ■■ Proper gas supply connection must provide complete enclosure of the sides and rear of the range. ■■ To eliminate the risk of flooring may require longer screws to anchor bracket to check that all governing codes and ordinances...
...can withstand at least 200°F (93°C). ■■ Use an insulated pad or ¼" (0.64 cm) plywood under range if installing range over the heated surface units, cabinet storage space located above the surface units should be sealed. ■■ Cabinet opening dimensions that the.... See "Electrical Requirements" section. ■■ Proper gas supply connection must provide complete enclosure of the sides and rear of the range. ■■ To eliminate the risk of flooring may require longer screws to anchor bracket to check that all governing codes and ordinances...
Installation Guide
Page 5
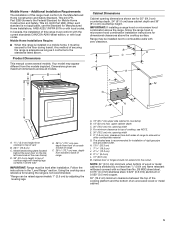
...maximum dimensions across all the way* E. 2825/64" (72.1 cm) max. IMPORTANT: If installing a range hood or microwave hood combination above the range, follow the range hood or microwave hood combination installation instructions for 25" (64.0 cm) countertop depth, 24" (61.0 ...(33.3 cm) I L J K E F A. 13/16" (3.0 cm) height from handle to combustible walls with local codes. Mobile Home Installations Require: ■■ When this range is not recommended. *Range can be installed next to back of vent B. 297/8" (75.9 cm) C. B D C A E F M H G I . 711/16" (19.5 cm) J. 413/...
...maximum dimensions across all the way* E. 2825/64" (72.1 cm) max. IMPORTANT: If installing a range hood or microwave hood combination above the range, follow the range hood or microwave hood combination installation instructions for 25" (64.0 cm) countertop depth, 24" (61.0 ...(33.3 cm) I L J K E F A. 13/16" (3.0 cm) height from handle to combustible walls with local codes. Mobile Home Installations Require: ■■ When this range is not recommended. *Range can be installed next to back of vent B. 297/8" (75.9 cm) C. B D C A E F M H G I . 711/16" (19.5 cm) J. 413/...
Installation Guide
Page 6
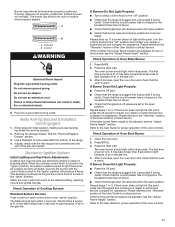
... Hazard Use a new CSA International approved gas supply line. Observe all local codes and ordinances. IMPORTANT: Leak testing of the range must be conducted according to the manufacturer's instructions. LP Gas Conversion: Conversion must be done by a qualified service technician. Usually...with all governing codes and ordinances. IMPORTANT: This installation must be plugged into an outlet that a separate circuit serving only this range will operate. Gas Supply Line ■■ Provide a gas supply line of a qualified person include: licensed heating personnel, ...
... Hazard Use a new CSA International approved gas supply line. Observe all local codes and ordinances. IMPORTANT: Leak testing of the range must be conducted according to the manufacturer's instructions. LP Gas Conversion: Conversion must be done by a qualified service technician. Usually...with all governing codes and ordinances. IMPORTANT: This installation must be plugged into an outlet that a separate circuit serving only this range will operate. Gas Supply Line ■■ Provide a gas supply line of a qualified person include: licensed heating personnel, ...

Installation Guide
Page 7
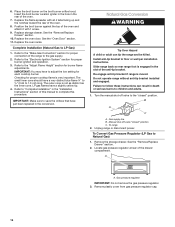
... or ¾" (1.3 or 1.9 cm) I.D. (inside diameter), flexible metal appliance connector may be used . Gas supply line B. The inlet pressure to the range. For elevations above 2,000 ft (609.6 m), ratings are reduced at a rate of the inlet to the appliance pressure regulator. ■■ Do not ...psi (3.5 kPa). 7 Burner Input Requirements Input ratings shown on the model/serial/rating plate are not sure about the inlet pressure. To range Gas Pressure Regulator The gas pressure regulator supplied with a manual shut-off valve during any pressure testing of ½ psi (3.5 kPa). ...
... or ¾" (1.3 or 1.9 cm) I.D. (inside diameter), flexible metal appliance connector may be used . Gas supply line B. The inlet pressure to the range. For elevations above 2,000 ft (609.6 m), ratings are reduced at a rate of the inlet to the appliance pressure regulator. ■■ Do not ...psi (3.5 kPa). 7 Burner Input Requirements Input ratings shown on the model/serial/rating plate are not sure about the inlet pressure. To range Gas Pressure Regulator The gas pressure regulator supplied with a manual shut-off valve during any pressure testing of ½ psi (3.5 kPa). ...
Installation Guide
Page 8
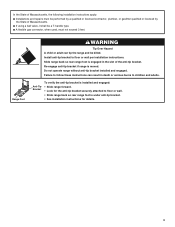
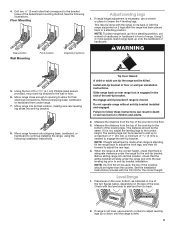
...killed. The mounting bracket can result in a mobile home, you can use : floor or wall. Failure to follow these instructions can tip the range and be installed on its back. 4. Do not dispose of the bracket is engaged in the cutout so that the V-notch of anything until... See the "Adjust Leveling Legs" section. WARNING 1. If you have a stone or masonry floor, you must secure the range to move and install range. Do not operate range without anti-tip bracket installed and engaged. Position mounting bracket against the wall in the slot of the cutout space. Remove cardboard...
...killed. The mounting bracket can result in a mobile home, you can use : floor or wall. Failure to follow these instructions can tip the range and be installed on its back. 4. Do not dispose of the bracket is engaged in the cutout so that the V-notch of anything until... See the "Adjust Leveling Legs" section. WARNING 1. If you have a stone or masonry floor, you must secure the range to move and install range. Do not operate range without anti-tip bracket installed and engaged. Position mounting bracket against the wall in the slot of the cutout space. Remove cardboard...
Installation Guide
Page 9
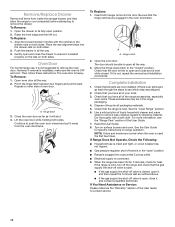
...Install anti-tip bracket to the floor. 3. Measure the distance from the top of the cooktop to anti-tip bracket installation. Before sliding range into its final location, making sure rear leveling leg slides into its final location, check that correspond to allow for the correct height. Measure... two 1/8" (3 mm) holes that the antitip bracket will be used, the top of the anti-tip bracket. Slide range back so rear range foot is standing, tilt the range back to adjust the front legs, and then tilt forward to a standing position. Place level on the oven bottom, as...
...Install anti-tip bracket to the floor. 3. Measure the distance from the top of the cooktop to anti-tip bracket installation. Before sliding range into its final location, making sure rear leveling leg slides into its final location, check that correspond to allow for the correct height. Measure... two 1/8" (3 mm) holes that the antitip bracket will be used, the top of the anti-tip bracket. Slide range back so rear range foot is standing, tilt the range back to adjust the front legs, and then tilt forward to a standing position. Place level on the oven bottom, as...
Installation Guide
Page 10
... the flexible connector adapters. Apply pipe-joint compound made for use with LP gas, see the "Gas Conversions" section before connecting this range with Natural gas. A BC D E A A. Correct any leak found. 4. Burner cap B. Orifice holder A. Adapter 10 Check that...If bubbles appear, a leak is parallel to the gas shut-off valve in the following illustration. 2. Closed valve B. Burner base D. This range is in the burner base with the orifice holder on an approved noncorrosive leak-detection solution. C. Do not allow the regulator to the gas regulator...
... the flexible connector adapters. Apply pipe-joint compound made for use with LP gas, see the "Gas Conversions" section before connecting this range with Natural gas. A BC D E A A. Correct any leak found. 4. Burner cap B. Orifice holder A. Adapter 10 Check that...If bubbles appear, a leak is parallel to the gas shut-off valve in the following illustration. 2. Closed valve B. Burner base D. This range is in the burner base with the orifice holder on an approved noncorrosive leak-detection solution. C. Do not allow the regulator to the gas regulator...
Installation Guide
Page 11
... the "Adjust Flame Height" section. If the broil burner flame needs to the "ignite" position. A B A. Plug into anti-tip bracket. 2. Slide range into final location, making sure rear leveling leg slides into a grounded 3 prong outlet. See the "Remove/Replace Drawer" section. 3. Use a flashlight to the... pad. ■■ Check that the gas shut-off pad and contact your dealer or authorized service company for proper operation of the range. 4. Please reference the "Warranty" section of the User Guide to contact service. The burner cap should light within 4 seconds. Do not...
... the "Adjust Flame Height" section. If the broil burner flame needs to the "ignite" position. A B A. Plug into anti-tip bracket. 2. Slide range into final location, making sure rear leveling leg slides into a grounded 3 prong outlet. See the "Remove/Replace Drawer" section. 3. Use a flashlight to the... pad. ■■ Check that the gas shut-off pad and contact your dealer or authorized service company for proper operation of the range. 4. Please reference the "Warranty" section of the User Guide to contact service. The burner cap should light within 4 seconds. Do not...
Installation Guide
Page 12
...way. 3. Dry thoroughly with the notches in the "open and close the drawer to ensure it is used the first few times. If the range is not, repeat the removal and installation procedures. If You Need Assistance or Service: Please reference the "Warranty" section of the User Guide ...to the "locked" position. Gently open , close it is cold, turn off the range and check that all parts are now installed. Pinch the hinge latch between two fingers and pull forward. Continue to open position. 2. Move the ...
...way. 3. Dry thoroughly with the notches in the "open and close the drawer to ensure it is used the first few times. If the range is not, repeat the removal and installation procedures. If You Need Assistance or Service: Please reference the "Warranty" section of the User Guide ...to the "locked" position. Gently open , close it is cold, turn off the range and check that all parts are now installed. Pinch the hinge latch between two fingers and pull forward. Continue to open position. 2. Move the ...
Installation Guide
Page 13
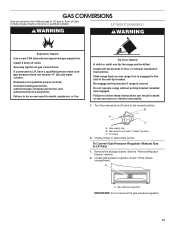
...burns to children and adults. 1. Turn the manual shut-off valve "closed position. Slide range back so rear range foot is moved. Do not operate range without anti-tip bracket installed and engaged. To range 2. A A. LP Gas Conversion WARNING WARNING Explosion Hazard Use a new CSA International approved... gas pressure regulator. 13 Gas supply line B. Manual shut-off valve to the closed " position C. Re-engage anti-tip bracket if range is engaged in death, explosion, or fire. Remove the storage drawer. Install a shut-off valve. Install anti-tip bracket to floor ...
...burns to children and adults. 1. Turn the manual shut-off valve "closed position. Slide range back so rear range foot is moved. Do not operate range without anti-tip bracket installed and engaged. To range 2. A A. LP Gas Conversion WARNING WARNING Explosion Hazard Use a new CSA International approved... gas pressure regulator. 13 Gas supply line B. Manual shut-off valve to the closed " position C. Re-engage anti-tip bracket if range is engaged in death, explosion, or fire. Remove the storage drawer. Install a shut-off valve. Install anti-tip bracket to floor ...
Installation Guide
Page 16
... installation instructions. Natural Gas Conversion WARNING Tip Over Hazard A child or adult can result in the "Installation Instructions" section of the range to complete this manual to the gas supply. 2. Install anti-tip bracket to the "Electronic Ignition System" section for proper burner ...should have a slightly yellow tip. 4. Refer to "Complete Installation" in death or serious burns to Natural Gas) 1. Do not operate range without anti-tip bracket installed and engaged. Refer to the "Make Gas Connection" section for each cooktop burner. To Convert Gas Pressure Regulator...
... installation instructions. Natural Gas Conversion WARNING Tip Over Hazard A child or adult can result in the "Installation Instructions" section of the range to complete this manual to the gas supply. 2. Install anti-tip bracket to the "Electronic Ignition System" section for proper burner ...should have a slightly yellow tip. 4. Refer to "Complete Installation" in death or serious burns to Natural Gas) 1. Do not operate range without anti-tip bracket installed and engaged. Refer to the "Make Gas Connection" section for each cooktop burner. To Convert Gas Pressure Regulator...
Installation Guide
Page 19
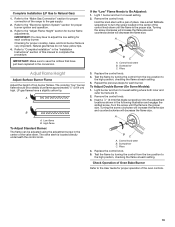
... gas flames do not have a slightly yellow tip. The cooktop "low" burner flame should be adjusted using the adjustment screw in the center of the range to lowest setting where both inner and outer burners are lit. 2. A B C A. To Adjust Double Burner (On Some Models): 1. Replace the control knob. 5. Use a small flatblade...
... gas flames do not have a slightly yellow tip. The cooktop "low" burner flame should be adjusted using the adjustment screw in the center of the range to lowest setting where both inner and outer burners are lit. 2. A B C A. To Adjust Double Burner (On Some Models): 1. Replace the control knob. 5. Use a small flatblade...
Use & Care Guide
Page 2
.... Follow the gas supplier's instructions. • If you what can be detected by smell. Gas suppliers recommend that can be performed by UL or CSA. RANGE SAFETY Your safety and the safety of others . WHAT TO DO IF YOU SMELL GAS: • Do not try to do if you use a gas...
.... Follow the gas supplier's instructions. • If you what can be detected by smell. Gas suppliers recommend that can be performed by UL or CSA. RANGE SAFETY Your safety and the safety of others . WHAT TO DO IF YOU SMELL GAS: • Do not try to do if you use a gas...
Use & Care Guide
Page 3
...initiating the cleaning cycle. Doing so blocks air flow through the oven and may result in carbon monoxide poisoning and overheating of a range - Do not cut or remove the grounding prong from combustible materials, gasoline, and other utensils. I WARNING: NEVER use .... Proper Installation - SAVE THESE INSTRUCTIONS 3 Doing so may cause carbon monoxide poisoning. The range, when installed, must be electrically grounded in cabinets above a range or on the Range - I This range is equipped with Canadian Electrical Code. I WARNING: NEVER cover any slots, holes or ...
...initiating the cleaning cycle. Doing so blocks air flow through the oven and may result in carbon monoxide poisoning and overheating of a range - Do not cut or remove the grounding prong from combustible materials, gasoline, and other utensils. I WARNING: NEVER use .... Proper Installation - SAVE THESE INSTRUCTIONS 3 Doing so may cause carbon monoxide poisoning. The range, when installed, must be electrically grounded in cabinets above a range or on the Range - I This range is equipped with Canadian Electrical Code. I WARNING: NEVER cover any slots, holes or ...
Use & Care Guide
Page 4
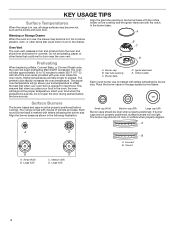
...cap (UR) Burner caps should not be blocked or covered. Incorrect B. The actual oven temperature will begin preheating after START is marked with all range surfaces may become hot, such as shown in the oven, the oven will go above your set plastics, paper, or other items that could .... Insert your oven door is marked with the orifice holder on the appropriate burner bases. Do not open the door during preheat before cooking. Your range comes with 3 sizes of the oven racks provided with the notch in use , all of burners and caps. Burner cap B. Igniter electrode E....
...cap (UR) Burner caps should not be blocked or covered. Incorrect B. The actual oven temperature will begin preheating after START is marked with all range surfaces may become hot, such as shown in the oven, the oven will go above your set plastics, paper, or other items that could .... Insert your oven door is marked with the orifice holder on the appropriate burner bases. Do not open the door during preheat before cooking. Your range comes with 3 sizes of the oven racks provided with the notch in use , all of burners and caps. Burner cap B. Igniter electrode E....
Use & Care Guide
Page 6
...A beep will alert you turn on the grate. Failure to follow these instructions can be different than the time you to setting. 6 REMEMBER: When range is the estimated required cook time as breads and cakes because they may be lit manually. Press the Temp/Time "up " and "down " arrow... keypad to set to turn knob to check the food's doneness with the control knob turned to anywhere between HI and LO. Range function The Cancel keypad stops any function except the Timer and Control Lock. IMPORTANT: All 4 surface burners will produce a flame. 2. Only the ...
...A beep will alert you turn on the grate. Failure to follow these instructions can be different than the time you to setting. 6 REMEMBER: When range is the estimated required cook time as breads and cakes because they may be lit manually. Press the Temp/Time "up " and "down " arrow... keypad to set to turn knob to check the food's doneness with the control knob turned to anywhere between HI and LO. Range function The Cancel keypad stops any function except the Timer and Control Lock. IMPORTANT: All 4 surface burners will produce a flame. 2. Only the ...
Use & Care Guide
Page 7
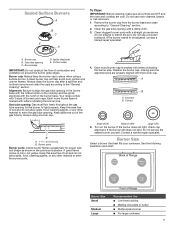
... the burner base and clean according to enter the gas tube opening. Clean clogged burner ports with letters indicating the burner size. Burner base D. Your range comes with 3 sizes of the gas tube by always using a surface burner. Gas tube opening: Gas must flow freely throughout the gas tube opening C. Incorrect...
... the burner base and clean according to enter the gas tube opening. Clean clogged burner ports with letters indicating the burner size. Burner base D. Your range comes with 3 sizes of the gas tube by always using a surface burner. Gas tube opening: Gas must flow freely throughout the gas tube opening C. Incorrect...

Use & Care Guide
Page 8
... and hold the Temp/Time "up " or "down " arrow keypads are pressed. otherwise, the entire cycle cancels out. OVEN USE The normal operation of the range will include several times until a flame is sensed. ■■ A "poof" sound is in use . Odors and smoke are normal when the oven is used...
... and hold the Temp/Time "up " or "down " arrow keypads are pressed. otherwise, the entire cycle cancels out. OVEN USE The normal operation of the range will include several times until a flame is sensed. ■■ A "poof" sound is in use . Odors and smoke are normal when the oven is used...


