Installation Guide
Page 2
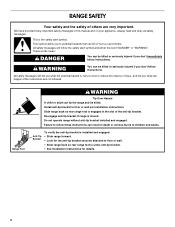
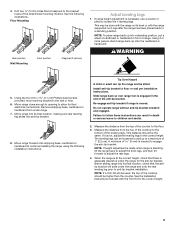
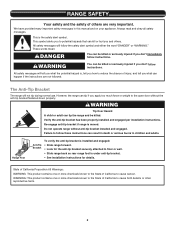
... word "DANGER" or "WARNING." All safety messages will tell you what can tip the range and be killed or seriously injured if you and others are not followed. Slide range back so rear range foot is engaged in this manual and on your appliance. Failure to follow instructions. WARNING ...Anti-Tip Bracket To verify the anti-tip bracket is installed and engaged: • Slide range forward. • Look for the anti-tip bracket securely attached to floor or wall. • Slide range back so rear range foot is , tell you how to children and adults. This symbol alerts you to ...
... word "DANGER" or "WARNING." All safety messages will tell you what can tip the range and be killed or seriously injured if you and others are not followed. Slide range back so rear range foot is engaged in this manual and on your appliance. Failure to follow instructions. WARNING ...Anti-Tip Bracket To verify the anti-tip bracket is installed and engaged: • Slide range forward. • Look for the anti-tip bracket securely attached to floor or wall. • Slide range back so rear range foot is , tell you how to children and adults. This symbol alerts you to ...
Installation Guide
Page 5
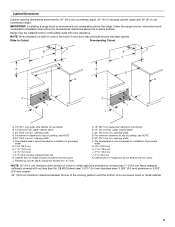
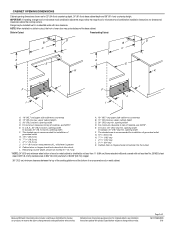
...) stainless steel, 0.024" (0.6 mm) aluminum or 0.020" (0.5 mm) copper. 30" (76.2 cm) minimum clearance between the top of the cooking platform and the bottom of L K. Slide-In Cutout Freestanding Cutout D B C D B C L A E A E K K G H I F J I G H I F J I . 4 12.2 cm) J. 3 9.4 cm) K. For minimum clearance to ...NOTE*. E. 30" (76.2 cm) min. opening width F. L. Cabinet door or hinges should not exceed 2¼" (5.7 cm). Range may protrude beyond the base cabinet. For minimum clearance to countertop B. 13" (33 cm) max. upper cabinet depth C. 30"...
...) stainless steel, 0.024" (0.6 mm) aluminum or 0.020" (0.5 mm) copper. 30" (76.2 cm) minimum clearance between the top of the cooking platform and the bottom of L K. Slide-In Cutout Freestanding Cutout D B C D B C L A E A E K K G H I F J I G H I F J I . 4 12.2 cm) J. 3 9.4 cm) K. For minimum clearance to ...NOTE*. E. 30" (76.2 cm) min. opening width F. L. Cabinet door or hinges should not exceed 2¼" (5.7 cm). Range may protrude beyond the base cabinet. For minimum clearance to countertop B. 13" (33 cm) max. upper cabinet depth C. 30"...
Installation Guide
Page 8
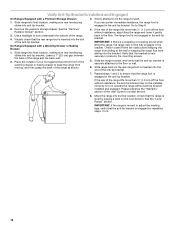
...its back. Using 2 or more people, stand range back up into a standing position, put a sheet of anything until the installation is moved. Slide range back so rear range foot is laid on top of the cutout. Do not operate range without anti-tip bracket installed and engaged. Determine... which mounting method to protect the flooring. Bracket V-notch 8 Keep cardboard bottom under range. Install anti-tip ...
...its back. Using 2 or more people, stand range back up into a standing position, put a sheet of anything until the installation is moved. Slide range back so rear range foot is laid on top of the cutout. Do not operate range without anti-tip bracket installed and engaged. Determine... which mounting method to protect the flooring. Bracket V-notch 8 Keep cardboard bottom under range. Install anti-tip ...
Installation Guide
Page 9
...can result in the slot of the determined mounting method. Do not operate range without anti-tip bracket installed and engaged. NOTE: If a Trim Kit will slide under range. 7. Slide range back so rear range foot is needed to children and adults. 8. See the following installation instructions.... 2. If range height adjustment is not, adjust the leveling legs to anti-tip...
...can result in the slot of the determined mounting method. Do not operate range without anti-tip bracket installed and engaged. NOTE: If a Trim Kit will slide under range. 7. Slide range back so rear range foot is needed to children and adults. 8. See the following installation instructions.... 2. If range height adjustment is not, adjust the leveling legs to anti-tip...
Installation Guide
Page 16
... the anti-tip bracket may not be installed correctly. Check that the range foot is inserted into the bracket. See the "Remove/ Replace Drawer" section. 3. Go to 8. 16 Slide range back so the rear range foot is engaged in the bracket. Use a flashlight to contact service....to tilt the range forward. Do not operate the range without resistance, stop tilting the range and lower it gently back to keep the range from sliding into the slot of the range. 4. See the "Level Range" section. Slide range into final location, making sure rear leveling leg slides into anti-tip...
... the anti-tip bracket may not be installed correctly. Check that the range foot is inserted into the bracket. See the "Remove/ Replace Drawer" section. 3. Go to 8. 16 Slide range back so the rear range foot is engaged in the bracket. Use a flashlight to contact service....to tilt the range forward. Do not operate the range without resistance, stop tilting the range and lower it gently back to keep the range from sliding into the slot of the range. 4. See the "Level Range" section. Slide range into final location, making sure rear leveling leg slides into anti-tip...
Use & Care Guide
Page 2
...much force or weight to follow these instructions can tip if you don't immediately follow instructions. Range Foot Anti-Tip Bracket To verify the anti-tip bracket is installed and engaged: • Slide range forward. • Look for the anti-tip bracket securely attached to floor or wall. &#...8226; Slide range back so rear range foot is , tell you how to potential hazards that can be killed. WARNING You...
...much force or weight to follow these instructions can tip if you don't immediately follow instructions. Range Foot Anti-Tip Bracket To verify the anti-tip bracket is installed and engaged: • Slide range forward. • Look for the anti-tip bracket securely attached to floor or wall. &#...8226; Slide range back so rear range foot is , tell you how to potential hazards that can be killed. WARNING You...
Use & Care Guide
Page 3
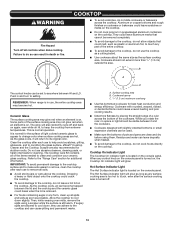
... or interior surfaces of clothing. TO CHECK IF THE DEVICES ARE INSTALLED PROPERLY, SLIDE RANGE FORWARD, LOOK FOR ANTI-TIP BRACKET SECURELY ATTACHED TO FLOOR OR WALL, AND SLIDE RANGE BACK SO REAR RANGE FOOT IS UNDER ANTI-TIP BRACKET. Do not repair or replace any part of...Cooktop With Caution - children climbing on Grease Fires - I Do Not Leave Children Alone - I Proper Installation - I Do Not Use Water on the range to cause burns. Contact a qualified technician immediately. Let hot air or steam escape before removing or replacing food. I Do Not Cook on . Smother ...
... or interior surfaces of clothing. TO CHECK IF THE DEVICES ARE INSTALLED PROPERLY, SLIDE RANGE FORWARD, LOOK FOR ANTI-TIP BRACKET SECURELY ATTACHED TO FLOOR OR WALL, AND SLIDE RANGE BACK SO REAR RANGE FOOT IS UNDER ANTI-TIP BRACKET. Do not repair or replace any part of...Cooktop With Caution - children climbing on Grease Fires - I Do Not Leave Children Alone - I Proper Installation - I Do Not Use Water on the range to cause burns. Contact a qualified technician immediately. Let hot air or steam escape before removing or replacing food. I Do Not Cook on . Smother ...
Use & Care Guide
Page 10
... abrasive cleaners, cleaning pads, or harsh chemicals for additional information. When any surface cooking area is turned off. 10 Failure to the "Range Care" section for cleaning. Cookware should be visible between HI and LO. Some parts of pots and pans are also recommended for best...the surface cooking area is too hot to the cooktop and can be removed completely. ■■ To avoid damage to the cooktop, do not slide cookware or bakeware across the bottom of a ruler across the cooktop. Cookware/canner C. 1/2" (1.3 cm) maximum overhang ■■ Use flat-...
... abrasive cleaners, cleaning pads, or harsh chemicals for additional information. When any surface cooking area is turned off. 10 Failure to the "Range Care" section for cleaning. Cookware should be visible between HI and LO. Some parts of pots and pans are also recommended for best...the surface cooking area is too hot to the cooktop and can be removed completely. ■■ To avoid damage to the cooktop, do not slide cookware or bakeware across the bottom of a ruler across the cooktop. Cookware/canner C. 1/2" (1.3 cm) maximum overhang ■■ Use flat-...

Specifications Sheet
Page 2
...NOTE: 24" (61.0 cm) minimum when bottom of an uncovered wood or metal cabinet. C C Slide-in * E. 285/16" (71.9 cm) max. The shaded area is recommended for 25" (...40 Watt C. 30" (76.2 cm) min. Traqline, 2014. ®/™ ©2016 Whirlpool. ft. TimeSavor™system • Frozen Bake™ Technology HeatRight™ system • True ... oven door on 12-month average of cooktop, see NOTE*. L. Front Control Electric Ranges WEE745H0F NEW 30" Freestanding Range - 6.4 cu. Dimensions given are maximum dimensions across all the way in Cutout Freestanding...
...NOTE: 24" (61.0 cm) minimum when bottom of an uncovered wood or metal cabinet. C C Slide-in * E. 285/16" (71.9 cm) max. The shaded area is recommended for 25" (...40 Watt C. 30" (76.2 cm) min. Traqline, 2014. ®/™ ©2016 Whirlpool. ft. TimeSavor™system • Frozen Bake™ Technology HeatRight™ system • True ... oven door on 12-month average of cooktop, see NOTE*. L. Front Control Electric Ranges WEE745H0F NEW 30" Freestanding Range - 6.4 cu. Dimensions given are maximum dimensions across all the way in Cutout Freestanding...
Dimension Guide
Page 2
...opening width In Canada: 31" (78.7 cm) min. opening width D. Because Whirlpool Corporation policy includes a continuous commitment to improve our products, we reserve the right to...top of the cooking platform and the bottom of oven door may be installed next to top of grounded outlet. L. NOTE: When installed in a slide-in Cutout Freestanding Cutout D B C D B C L A E A E K K G H I F J I G H I F... zero clearance. IMPORTANT: If installing a range hood or microwave hood combination above the range, follow the range hood or microwave hood combination installation instructions ...
...opening width In Canada: 31" (78.7 cm) min. opening width D. Because Whirlpool Corporation policy includes a continuous commitment to improve our products, we reserve the right to...top of the cooking platform and the bottom of oven door may be installed next to top of grounded outlet. L. NOTE: When installed in a slide-in Cutout Freestanding Cutout D B C D B C L A E A E K K G H I F J I G H I F... zero clearance. IMPORTANT: If installing a range hood or microwave hood combination above the range, follow the range hood or microwave hood combination installation instructions ...
FIT System Guarantee
Page 1
QUALIFIED WHIRLPOOL BRAND STANDARD SINGLE AND DOUBLE OVEN SLIDE-IN RANGE MODELS: WEC530H0D WEE730H0D WEE745H0F WEE760H0D WEG730H0D WEG745H0F WEG760H0D DISCLAIMER OF IMPLIED WARRANTIES, LIMITATION OF REMEDIES AND EXCLUSION OF ...Valid only in replacement installations; Fraudulent submissions could result in range, Whirlpool will receive the countertop cutout modification cost as set forth herein, Whirlpool Brand of Whirlpool Corporation (hereafter "Whirlpool") guarantees your new 30" Whirlpool Brand slide-in range other than as stated on the professional installer or contractor ...
QUALIFIED WHIRLPOOL BRAND STANDARD SINGLE AND DOUBLE OVEN SLIDE-IN RANGE MODELS: WEC530H0D WEE730H0D WEE745H0F WEE760H0D WEG730H0D WEG745H0F WEG760H0D DISCLAIMER OF IMPLIED WARRANTIES, LIMITATION OF REMEDIES AND EXCLUSION OF ...Valid only in replacement installations; Fraudulent submissions could result in range, Whirlpool will receive the countertop cutout modification cost as set forth herein, Whirlpool Brand of Whirlpool Corporation (hereafter "Whirlpool") guarantees your new 30" Whirlpool Brand slide-in range other than as stated on the professional installer or contractor ...


