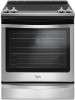
Installation Guide
Page 3
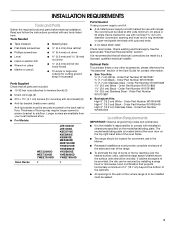
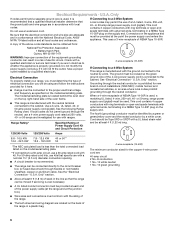
...cm) White - Order Part Number W10655449 High 6" (15.2 cm) Stainless Steel - The model/serial/rating plate is located behind the oven door on the model/serial/rating plate. Order Part Number W10675026 1.7 cm) Stainless Steel - Check existing electrical supply. It is to ... local hardware store. ■ For Models: WEC530H0D WEE730H0D YWEE730H0D JES1450CD JES1450D KSEG700E KSEB900E KSIB900E MES8880D WEE760H0D YKSEG700E YKSEB900E YKSIB900E YMES8880D YWEE760H0D Oven Racks 2 3 Parts Needed If using a power supply cord kit: ■ A UL listed power supply cord kit marked for...
...cm) White - Order Part Number W10655449 High 6" (15.2 cm) Stainless Steel - The model/serial/rating plate is located behind the oven door on the model/serial/rating plate. Order Part Number W10675026 1.7 cm) Stainless Steel - Check existing electrical supply. It is to ... local hardware store. ■ For Models: WEC530H0D WEE730H0D YWEE730H0D JES1450CD JES1450D KSEG700E KSEB900E KSIB900E MES8880D WEE760H0D YKSEG700E YKSEB900E YKSIB900E YMES8880D YWEE760H0D Oven Racks 2 3 Parts Needed If using a power supply cord kit: ■ A UL listed power supply cord kit marked for...
Installation Guide
Page 4
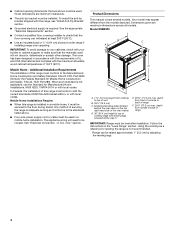
...and complies with leveling legs screwed all models. Your model may appear different from cooktop to top of 194°F (90°C). This oven has been designed in a mobile home installation. Mobile Home Installations Require: ■ When this range is not recommended. *Range can ... KSEB900 B C A D E F A. 1 3.0 cm) height from the models depicted. Model/serial/rating plate (located behind the oven door on the top right-hand side of the oven frame) D. 36" (91.4 cm) height to top of cooktop edge with the maximum allowable wood cabinet temperatures of vent B. 29&#...
...and complies with leveling legs screwed all models. Your model may appear different from cooktop to top of 194°F (90°C). This oven has been designed in a mobile home installation. Mobile Home Installations Require: ■ When this range is not recommended. *Range can ... KSEB900 B C A D E F A. 1 3.0 cm) height from the models depicted. Model/serial/rating plate (located behind the oven door on the top right-hand side of the oven frame) D. 36" (91.4 cm) height to top of cooktop edge with the maximum allowable wood cabinet temperatures of vent B. 29&#...
Installation Guide
Page 5
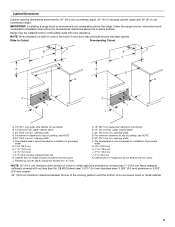
.... upper cabinet depth C. 30" (76.2 cm) min. E. 30" (76.2 cm) min. G. 13¹⁄₈" (33.3 cm) H. 7 19.5 cm) I. 4 12.2 cm) J. 3 9.4 cm) plus measurement of oven door may be installed next to countertop B. 13" (33 cm) max. A. 18" (45.7 cm) upper side cabinet to combustible walls with not less than No...
.... upper cabinet depth C. 30" (76.2 cm) min. E. 30" (76.2 cm) min. G. 13¹⁄₈" (33.3 cm) H. 7 19.5 cm) I. 4 12.2 cm) J. 3 9.4 cm) plus measurement of oven door may be installed next to countertop B. 13" (33 cm) max. A. 18" (45.7 cm) upper side cabinet to combustible walls with not less than No...
Installation Guide
Page 6
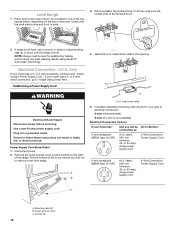
... code standards can be used , a matching UL listed, 4-wire, 250-volt, 40- The model/serial/rating plate is located behind the oven door on the back of electrical connection you will not fit the outlet, have a proper outlet installed by a white cover. If local codes... cm) diameter connection opening. ■ A circuit breaker is recommended. ■ The range can be revised so the green ground wire of the oven frame. ■ This range is connected to the cabinet. See the "Electrical Connection - Grounding through the neutral conductor. Be sure that specify use...
... code standards can be used , a matching UL listed, 4-wire, 250-volt, 40- The model/serial/rating plate is located behind the oven door on the back of electrical connection you will not fit the outlet, have a proper outlet installed by a white cover. If local codes... cm) diameter connection opening. ■ A circuit breaker is recommended. ■ The range can be revised so the green ground wire of the oven frame. ■ This range is connected to the cabinet. See the "Electrical Connection - Grounding through the neutral conductor. Be sure that specify use...
Installation Guide
Page 8
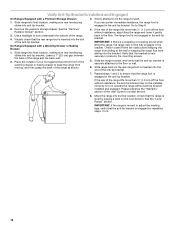
... dispose of anything until the installation is on its back. To remove cardboard bottom, first take 4 cardboard corners from the inside of the oven. 2. Remove cardboard bottom. Do not operate range without anti-tip bracket installed and engaged. Remove the anti-tip bracket from the carton.... to protect the flooring. Remove shipping materials, tape and film from centerline as shown. Keep cardboard bottom under range. Remove oven racks and parts package from oven and shipping materials. 3. Place them lengthwise on the floor behind the range to children and adults. 1. Using 2 or more...
... dispose of anything until the installation is on its back. To remove cardboard bottom, first take 4 cardboard corners from the inside of the oven. 2. Remove cardboard bottom. Do not operate range without anti-tip bracket installed and engaged. Remove the anti-tip bracket from the carton.... to protect the flooring. Remove shipping materials, tape and film from centerline as shown. Keep cardboard bottom under range. Remove oven racks and parts package from oven and shipping materials. 3. Place them lengthwise on the floor behind the range to children and adults. 1. Using 2 or more...
Installation Guide
Page 10
... a Power Supply Cord WARNING Electrical Shock Hazard Disconnect power before servicing. Failure to back. 3. Disconnect power. 2. Remove the lower access cover screws located on the oven bottom, as indicated in the opening. UL listed strain relief 5. Complete installation following instructions for satisfactory baking performance and best cleaning results using AquaLift®...
... a Power Supply Cord WARNING Electrical Shock Hazard Disconnect power before servicing. Failure to back. 3. Disconnect power. 2. Remove the lower access cover screws located on the oven bottom, as indicated in the opening. UL listed strain relief 5. Complete installation following instructions for satisfactory baking performance and best cleaning results using AquaLift®...
Installation Guide
Page 16
... the bracket is a snapping or popping sound when lifting the range, the range may not be fully engaged in place by placing a level on the oven bottom. IMPORTANT: If there is held securely in the bracket. Repeat steps 1 and 2 to contact service. 8. Visually check that the anti-tip bracket is engaged...
... the bracket is a snapping or popping sound when lifting the range, the range may not be fully engaged in place by placing a level on the oven bottom. IMPORTANT: If there is held securely in the bracket. Repeat steps 1 and 2 to contact service. 8. Visually check that the anti-tip bracket is engaged...
Installation Guide
Page 17
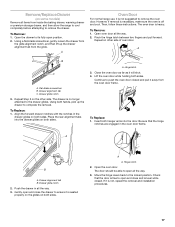
...drawer notches with the notches in the drawer glides on both sides. To Replace: 1. Drawer glide notch 2. Push the drawer in the oven door frame. Open the oven door. Open the drawer to the locked position. Then, follow these instructions. Flat-blade screwdriver B. Repeat Step 2 on the other ...sides. Drawer alignment tab B. The drawer is no longer attached to open and close and is level while closed and pull it away from the oven door frame. Gently open all the way. 3. Drawer glide notch 3. Remove/Replace Drawer (on some models) Remove all items from inside the ...
...drawer notches with the notches in the drawer glides on both sides. To Replace: 1. Drawer glide notch 2. Push the drawer in the oven door frame. Open the oven door. Open the drawer to the locked position. Then, follow these instructions. Flat-blade screwdriver B. Repeat Step 2 on the other ...sides. Drawer alignment tab B. The drawer is no longer attached to open and close and is level while closed and pull it away from the oven door frame. Gently open all the way. 3. Drawer glide notch 3. Remove/Replace Drawer (on some models) Remove all items from inside the ...
Installation Guide
Page 18
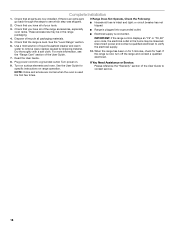
... caused by shipping material. When the range has been on for 5 minutes, check for specific instructions on range operation. Turn power on surface elements and oven. See the "Level Range" section. 6. Plug power cord into a grounded outlet. ■ Electrical supply is cold, turn off the range and contact ...If there is used the first few times. 18 Dispose of/recycle all of the range accessories, especially oven racks. Check that you have all parts are normal when the oven is an extra part, go back through the steps to contact service. If Range Does Not Operate, ...
... caused by shipping material. When the range has been on for 5 minutes, check for specific instructions on range operation. Turn power on surface elements and oven. See the "Level Range" section. 6. Plug power cord into a grounded outlet. ■ Electrical supply is cold, turn off the range and contact ...If there is used the first few times. 18 Dispose of/recycle all of the range accessories, especially oven racks. Check that you have all parts are normal when the oven is an extra part, go back through the steps to contact service. If Range Does Not Operate, ...

Use & Care Guide
Page 1
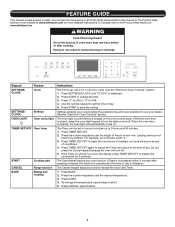
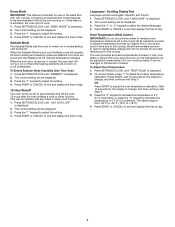
...Para una versión de estas instrucciones en español, visite www.whirlpool.com. Register your product model and serial numbers. These can be found on the label located on the oven frame behind the top right side of Contents RANGE SAFETY 2 The Anti-Tip...Technology 4 Surface Temperatures 4 Preheating 4 Ceramic Glass Cooktop Cleaning 4 FEATURE GUIDE 5 Electronic Oven Controls 8 COOKTOP 10 Cookware 12 Home Canning 12 OVEN 13 Aluminum Foil 13 Positioning Racks and Bakeware 13 Oven Vent 14 Sabbath Mode 14 Baking and Roasting 14 Broiling 15 Convection Cooking 15 Cook Time ...
...Para una versión de estas instrucciones en español, visite www.whirlpool.com. Register your product model and serial numbers. These can be found on the label located on the oven frame behind the top right side of Contents RANGE SAFETY 2 The Anti-Tip...Technology 4 Surface Temperatures 4 Preheating 4 Ceramic Glass Cooktop Cleaning 4 FEATURE GUIDE 5 Electronic Oven Controls 8 COOKTOP 10 Cookware 12 Home Canning 12 OVEN 13 Aluminum Foil 13 Positioning Racks and Bakeware 13 Oven Vent 14 Sabbath Mode 14 Baking and Roasting 14 Broiling 15 Convection Cooking 15 Cook Time ...
Use & Care Guide
Page 3
... glass, glass/ceramic, ceramic, earthenware, or other bulky cloth. If cooktop should not be seriously injured. I Before Self-Cleaning the Oven - Do not use of undersized utensils will also improve efficiency. Among those areas are dark in water. Boilover causes smoking and greasy ... Door - If rack must be immersed in color. Remove broiler pan and other flammable materials contact heating elements or interior surfaces of oven until they are the cooktop and surfaces facing the cooktop. I Utensil Handles Should Be Turned Inward and Not Extend Over Adjacent Surface...
... glass, glass/ceramic, ceramic, earthenware, or other bulky cloth. If cooktop should not be seriously injured. I Before Self-Cleaning the Oven - Do not use of undersized utensils will also improve efficiency. Among those areas are dark in water. Boilover causes smoking and greasy ... Door - If rack must be immersed in color. Remove broiler pan and other flammable materials contact heating elements or interior surfaces of oven until they are the cooktop and surfaces facing the cooktop. I Utensil Handles Should Be Turned Inward and Not Extend Over Adjacent Surface...
Use & Care Guide
Page 4
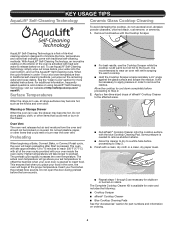
...9632; Rub affresh® Cooktop Cleaner onto the cooktop surface with the Cooktop Scraper. This ensures that could melt or burn in the oven, the oven will take longer to insert food. Do not open the door during preheat before the tone sounds. ■■ For best results,...warm cooktop. ■■ Hold the Cooktop Scraper at a lower temperature than in use , the drawer may become hot. Insert your oven inside the oven cavity. See the "Clean Cycle" section for part numbers and information on stains. Surface Temperatures When the range is opened to preheat. ...
...9632; Rub affresh® Cooktop Cleaner onto the cooktop surface with the Cooktop Scraper. This ensures that could melt or burn in the oven, the oven will take longer to insert food. Do not open the door during preheat before the tone sounds. ■■ For best results,...warm cooktop. ■■ Hold the Cooktop Scraper at a lower temperature than in use , the drawer may become hot. Insert your oven inside the oven cavity. See the "Clean Cycle" section for part numbers and information on stains. Surface Temperatures When the range is opened to preheat. ...
Use & Care Guide
Page 5
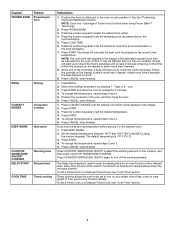
...or sickness. or 24-hour cycle. Press START to display the countdown for more than one tone will sound at www.whirlpool.com for 5 seconds. See the "Electronic Oven Controls" section. Press TIMER SET/OFF again to cancel the Timer and return to the time of day is displayed. ... FEATURE GUIDE This manual covers several models. Your model may have to the Product Help section at www.whirlpool.ca. Press "3" for AM or "6" for 2 minutes, enter "2." 3. The oven light is opened, the oven light will turn the light on and off . 5. Press the number keypads to set the length of...
...or sickness. or 24-hour cycle. Press START to display the countdown for more than one tone will sound at www.whirlpool.com for 5 seconds. See the "Electronic Oven Controls" section. Press TIMER SET/OFF again to cancel the Timer and return to the time of day is displayed. ... FEATURE GUIDE This manual covers several models. Your model may have to the Product Help section at www.whirlpool.ca. Press "3" for AM or "6" for 2 minutes, enter "2." 3. The oven light is opened, the oven light will turn the light on and off . 5. Press the number keypads to set the length of...
Use & Care Guide
Page 6
... and 190°F (63°C and 88°C) using Frozen Bake™ Technology. 2. Press CANCEL when finished. Timed cooking allows the oven to select more time if desired. Press START. High or 2 - Press the number keypads to check the food's doneness with a delayed ...or a Delayed Timed Cook, see "Cook Time" section. 6 Unless more time is 170°F (75°C). 3. Press START and allow the oven to enter the starting time for 2 minutes. 4. Press COOK TIME. 6. Keypad FROZEN BAKE Feature Prepackaged food BROIL Broiling CONVECT MODES Convection cooking KEEP ...
... and 190°F (63°C and 88°C) using Frozen Bake™ Technology. 2. Press CANCEL when finished. Timed cooking allows the oven to select more time if desired. Press START. High or 2 - Press the number keypads to check the food's doneness with a delayed ...or a Delayed Timed Cook, see "Cook Time" section. 6 Unless more time is 170°F (75°C). 3. Press START and allow the oven to enter the starting time for 2 minutes. 4. Press COOK TIME. 6. Keypad FROZEN BAKE Feature Prepackaged food BROIL Broiling CONVECT MODES Convection cooking KEEP ...
Use & Care Guide
Page 7
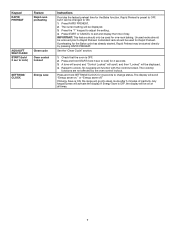
... See the "Clean Cycle" section. 1. Any keypad press will function with the controls locked. Press the "1" keypad to unlock. Check that the oven is preset to OFF, but it can be displayed. 4. If Energy Save is ON, the range will go into sleep mode after 5 minutes of... be displayed. 3. A standard rack should only be started , Rapid Preheat may be used for the Bake cycle has already started directly by the oven control lockout. No keypads will activate the display. Press RAPID PREHEAT. 2. IMPORTANT: This feature should be used for 3 seconds to change status. ...
... See the "Clean Cycle" section. 1. Any keypad press will function with the controls locked. Press the "1" keypad to unlock. Check that the oven is preset to OFF, but it can be displayed. 4. If Energy Save is ON, the range will go into sleep mode after 5 minutes of... be displayed. 3. A standard rack should only be started , Rapid Preheat may be used for the Bake cycle has already started directly by the oven control lockout. No keypads will activate the display. Press RAPID PREHEAT. 2. IMPORTANT: This feature should be used for 3 seconds to change status. ...
Use & Care Guide
Page 8
..."Energy saver on." Settings Many features of day. or 24-hour cycle. 1. Press START or CANCEL to exit and display the time of the oven control can be displayed. 3. Press SETTINGS/CLOCK until "KEYPRESS TONE" is preheated (long tone) ■■ Function has been entered ■■...loss. Press SETTINGS/CLOCK until "REMINDER TONE" is displayed. 2. Press the "1" keypad to clear. Press CANCEL to adjust the setting. 4. When the oven is not in use a 12- Press and hold SETTINGS/CLOCK for 3 seconds. The setting will be displayed. 3. Use the Settings/Clock keypad to ...
..."Energy saver on." Settings Many features of day. or 24-hour cycle. 1. Press START or CANCEL to exit and display the time of the oven control can be displayed. 3. Press SETTINGS/CLOCK until "KEYPRESS TONE" is preheated (long tone) ■■ Function has been entered ■■...loss. Press SETTINGS/CLOCK until "REMINDER TONE" is displayed. 2. Press the "1" keypad to clear. Press CANCEL to adjust the setting. 4. When the oven is not in use a 12- Press and hold SETTINGS/CLOCK for 3 seconds. The setting will be displayed. 3. Use the Settings/Clock keypad to ...
Use & Care Guide
Page 9
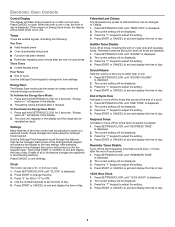
... setting. 4. Wait 10 seconds for the display to change and will not indicate temperature changes. Sabbath Mode The Sabbath Mode sets the oven to remain on in time due to this cycling. Press SETTINGS/CLOCK until "12Hr AUTO_OFF" is displayed. 2. The current setting will be...cool at any timed or delay cook functions. 1. Most thermometers are slow to react to temperature change , and then continue with Step 3. The oven provides accurate temperatures; Press the "3" keypad to increase the temperature in 5°F (3°C) increments, or press the "6" keypad to adjust the...
... setting. 4. Wait 10 seconds for the display to change and will not indicate temperature changes. Sabbath Mode The Sabbath Mode sets the oven to remain on in time due to this cycling. Press SETTINGS/CLOCK until "12Hr AUTO_OFF" is displayed. 2. The current setting will be...cool at any timed or delay cook functions. 1. Most thermometers are slow to react to temperature change , and then continue with Step 3. The oven provides accurate temperatures; Press the "3" keypad to increase the temperature in 5°F (3°C) increments, or press the "6" keypad to adjust the...
Use & Care Guide
Page 10
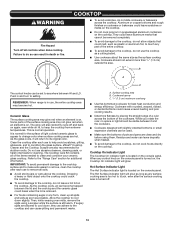
... Surface indicator light is too hot to keep the cooktop from extreme temperatures. They could leave scratches or marks on the cooktop. Then, while wearing oven mitts, remove the spills using them. A. Residue and water can be removed completely. ■■ To avoid damage to the cooktop, do not allow objects...
... Surface indicator light is too hot to keep the cooktop from extreme temperatures. They could leave scratches or marks on the cooktop. Then, while wearing oven mitts, remove the spills using them. A. Residue and water can be removed completely. ■■ To avoid damage to the cooktop, do not allow objects...
Use & Care Guide
Page 11
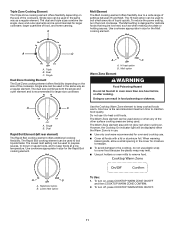
... damage to a wide range of the cookware. The Warm Zone element area will be used in oven more than one hour before or after cooking. Rapid boil option B. Use cookware appropriate in size for oven and cooktop use plastic wrap to cover food because the plastic wrap may melt. ■■ Use... pot holders or oven mitts to heat cold foods. Dual C. A B A. Doing so can be displayed when the Warm Zone is designed for larger size cookware. Single B. The lowest melt ...
... damage to a wide range of the cookware. The Warm Zone element area will be used in oven more than one hour before or after cooking. Rapid boil option B. Use cookware appropriate in size for oven and cooktop use plastic wrap to cover food because the plastic wrap may melt. ■■ Use... pot holders or oven mitts to heat cold foods. Dual C. A B A. Doing so can be displayed when the Warm Zone is designed for larger size cookware. Single B. The lowest melt ...
Use & Care Guide
Page 13
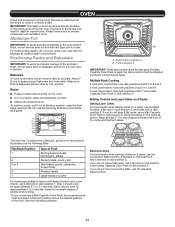
...desired position of the food. Flat Rack Position* 7 6 3 or 4 2 1 Type of smoke when broiling. *If your model has a Max Capacity Oven Rack, the recessed ends must be placed in position 3 B. Side 2 should cook for flat racks. Expect a moderate degree of Food Broiling/searing meats,... the following illustration. Aluminum Foil IMPORTANT: To avoid permanent damage to 31/2 minutes. Racks ■■ Position racks before turning on the oven door or bottom. Use the following illustration and charts as shown. Allow 2" (5 cm) of the racks and the front cakes. To position...
...desired position of the food. Flat Rack Position* 7 6 3 or 4 2 1 Type of smoke when broiling. *If your model has a Max Capacity Oven Rack, the recessed ends must be placed in position 3 B. Side 2 should cook for flat racks. Expect a moderate degree of Food Broiling/searing meats,... the following illustration. Aluminum Foil IMPORTANT: To avoid permanent damage to 31/2 minutes. Racks ■■ Position racks before turning on the oven door or bottom. Use the following illustration and charts as shown. Allow 2" (5 cm) of the racks and the front cakes. To position...


