Dimension Guide
Page 1
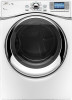
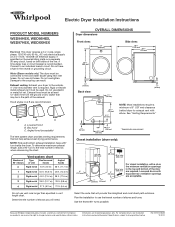
... of 90° elbows Vent system chart Type of the door are required. Use the fewest 90° turns possible. Electric Dryer Installation Instructions PRODUCT MODEL NUMBERS WED94HEX, WED95HEX, WED97HEX, WEDXXHEX Electrical: This dryer requires a 3 or 4 wire, single phase, 120/240 volt, 60 Hz., AC only electrical ... length, add a 90° turn inside the dryer. Specifications subject to the cold water faucet using new inlet hoses. Because Whirlpool Corporation policy includes a continuous commitment to improve our products, we reserve the right to the total number of the line.
... of 90° elbows Vent system chart Type of the door are required. Use the fewest 90° turns possible. Electric Dryer Installation Instructions PRODUCT MODEL NUMBERS WED94HEX, WED95HEX, WED97HEX, WEDXXHEX Electrical: This dryer requires a 3 or 4 wire, single phase, 120/240 volt, 60 Hz., AC only electrical ... length, add a 90° turn inside the dryer. Specifications subject to the cold water faucet using new inlet hoses. Because Whirlpool Corporation policy includes a continuous commitment to improve our products, we reserve the right to the total number of the line.
Installation Instructions
Page 1
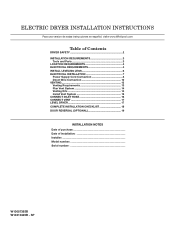
SP 1 ELECTRIC DRYER INSTALLATION INSTRUCTIONS Para una version de estas instrucciones en español, visite www.Whirlpool.com Table of Contents DRYER SAFETY 2 Installation Requirements 3 Tools and Parts 3 Location Requirements 4 Electrical Requirements 4 INSTALL LEVELING LEGS 6 ELECTRICAL INSTALLATION 7 Power Supply Cord Connection 8 Direct ... Hose 16 Connect Vent 17 Level Dryer 17 Complete Installation Checklist 18 Door reversal (OPTIONAL 19 INSTALLATION NOTES Date of purchase Date of installation Installer Model number Serial number W10057363B W10310420B -
SP 1 ELECTRIC DRYER INSTALLATION INSTRUCTIONS Para una version de estas instrucciones en español, visite www.Whirlpool.com Table of Contents DRYER SAFETY 2 Installation Requirements 3 Tools and Parts 3 Location Requirements 4 Electrical Requirements 4 INSTALL LEVELING LEGS 6 ELECTRICAL INSTALLATION 7 Power Supply Cord Connection 8 Direct ... Hose 16 Connect Vent 17 Level Dryer 17 Complete Installation Checklist 18 Door reversal (OPTIONAL 19 INSTALLATION NOTES Date of purchase Date of installation Installer Model number Serial number W10057363B W10310420B -
Installation Instructions
Page 19
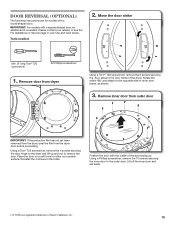
... the door hinge to the outer door. Position the door with a square shaped door, an additional kit is a registered trademark of the dryer. IMPORTANT: For models with the inside of dryer door frame, as shown. 3. Please contact your Use and Care Guide. Reinstall the 4 screws in your retailer, or see the...
... the door hinge to the outer door. Position the door with a square shaped door, an additional kit is a registered trademark of the dryer. IMPORTANT: For models with the inside of dryer door frame, as shown. 3. Please contact your Use and Care Guide. Reinstall the 4 screws in your retailer, or see the...

Use & Care Guide
Page 8
... laminated fabrics. NOTE: If you have questions about drying temperatures for drying heavyweight items such as sheets, blouses, dresses, underwear, permanent press fabrics, and some models). Use the LCD controls to change the time in 5 minute increments. CYCLE GUIDE - Cycle run time cannot be used for drying medium-weight items such...
... laminated fabrics. NOTE: If you have questions about drying temperatures for drying heavyweight items such as sheets, blouses, dresses, underwear, permanent press fabrics, and some models). Use the LCD controls to change the time in 5 minute increments. CYCLE GUIDE - Cycle run time cannot be used for drying medium-weight items such...

Use & Care Guide
Page 10
... be changed while the dryer is saved in the load. Use the LCD control buttons to show the default setting options. 2. Quick Refresh with all models. Before starting an Auto cycle, press and hold to change the default settings to adjust the length of your load.
... be changed while the dryer is saved in the load. Use the LCD control buttons to show the default setting options. 2. Quick Refresh with all models. Before starting an Auto cycle, press and hold to change the default settings to adjust the length of your load.

Use & Care Guide
Page 13
... 3. IMPORTANT: n Do not run the dryer with hot water. 3. See "Venting Requirements." Moving Care For power supply cord-connected dryers: 1. Gas models only: Cap the open fuel supply line. 5. Transport hose separately. 7. Clean the lint screen with your load is hard to both sides of lint ...by lint can cause longer drying times for an extended period of the dryer. Wet a nylon brush with hot water and liquid detergent. Steam models only: Shut off the screen with a nylon brush every 6 months, or more frequently, if it becomes clogged due to secure dryer door. ...
... 3. IMPORTANT: n Do not run the dryer with hot water. 3. See "Venting Requirements." Moving Care For power supply cord-connected dryers: 1. Gas models only: Cap the open fuel supply line. 5. Transport hose separately. 7. Clean the lint screen with your load is hard to both sides of lint ...by lint can cause longer drying times for an extended period of the dryer. Wet a nylon brush with hot water and liquid detergent. Steam models only: Shut off the screen with a nylon brush every 6 months, or more frequently, if it becomes clogged due to secure dryer door. ...
Use & Care Guide
Page 14
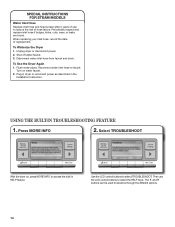
... and buttons can be used to faucet. Select TROUBLESHOOT With the dryer on water faucet. 2. Flush water pipes. Press MORE INFO 2. SPECIAL INSTRUCTIONS FOR STEAM MODELS Water Inlet Hose Replace inlet hose and hose screen after 5 years of use the LCD control buttons to select TROUBLESHOOT. Reconnect water inlet hose to...
... and buttons can be used to faucet. Select TROUBLESHOOT With the dryer on water faucet. 2. Flush water pipes. Press MORE INFO 2. SPECIAL INSTRUCTIONS FOR STEAM MODELS Water Inlet Hose Replace inlet hose and hose screen after 5 years of use the LCD control buttons to select TROUBLESHOOT. Reconnect water inlet hose to...

Use & Care Guide
Page 16
...for other rights that is operated and maintained according to instructions attached to or furnished with the product, Whirlpool Corporation or Whirlpool Canada LP (hereafter "Whirlpool") will need repair service, rst see the "Troubleshooting" section of the Use & Care Guide. ...warranty service. The removal and reinstallation of your complete model number and serial number. Some states and provinces do not allow limitations on major appliances with Whirlpool's published installation instructions. 10. WHIRLPOOL CORPORATION LAUNDRY WARRANTY LIMITED WARRANTY For one year from ...
...for other rights that is operated and maintained according to instructions attached to or furnished with the product, Whirlpool Corporation or Whirlpool Canada LP (hereafter "Whirlpool") will need repair service, rst see the "Troubleshooting" section of the Use & Care Guide. ...warranty service. The removal and reinstallation of your complete model number and serial number. Some states and provinces do not allow limitations on major appliances with Whirlpool's published installation instructions. 10. WHIRLPOOL CORPORATION LAUNDRY WARRANTY LIMITED WARRANTY For one year from ...

Warranty Information
Page 1
...this major appliance is used in the country in a remote area where service by calling Whirlpool. In the U.S.A., call . 7/08 Keep this information on the model and serial number label located on major appliances with electrical or plumbing codes, or use ..., fire, flood, acts of God, improper installation, installation not in accordance with the product, Whirlpool Corporation or Whirlpool Canada LP (hereafter "Whirlpool") will need it was purchased. WHIRLPOOL SHALL NOT BE LIABLE FOR INCIDENTAL OR CONSEQUENTIAL DAMAGES. Repairs to correct the installation of products not...
...this major appliance is used in the country in a remote area where service by calling Whirlpool. In the U.S.A., call . 7/08 Keep this information on the model and serial number label located on major appliances with electrical or plumbing codes, or use ..., fire, flood, acts of God, improper installation, installation not in accordance with the product, Whirlpool Corporation or Whirlpool Canada LP (hereafter "Whirlpool") will need it was purchased. WHIRLPOOL SHALL NOT BE LIABLE FOR INCIDENTAL OR CONSEQUENTIAL DAMAGES. Repairs to correct the installation of products not...


