
Installation Guide
Page 1
... Vent System 14 CONNECT INLET HOSE (STEAM MODEL ONLY 15 CONNECT VENT 16 LEVEL DRYER 17 COMPLETE INSTALLATION CHECKLIST 17 DOOR REVERSAL (OPTIONAL 17 Para una version de estas instrucciones en español, visite www.Whirlpool.com INSTALLATION NOTES Date of purchase Date of installation Installer Model number Serial number W10508904B W10508905B -
... Vent System 14 CONNECT INLET HOSE (STEAM MODEL ONLY 15 CONNECT VENT 16 LEVEL DRYER 17 COMPLETE INSTALLATION CHECKLIST 17 DOOR REVERSAL (OPTIONAL 17 Para una version de estas instrucciones en español, visite www.Whirlpool.com INSTALLATION NOTES Date of purchase Date of installation Installer Model number Serial number W10508904B W10508905B -

Installation Guide
Page 18
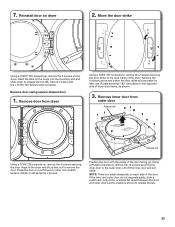
... the 4 screws in the holes. DOOR REVERSAL (OPTIONAL) The following instructions are for models with the inside of the dryer. Using a Phillips screwdriver, remove the 10 screws securing the inner door to the opposite side of Saturn Fasteners, Inc. 18 Remove door from the dryer door before proceeding. Position the door with a round and square-shaped...
... the 4 screws in the holes. DOOR REVERSAL (OPTIONAL) The following instructions are for models with the inside of the dryer. Using a Phillips screwdriver, remove the 10 screws securing the inner door to the opposite side of Saturn Fasteners, Inc. 18 Remove door from the dryer door before proceeding. Position the door with a round and square-shaped...
Installation Guide
Page 21
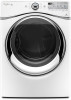
... . 9. Using a TORX T25 screwdriver, remove the 2 screws securing the door strike to the outer door. 10. Secure in the holes. 2. Reinstall door on the dryer. Reinstall the 10 screws securing the inner door to the door frame of door Reverse door swing round-shaped door - Remove door from the dryer door before proceeding. Reinstall the 4 screws in place with the inside...
... . 9. Using a TORX T25 screwdriver, remove the 2 screws securing the door strike to the outer door. 10. Secure in the holes. 2. Reinstall door on the dryer. Reinstall the 10 screws securing the inner door to the door frame of door Reverse door swing round-shaped door - Remove door from the dryer door before proceeding. Reinstall the 4 screws in place with the inside...
Installation Guide
Page 23
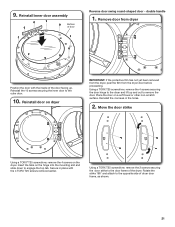
... tab. Remove the 4 screws above and below the door strike and set aside. Reverse door swing square-shaped door 1. Position the door with the 4 TORX T25 screws removed earlier. Using a Phillips screwdriver, remove the 13 screws securing the inner door to release the tab. 23 Remove door from outer door Release tab Release tab Using a TORX T25 screwdriver...
... tab. Remove the 4 screws above and below the door strike and set aside. Reverse door swing square-shaped door 1. Position the door with the 4 TORX T25 screws removed earlier. Using a Phillips screwdriver, remove the 13 screws securing the inner door to release the tab. 23 Remove door from outer door Release tab Release tab Using a TORX T25 screwdriver...


