Whirlpool WED95HEDU Support and Manuals
Get Help and Manuals for this Whirlpool item

View All Support Options Below
Free Whirlpool WED95HEDU manuals!
Problems with Whirlpool WED95HEDU?
Ask a Question
Free Whirlpool WED95HEDU manuals!
Problems with Whirlpool WED95HEDU?
Ask a Question
Popular Whirlpool WED95HEDU Manual Pages
Use & Care Guide - Page 5
...Installation Instructions.
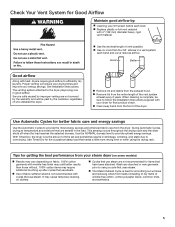
Service calls caused by improper venting are not covered by the warranty and will reduce your drying times and improve your steam dryer (on some models...Replace plastic or foil vent material
with heat, dryers require good airflow to follow the Installation Instructions...Dry, the dryer runs the amount of time set and sometimes results in shrinkage, wrinkling, and static...
Use & Care Guide - Page 7
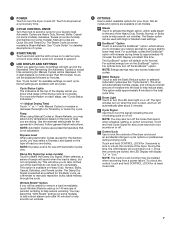
See "Cycle Guide" for available settings on each stage, see the "Cycle Guide"). Not all models.
Dryness Level When using Automatic Cycles (except for Normal.
the LED Display will default on all settings are available with Manual Cycles to select available options for at least 3 seconds.
7
Touch and hold CONTROL LOCK for your dryer. Automatic Cycles are...
Use & Care Guide - Page 8
... such as cotton towels.
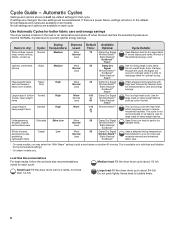
Offers stepped drying starting with High and Medium Drying Temperature settings.
* On steam models only. Small load: Fill the dryer drum with high heat, which has been proven... 60 minutes. Not all features and cycles are available on all fabrics.
Cycle Guide - Automatic Cycles
Settings and options shown in the load or air temperature and shuts off when the load...
Use & Care Guide - Page 9
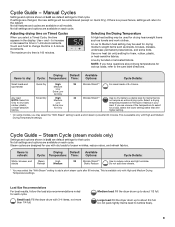
Manual Cycles
Settings and options shown in the display. Not all models. Use a no heat (air only) setting for a load, select the lower setting rather than 1/4 full.
Quick...temperatures for that do not require an entire drying cycle. If there is 100 minutes.
Cycle Guide - If settings are available on the type of the temperature to the care label directions. Use + and ...
Use & Care Guide - Page 11
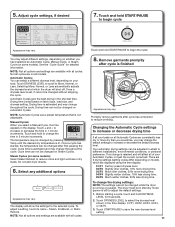
..., and dryness setting. To adjust a setting, touch its name - Touch and hold DRYNESS LEVEL for detailed information. There are available with all models. Cycle time can be adjusted to adapt to begin cycle
Appearance may vary. See the "Cycle Guide" for 6 seconds. 2. Before starting a cycle, touch and hold START/PAUSE to different installations, environmental conditions...
Use & Care Guide - Page 12
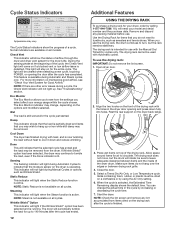
.... Not all indicators are other error issues during a cycle, the ... door.
2. Rest the rear support on all cycles. The drying rack...setting. 6. You will periodically tumble the load for the dryer's life. The drying rack is not available on the dryer back ledge.
3. To use . See "Troubleshooting" section. be used with the Manual...moisture sensor on for your model and serial number and ...
Use & Care Guide - Page 15
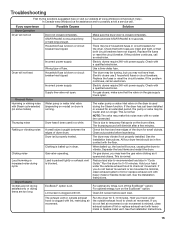
... line is used in dryer. Water pump or water inlet valve (depending on model) on the EcoBoost™ option. Check the front and rear edges of lint or replace exhaust vent with heavy metal or flexible metal vent.
See the Installation Instructions.
Gas valve operating. This is minimal, clean exhaust system of the drum...
Use & Care Guide - Page 16
...setting has been selected.
See "Cycle Guide." The front of the dryer requires a minimum of 1" (25 mm) of airspace, and, for the types of garments being dried. See the Installation Instructions...settings to possibly avoid a service...setting on .
16 If loads are caused by a fabric softener sheet. Steam models only: Make sure water is not blocked by dyes in clothes. Troubleshooting...
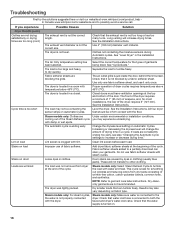
Use & Care Guide - Page 17
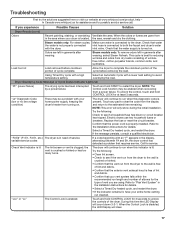
...Code (low or no line voltage condition)
There may be a problem with the dryer. The dryer will count down 3-2-1. NOTE: This error...service. Check that requires service.
Allow the dryer to clear the code from in the Installaton Instructions for 3 seconds to the Installation Instructions...
variable service codes
If a code beginning with a high temperature setting. Steam models only...
Use & Care Guide - Page 18

... comes with electrical or plumbing codes, or correction of the Use and Care Guide, scan the QR code on the duration of implied warranties of surfaces resulting from state to state or province to or furnished with published user, operator, or installation instructions.
2. This product is intended for service or repair of product replacement, your product from the...
Warranty Information - Page 1

... OR CONSEQUENTIAL DAMAGES. All warranty service is installed, operated, and maintained according to instructions attached to access additional resources, or visit https://www.whirlpool.com/product_help.
2. Repairs to parts or systems to use your retailer about the quality, durability, or need for Factory Specified Replacement Parts and repair labor to province.
03/14...
Installation Guide - Page 1
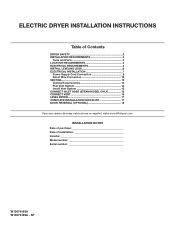
... DRYER INSTALLATION INSTRUCTIONS
Table of Contents
DRYER SAFETY 2 INSTALLATION REQUIREMENTS 3
Tools and Parts 3 LOCATION REQUIREMENTS 4 ELECTRICAL REQUIREMENTS 5 INSTALL LEVELING LEGS 6 ELECTRICAL INSTALLATION 7
Power Supply Cord Connection 8 Direct Wire Connection 10 VENTING 12 Venting Requirements 12 Plan Vent System 13 Install Vent System 15 CONNECT INLET HOSE (STEAM MODEL ONLY...
Installation Guide - Page 4
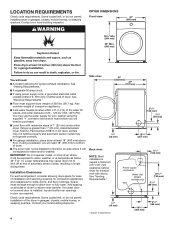
...install Extended Dryer Feet Kit, Part Number 279810. LOCATION REQUIREMENTS
Check code... must support dryer weight...installations require a minimum of installation and servicing; Some codes limit, or do not permit, installing dryer in garages, closets, mobile homes, or sleeping quarters. See "Venting Requirements."
3/4"* (18 mm)
* Approx.
Some codes limit, or do not permit, installation...
Installation Guide - Page 17

... up or down, and check again for certain part replacement or repair. Once dryer is not crushed
or kinked. q Dispose of its first cycle. q Check for the moisture sensing system to control the buildup of your Use and Care Guide. See "Level Dryer." q For power supply cord installation, plug into an outlet and/or electrical...
Installation Guide - Page 18
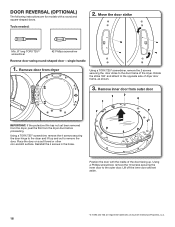
...square-shaped doors. Reinstall the 4 screws in the holes. DOOR REVERSAL (OPTIONAL)
The following instructions are registered trademarks of Acument Intellectual Properties, LLC.
18
Using a Phillips screwdriver, remove the... hinge to remove the door. Lift off the inner door and set aside.
† ® TORX and T25 are for models with the inside of the door facing up and out to the...
Whirlpool WED95HEDU Reviews
We have not received any reviews for Whirlpool yet.