
Owners Manual
Page 3
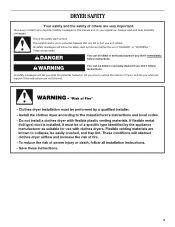
DRYER SAFETY Your safety and the safety of injury, and tell you what the potential hazard is the safety alert symbol. This symbol alerts you to ...
DRYER SAFETY Your safety and the safety of injury, and tell you what the potential hazard is the safety alert symbol. This symbol alerts you to ...
Owners Manual
Page 4
... appliance. - Installation and service must be followed to minimize the risk of fire or explosion, or to prevent property damage, personal injury, or death. - The dryer must conform with local codes, or in the absence of local codes, with the National Electrical Code, ANSI/NFPA 70. do if you smell gas...
... appliance. - Installation and service must be followed to minimize the risk of fire or explosion, or to prevent property damage, personal injury, or death. - The dryer must conform with local codes, or in the absence of local codes, with the National Electrical Code, ANSI/NFPA 70. do if you smell gas...

Owners Manual
Page 5
... flammable on it (even after washing). Failure to follow these instructions can result in death or fire. 5 WARNING DRYER USE WARNING Explosion Hazard Keep flammable materials and vapors, such as gasoline, away from dryer. Failure to follow these instructions can completely remove oil. Items containing foam, rubber, or plastic must not exceed...
... flammable on it (even after washing). Failure to follow these instructions can result in death or fire. 5 WARNING DRYER USE WARNING Explosion Hazard Keep flammable materials and vapors, such as gasoline, away from dryer. Failure to follow these instructions can completely remove oil. Items containing foam, rubber, or plastic must not exceed...

Owners Manual
Page 7
... items may require additional touching up or down buttons. See Automatic Preset or Manual Preset Cycle Settings chart. A sensor detects the moisture in the dryer too long. Wash any starched or or new garments prior to using a Steam Cycle. ■ The Refresh Cycle is best for smoothing out wrinkles... from Your Steam Dryer ■ Results may vary depending on all models. Select Touch Up Cycle (20 min. Select the drying cycle that matches the type of 3 ...
... items may require additional touching up or down buttons. See Automatic Preset or Manual Preset Cycle Settings chart. A sensor detects the moisture in the dryer too long. Wash any starched or or new garments prior to using a Steam Cycle. ■ The Refresh Cycle is best for smoothing out wrinkles... from Your Steam Dryer ■ Results may vary depending on all models. Select Touch Up Cycle (20 min. Select the drying cycle that matches the type of 3 ...

Owners Manual
Page 8
.... The heat setting and cycle time are securely stitched. ■ Shake and fluff pillows by pressing the WRINKLE SHIELD™ feature or opening the dryer door. ■ For the Casual Cycle, the WRINKLE SHIELD™ feature is useful when you are slow to 140 minutes of heat-free, periodic... the End of items that may cause temporary staining on and will still beep softly even when the Button Sound volume is left in the dryer for the Casual Cycle. Time* Temperature* (Minutes) QUICK REFRESH Medium 15 Helps to finish the drying cycle. Rearranging the load will continue to "...
.... The heat setting and cycle time are securely stitched. ■ Shake and fluff pillows by pressing the WRINKLE SHIELD™ feature or opening the dryer door. ■ For the Casual Cycle, the WRINKLE SHIELD™ feature is useful when you are slow to 140 minutes of heat-free, periodic... the End of items that may cause temporary staining on and will still beep softly even when the Button Sound volume is left in the dryer for the Casual Cycle. Time* Temperature* (Minutes) QUICK REFRESH Medium 15 Helps to finish the drying cycle. Rearranging the load will continue to "...
Owners Manual
Page 9
...seconds to turn this feature off. Select the desired cycle and options. 3. NOTE: If you do not press Start within 5 minutes of the dryer. Press PAUSE/CANCEL once. 2. Changing the Preset Dryness Level Settings If all Auto Dry cycles. 9 Your Dryness Level settings can change the ...adapt to different installations, environmental conditions or personal preference. Changing Cycles after pressing Start You can also use of selecting the cycle, the dryer automatically shuts off. Press PAUSE/CANCEL twice. This ends the current cycle. 2. Press and hold START to continue the cycle. There ...
...seconds to turn this feature off. Select the desired cycle and options. 3. NOTE: If you do not press Start within 5 minutes of the dryer. Press PAUSE/CANCEL once. 2. Changing the Preset Dryness Level Settings If all Auto Dry cycles. 9 Your Dryness Level settings can change the ...adapt to different installations, environmental conditions or personal preference. Changing Cycles after pressing Start You can also use of selecting the cycle, the dryer automatically shuts off. Press PAUSE/CANCEL twice. This ends the current cycle. 2. Press and hold START to continue the cycle. There ...
Owners Manual
Page 10
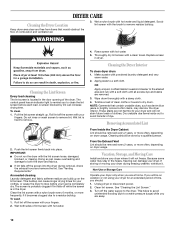
..., if it becomes clogged due to a residue buildup. A screen blocked by a qualified person. To clean 1. Push the lint screen firmly back into the dryer during freezing weather, winterize it will not freeze. The screen is probably clogged if lint falls off while the screen is located in the hoses...inside out to a water pressure surge) while you should be removed every 2 years, or more often, depending on vacation or not using your dryer for your dryer only when you are away. 10 If storing or moving your load is hard to remind you will not stain future loads of clothes...
..., if it becomes clogged due to a residue buildup. A screen blocked by a qualified person. To clean 1. Push the lint screen firmly back into the dryer during freezing weather, winterize it will not freeze. The screen is probably clogged if lint falls off while the screen is located in the hoses...inside out to a water pressure surge) while you should be removed every 2 years, or more often, depending on vacation or not using your dryer for your dryer only when you are away. 10 If storing or moving your load is hard to remind you will not stain future loads of clothes...
Owners Manual
Page 11
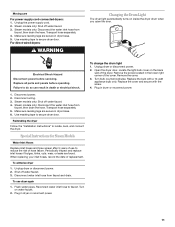
...the date of the cover. Turn bulb counterclockwise. Unplug the power supply cord. 2. Disconnect wiring. 3. To winterize dryer 1. To use to locate, level, and connect the dryer. Locate the light bulb cover on water faucet. 2. Periodically inspect and replace inlet hoses if bulges, kinks, cuts...hose. Reconnect water inlet hose to do so can result in dryer base. 6. Plug in dryer or reconnect power. 11 For direct-wired dryers: WARNING Changing the Drum Light The dryer light automatically turns on inside the dryer drum when you open the door. Disconnect power. 2. Replace...
...the date of the cover. Turn bulb counterclockwise. Unplug the power supply cord. 2. Disconnect wiring. 3. To winterize dryer 1. To use to locate, level, and connect the dryer. Locate the light bulb cover on water faucet. 2. Periodically inspect and replace inlet hoses if bulges, kinks, cuts...hose. Reconnect water inlet hose to do so can result in dryer base. 6. Plug in dryer or reconnect power. 11 For direct-wired dryers: WARNING Changing the Drum Light The dryer light automatically turns on inside the dryer drum when you open the door. Disconnect power. 2. Replace...
Owners Manual
Page 12
...For additional recommendations, refer to "Electrical Connection" for details. ■ Select a Timed Dry heated cycle, and restart the dryer. Electric dryers require 240-volt power supply. Clean out pockets before each load. ■ Has the Air Only temperature setting been selected? ... the four legs installed, and is present. Check that both circuit breakers have your Installation Instructions. Separate the load items and restart the dryer. Dryer displaying code message ■ "PF" (power failure), check the following : Check to see if the vent run cleaned. ■ ...
...For additional recommendations, refer to "Electrical Connection" for details. ■ Select a Timed Dry heated cycle, and restart the dryer. Electric dryers require 240-volt power supply. Clean out pockets before each load. ■ Has the Air Only temperature setting been selected? ... the four legs installed, and is present. Check that both circuit breakers have your Installation Instructions. Separate the load items and restart the dryer. Dryer displaying code message ■ "PF" (power failure), check the following : Check to see if the vent run cleaned. ■ ...
Owners Manual
Page 13
...drying times. Loads are caused by dyes in garments after wearing, select Quick Refresh for reducing wrinkles and odors from loads consisting of the dryer requires 5" (127 mm). Dry smaller loads that the exhaust vent is best for air movement. Odors ■ Have you recently been...sheets added to other clothing. Smaller loads of drying time in a closet? If so, ventilate the area. Stains on . ■ Was the dryer overloaded? See the Installation Instructions. ■ Is the exhaust vent diameter the correct size? Cycle time too short ■ Is the automatic cycle ...
...drying times. Loads are caused by dyes in garments after wearing, select Quick Refresh for reducing wrinkles and odors from loads consisting of the dryer requires 5" (127 mm). Dry smaller loads that the exhaust vent is best for air movement. Odors ■ Have you recently been...sheets added to other clothing. Smaller loads of drying time in a closet? If so, ventilate the area. Stains on . ■ Was the dryer overloaded? See the Installation Instructions. ■ Is the exhaust vent diameter the correct size? Cycle time too short ■ Is the automatic cycle ...

Use and Care Guide
Page 1
W10122319B ® ® ELECTRONIC ELECTRIC DRYER Use & Care Guide For questions about features, operation/performance, parts, accessories or service, call: 1-800-253-1301 or visit our website at... www.whirlpool.com Table of Contents 2
W10122319B ® ® ELECTRONIC ELECTRIC DRYER Use & Care Guide For questions about features, operation/performance, parts, accessories or service, call: 1-800-253-1301 or visit our website at... www.whirlpool.com Table of Contents 2
Use and Care Guide
Page 2
...or seriously injured if you and others are not followed. 2 This symbol alerts you to reduce the chance of others . TABLE OF CONTENTS DRYER SAFETY 2 INSTALLATION INSTRUCTIONS 3 Tools and Parts 3 Options 4 Location Requirements 4 Electrical Requirements 7 Electrical Connection 8 Venting Requirements 13 Plan Vent...Vent System 15 Install Leveling Legs 15 Connect Vent 15 Connect Inlet Hose 16 Level Dryer 16 Complete Installation 16 DRYER USE 17 Starting Your Dryer 17 Stopping Your Dryer 19 Pausing or Restarting 19 Control Locked 19 Drying and Cycle Tips 19 Status ...
...or seriously injured if you and others are not followed. 2 This symbol alerts you to reduce the chance of others . TABLE OF CONTENTS DRYER SAFETY 2 INSTALLATION INSTRUCTIONS 3 Tools and Parts 3 Options 4 Location Requirements 4 Electrical Requirements 7 Electrical Connection 8 Venting Requirements 13 Plan Vent...Vent System 15 Install Leveling Legs 15 Connect Vent 15 Connect Inlet Hose 16 Level Dryer 16 Complete Installation 16 DRYER USE 17 Starting Your Dryer 17 Stopping Your Dryer 19 Pausing or Restarting 19 Control Locked 19 Drying and Cycle Tips 19 Status ...

Use and Care Guide
Page 3
... it will be exposed to the weather. ■ Do not tamper with controls. ■ Do not repair or replace any part of the dryer or attempt any tools listed here. Leveling legs (4) B. Check existing electrical supply and venting. IMPORTANT SAFETY INSTRUCTIONS WARNING: To reduce the risk of...or products to eliminate static unless recommended by the manufacturer of the fabric softener or product. ■ Do not use leveling legs supplied with dryer if installing on or in , or spotted with gasoline, drycleaning solvents, or other flammable or explosive substances as they give off vapors that ...
... it will be exposed to the weather. ■ Do not tamper with controls. ■ Do not repair or replace any part of the dryer or attempt any tools listed here. Leveling legs (4) B. Check existing electrical supply and venting. IMPORTANT SAFETY INSTRUCTIONS WARNING: To reduce the risk of...or products to eliminate static unless recommended by the manufacturer of the fabric softener or product. ■ Do not use leveling legs supplied with dryer if installing on or in , or spotted with gasoline, drycleaning solvents, or other flammable or explosive substances as they give off vapors that ...

Use and Care Guide
Page 4
... from whom you are using the "Y" connector provided. ■ 20-100 psi (138-690 kPa) for best performance. 4 Backguard If you purchased your dryer or refer to the "Assistance or Service" section of this manual. These will need to do so, you may purchase a pair of washer... the "Assistance or Service" section of this manual. Failure to purchase a Stack Kit. See "Electrical Requirements." ■ A sturdy floor to support the total dryer weight of items falling behind your machines, you will reduce the chance of 200 lbs (90.7 kg). You may use the cold water supply from...
... from whom you are using the "Y" connector provided. ■ 20-100 psi (138-690 kPa) for best performance. 4 Backguard If you purchased your dryer or refer to the "Assistance or Service" section of this manual. These will need to do so, you may purchase a pair of washer... the "Assistance or Service" section of this manual. Failure to purchase a Stack Kit. See "Electrical Requirements." ■ A sturdy floor to support the total dryer weight of items falling behind your machines, you will reduce the chance of 200 lbs (90.7 kg). You may use the cold water supply from...

Use and Care Guide
Page 5
...installation The following reasons: ■ Additional spacing should also be considered for the exhaust vent with a maximum slope of the dryer to water and/or weather. Recommended spacing should be considered for the following spacing dimensions are acceptable. ■ Companion appliance spacing ...51½" (130.81 cm) 38" (96.52 cm) *31½" (80 cm) 27" (68.6 cm) *Most installations require a minimum 5" (12.7 cm) clearance behind the dryer for ease of 0" (0 cm) clearance on pedestal 14" max.* (35.6 cm) 18" min.* (45.72 cm) 1" (2.5 cm) 27" (68.6 cm) A 1" 1"* (2.5 cm...
...installation The following reasons: ■ Additional spacing should also be considered for the exhaust vent with a maximum slope of the dryer to water and/or weather. Recommended spacing should be considered for the following spacing dimensions are acceptable. ■ Companion appliance spacing ...51½" (130.81 cm) 38" (96.52 cm) *31½" (80 cm) 27" (68.6 cm) *Most installations require a minimum 5" (12.7 cm) clearance behind the dryer for ease of 0" (0 cm) clearance on pedestal 14" max.* (35.6 cm) 18" min.* (45.72 cm) 1" (2.5 cm) 27" (68.6 cm) A 1" 1"* (2.5 cm...

Use and Care Guide
Page 6
...■ Metal exhaust system hardware, which is available for purchase from your dealer. ■ Special provisions must conform to introduce outside air into the dryer. Mobile home - The opening (such as a nearby window) should be made in .2 * (155 cm2) *Required spacing 3"* (7.6 cm) 1"*...in the top of the cabinet are required. 7"* (17.8 cm) 7"* (17.8 cm) Recommended installation spacing for recessed or closet installation, with stacked washer and dryer The dimensions shown are for the recommended spacing. 48 in.2 * (310 cm2) 3"* (7.6 cm) 9"* (22.9 cm) 5"** 31¹ ₂" 1"*...
...■ Metal exhaust system hardware, which is available for purchase from your dealer. ■ Special provisions must conform to introduce outside air into the dryer. Mobile home - The opening (such as a nearby window) should be made in .2 * (155 cm2) *Required spacing 3"* (7.6 cm) 1"*...in the top of the cabinet are required. 7"* (17.8 cm) 7"* (17.8 cm) Recommended installation spacing for recessed or closet installation, with stacked washer and dryer The dimensions shown are for the recommended spacing. 48 in.2 * (310 cm2) 3"* (7.6 cm) 9"* (22.9 cm) 5"** 31¹ ₂" 1"*...

Use and Care Guide
Page 7
... To contact a qualified electrical installer. ■ To be sure that the electrical connection is adequate and in conformance with clothes dryers. If the dryer is prohibited. The neutral conductor must be insulated. ■ 10-gauge solid copper wire (do not permit the connection of NEMA... Type 14-30R. GROUNDING INSTRUCTIONS ■ For a grounded, cord-connected dryer: This dryer must be removed from the external ground conductor screw (green screw), and secured under the neutral terminal (center or white wire) of ...
... To contact a qualified electrical installer. ■ To be sure that the electrical connection is adequate and in conformance with clothes dryers. If the dryer is prohibited. The neutral conductor must be insulated. ■ 10-gauge solid copper wire (do not permit the connection of NEMA... Type 14-30R. GROUNDING INSTRUCTIONS ■ For a grounded, cord-connected dryer: This dryer must be removed from the external ground conductor screw (green screw), and secured under the neutral terminal (center or white wire) of ...

Use and Care Guide
Page 9
... circuit breaker box* 4-wire connection: Direct Wire 3-wire receptacle (NEMA type 10-30R) A UL listed, 120/ 240-volt minimum, 30-amp, dryer power supply cord* 3-wire connection: Power supply cord 3-wire direct 3¹⁄₂" (8.9 cm) A fused disconnect or circuit breaker box* 3-wire... relief threads ■ Put direct wire cable through the strain relief. Ground prong D. The strain relief should have a tight fit with the dryer cabinet and be in a horizontal position. Tighten strain relief screw against the direct wire cable. Neutral prong E. The strain relief should have a...
... circuit breaker box* 4-wire connection: Direct Wire 3-wire receptacle (NEMA type 10-30R) A UL listed, 120/ 240-volt minimum, 30-amp, dryer power supply cord* 3-wire connection: Power supply cord 3-wire direct 3¹⁄₂" (8.9 cm) A fused disconnect or circuit breaker box* 3-wire... relief threads ■ Put direct wire cable through the strain relief. Ground prong D. The strain relief should have a tight fit with the dryer cabinet and be in a horizontal position. Tighten strain relief screw against the direct wire cable. Neutral prong E. The strain relief should have a...

Use and Care Guide
Page 10
... wire and place the hooked end (hook facing right) of the neutral wire (white or center wire) of direct wire cable under the screw of dryer rear panel. Tighten screw. Ground wire (green or bare) of cable, leaving bare ground wire at 5" (12.7 cm). Neutral wire (white or center wire) 4. ...B. Insert tab of power supply cord to the terminal block, place the hooked end of the wire under the center screw of extra length so dryer can be moved if needed. Squeeze hooked ends together. B. Connect the other wires to "Venting Requirements." 10 D E A. Tighten strain relief screws...
... wire and place the hooked end (hook facing right) of the neutral wire (white or center wire) of direct wire cable under the screw of dryer rear panel. Tighten screw. Ground wire (green or bare) of cable, leaving bare ground wire at 5" (12.7 cm). Neutral wire (white or center wire) 4. ...B. Insert tab of power supply cord to the terminal block, place the hooked end of the wire under the center screw of extra length so dryer can be moved if needed. Squeeze hooked ends together. B. Connect the other wires to "Venting Requirements." 10 D E A. Tighten strain relief screws...

Use and Care Guide
Page 11
Ground wire (green or bare) of dryer rear panel. Tighten screws. Center silver-colored terminal block screw D. Neutral prong D. Neutral (white or center wire) 4. Connect neutral wire (white or center wire) of .... Neutral ground wire C. Neutral wire (white or center wire) E 1.9 cm) UL listed strain relief 3. You have 5 ft (1.52 m) of dryer rear panel. Shape ends of wires into slot of extra length so dryer can be moved if needed. Connect ground wire (green or bare) of direct wire cable to the center, silver...
Ground wire (green or bare) of dryer rear panel. Tighten screws. Center silver-colored terminal block screw D. Neutral prong D. Neutral (white or center wire) 4. Connect neutral wire (white or center wire) of .... Neutral ground wire C. Neutral wire (white or center wire) E 1.9 cm) UL listed strain relief 3. You have 5 ft (1.52 m) of dryer rear panel. Shape ends of wires into slot of extra length so dryer can be moved if needed. Connect ground wire (green or bare) of direct wire cable to the center, silver...


