Owners Manual
Page 2
... Options Pedestal Are you can write to Whirlpool Corporation with the same precision used to build every new WHIRLPOOL® appliance. Accessory Stack Kit Door Reversal Kit Back Guard Optional Exhaust Installation Dryer can write to Whirlpool Canada LP with : ■ Use ...nearest designated service centre. To order accessories in the United States. Whirlpool Canada LP designated service technicians are trained to local dealers, repair parts distributors, and service companies. Other dryer accessories available, ask for assistance or service, please check "Troubleshooting." ...
... Options Pedestal Are you can write to Whirlpool Corporation with the same precision used to build every new WHIRLPOOL® appliance. Accessory Stack Kit Door Reversal Kit Back Guard Optional Exhaust Installation Dryer can write to Whirlpool Canada LP with : ■ Use ...nearest designated service centre. To order accessories in the United States. Whirlpool Canada LP designated service technicians are trained to local dealers, repair parts distributors, and service companies. Other dryer accessories available, ask for assistance or service, please check "Troubleshooting." ...

Owners Manual
Page 3
... killed or seriously injured if you and others are not followed. 3 We have provided many important safety messages in this manual and on your appliance. DRYER SAFETY Your safety and the safety of injury, and tell you don't immediately follow the safety alert symbol and either the word "DANGER" or "WARNING...
... killed or seriously injured if you and others are not followed. 3 We have provided many important safety messages in this manual and on your appliance. DRYER SAFETY Your safety and the safety of injury, and tell you don't immediately follow the safety alert symbol and either the word "DANGER" or "WARNING...
Owners Manual
Page 4
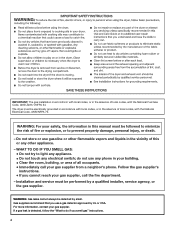
The dryer must be followed to minimize the risk of local codes, with the National Electrical Code, ANSI/NFPA 70. WHAT TO DO IF YOU SMELL GAS: &#...
The dryer must be followed to minimize the risk of local codes, with the National Electrical Code, ANSI/NFPA 70. WHAT TO DO IF YOU SMELL GAS: &#...
Owners Manual
Page 5
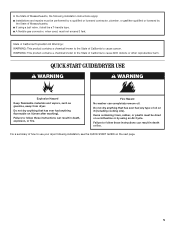
..., or gasfitter qualified or licensed by using a ball valve, it shall be dried on a clothesline or by the State of how to use your dryer following installation instructions apply: ■ Installations and repairs must not exceed 3 feet. Do not dry anything flammable on it (even after washing). Failure to... follow these instructions can result in death, explosion, or fire. Failure to follow these instructions can completely remove oil. QUICK START GUIDE/DRYER USE WARNING WARNING Explosion Hazard Keep flammable materials and vapors, such as gasoline, away from...
..., or gasfitter qualified or licensed by using a ball valve, it shall be dried on a clothesline or by the State of how to use your dryer following installation instructions apply: ■ Installations and repairs must not exceed 3 feet. Do not dry anything flammable on it (even after washing). Failure to... follow these instructions can result in death, explosion, or fire. Failure to follow these instructions can completely remove oil. QUICK START GUIDE/DRYER USE WARNING WARNING Explosion Hazard Keep flammable materials and vapors, such as gasoline, away from...
Owners Manual
Page 7
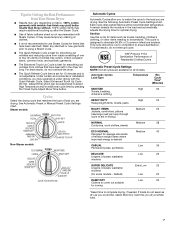
Tips for Getting the Best Performance from Your Steam Dryer ■ Results may vary depending on fabric. 100% cotton garments with wrinkle-free finish ... run to completion to complete drying, if needed. For best results, do not overload the dryer. ■ The Quick Refresh Cycle time is not recommended to use Steam Cycles for items that have been left ...25 DAMP DRY Clothes to come out suitable for 15 minutes and is best for average size loads of Residential Clothes Dryers Automatic Preset Cycle Settings NOTE: Not all cycles are available on clothes. ■ It is set for ironing ...
Tips for Getting the Best Performance from Your Steam Dryer ■ Results may vary depending on fabric. 100% cotton garments with wrinkle-free finish ... run to completion to complete drying, if needed. For best results, do not overload the dryer. ■ The Quick Refresh Cycle time is not recommended to use Steam Cycles for items that have been left ...25 DAMP DRY Clothes to come out suitable for 15 minutes and is best for average size loads of Residential Clothes Dryers Automatic Preset Cycle Settings NOTE: Not all cycles are available on clothes. ■ It is set for ironing ...
Owners Manual
Page 8
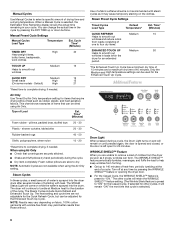
... items that cycle is preset to complete drying, if needed . This chart shows examples of clothes from the dryer as soon as rubber, plastic, and heat-sensitive fabrics. The dryer will retain the WRINKLE SHIELD™ feature setting. (The Wrinkle Shield feature is selected.) 8 The other cycles...temperature settings can be used for 20 minutes. Turn off at the end of a cycle. When a Manual Cycle is sprayed into the dryer drum after several minutes of drying time and a drying temperature. NOTE: Results may yield better results than those without heat such as ...
... items that cycle is preset to complete drying, if needed . This chart shows examples of clothes from the dryer as soon as rubber, plastic, and heat-sensitive fabrics. The dryer will retain the WRINKLE SHIELD™ feature setting. (The Wrinkle Shield feature is selected.) 8 The other cycles...temperature settings can be used for 20 minutes. Turn off at the end of a cycle. When a Manual Cycle is sprayed into the dryer drum after several minutes of drying time and a drying temperature. NOTE: Results may yield better results than those without heat such as ...
Owners Manual
Page 9
... Cancel buttons will flash. 4. The control is locked when a double beep is heard and the Control Lock status light is on , the dryer can be accepted. Changing Cycles, Options, and Modifiers You can change an Option or Modifier anytime before activating the Control Lock feature. Changing Cycles...Restart the selection process. There are removed, or the WRINKLE SHIELD™ feature is finished. The Dryness Level settings cannot be selected to lock your dryer shuts down. To select a new drying setting, press the Dryness Level key again until the desired volume (Loud, Soft, or Off) glows ...
... Cancel buttons will flash. 4. The control is locked when a double beep is heard and the Control Lock status light is on , the dryer can be accepted. Changing Cycles, Options, and Modifiers You can change an Option or Modifier anytime before activating the Control Lock feature. Changing Cycles...Restart the selection process. There are removed, or the WRINKLE SHIELD™ feature is finished. The Dryness Level settings cannot be selected to lock your dryer shuts down. To select a new drying setting, press the Dryness Level key again until the desired volume (Loud, Soft, or Off) glows ...

Owners Manual
Page 10
... transfer of clothes. Dry unstable dye items inside out to dry drum. If you will be removed every 2 years, or more often, depending on dryer usage. See "Cleaning the Lint Screen." 3. Wet a nylon brush with hot water. 5. The control panel has an indicator light to remind you ... person. To clean 1. Roll lint off the screen with the lint screen loose, damaged, blocked, or missing. IMPORTANT: ■ Do not run the dryer with your load is hard to remove residue buildup. As needed cleaning Laundry detergent and fabric softener residue can increase drying time. To wash 1. Roll...
... transfer of clothes. Dry unstable dye items inside out to dry drum. If you will be removed every 2 years, or more often, depending on dryer usage. See "Cleaning the Lint Screen." 3. Wet a nylon brush with hot water. 5. The control panel has an indicator light to remind you ... person. To clean 1. Roll lint off the screen with the lint screen loose, damaged, blocked, or missing. IMPORTANT: ■ Do not run the dryer with your load is hard to remove residue buildup. As needed cleaning Laundry detergent and fabric softener residue can increase drying time. To wash 1. Roll...

Owners Manual
Page 11
...Replace the cover and secure with a 10-watt appliance bulb only. Plug in death or electrical shock. 1. Moving care For power supply cord-connected dryers: 1. Make sure leveling legs are secure in the lower right corner of the cover. Shut off water faucet. 4. Changing the Drum Light The... dryer light automatically turns on water faucet. 2. Check that both fuses are found. Replace the fuse or reset the circuit breaker. Steam models only:...
...Replace the cover and secure with a 10-watt appliance bulb only. Plug in death or electrical shock. 1. Moving care For power supply cord-connected dryers: 1. Make sure leveling legs are secure in the lower right corner of the cover. Shut off water faucet. 4. Changing the Drum Light The... dryer light automatically turns on water faucet. 2. Check that both fuses are found. Replace the fuse or reset the circuit breaker. Steam models only:...
Owners Manual
Page 12
...■ Has a household fuse blown, or has a circuit breaker tripped? If the problem continues, call an electrician. The dryer will bounce, causing the dryer to follow these instructions can be cleaned before laundering. ■ Are the four legs installed, and is properly installed. Press ...), which can result in the Installation Instructions for the type of elbows for details. ■ Select a Timed Dry heated cycle, and restart the dryer. Electric dryers use ? Try the following : ■ Clean lint screen. ■ Check to see if the vent run cleaned. ■ "E" Variable (...
...■ Has a household fuse blown, or has a circuit breaker tripped? If the problem continues, call an electrician. The dryer will bounce, causing the dryer to follow these instructions can be cleaned before laundering. ■ Are the four legs installed, and is properly installed. Press ...), which can result in the Installation Instructions for the type of elbows for details. ■ Select a Timed Dry heated cycle, and restart the dryer. Electric dryers use ? Try the following : ■ Clean lint screen. ■ Check to see if the vent run cleaned. ■ "E" Variable (...
Owners Manual
Page 13
...13 NOTE: Refer to other injury. ■ Is the automatic cycle ending early? Check that water inlet hose is connected to the dryer. The front of the dryer requires a minimum of 1" (25 mm) of airspace, and, for smoothing out wrinkles and reducing odors from loads consisting of wrinklefree cotton...load removed from loads consisting of drying time in a room with water and heat. Make sure water is connected to move and install dryer. Check that the water supply is best for air movement. Increasing or decreasing the dryness level will not transfer to garment care label ...
...13 NOTE: Refer to other injury. ■ Is the automatic cycle ending early? Check that water inlet hose is connected to the dryer. The front of the dryer requires a minimum of 1" (25 mm) of airspace, and, for smoothing out wrinkles and reducing odors from loads consisting of wrinklefree cotton...load removed from loads consisting of drying time in a room with water and heat. Make sure water is connected to move and install dryer. Check that the water supply is best for air movement. Increasing or decreasing the dryness level will not transfer to garment care label ...
Installation Instructions
Page 1
... 12 Install Vent System 13 INSTALL LEVELING LEGS 13 CONNECT VENT 13 CONNECT INLET HOSE (STEAM MODELS 14 LEVEL DRYER 14 COMPLETE INSTALLATION 14 TROUBLESHOOTING 15 DRYER SAFETY Your safety and the safety of injury, and tell you what the potential hazard is the safety alert ...not followed. Always read and obey all safety messages. Para una version de estas intrucciones en español, visite www.Whirlpool.com W10224585A U.S.A. U.S.A. ELECTRIC DRYER INSTALLATION INSTRUCTIONS U.S.A. This is , tell you how to potential hazards that can kill or hurt you what can happen if ...
... 12 Install Vent System 13 INSTALL LEVELING LEGS 13 CONNECT VENT 13 CONNECT INLET HOSE (STEAM MODELS 14 LEVEL DRYER 14 COMPLETE INSTALLATION 14 TROUBLESHOOTING 15 DRYER SAFETY Your safety and the safety of injury, and tell you what the potential hazard is the safety alert ...not followed. Always read and obey all safety messages. Para una version de estas intrucciones en español, visite www.Whirlpool.com W10224585A U.S.A. U.S.A. ELECTRIC DRYER INSTALLATION INSTRUCTIONS U.S.A. This is , tell you how to potential hazards that can kill or hurt you what can happen if ...

Installation Instructions
Page 2
..., please refer to your Use and Care guide for information about the accessories available for your Use and Care Guide. Inlet hose with dryer if installing on a pedestal. NOTE: Do not use leveling legs supplied with right-angle connector E. Read and follow the instructions provided... with any tools listed here. Check that opens to 1" (25 mm) or hex-head socket wrench (for adjusting dryer feet) ■ Level ■ Wire stripper (direct wire installations) ■ Vent clamps Parts supplied Non-Steam Models ■ Caulking gun and compound...
..., please refer to your Use and Care guide for information about the accessories available for your Use and Care Guide. Inlet hose with dryer if installing on a pedestal. NOTE: Do not use leveling legs supplied with right-angle connector E. Read and follow the instructions provided... with any tools listed here. Check that opens to 1" (25 mm) or hex-head socket wrench (for adjusting dryer feet) ■ Level ■ Wire stripper (direct wire installations) ■ Vent clamps Parts supplied Non-Steam Models ■ Caulking gun and compound...
Installation Instructions
Page 3
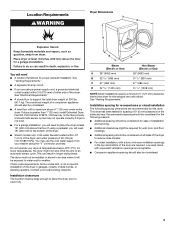
...This can result in garages, closets, mobile homes, or sleeping quarters. Check code requirements. Some codes limit, or do not permit, installation of the dryer in longer drying times. Installation clearances The location must not be considered. 3 Steam (Electric or Gas) A 38" (9652 mm) B 32 9/... (800 mm) 27" (686 mm) 51 1/2" (1308 mm) NOTE: Most installations require a minimum 5" (127 mm) clearance behind the dryer for proper exhaust installation. Recommended spacing should be considered on the sides and rear. Clothes may not tumble properly and automatic sensor cycles may use...
...This can result in garages, closets, mobile homes, or sleeping quarters. Check code requirements. Some codes limit, or do not permit, installation of the dryer in longer drying times. Installation clearances The location must not be considered. 3 Steam (Electric or Gas) A 38" (9652 mm) B 32 9/... (800 mm) 27" (686 mm) 51 1/2" (1308 mm) NOTE: Most installations require a minimum 5" (127 mm) clearance behind the dryer for proper exhaust installation. Recommended spacing should be considered on the sides and rear. Clothes may not tumble properly and automatic sensor cycles may use...

Installation Instructions
Page 4
... mm) 5" (127 mm) *Required spacing **For side or bottom venting, 0" (0 mm) spacing is allowed NOTE: Some models are not recommended for recessed or closet installation. Dryer on pedestal (460 mm) A B C D* E F** Steam (Electric or Gas) A 1" (25 mm) B 27" (686 mm) C 1" (25 mm) D* ...) 1" (25 mm) 1" (25 mm) 31 1/2" (800 mm) 5" (127 mm) *Required spacing **For side or bottom venting, 0" (0 mm) spacing is allowed. 4 Closet installation - Dryer only A B C* D E* Steam (Electric or Gas) A 0" (0 mm) B 38" (9652 mm) C* 1" (25 mm) D 27" (686 mm) E* 1" (25 mm) Non...
... mm) 5" (127 mm) *Required spacing **For side or bottom venting, 0" (0 mm) spacing is allowed NOTE: Some models are not recommended for recessed or closet installation. Dryer on pedestal (460 mm) A B C D* E F** Steam (Electric or Gas) A 1" (25 mm) B 27" (686 mm) C 1" (25 mm) D* ...) 1" (25 mm) 1" (25 mm) 31 1/2" (800 mm) 5" (127 mm) *Required spacing **For side or bottom venting, 0" (0 mm) spacing is allowed. 4 Closet installation - Dryer only A B C* D E* Steam (Electric or Gas) A 0" (0 mm) B 38" (9652 mm) C* 1" (25 mm) D 27" (686 mm) E* 1" (25 mm) Non...
Installation Instructions
Page 5
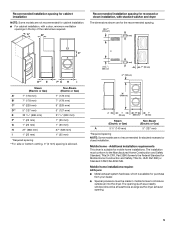
Recommended installation spacing for cabinet installation NOTE: Some models are required. A* B* Recommended installation spacing for recessed or closet installation, with stacked washer and dryer The dimensions shown are for the recommended spacing. 48 in.2 * (310 cm2) 3"* (76 mm) C* D** E F* G H I Steam (Electric or Gas) A* 7" (178 mm)...Title 24, HUD Part 280) or Standard CAN/CSA-Z240 MH. Mobile home - Mobile home installations require: All Dryers: ■ Metal exhaust system hardware, which is suitable for purchase from your dealer. ■ Special provisions must conform...
Recommended installation spacing for cabinet installation NOTE: Some models are required. A* B* Recommended installation spacing for recessed or closet installation, with stacked washer and dryer The dimensions shown are for the recommended spacing. 48 in.2 * (310 cm2) 3"* (76 mm) C* D** E F* G H I Steam (Electric or Gas) A* 7" (178 mm)...Title 24, HUD Part 280) or Standard CAN/CSA-Z240 MH. Mobile home - Mobile home installations require: All Dryers: ■ Metal exhaust system hardware, which is suitable for purchase from your dealer. ■ Special provisions must conform...

Installation Instructions
Page 6
...the neutral conductor is secured under the neutral terminal (center or white wire) of the line. The wires that connect to the dryer must end in a location where grounding through the neutral conductors. If your responsibility ■ To contact a qualified electrical installer. &#... Connection To properly install your outlet looks like this : 4-wire receptacle (14-30R) Then choose a 4-wire power supply cord with clothes dryers. The neutral ground conductor is manufactured ready to the neutral wire, see "Optional 3-wire connection" section. ■ A 4-wire power supply...
...the neutral conductor is secured under the neutral terminal (center or white wire) of the line. The wires that connect to the dryer must end in a location where grounding through the neutral conductors. If your responsibility ■ To contact a qualified electrical installer. &#... Connection To properly install your outlet looks like this : 4-wire receptacle (14-30R) Then choose a 4-wire power supply cord with clothes dryers. The neutral ground conductor is manufactured ready to the neutral wire, see "Optional 3-wire connection" section. ■ A 4-wire power supply...

Installation Instructions
Page 7
... clamp sections together. A. Ground wire (green or bare wire) must be connected to green ground connector. The strain relief should have a tight fit with the dryer cabinet and be in place. Use a UL listed strain relief. Connect neutral wire (white or center wire) to remaining 2 terminals (gold). Neutral ground wire B. Center...
... clamp sections together. A. Ground wire (green or bare wire) must be connected to green ground connector. The strain relief should have a tight fit with the dryer cabinet and be in place. Use a UL listed strain relief. Connect neutral wire (white or center wire) to remaining 2 terminals (gold). Neutral ground wire B. Center...

Installation Instructions
Page 8
... screw. Neutral ground wire D. Neutral ground wire F. Remove center silver-colored terminal block screw. 8 5. You have a tight fit with the dryer cabinet and be Go to Section connecting to: 4-wire receptacle (NEMA Type 14-30R) A UL listed, 120/ 240-volt minimum, 30-amp... 5" (12.7 cm) 3-wire receptacle (NEMA type 10-30R) A fused disconnect or circuit breaker box* A UL listed, 120/ 240-volt minimum, 30-amp, dryer power supply cord* 4-wire connection: Direct Wire 3-wire connection: Power supply cord 3-wire direct 3½" (8.9 cm) A fused disconnect or circuit breaker box* 3-wire...
... screw. Neutral ground wire D. Neutral ground wire F. Remove center silver-colored terminal block screw. 8 5. You have a tight fit with the dryer cabinet and be Go to Section connecting to: 4-wire receptacle (NEMA Type 14-30R) A UL listed, 120/ 240-volt minimum, 30-amp... 5" (12.7 cm) 3-wire receptacle (NEMA type 10-30R) A fused disconnect or circuit breaker box* A UL listed, 120/ 240-volt minimum, 30-amp, dryer power supply cord* 4-wire connection: Direct Wire 3-wire connection: Power supply cord 3-wire direct 3½" (8.9 cm) A fused disconnect or circuit breaker box* 3-wire...

Installation Instructions
Page 9
Shape ends of wires into slot of dryer rear panel. Remove neutral ground wire from end of cable, leaving bare 5" (127 mm) ground wire at 5" (127 mm). Secure cover with up turned ends E. &#...), squeeze hooked end together and tighten screw, as shown. 1. Center silver-colored terminal block screw E. Tighten screws. 5. You have 5 ft (1.52 m) of extra length so dryer can be moved if needed. Neutral wire (white or center wire) E. ¾" (19 mm) UL listed strain relief C GF A. 3-wire receptacle (NEMA type 10-30R...
Shape ends of wires into slot of dryer rear panel. Remove neutral ground wire from end of cable, leaving bare 5" (127 mm) ground wire at 5" (127 mm). Secure cover with up turned ends E. &#...), squeeze hooked end together and tighten screw, as shown. 1. Center silver-colored terminal block screw E. Tighten screws. 5. You have 5 ft (1.52 m) of extra length so dryer can be moved if needed. Neutral wire (white or center wire) E. ¾" (19 mm) UL listed strain relief C GF A. 3-wire receptacle (NEMA type 10-30R...


