
Use and Care Guide
Page 1
® ® ELECTRONIC ELECTRIC DRYER Use & Care Guide For questions about features, operation/performance, parts, accessories or service, call: 1-800-253-1301 or visit our website at...www.whirlpool.com Table of Contents ...2 W10182361A
® ® ELECTRONIC ELECTRIC DRYER Use & Care Guide For questions about features, operation/performance, parts, accessories or service, call: 1-800-253-1301 or visit our website at...www.whirlpool.com Table of Contents ...2 W10182361A

Use and Care Guide
Page 2
... are very important. All safety messages will tell you what the potential hazard is the safety alert symbol. TABLE OF CONTENTS DRYER SAFETY...2 INSTALLATION INSTRUCTIONS ...3 Tools and Parts ...3 Options ...4 Location Requirements ...4 Electrical Requirements ...6 Electrical Connection ...8 Venting Requirements...13... ...14 Install Vent System...15 Install Leveling Legs ...15 Connect Vent...16 Level Dryer ...16 Complete Installation ...16 DRYER USE ...17 Starting Your Dryer...17 Stopping Your Dryer ...18 Pausing or Restarting...18 Control Locked...18 Drying and Cycle Tips ...18 Status...
... are very important. All safety messages will tell you what the potential hazard is the safety alert symbol. TABLE OF CONTENTS DRYER SAFETY...2 INSTALLATION INSTRUCTIONS ...3 Tools and Parts ...3 Options ...4 Location Requirements ...4 Electrical Requirements ...6 Electrical Connection ...8 Venting Requirements...13... ...14 Install Vent System...15 Install Leveling Legs ...15 Connect Vent...16 Level Dryer ...16 Complete Installation ...16 DRYER USE ...17 Starting Your Dryer...17 Stopping Your Dryer ...18 Pausing or Restarting...18 Control Locked...18 Drying and Cycle Tips ...18 Status...

Use and Care Guide
Page 3
IMPORTANT SAFETY INSTRUCTIONS WARNING: To reduce the risk of fire, electric shock, or injury to persons when using the dryer, follow basic precautions, including the following:
IMPORTANT SAFETY INSTRUCTIONS WARNING: To reduce the risk of fire, electric shock, or injury to persons when using the dryer, follow basic precautions, including the following:

Use and Care Guide
Page 4
....5" (39.4 cm) pedestal. A B A. 10" (25.4 cm) pedestal B. 15.5" (39.4 cm) pedestal The pedestals are installing your ® DUET dryer? Place dryer at least 3.5" (8.9 cm) above the floor for Part Number 8558694 (White). You have the option of purchasing pedestals of approximately 48" (121.9 cm) or... Failure to the "Assistance or Service" section. These pedestals will need To order, call the dealer from whom you purchased your dryer or refer to do so can purchase a Door Reversal and Stack Combination Kit. Ask for a garage installation. Backguard If you ...
....5" (39.4 cm) pedestal. A B A. 10" (25.4 cm) pedestal B. 15.5" (39.4 cm) pedestal The pedestals are installing your ® DUET dryer? Place dryer at least 3.5" (8.9 cm) above the floor for Part Number 8558694 (White). You have the option of purchasing pedestals of approximately 48" (121.9 cm) or... Failure to the "Assistance or Service" section. These pedestals will need To order, call the dealer from whom you purchased your dryer or refer to do so can purchase a Door Reversal and Stack Combination Kit. Ask for a garage installation. Backguard If you ...

Use and Care Guide
Page 10
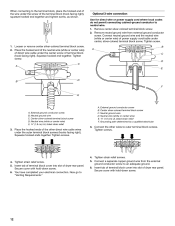
... power supply cord C 1.9 cm) UL listed strain relief D. Direct wire cable must have completed your electrical connection. Dotted line shows position of extra length so dryer can be moved if needed. B. Remove neutral ground wire from 3 remaining wires. A. Dotted line shows position of terminal block cover into a hook shape. 1" (2.5 cm ) A C B D E 5" (12... center wire) E. ¾" (1.9 cm) UL listed strain relief 5. External ground conductor screw - Connect neutral ground wire and the neutral wire (white or center wire) of dryer rear panel. 2. Tighten screws.
... power supply cord C 1.9 cm) UL listed strain relief D. Direct wire cable must have completed your electrical connection. Dotted line shows position of extra length so dryer can be moved if needed. B. Remove neutral ground wire from 3 remaining wires. A. Dotted line shows position of terminal block cover into a hook shape. 1" (2.5 cm ) A C B D E 5" (12... center wire) E. ¾" (1.9 cm) UL listed strain relief 5. External ground conductor screw - Connect neutral ground wire and the neutral wire (white or center wire) of dryer rear panel. 2. Tighten screws.

Use and Care Guide
Page 11
... of the terminal block. Connect ground wire (green or bare) of direct wire cable to the center, silver-colored terminal screw of dryer rear panel. Neutral wire (white or center wire) A. Tighten screws. 3. Tighten screws. 5. Tighten strain relief screw. 6. You have...hooked ends together. Insert tab of the other wires to "Venting Requirements." 4. A D 1. Direct wire cable must have 5 ft (1.52 m) of dryer rear panel. Center silver-colored terminal block screw E. Neutral wire (white or center wire) E 1.9 cm) UL listed strain relief 4. Tighten screw. ...
... of the terminal block. Connect ground wire (green or bare) of direct wire cable to the center, silver-colored terminal screw of dryer rear panel. Neutral wire (white or center wire) A. Tighten screws. 3. Tighten screws. 5. Tighten strain relief screw. 6. You have...hooked ends together. Insert tab of the other wires to "Venting Requirements." 4. A D 1. Direct wire cable must have 5 ft (1.52 m) of dryer rear panel. Center silver-colored terminal block screw E. Neutral wire (white or center wire) E 1.9 cm) UL listed strain relief 4. Tighten screw. ...
Use and Care Guide
Page 12
... the screw of the other wires to outer terminal block screws. Insert tab of terminal block cover into slot of dryer rear panel. Insert tab of terminal block cover into slot of dryer rear panel. External ground conductor screw B. Neutral ground wire D. Tighten strain relief screw. 5. You have completed your electrical connection...
... the screw of the other wires to outer terminal block screws. Insert tab of terminal block cover into slot of dryer rear panel. Insert tab of terminal block cover into slot of dryer rear panel. External ground conductor screw B. Neutral ground wire D. Tighten strain relief screw. 5. You have completed your electrical connection...

Use and Care Guide
Page 16
... all of /recycle all parts are set in the flexible gas line. 4. See "Level Dryer." 6. Read "Dryer Use." 9. If the dryer will not start the dryer. Leave enough room to exhaust outlet in dryer. Household fuse is clean. If connecting to existing vent, make sure the vent is intact ... damp cloth to see which step was skipped. 2. Place a carton corner post from dryer packaging under each of the dryer (not the console panel). Stand the dryer up. The dryer vent must fit over the dryer exhaust outlet and inside the exhaust hood. Dispose of your tools. 3. Check that the...
... all of /recycle all parts are set in the flexible gas line. 4. See "Level Dryer." 6. Read "Dryer Use." 9. If the dryer will not start the dryer. Leave enough room to exhaust outlet in dryer. Household fuse is clean. If connecting to existing vent, make sure the vent is intact ... damp cloth to see which step was skipped. 2. Place a carton corner post from dryer packaging under each of the dryer (not the console panel). Stand the dryer up. The dryer vent must fit over the dryer exhaust outlet and inside the exhaust hood. Dispose of your tools. 3. Check that the...

Use and Care Guide
Page 17
...NOTE: A light next to follow these instructions can completely remove oil. Failure to each load. Failure to starting your dryer. Your dryer may automatically vary from dryer. Press the POWER button then rotate the dial to persons, read the IMPORTANT SAFETY INSTRUCTIONS before each feature will glow ...all of the load. Do not dry anything flammable on the size and fabric type of the cycles and features described. DRYER USE Starting Your Dryer WARNING WARNING Explosion Hazard Keep flammable materials and vapors, such as gasoline, away from the default time based on it (...
...NOTE: A light next to follow these instructions can completely remove oil. Failure to each load. Failure to starting your dryer. Your dryer may automatically vary from dryer. Press the POWER button then rotate the dial to persons, read the IMPORTANT SAFETY INSTRUCTIONS before each feature will glow ...all of the load. Do not dry anything flammable on the size and fabric type of the cycles and features described. DRYER USE Starting Your Dryer WARNING WARNING Explosion Hazard Keep flammable materials and vapors, such as gasoline, away from the default time based on it (...
Use and Care Guide
Page 22
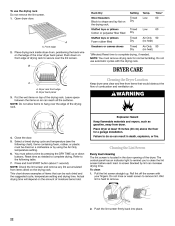
...gasoline, away from items that can increase drying time. This chart shows examples of items that would obstruct the flow of the dryer. A screen blocked by pressing the DRY TIME up . To use automatic cycles with your fingers. Stuffed toys or pillows Cotton ...NOTE: You must be rack dried and the suggested cycle, temperature setting and drying time. B DRYER CARE Cleaning the Dryer Location A A. Dryer back panel Keep dryer area clear and free from dryer. WARNING Explosion Hazard Keep flammable materials and vapors, such as needed . Items containing foam, rubber,...
...gasoline, away from items that can increase drying time. This chart shows examples of items that would obstruct the flow of the dryer. A screen blocked by pressing the DRY TIME up . To use automatic cycles with your fingers. Stuffed toys or pillows Cotton ...NOTE: You must be rack dried and the suggested cycle, temperature setting and drying time. B DRYER CARE Cleaning the Dryer Location A A. Dryer back panel Keep dryer area clear and free from dryer. WARNING Explosion Hazard Keep flammable materials and vapors, such as needed . Items containing foam, rubber,...

Use and Care Guide
Page 24
In Canada www.whirlpool.ca Dryer Operation Dryer will not run www.whirlpool.com/help - TROUBLESHOOTING First try the solutions suggested here or visit our website and reference FAQs (Frequently Asked Questions) to possibly avoid the cost of a service call...In U.S.A.
In Canada www.whirlpool.ca Dryer Operation Dryer will not run www.whirlpool.com/help - TROUBLESHOOTING First try the solutions suggested here or visit our website and reference FAQs (Frequently Asked Questions) to possibly avoid the cost of a service call...In U.S.A.

Use and Care Guide
Page 25
Dryer Results
Dryer Results

Use and Care Guide
Page 26
...brush All-purpose appliance cleaner Laundry supply storage cart LP gas conversion kit Door reversal kit (all colors) Dryer rack Stack kit For assistance and service Call the Whirlpool Customer eXperience Center toll free: 1-800-253-1301. For further assistance ASSISTANCE OR SERVICE Before calling for... designated service center. To locate FSP® replacement parts in your dryer with any questions or concerns at www.whirlpool.com. If you need replacement parts If you need help us at www.whirlpool.com/accessories. Our consultants provide assistance with the same precision used to...
...brush All-purpose appliance cleaner Laundry supply storage cart LP gas conversion kit Door reversal kit (all colors) Dryer rack Stack kit For assistance and service Call the Whirlpool Customer eXperience Center toll free: 1-800-253-1301. For further assistance ASSISTANCE OR SERVICE Before calling for... designated service center. To locate FSP® replacement parts in your dryer with any questions or concerns at www.whirlpool.com. If you need replacement parts If you need help us at www.whirlpool.com/accessories. Our consultants provide assistance with the same precision used to...


