Use and Care Guide
Page 1
www.whirlpool.com Table of Contents 2 W10182361A ® ® ELECTRONIC ELECTRIC DRYER Use & Care Guide For questions about features, operation/performance, parts, accessories or service, call: 1-800-253-1301 or visit our website at...
www.whirlpool.com Table of Contents 2 W10182361A ® ® ELECTRONIC ELECTRIC DRYER Use & Care Guide For questions about features, operation/performance, parts, accessories or service, call: 1-800-253-1301 or visit our website at...
Use and Care Guide
Page 2
... seriously injured if you don't follow the safety alert symbol and either the word "DANGER" or "WARNING." TABLE OF CONTENTS DRYER SAFETY 2 INSTALLATION INSTRUCTIONS 3 Tools and Parts 3 Options 4 Location Requirements 4 Electrical Requirements 6 Electrical Connection 8 Venting Requirements 13 Plan Vent System 14 Install Vent System 15 Install Leveling Legs 15 Connect Vent 16 Level...
... seriously injured if you don't follow the safety alert symbol and either the word "DANGER" or "WARNING." TABLE OF CONTENTS DRYER SAFETY 2 INSTALLATION INSTRUCTIONS 3 Tools and Parts 3 Options 4 Location Requirements 4 Electrical Requirements 6 Electrical Connection 8 Venting Requirements 13 Plan Vent System 14 Install Vent System 15 Install Leveling Legs 15 Connect Vent 16 Level...
Use and Care Guide
Page 3
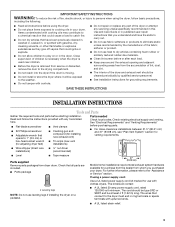
...catch fire. ■ Do not dry articles that you purchased your dryer. Check that could ignite or explode. ■ Do not allow children to the "Assistance or Service" section. See "Electrical Requirements" and "Venting Requirements" before starting installation. IMPORTANT SAFETY INSTRUCTIONS ... measure Parts supplied Remove parts packages from the accumulation of lint, dust, and dirt. ■ The interior of the dryer and exhaust vent should be at least 4 ft (1.22 m) long. Items contaminated with clothes dryers. For further information, please refer to play on a pedestal....
...catch fire. ■ Do not dry articles that you purchased your dryer. Check that could ignite or explode. ■ Do not allow children to the "Assistance or Service" section. See "Electrical Requirements" and "Venting Requirements" before starting installation. IMPORTANT SAFETY INSTRUCTIONS ... measure Parts supplied Remove parts packages from the accumulation of lint, dust, and dirt. ■ The interior of the dryer and exhaust vent should be at least 4 ft (1.22 m) long. Items contaminated with clothes dryers. For further information, please refer to play on a pedestal....
Use and Care Guide
Page 4
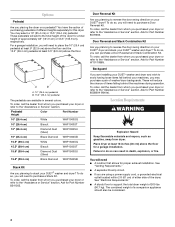
... to reverse the door swing direction on your DUET® dryer? Place dryer at least 3.5" (8.9 cm) above the floor for Part Number 8558694 (White). See "Electrical Requirements." ■ A sturdy floor to support the total dryer weight of items falling behind your machines, you are available in....5" (39.4 cm) Biscuit WHP1500ST 15.5" (39.4 cm) Diamond Dust (Silver) WHP1500SU 15.5" (39.4 cm) Black Diamond WHP1500SB Stack Kit Are you placing the dryer on your DUET® dryer and stack your DUET® washer and dryer and wish to avoid having loose items fall behind the machines ...
... to reverse the door swing direction on your DUET® dryer? Place dryer at least 3.5" (8.9 cm) above the floor for Part Number 8558694 (White). See "Electrical Requirements." ■ A sturdy floor to support the total dryer weight of items falling behind your machines, you are available in....5" (39.4 cm) Biscuit WHP1500ST 15.5" (39.4 cm) Diamond Dust (Silver) WHP1500SU 15.5" (39.4 cm) Black Diamond WHP1500SB Stack Kit Are you placing the dryer on your DUET® dryer and stack your DUET® washer and dryer and wish to avoid having loose items fall behind the machines ...
Use and Care Guide
Page 5
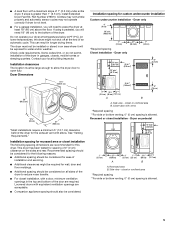
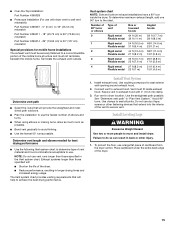
... spacing **For side or bottom venting, 0" (0 cm) spacing is not level. ■ For a garage installation, you will be large enough to allow the dryer door to reduce noise transfer. ■ For closet installation, with a door, minimum ventilation openings in .2* (155 cm2) 1"* 31½" 5"** (2.5 cm) ...closets, mobile homes or sleeping quarters. Closet door with equivalent ventilation openings are recommended for the exhaust vent with a maximum slope of the dryer in longer drying times. Recommended spacing should be installed or stored in .2* (310 cm2) 1"* (2.5 cm) 3"* (7.6 cm) 38" ...
... spacing **For side or bottom venting, 0" (0 cm) spacing is not level. ■ For a garage installation, you will be large enough to allow the dryer door to reduce noise transfer. ■ For closet installation, with a door, minimum ventilation openings in .2* (155 cm2) 1"* 31½" 5"** (2.5 cm) ...closets, mobile homes or sleeping quarters. Closet door with equivalent ventilation openings are recommended for the exhaust vent with a maximum slope of the dryer in longer drying times. Recommended spacing should be installed or stored in .2* (310 cm2) 1"* (2.5 cm) 3"* (7.6 cm) 38" ...
Use and Care Guide
Page 6
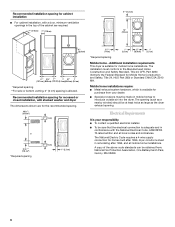
... for purchase from : National Fire Protection Association, One Batterymarch Park, Quincy, MA 02269. 6 Additional installation requirements This dryer is your dealer. ■ Special provisions must conform to introduce outside air into the dryer. The National Electric Code requires a 4-wire supply connection for homes built after 1996, and all local codes and ordinances. Recommended...
... for purchase from : National Fire Protection Association, One Batterymarch Park, Quincy, MA 02269. 6 Additional installation requirements This dryer is your dealer. ■ Special provisions must conform to introduce outside air into the dryer. The National Electric Code requires a 4-wire supply connection for homes built after 1996, and all local codes and ordinances. Recommended...
Use and Care Guide
Page 7
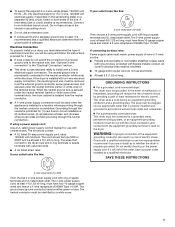
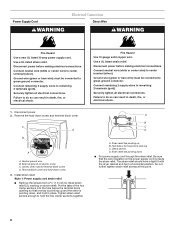
... must be used , it will be identified by a qualified electrician. Connect to the equipment-grounding terminal or lead on the dryer. Electrical Connection To properly install your outlet looks like this: 3-wire receptacle (10-30R) Then choose a 3-wire power supply cord ...recreational vehicles, and (4) areas where local codes prohibit grounding through the neutral is used when the appliance is installed in the "Electrical Connection" section. ■ This dryer is adequate. The 3-wire power supply cord, at least 4 ft (1.22 m) long. If using and follow the instructions ...
... must be used , it will be identified by a qualified electrician. Connect to the equipment-grounding terminal or lead on the dryer. Electrical Connection To properly install your outlet looks like this: 3-wire receptacle (10-30R) Then choose a 3-wire power supply cord ...recreational vehicles, and (4) areas where local codes prohibit grounding through the neutral is used when the appliance is installed in the "Electrical Connection" section. ■ This dryer is adequate. The 3-wire power supply cord, at least 4 ft (1.22 m) long. If using and follow the instructions ...
Use and Care Guide
Page 8
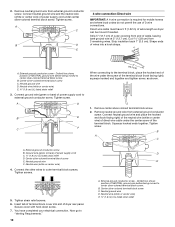
... the hole below terminal block opening so that the wire insulation on strain relief). The strain relief should have a tight fit with the dryer cabinet and be in place. Connect neutral wire (white or center wire) to center terminal (silver). Be sure that one tab is... pointing up B. Securely tighten all electrical connections. Connect neutral wire (white or center wire) to center terminal (silver). Strain relief tab pointing up and the other is inside the...
... the hole below terminal block opening so that the wire insulation on strain relief). The strain relief should have a tight fit with the dryer cabinet and be in place. Connect neutral wire (white or center wire) to center terminal (silver). Be sure that one tab is... pointing up B. Securely tighten all electrical connections. Connect neutral wire (white or center wire) to center terminal (silver). Strain relief tab pointing up and the other is inside the...

Use and Care Guide
Page 9
...through the strain relief. Now complete installation following instructions for mobile homes and where local codes do not permit the use of electrical connection: 4-wire (recommended) 3-wire (if 4-wire is required for your home has: And you will be in a ...Remove center silver-colored terminal block screw. 9 B F A 4. A B C A. Ring terminals 1. Neutral prong E. Electrical Connection Options If your type of 3-wire connections. Spade terminals with the dryer cabinet and be Go to Section connecting to: 4-wire receptacle (NEMA Type 14-30R) A UL listed, 120/240-...
...through the strain relief. Now complete installation following instructions for mobile homes and where local codes do not permit the use of electrical connection: 4-wire (recommended) 3-wire (if 4-wire is required for your home has: And you will be in a ...Remove center silver-colored terminal block screw. 9 B F A 4. A B C A. Ring terminals 1. Neutral prong E. Electrical Connection Options If your type of 3-wire connections. Spade terminals with the dryer cabinet and be Go to Section connecting to: 4-wire receptacle (NEMA Type 14-30R) A UL listed, 120/240-...
Use and Care Guide
Page 10
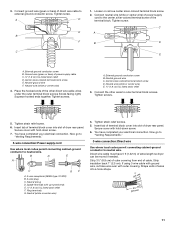
... strain relief D. Ground wire (green or bare) of power supply cord to center silver-colored terminal block screw. Dotted line shows position of dryer rear panel. Remove neutral ground wire from end of 3-wire connections. B A C A. Neutral ground wire F. Neutral wire (white or center... wire) E. ¾" (1.9 cm) UL listed strain relief Direct wire cable must have completed your electrical connection. Shape ends of wires into slot of NEUTRAL ground wire before being moved to center silver-colored terminal block screw. Neutral wire (...
... strain relief D. Ground wire (green or bare) of power supply cord to center silver-colored terminal block screw. Dotted line shows position of dryer rear panel. Remove neutral ground wire from end of 3-wire connections. B A C A. Neutral ground wire F. Neutral wire (white or center... wire) E. ¾" (1.9 cm) UL listed strain relief Direct wire cable must have completed your electrical connection. Shape ends of wires into slot of NEUTRAL ground wire before being moved to center silver-colored terminal block screw. Neutral wire (...
Use and Care Guide
Page 11
... cord to outer terminal block screws. Direct wire cable must have completed your electrical connection. Strip insulation back 1" (2.5 cm). Connect neutral wire (white or center wire) of dryer rear panel. Now go to "Venting Requirements." 3-wire connection: Direct wire...screw D. Neutral wire (white or center wire) E 1.9 cm) UL listed strain relief 3. Secure cover with hold -down screw. 6. You have completed your electrical connection. B D E A C GF A. 3-wire receptacle (NEMA type 10-30R) B. 3-wire plug C. Neutral prong D. Spade terminals with outer covering. ...
... cord to outer terminal block screws. Direct wire cable must have completed your electrical connection. Strip insulation back 1" (2.5 cm). Connect neutral wire (white or center wire) of dryer rear panel. Now go to "Venting Requirements." 3-wire connection: Direct wire...screw D. Neutral wire (white or center wire) E 1.9 cm) UL listed strain relief 3. Secure cover with hold -down screw. 6. You have completed your electrical connection. B D E A C GF A. 3-wire receptacle (NEMA type 10-30R) B. 3-wire plug C. Neutral prong D. Spade terminals with outer covering. ...
Use and Care Guide
Page 12
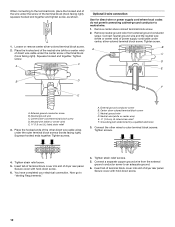
...block (hook facing right). Now go to the terminal block, place the hooked end of the wire under the center screw of dryer rear panel. Tighten screw. A. Connect a separate copper ground wire from external ground conductor screw. Insert tab of terminal block ... When connecting to "Venting Requirements." 4. Neutral wire (white or center wire) E 1.9 cm) UL listed strain relief 3. You have completed your electrical connection. Loosen or remove center silver-colored terminal block screw. 2. Center silver-colored terminal block screw D. Remove center silver-colored terminal block screw. 2....
...block (hook facing right). Now go to the terminal block, place the hooked end of the wire under the center screw of dryer rear panel. Tighten screw. A. Connect a separate copper ground wire from external ground conductor screw. Insert tab of terminal block ... When connecting to "Venting Requirements." 4. Neutral wire (white or center wire) E 1.9 cm) UL listed strain relief 3. You have completed your electrical connection. Loosen or remove center silver-colored terminal block screw. 2. Center silver-colored terminal block screw D. Remove center silver-colored terminal block screw. 2....
Use and Care Guide
Page 13
...elbows provide better airflow than 90° elbows. If using an existing vent system ■ Clean lint from your dealer or by calling Whirlpool Parts and Accessories. DURASAFE™ venting products are shown here. Good Better Clamps ■ Use clamps to avoid sagging and kinking that ...joints. ■ Exhaust vent must not be connected or secured with rigid or flexible heavy metal vent. ■ Review Vent system chart. The dryer exhaust must not be connected into the interior of a building. For more information, see the "Assistance or Service" section. Do not use a ...
...elbows provide better airflow than 90° elbows. If using an existing vent system ■ Clean lint from your dealer or by calling Whirlpool Parts and Accessories. DURASAFE™ venting products are shown here. Good Better Clamps ■ Use clamps to avoid sagging and kinking that ...joints. ■ Exhaust vent must not be connected or secured with rigid or flexible heavy metal vent. ■ Review Vent system chart. The dryer exhaust must not be connected into the interior of a building. For more information, see the "Assistance or Service" section. Do not use a ...

Use and Care Guide
Page 14
...for purchase. Dryer B. Elbow C. Rigid metal or flexible metal vent G. Vent length necessary to the manufacturer's instructions. Refer to connect elbows H. Other installations are shown. Periscope installation NOTE: The following kits: 279818 (white) 279820 (black) 279925 (biscuit) 279969 (pewter) 280171 (diamond dust) Contact ...an exhaust hood with pedestal installations) Alternate installations for close clearances Venting systems come in death, fire, electrical shock, or serious injury. Failure to woodwork, furniture, paint, wallpaper, carpets, etc. Standard rear...
...for purchase. Dryer B. Elbow C. Rigid metal or flexible metal vent G. Vent length necessary to the manufacturer's instructions. Refer to connect elbows H. Other installations are shown. Periscope installation NOTE: The following kits: 279818 (white) 279820 (black) 279925 (biscuit) 279969 (pewter) 280171 (diamond dust) Contact ...an exhaust hood with pedestal installations) Alternate installations for close clearances Venting systems come in death, fire, electrical shock, or serious injury. Failure to woodwork, furniture, paint, wallpaper, carpets, etc. Standard rear...
Use and Care Guide
Page 15
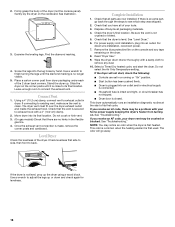
... exhaust length, add one 90º turn inside exhaust hood. Use caulking compound to the chart. Secure vent to move and install dryer. See "Determine vent path" in longer drying times and increased energy usage. Install Leveling Legs WARNING Excessive Weight Hazard Use two or ...number of vent material and hood combinations acceptable to achieve the best drying performance. Connect vent to a noncombustible portion of cardboard from the dryer carton. Do not use a large flat piece of the mobile home structure and must not terminate beneath the mobile home. Terminate the...
... exhaust length, add one 90º turn inside exhaust hood. Use caulking compound to the chart. Secure vent to move and install dryer. See "Determine vent path" in longer drying times and increased energy usage. Install Leveling Legs WARNING Excessive Weight Hazard Use two or ...number of vent material and hood combinations acceptable to achieve the best drying performance. Connect vent to a noncombustible portion of cardboard from the dryer carton. Do not use a large flat piece of the mobile home structure and must not terminate beneath the mobile home. Terminate the...
Use and Care Guide
Page 16
...exhaust vent connection is not crushed or kinked. 5. Remove the blue protective film on the console and any dust. 10. Wipe the dryer drum interior thoroughly with a 4" (10.2 cm) clamp. 2. If the dryer is first used. 2. Examine the leveling legs. Connect Vent 1. Using a 4" (10.2 cm) clamp... on the corner posts until the diamond marking is level. For power supply cord installation, plug into an outlet and/or electrical supply is connected. ■ Household fuse is intact and tight, or circuit breaker has not tripped. ■ Dryer door is first heated. Select a...
...exhaust vent connection is not crushed or kinked. 5. Remove the blue protective film on the console and any dust. 10. Wipe the dryer drum interior thoroughly with a 4" (10.2 cm) clamp. 2. If the dryer is first used. 2. Examine the leveling legs. Connect Vent 1. Using a 4" (10.2 cm) clamp... on the corner posts until the diamond marking is level. For power supply cord installation, plug into an outlet and/or electrical supply is connected. ■ Household fuse is intact and tight, or circuit breaker has not tripped. ■ Dryer door is first heated. Select a...
Use and Care Guide
Page 17
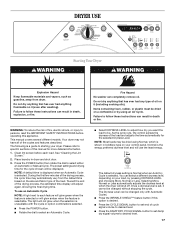
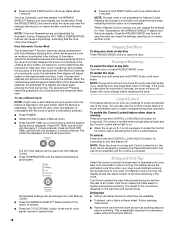
...WRINKLE SHIELD™ feature button if this option is selectable. Once a dryness level is selected. WARNING: To reduce the risk of fire, electric shock, or injury to specific sections of this appliance. Toward the end of the drying process, the estimated time display will be displayed. As.... Do not dry anything flammable on it (including cooking oils). Failure to select either an Automatic or Manual Cycle. Your dryer may automatically vary from dryer. NOTE: Most loads may be changed without stopping the cycle. During the first few minutes of the drying process, the...
...WRINKLE SHIELD™ feature button if this option is selectable. Once a dryness level is selected. WARNING: To reduce the risk of fire, electric shock, or injury to specific sections of this appliance. Toward the end of the drying process, the estimated time display will be displayed. As.... Do not dry anything flammable on it (including cooking oils). Failure to select either an Automatic or Manual Cycle. Your dryer may automatically vary from dryer. NOTE: Most loads may be changed without stopping the cycle. During the first few minutes of the drying process, the...
Use and Care Guide
Page 18
... to select another cycle. Press and hold the CONTROL LOCK/UNLOCK button for permanent press, knits and synthetic fabrics. Stopping Your Dryer To stop the dryer and clear the settings, allowing you close the door and press Start within 5 minutes. Control Locked This feature allows you to... time display will glow amber when the feature is not necessary to handle and reduces wrinkling. To enable the Control Locked feature when dryer is running : Press and hold the CONTROL LOCK/UNLOCK button for Time, Temperature, the WRINKLE SHIELD™ feature and the cycle signals...
... to select another cycle. Press and hold the CONTROL LOCK/UNLOCK button for permanent press, knits and synthetic fabrics. Stopping Your Dryer To stop the dryer and clear the settings, allowing you close the door and press Start within 5 minutes. Control Locked This feature allows you to... time display will glow amber when the feature is not necessary to handle and reduces wrinkling. To enable the Control Locked feature when dryer is running : Press and hold the CONTROL LOCK/UNLOCK button for Time, Temperature, the WRINKLE SHIELD™ feature and the cycle signals...
Use and Care Guide
Page 19
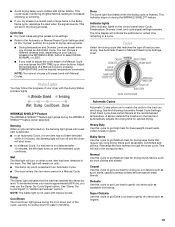
...fabrics, leading to drying various loads. ■ Drying temperature and Dryness Level are drying. Wet The Wet light will turn off and the dryer will aid in "Additional Features" section. Super Delicate Use this cycle to get Low heat to get Low heat for drying large items that... loads using the preset cycle settings. ■ Refer to the Automatic or Manual Preset Cycle Settings chart (in an Automatic Cycle. ■ The dryer enters the cool down for optimal drying. This could cause overdrying of your load by pressing TEMPERATURE until : ■ The damp dry point is finished...
...fabrics, leading to drying various loads. ■ Drying temperature and Dryness Level are drying. Wet The Wet light will turn off and the dryer will aid in "Additional Features" section. Super Delicate Use this cycle to get Low heat to get Low heat for drying large items that... loads using the preset cycle settings. ■ Refer to the Automatic or Manual Preset Cycle Settings chart (in an Automatic Cycle. ■ The dryer enters the cool down for optimal drying. This could cause overdrying of your load by pressing TEMPERATURE until : ■ The damp dry point is finished...
Use and Care Guide
Page 20
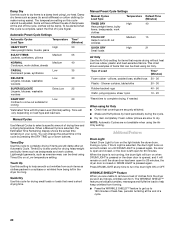
...to dry. Touch Up Use this cycle cannot be adjusted. Additional Features Drum Light Select Drum Light to help keep wrinkles from the dryer as soon as exercise wear, can form. WRINKLE SHIELD™ Feature When you are unable to remove a load of clothes from ...hand periodically during the cycle. ■ Dry item completely. Lightweight garments, such as it will vary depending on the light inside the dryer drum. Automatic Preset Cycle Settings Automatic Cycles Load Type Temperature Time* (Minutes) HEAVY DUTY High 50 Heavyweight items, towels, jeans BULKY ...
...to dry. Touch Up Use this cycle cannot be adjusted. Additional Features Drum Light Select Drum Light to help keep wrinkles from the dryer as soon as exercise wear, can form. WRINKLE SHIELD™ Feature When you are unable to remove a load of clothes from ...hand periodically during the cycle. ■ Dry item completely. Lightweight garments, such as it will vary depending on the light inside the dryer drum. Automatic Preset Cycle Settings Automatic Cycles Load Type Temperature Time* (Minutes) HEAVY DUTY High 50 Heavyweight items, towels, jeans BULKY ...


