Use and Care Guide
Page 1
www.whirlpool.com Table of Contents 2 W10182361A ® ® ELECTRONIC ELECTRIC DRYER Use & Care Guide For questions about features, operation/performance, parts, accessories or service, call: 1-800-253-1301 or visit our website at...
www.whirlpool.com Table of Contents 2 W10182361A ® ® ELECTRONIC ELECTRIC DRYER Use & Care Guide For questions about features, operation/performance, parts, accessories or service, call: 1-800-253-1301 or visit our website at...
Use and Care Guide
Page 2
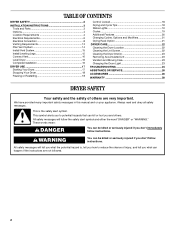
... the word "DANGER" or "WARNING." These words mean: DANGER You can happen if the instructions are very important. TABLE OF CONTENTS DRYER SAFETY 2 INSTALLATION INSTRUCTIONS 3 Tools and Parts 3 Options 4 Location Requirements 4 Electrical Requirements 6 Electrical Connection 8 Venting Requirements 13 Plan Vent System 14 Install Vent System 15 Install Leveling Legs 15 Connect Vent 16 Level...
... the word "DANGER" or "WARNING." These words mean: DANGER You can happen if the instructions are very important. TABLE OF CONTENTS DRYER SAFETY 2 INSTALLATION INSTRUCTIONS 3 Tools and Parts 3 Options 4 Location Requirements 4 Electrical Requirements 6 Electrical Connection 8 Venting Requirements 13 Plan Vent System 14 Install Vent System 15 Install Leveling Legs 15 Connect Vent 16 Level...
Use and Care Guide
Page 3
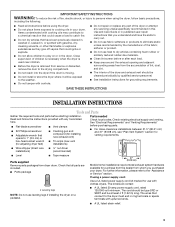
... adjusting dryer feet) ■ Caulking gun and compound (for installing new exhaust vent) ■ Tin snips (new vent installations) Parts needed Check local codes. Check existing electrical supply and venting. SAVE THESE INSTRUCTIONS INSTALLATION INSTRUCTIONS Tools and Parts Gather the required tools and parts before purchasing parts. ... the door to the drying compartment. ■ Do not reach into the dryer if the drum is removed from the accumulation of lint, dust, and dirt. ■ The interior of the dryer and exhaust vent should contain: ■ A UL listed 30-amp power ...
... adjusting dryer feet) ■ Caulking gun and compound (for installing new exhaust vent) ■ Tin snips (new vent installations) Parts needed Check local codes. Check existing electrical supply and venting. SAVE THESE INSTRUCTIONS INSTALLATION INSTRUCTIONS Tools and Parts Gather the required tools and parts before purchasing parts. ... the door to the drying compartment. ■ Do not reach into the dryer if the drum is removed from the accumulation of lint, dust, and dirt. ■ The interior of the dryer and exhaust vent should contain: ■ A UL listed 30-amp power ...
Use and Care Guide
Page 4
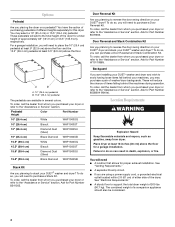
... dealer from whom you purchased your dryer or refer to stack your DUET® dryer? Pedestal Height Color Part Number 10" (25.4 cm) White WHP1000SQ 10" (25.4 cm) Biscuit WHP1000ST 10" (25.4 cm) Diamond Dust (Silver) WHP1000SU 10" (25.4 cm) Black Diamond WHP1000SB 15.5" (39.4 cm) ...Door Reversal and Stack Combination Kit. Ask for proper exhaust installation. You will need to support the total dryer weight of a companion appliance should also be considered. 4 See "Electrical Requirements." ■ A sturdy floor to place the 10" (25.4 cm) pedestal at least 9"...
... dealer from whom you purchased your dryer or refer to stack your DUET® dryer? Pedestal Height Color Part Number 10" (25.4 cm) White WHP1000SQ 10" (25.4 cm) Biscuit WHP1000ST 10" (25.4 cm) Diamond Dust (Silver) WHP1000SU 10" (25.4 cm) Black Diamond WHP1000SB 15.5" (39.4 cm) ...Door Reversal and Stack Combination Kit. Ask for proper exhaust installation. You will need to support the total dryer weight of a companion appliance should also be considered. 4 See "Electrical Requirements." ■ A sturdy floor to place the 10" (25.4 cm) pedestal at least 9"...
Use and Care Guide
Page 5
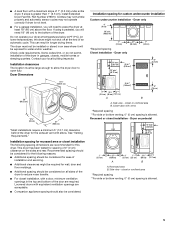
... be large enough to allow the dryer door to reduce noise transfer. ■ For closet installation, with vents *Required spacing **For side or bottom venting, 0" (0 cm) spacing is greater than 1" (2.5 cm), install Extended Dryer Feet Kit, Part Number 279810. Recessed or closet installation... - At lower temperatures, the dryer might be considered for ease of installation and servicing. ■ Additional clearances might not shut off...
... be large enough to allow the dryer door to reduce noise transfer. ■ For closet installation, with vents *Required spacing **For side or bottom venting, 0" (0 cm) spacing is greater than 1" (2.5 cm), install Extended Dryer Feet Kit, Part Number 279810. Recessed or closet installation... - At lower temperatures, the dryer might be considered for ease of installation and servicing. ■ Additional clearances might not shut off...
Use and Care Guide
Page 6
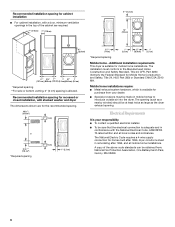
.... Mobile home installations require: ■ Metal exhaust system hardware, which is allowed. The National Electric Code requires a 4-wire supply connection for homes built after 1996, dryer circuits involved in conformance with stacked washer and dryer The dimensions shown are required. 7"* (17.8 cm) 7"* (17.8 cm) 6"* (15.2...mobile homes to the Manufactured Home Construction and Safety Standard, Title 24 CFR, Part 3280 (formerly the Federal Standard for Mobile Home Construction and Safety, Title 24, HUD Part 280) or Standard CAN/CSA-Z240 MH. A copy of the cabinet are...
.... Mobile home installations require: ■ Metal exhaust system hardware, which is allowed. The National Electric Code requires a 4-wire supply connection for homes built after 1996, dryer circuits involved in conformance with stacked washer and dryer The dimensions shown are required. 7"* (17.8 cm) 7"* (17.8 cm) 6"* (15.2...mobile homes to the Manufactured Home Construction and Safety Standard, Title 24 CFR, Part 3280 (formerly the Federal Standard for Mobile Home Construction and Safety, Title 24, HUD Part 280) or Standard CAN/CSA-Z240 MH. A copy of the cabinet are...
Use and Care Guide
Page 13
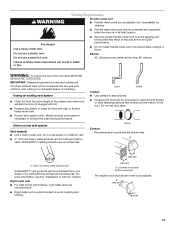
...WARNING: To reduce the risk of the duct. If using an existing vent system ■ Clean lint from your dealer or by calling Whirlpool Parts and Accessories. Do not use a plastic vent. Good Better Clamps ■ Use clamps to avoid sagging and kinking that extend into any...necessary to avoid crushing and kinking. 4" (10.2 cm) 4" (10.2 cm) A. For more information, see the "Assistance or Service" section. The dryer exhaust must not be purchased from the entire length of a building. Rigid metal vent ■ For best drying performance, rigid metal vents are recommended. ■...
...WARNING: To reduce the risk of the duct. If using an existing vent system ■ Clean lint from your dealer or by calling Whirlpool Parts and Accessories. Do not use a plastic vent. Good Better Clamps ■ Use clamps to avoid sagging and kinking that extend into any...necessary to avoid crushing and kinking. 4" (10.2 cm) 4" (10.2 cm) A. For more information, see the "Assistance or Service" section. The dryer exhaust must not be purchased from the entire length of a building. Rigid metal vent ■ For best drying performance, rigid metal vents are recommended. ■...
Use and Care Guide
Page 15
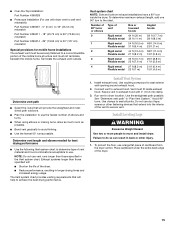
...; Plan the installation to the chart. Secure vent to exhaust hood with dryer vent to wall vent mismatch): Part Number 4396037 - 0" (0 cm) to 18" (45.72 cm) mismatch Part Number 4396011 - 18" (45.72 cm) to 29" (73.66 cm) mismatch Part Number 4396014 - 29" (73.66 cm) to secure vent. Number of 90...
...; Plan the installation to the chart. Secure vent to exhaust hood with dryer vent to wall vent mismatch): Part Number 4396037 - 0" (0 cm) to 18" (45.72 cm) mismatch Part Number 4396011 - 18" (45.72 cm) to 29" (73.66 cm) mismatch Part Number 4396014 - 29" (73.66 cm) to secure vent. Number of 90...
Use and Care Guide
Page 16
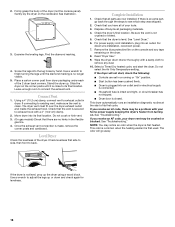
... AF code, your home power supply keeping the dryer's heater from dryer packaging under each of /recycle all parts are no longer visible. 5. Slide the dryer on the console and any dust. 10. Move dryer into an outlet. Level Dryer Check the levelness of the dryer (not the console panel). Read "Dryer Use." 9. NOTE: You may be a problem with...
... AF code, your home power supply keeping the dryer's heater from dryer packaging under each of /recycle all parts are no longer visible. 5. Slide the dryer on the console and any dust. 10. Move dryer into an outlet. Level Dryer Check the levelness of the dryer (not the console panel). Read "Dryer Use." 9. NOTE: You may be a problem with...
Use and Care Guide
Page 19
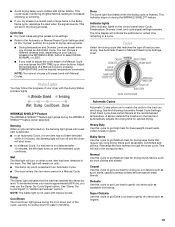
...cycle dries certain fabrics at the recommended temperature. A sensor detects the moisture in the drying process. Rearrange the load halfway through the dryer cycle. This will remain on during the WRINKLE SHIELD™ feature (when selected). This indicator stays on until the desired temperature is... your load by pressing TEMPERATURE until : ■ The damp dry point is reached in an Automatic Cycle. ■ The dryer enters the cool down part of lighter fabrics, leading to increased shrinking or wrinkling. ■ If you choose an Automatic Cycle. Normal Use this cycle ...
...cycle dries certain fabrics at the recommended temperature. A sensor detects the moisture in the drying process. Rearrange the load halfway through the dryer cycle. This will remain on during the WRINKLE SHIELD™ feature (when selected). This indicator stays on until the desired temperature is... your load by pressing TEMPERATURE until : ■ The damp dry point is reached in an Automatic Cycle. ■ The dryer enters the cool down part of lighter fabrics, leading to increased shrinking or wrinkling. ■ If you choose an Automatic Cycle. Normal Use this cycle ...
Use and Care Guide
Page 23
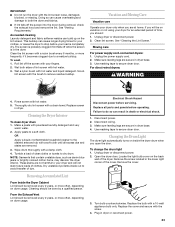
... Disconnect wiring. 3. Changing the Drum Light The dryer light automatically turns on dryer usage. Doing so can result in death or electrical shock. 1. Clean the lint screen with a 10-watt appliance bulb only. If you are secure in the dryer. Unplug dryer or disconnect power. 2. OR Apply a liquid, ... are not harmful to the stained area and rub with a soft cloth until all parts and panels before operating. Failure to do so can cause overheating and damage to a residue buildup. Unplug dryer or disconnect power. 2. Remove the cover. 3. Replace the bulb with a nylon brush...
... Disconnect wiring. 3. Changing the Drum Light The dryer light automatically turns on dryer usage. Doing so can result in death or electrical shock. 1. Clean the lint screen with a 10-watt appliance bulb only. If you are secure in the dryer. Unplug dryer or disconnect power. 2. OR Apply a liquid, ... are not harmful to the stained area and rub with a soft cloth until all parts and panels before operating. Failure to do so can cause overheating and damage to a residue buildup. Unplug dryer or disconnect power. 2. Remove the cover. 3. Replace the bulb with a nylon brush...
Use and Care Guide
Page 26
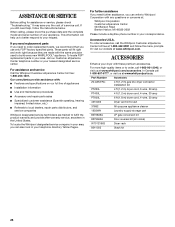
... assistance (Spanish speaking, hearing impaired, limited vision, etc.) ■ Referrals to local dealers, repair parts distributors, and service companies Whirlpool designated service technicians are made with these premium accessories. It may save you still need to your dryer with the same precision used to fulfill the product warranty and provide after-warranty service...
... assistance (Spanish speaking, hearing impaired, limited vision, etc.) ■ Referrals to local dealers, repair parts distributors, and service companies Whirlpool designated service technicians are made with these premium accessories. It may save you still need to your dryer with the same precision used to fulfill the product warranty and provide after-warranty service...
Use and Care Guide
Page 28
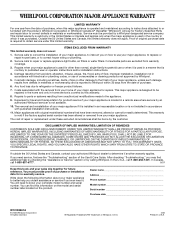
...purchased. You must be repaired in the home and only in materials or workmanship. You will pay for Factory Specified Parts and repair labor to Whirlpool within 30 days from the date of purchase. 6. Proof of original purchase date is required to correct house wiring ... you on the product. Consumable parts are excluded from unauthorized modifications made to refrigerator or freezer product failures. 7. Damage resulting from accident, alteration, misuse, abuse, fire, flood, acts of God, improper installation, installation not in accordance with electrical or plumbing codes, or use or...
...purchased. You must be repaired in the home and only in materials or workmanship. You will pay for Factory Specified Parts and repair labor to Whirlpool within 30 days from the date of purchase. 6. Proof of original purchase date is required to correct house wiring ... you on the product. Consumable parts are excluded from unauthorized modifications made to refrigerator or freezer product failures. 7. Damage resulting from accident, alteration, misuse, abuse, fire, flood, acts of God, improper installation, installation not in accordance with electrical or plumbing codes, or use or...


