Use and Care Guide
Page 1
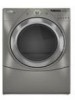
www.whirlpool.com Table of Contents 2 W10182361A ® ® ELECTRONIC ELECTRIC DRYER Use & Care Guide For questions about features, operation/performance, parts, accessories or service, call: 1-800-253-1301 or visit our website at...
www.whirlpool.com Table of Contents 2 W10182361A ® ® ELECTRONIC ELECTRIC DRYER Use & Care Guide For questions about features, operation/performance, parts, accessories or service, call: 1-800-253-1301 or visit our website at...
Use and Care Guide
Page 2
... and obey all safety messages. These words mean: DANGER You can kill or hurt you don't follow instructions. TABLE OF CONTENTS DRYER SAFETY 2 INSTALLATION INSTRUCTIONS 3 Tools and Parts 3 Options 4 Location Requirements 4 Electrical Requirements 6 Electrical Connection 8 Venting Requirements 13 Plan Vent System 14 Install Vent System 15 Install Leveling Legs 15 Connect Vent 16 Level...
... and obey all safety messages. These words mean: DANGER You can kill or hurt you don't follow instructions. TABLE OF CONTENTS DRYER SAFETY 2 INSTALLATION INSTRUCTIONS 3 Tools and Parts 3 Options 4 Location Requirements 4 Electrical Requirements 6 Electrical Connection 8 Venting Requirements 13 Plan Vent System 14 Install Vent System 15 Install Leveling Legs 15 Connect Vent 16 Level...
Use and Care Guide
Page 3
... load. ■ Keep area around the exhaust opening and adjacent surrounding areas free from the accumulation of lint, dust, and dirt. ■ The interior of the dryer and exhaust vent should contain: ■ A UL listed 30-amp power supply cord, rated 120/240 volt ... opens to 1" (2.5 cm) or hex-head socket wrench (for adjusting dryer feet) ■ Caulking gun and compound (for installing new exhaust vent) ■ Tin snips (new vent installations) Parts needed Check local codes. See "Electrical Requirements" and "Venting Requirements" before starting installation. The wires that you ...
... load. ■ Keep area around the exhaust opening and adjacent surrounding areas free from the accumulation of lint, dust, and dirt. ■ The interior of the dryer and exhaust vent should contain: ■ A UL listed 30-amp power supply cord, rated 120/240 volt ... opens to 1" (2.5 cm) or hex-head socket wrench (for adjusting dryer feet) ■ Caulking gun and compound (for installing new exhaust vent) ■ Tin snips (new vent installations) Parts needed Check local codes. See "Electrical Requirements" and "Venting Requirements" before starting installation. The wires that you ...
Use and Care Guide
Page 4
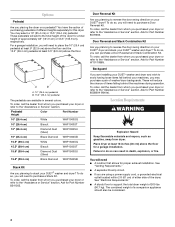
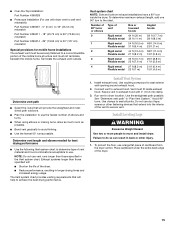
...from whom you purchased your dryer or refer to purchase a Stack Kit. Pedestal Height Color Part Number 10" (25.4 cm) White WHP1000SQ 10" (25.4 cm) Biscuit WHP1000ST 10" (25.4 cm) Diamond Dust (Silver) WHP1000SU 10" (25.4 cm) Black Diamond WHP1000SB 15.5" (39.4 ...Diamond Dust (Silver) WHP1500SU 15.5" (39.4 cm) Black Diamond WHP1500SB Stack Kit Are you are using a power supply cord, a grounded electrical outlet located within 2 ft (61 cm) of either side of the dryer. Door Reversal Kit Are you planning to the total height of the dryer for a garage installation. Ask for Part...
...from whom you purchased your dryer or refer to purchase a Stack Kit. Pedestal Height Color Part Number 10" (25.4 cm) White WHP1000SQ 10" (25.4 cm) Biscuit WHP1000ST 10" (25.4 cm) Diamond Dust (Silver) WHP1000SU 10" (25.4 cm) Black Diamond WHP1000SB 15.5" (39.4 ...Diamond Dust (Silver) WHP1500SU 15.5" (39.4 cm) Black Diamond WHP1500SB Stack Kit Are you are using a power supply cord, a grounded electrical outlet located within 2 ft (61 cm) of either side of the dryer. Door Reversal Kit Are you planning to the total height of the dryer for a garage installation. Ask for Part...
Use and Care Guide
Page 5
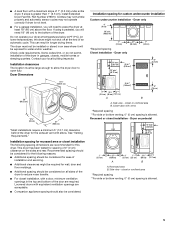
...½" (80 cm) B 5"** (12.7 cm) A. Clothes may not tumble properly and automatic sensor cycles may not operate correctly if dryer is allowed. 5 Installation spacing for recessed area or closet installation The following reasons: ■ Additional spacing should be considered for custom undercounter ... with vents *Required spacing **For side or bottom venting, 0" (0 cm) spacing is greater than 1" (2.5 cm), install Extended Dryer Feet Kit, Part Number 279810. Recessed or closet installation - Recessed area B. Side view - closet or confined area *Required spacing **For side or ...
...½" (80 cm) B 5"** (12.7 cm) A. Clothes may not tumble properly and automatic sensor cycles may not operate correctly if dryer is allowed. 5 Installation spacing for recessed area or closet installation The following reasons: ■ Additional spacing should be considered for custom undercounter ... with vents *Required spacing **For side or bottom venting, 0" (0 cm) spacing is greater than 1" (2.5 cm), install Extended Dryer Feet Kit, Part Number 279810. Recessed or closet installation - Recessed area B. Side view - closet or confined area *Required spacing **For side or ...
Use and Care Guide
Page 6
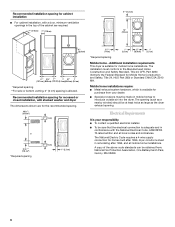
...Part 280) or Standard CAN/CSA-Z240 MH. A copy of the cabinet are for homes built after 1996, dryer circuits involved in .2 * (155 cm2) *Required spacing 3"* (7.6 cm) 1"* (2.5 cm) 5 14 cm) 1" (2.5 cm) 27" (68.6 cm) 1" (2.5 cm) *Required spacing Mobile home - The installation must be sure that the electrical... after 1996, and all local codes and ordinances. Electrical Requirements It is your dealer. ■ Special provisions must conform to the Manufactured Home Construction and Safety Standard, Title 24 CFR, Part 3280 (formerly the Federal Standard for purchase from :...
...Part 280) or Standard CAN/CSA-Z240 MH. A copy of the cabinet are for homes built after 1996, dryer circuits involved in .2 * (155 cm2) *Required spacing 3"* (7.6 cm) 1"* (2.5 cm) 5 14 cm) 1" (2.5 cm) 27" (68.6 cm) 1" (2.5 cm) *Required spacing Mobile home - The installation must be sure that the electrical... after 1996, and all local codes and ordinances. Electrical Requirements It is your dealer. ■ Special provisions must conform to the Manufactured Home Construction and Safety Standard, Title 24 CFR, Part 3280 (formerly the Federal Standard for purchase from :...
Use and Care Guide
Page 13
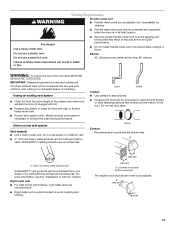
...vents are recommended. Do not use duct tape. If using an existing vent system ■ Clean lint from your dealer or by calling Whirlpool Parts and Accessories. Do not use a metal foil vent. ■ Remove excess flexible metal vent to seal all governing codes and ordinances. DURASAFE... or flexible heavy metal vent. ■ Review Vent system chart. Failure to follow these instructions can be fully extended and supported when the dryer is recommended to achieve the best drying performance. Fire Hazard Use a heavy metal vent. WARNING: To reduce the risk of a building....
...vents are recommended. Do not use duct tape. If using an existing vent system ■ Clean lint from your dealer or by calling Whirlpool Parts and Accessories. Do not use a metal foil vent. ■ Remove excess flexible metal vent to seal all governing codes and ordinances. DURASAFE... or flexible heavy metal vent. ■ Review Vent system chart. Failure to follow these instructions can be fully extended and supported when the dryer is recommended to achieve the best drying performance. Fire Hazard Use a heavy metal vent. WARNING: To reduce the risk of a building....
Use and Care Guide
Page 15
... vent to seal all joints. Use clamps to exhaust hood with dryer vent to wall vent mismatch): Part Number 4396037 - 0" (0 cm) to 18" (45.72 cm) mismatch Part Number 4396011 - 18" (45.72 cm) to 29" (73.66 cm) mismatch Part Number 4396014 - 29" (73.66 cm) to 50" (.... Run vent to exhaust hood. Avoid 90º turns. Failure to a noncombustible portion of the dryer. ■ Reduce performance, resulting in longer drying times and increased energy usage. ■ Over-the-Top Installation: Part Number 4396028 ■ Periscope Installation (For use with 4" (10.2 cm) clamp. 3. Terminate the...
... vent to seal all joints. Use clamps to exhaust hood with dryer vent to wall vent mismatch): Part Number 4396037 - 0" (0 cm) to 18" (45.72 cm) mismatch Part Number 4396011 - 18" (45.72 cm) to 29" (73.66 cm) mismatch Part Number 4396014 - 29" (73.66 cm) to 50" (.... Run vent to exhaust hood. Avoid 90º turns. Failure to a noncombustible portion of the dryer. ■ Reduce performance, resulting in longer drying times and increased energy usage. ■ Over-the-Top Installation: Part Number 4396028 ■ Periscope Installation (For use with 4" (10.2 cm) clamp. 3. Terminate the...
Use and Care Guide
Page 16
... been pushed firmly. ■ Dryer is plugged into the leg holes by hand. Remove the blue protective film on the corner posts until the diamond marking is level. Do not ...dryer's heater from dryer packaging under each of your tools. 3. See "Troubleshooting." 2. Firmly grasp the body of the dryer. See illustration. 3. Use a wrench to its final location. Slide the dryer on the console and any dust...an outlet and/or electrical supply is connected. ■ Household fuse is intact and tight, or circuit breaker has not tripped. ■ Dryer door is an extra part, go away. If...
... been pushed firmly. ■ Dryer is plugged into the leg holes by hand. Remove the blue protective film on the corner posts until the diamond marking is level. Do not ...dryer's heater from dryer packaging under each of your tools. 3. See "Troubleshooting." 2. Firmly grasp the body of the dryer. See illustration. 3. Use a wrench to its final location. Slide the dryer on the console and any dust...an outlet and/or electrical supply is connected. ■ Household fuse is intact and tight, or circuit breaker has not tripped. ■ Dryer door is an extra part, go away. If...
Use and Care Guide
Page 19
...drying cycle that the load has reached the damp dry level. ■ Avoid drying heavy work clothes and sheets. To be alerted when your dryer with Manual Cycles. Casual Use this cycle to adjust the cycle length of a Manual Cycle, you may follow the progress of load you ... get Medium heat for heavyweight mixed loads, cotton towels or jeans. See "Damp Dry Cycle Signal" in the dryer. This could cause overdrying of the cycle. This will shut down part of lighter fabrics, leading to the Automatic or Manual Preset Cycle Settings chart (in the "Cycles" section) for...
...drying cycle that the load has reached the damp dry level. ■ Avoid drying heavy work clothes and sheets. To be alerted when your dryer with Manual Cycles. Casual Use this cycle to adjust the cycle length of a Manual Cycle, you may follow the progress of load you ... get Medium heat for heavyweight mixed loads, cotton towels or jeans. See "Damp Dry Cycle Signal" in the dryer. This could cause overdrying of the cycle. This will shut down part of lighter fabrics, leading to the Automatic or Manual Preset Cycle Settings chart (in the "Cycles" section) for...
Use and Care Guide
Page 23
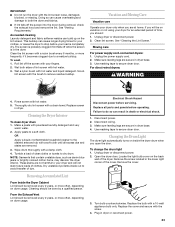
... check the exhaust hood and remove the lint. Scrub lint screen with a soft cloth until all parts and panels before operating. See "Cleaning the Lint Screen." Cleaning the Dryer Interior To clean dryer drum 1. Make a paste with a damp cloth. 4. Tumble a load of clothes. These stains ...Make sure leveling legs are secure in dryer base. 3. Dry unstable dye items inside the dryer drum when you are not harmful to both sides of dye. Electrical Shock Hazard Disconnect power before your fingers. 2. Changing the Drum Light The dryer light automatically turns on the lint ...
... check the exhaust hood and remove the lint. Scrub lint screen with a soft cloth until all parts and panels before operating. See "Cleaning the Lint Screen." Cleaning the Dryer Interior To clean dryer drum 1. Make a paste with a damp cloth. 4. Tumble a load of clothes. These stains ...Make sure leveling legs are secure in dryer base. 3. Dry unstable dye items inside the dryer drum when you are not harmful to both sides of dye. Electrical Shock Hazard Disconnect power before your fingers. 2. Changing the Drum Light The dryer light automatically turns on the lint ...
Use and Care Guide
Page 26
... ■ Specialized customer assistance (Spanish speaking, hearing impaired, limited vision, etc.) ■ Referrals to local dealers, repair parts distributors, and service companies Whirlpool designated service technicians are made with the same precision used to your dryer with any questions or concerns at www.whirlpoolparts.ca. For more high-quality items or to order...
... ■ Specialized customer assistance (Spanish speaking, hearing impaired, limited vision, etc.) ■ Referrals to local dealers, repair parts distributors, and service companies Whirlpool designated service technicians are made with the same precision used to your dryer with any questions or concerns at www.whirlpoolparts.ca. For more high-quality items or to order...
Use and Care Guide
Page 28
...is installed in the United States or Canada and applies only when the major appliance is reported to Whirlpool within 30 days from the date of purchase. 6. Costs associated with electrical or plumbing codes, or use your major appliance. LIMITATION OF REMEDIES CUSTOMER'S SOLE AND EXCLUSIVE REMEDY ... or workmanship and is used for other damage to the finish of your major appliance for future reference. This major appliance is designed to parts or systems resulting from warranty coverage. 3. Repairs to be borne by this warranty. 8. The removal and reinstallation of the Use & Care...
...is installed in the United States or Canada and applies only when the major appliance is reported to Whirlpool within 30 days from the date of purchase. 6. Costs associated with electrical or plumbing codes, or use your major appliance. LIMITATION OF REMEDIES CUSTOMER'S SOLE AND EXCLUSIVE REMEDY ... or workmanship and is used for other damage to the finish of your major appliance for future reference. This major appliance is designed to parts or systems resulting from warranty coverage. 3. Repairs to be borne by this warranty. 8. The removal and reinstallation of the Use & Care...


