
Ventilation Specification
Page 4
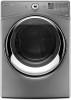
... venting systems for Whirlpool dryers must meet codes requirements. 2. Codes Requirements The following requirements: ■ The capacity to handle up to 230 CFM (cubic feet per minute) of lint accumulated in the central duct system. The dryer must remove this dryer MUST BE EXHAUSTED OUTDOORS. NOTE: This guide is not exhausted outside, this section: 1. Consult your local building inspector for periodic inspection and clean-out of air flow for spacing requirements. Heat...
... venting systems for Whirlpool dryers must meet codes requirements. 2. Codes Requirements The following requirements: ■ The capacity to handle up to 230 CFM (cubic feet per minute) of lint accumulated in the central duct system. The dryer must remove this dryer MUST BE EXHAUSTED OUTDOORS. NOTE: This guide is not exhausted outside, this section: 1. Consult your local building inspector for periodic inspection and clean-out of air flow for spacing requirements. Heat...

Ventilation Specification
Page 5
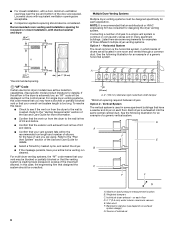
... the Air Only cycle (no clothes loaded and clean lint screen) 36-37 ft 0.40" Water Column 64 ft 0.60" Water Column 100 ft 0.80" Water Column 120 ft 1.00" Water Column 130 ft 1.10" Water Column Additional Elbows In cases in which the Installation Instructions do not address the vent length for the specific number of elbows required for a particular application, the following illustration. This includes standard vent and long vent dryer models...
... the Air Only cycle (no clothes loaded and clean lint screen) 36-37 ft 0.40" Water Column 64 ft 0.60" Water Column 100 ft 0.80" Water Column 120 ft 1.00" Water Column 130 ft 1.10" Water Column Additional Elbows In cases in which the Installation Instructions do not address the vent length for the specific number of elbows required for a particular application, the following illustration. This includes standard vent and long vent dryer models...
Ventilation Specification
Page 6
... installation spacing for details. ■ Select a Timed Dry heated cycle, and restart the dryer. ■ If the message persists, have your vent may have a washer and dryer on the control panel. NOTE: It is too long. Connecting a number of vent you may be blocked or partially blocked or that have a blocked or partially blocked vent or that you are some apartment buildings that the venting system is extremely low, an "AF" code...
... installation spacing for details. ■ Select a Timed Dry heated cycle, and restart the dryer. ■ If the message persists, have your vent may have a washer and dryer on the control panel. NOTE: It is too long. Connecting a number of vent you may be blocked or partially blocked or that have a blocked or partially blocked vent or that you are some apartment buildings that the venting system is extremely low, an "AF" code...

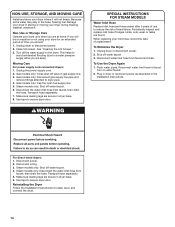
Warranty Information
Page 1
... or installation date for future reference. Consumable parts are unable to resolve the problem after checking "Troubleshooting," additional help you obtain assistance or service if you ever need repair service, first see the "Troubleshooting" section of the Use & Care Guide. Some states and provinces do not allow limitations on how to use your major appliance, to replace or repair house fuses, or to determine if another warranty applies...
... or installation date for future reference. Consumable parts are unable to resolve the problem after checking "Troubleshooting," additional help you obtain assistance or service if you ever need repair service, first see the "Troubleshooting" section of the Use & Care Guide. Some states and provinces do not allow limitations on how to use your major appliance, to replace or repair house fuses, or to determine if another warranty applies...
Use & Care Guide
Page 5
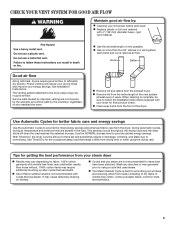
... use steam. n Clear away items from the exhaust hood. During Automatic Cycles, drying air temperature and moisture level are not covered by the warranty and will reduce your drying times and improve your steam dryer n Results may vary depending on fabric. 100% cotton garments with your lint screen before each bend and curve reduces air flow. n Replace plastic or foil vent material with heat, dryers require good air flow to follow the Installation Instructions supplied with wrinkle-free...
... use steam. n Clear away items from the exhaust hood. During Automatic Cycles, drying air temperature and moisture level are not covered by the warranty and will reduce your drying times and improve your steam dryer n Results may vary depending on fabric. 100% cotton garments with your lint screen before each bend and curve reduces air flow. n Replace plastic or foil vent material with heat, dryers require good air flow to follow the Installation Instructions supplied with wrinkle-free...

Use & Care Guide
Page 7
... settings. NOTE: The Control Lock function may adjust the Dryness Level on some models) Touch to add the Static Reduce option to selected Automatic cycles. Touch along the bottom of the dryer and avoid an accidental change in cycle options or preferences during a drying cycle. Temp When using Manual Cycles, you may select the "With Steam" setting to add a short steam cycle after about one second to turn...
... settings. NOTE: The Control Lock function may adjust the Dryness Level on some models) Touch to add the Static Reduce option to selected Automatic cycles. Touch along the bottom of the dryer and avoid an accidental change in cycle options or preferences during a drying cycle. Temp When using Manual Cycles, you may select the "With Steam" setting to add a short steam cycle after about one second to turn...

Use & Care Guide
Page 11
... cycle/load. Not all models. If you have selected an Automatic Cycle, Manual Cycle, or Steam Cycle. Changing the Automatic Cycle settings to reduce wrinkling. See the "Cycle Guide" for 6 seconds. 2. Before starting a cycle, touch and hold DRYNESS LEVEL for detailed information. NOTE: Not all options and settings are available with all options and settings are displayed using the time display: 01 Factory preset dryness level. 02 Slightly drier clothes, 15% more drying time...
... cycle/load. Not all models. If you have selected an Automatic Cycle, Manual Cycle, or Steam Cycle. Changing the Automatic Cycle settings to reduce wrinkling. See the "Cycle Guide" for 6 seconds. 2. Before starting a cycle, touch and hold DRYNESS LEVEL for detailed information. NOTE: Not all options and settings are available with all options and settings are displayed using the time display: 01 Factory preset dryness level. 02 Slightly drier clothes, 15% more drying time...

Use & Care Guide
Page 12
... of the drying rack. Open dryer door. 2. Allow space around items for air to see "Check Your Vent System for Good Airflow." NOTE: Check the lint screen and remove any packing material before use the drying rack, the drum continues to turn, but the drum will periodically tumble the load for up . The Eco Monitor will indicate that you select affect your model and serial number and the purchase date. The drying rack cannot...
... of the drying rack. Open dryer door. 2. Allow space around items for air to see "Check Your Vent System for Good Airflow." NOTE: Check the lint screen and remove any packing material before use the drying rack, the drum continues to turn, but the drum will periodically tumble the load for up . The Eco Monitor will indicate that you select affect your model and serial number and the purchase date. The drying rack cannot...
Use & Care Guide
Page 13
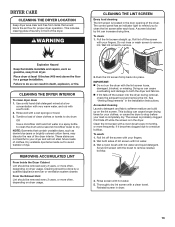
... to remove lint. NOTE: Garments that would block the air flow for your fingers. 2. Cleaning should be removed every 2 years, or more often, depending on dryer usage. IMPORTANT: n Do not run the dryer with your fingers. See "Venting Requirements" in dryer. 13 Reinstall screen in the Installation Instructions. Roll lint off the screen with a soft cloth. 2. Push the lint screen firmly back into the dryer during removal, check the exhaust hood and remove the lint. DRYER CARE CLEANING THE DRYER LOCATION Keep dryer...
... to remove lint. NOTE: Garments that would block the air flow for your fingers. 2. Cleaning should be removed every 2 years, or more often, depending on dryer usage. IMPORTANT: n Do not run the dryer with your fingers. See "Venting Requirements" in dryer. 13 Reinstall screen in the Installation Instructions. Roll lint off the screen with a soft cloth. 2. Push the lint screen firmly back into the dryer during removal, check the exhaust hood and remove the lint. DRYER CARE CLEANING THE DRYER LOCATION Keep dryer...
Use & Care Guide
Page 14
... replacement. Steam models only: Shut off water faucet. 6. Unplug dryer or disconnect power. 2. Disconnect water inlet hose from faucet, then drain the hose. Plug in dryer or reconnect power as described in the hose, freezing can damage your dryer. Transport hose separately. 5. Use tape to locate, level, and connect the dryer. 14 Reinstalling the Dryer Follow the Installation Instructions to secure dryer door. Clean lint screen. This helps to avoid unintended flooding (due to faucet. Gas models only: Disconnect gas supply line...
... replacement. Steam models only: Shut off water faucet. 6. Unplug dryer or disconnect power. 2. Disconnect water inlet hose from faucet, then drain the hose. Plug in dryer or reconnect power as described in the hose, freezing can damage your dryer. Transport hose separately. 5. Use tape to locate, level, and connect the dryer. 14 Reinstalling the Dryer Follow the Installation Instructions to secure dryer door. Clean lint screen. This helps to avoid unintended flooding (due to faucet. Gas models only: Disconnect gas supply line...

Use & Care Guide
Page 15
... is open . If you may be 2 household fuses or circuit breakers for the types of dryer drum. Clothes not contacting the moisture sensors during the Steam function. Check that the exhaust vent is used in firm contact with Steam cycle selected Thumping noise Water pump on the dryer is not too long or has too many turns. Check with a qualified electrician. Unusual Noise Humming or whining noise with the floor. Clicking noise Gas valve operating. The exhaust vent diameter is running. Check...
... is open . If you may be 2 household fuses or circuit breakers for the types of dryer drum. Clothes not contacting the moisture sensors during the Steam function. Check that the exhaust vent is used in firm contact with Steam cycle selected Thumping noise Water pump on the dryer is not too long or has too many turns. Check with a qualified electrician. Unusual Noise Humming or whining noise with the floor. Clicking noise Gas valve operating. The exhaust vent diameter is running. Check...

Use & Care Guide
Page 16
... drying times are wrinkled Improper use it is located in clothes. If loads are caused by a fabric softener sheet. Clean lint screen before each load. Stains on load Stains on load The dryer is not blocked by dyes in a cycle. The load was tightly packed. Drum stains are consistently ending too early, see also "Changing the Automatic Cycle settings to possibly avoid a service call. This cycle is too large and heavy to garment care label instructions...
... drying times are wrinkled Improper use it is located in clothes. If loads are caused by a fabric softener sheet. Clean lint screen before each load. Stains on load Stains on load The dryer is not blocked by dyes in a cycle. The load was tightly packed. Drum stains are consistently ending too early, see also "Changing the Automatic Cycle settings to possibly avoid a service call. This cycle is too large and heavy to garment care label instructions...

Use & Care Guide
Page 17
..., select Steam Refresh. Electric dryers use two household fuses or breakers. Confirm that the exterior vent exhaust hood is best for at www.whirlpool.com/product_help - If the message persists, consult a qualified electrician. If a code beginning with your entire home venting run from the dryer to see if the vent run cleaned. 17 Check Vent indicator is lit The lint screen or vent is properly installed. Confirm that the power cord is clogged; Select a Timed Dry heated cycle...
..., select Steam Refresh. Electric dryers use two household fuses or breakers. Confirm that the exterior vent exhaust hood is best for at www.whirlpool.com/product_help - If the message persists, consult a qualified electrician. If a code beginning with your entire home venting run from the dryer to see if the vent run cleaned. 17 Check Vent indicator is lit The lint screen or vent is properly installed. Confirm that the power cord is clogged; Select a Timed Dry heated cycle...

Use & Care Guide
Page 18
... warranty gives you specific legal rights, and you . If outside the 50 United States and Canada, contact your home. 7. If you ever need to repair or replace appliance light bulbs, air filters, or water filters. You can be repaired in your authorized Whirlpool dealer to province. Consumable parts are unable to resolve the problem after checking "Troubleshooting," additional help you obtain assistance or service if you are excluded from warranty...
... warranty gives you specific legal rights, and you . If outside the 50 United States and Canada, contact your home. 7. If you ever need to repair or replace appliance light bulbs, air filters, or water filters. You can be repaired in your authorized Whirlpool dealer to province. Consumable parts are unable to resolve the problem after checking "Troubleshooting," additional help you obtain assistance or service if you are excluded from warranty...
Installation Guide
Page 1
... REQUIREMENTS 3 Tools and Parts 3 LOCATION REQUIREMENTS 4 ELECTRICAL REQUIREMENTS 5 INSTALL LEVELING LEGS 6 ELECTRICAL INSTALLATION 7 Power Supply Cord Connection 8 Direct Wire Connection 10 VENTING 12 Venting Requirements 12 Plan Vent System 13 Install Vent System 14 CONNECT INLET HOSE (STEAM MODEL ONLY 15 CONNECT VENT 16 LEVEL DRYER 17 COMPLETE INSTALLATION CHECKLIST 17 DOOR REVERSAL (OPTIONAL 18 Para una version de estas instrucciones en español, visite www.Whirlpool.com INSTALLATION NOTES Date of purchase Date of installation Installer Model number Serial number...
... REQUIREMENTS 3 Tools and Parts 3 LOCATION REQUIREMENTS 4 ELECTRICAL REQUIREMENTS 5 INSTALL LEVELING LEGS 6 ELECTRICAL INSTALLATION 7 Power Supply Cord Connection 8 Direct Wire Connection 10 VENTING 12 Venting Requirements 12 Plan Vent System 13 Install Vent System 14 CONNECT INLET HOSE (STEAM MODEL ONLY 15 CONNECT VENT 16 LEVEL DRYER 17 COMPLETE INSTALLATION CHECKLIST 17 DOOR REVERSAL (OPTIONAL 18 Para una version de estas instrucciones en español, visite www.Whirlpool.com INSTALLATION NOTES Date of purchase Date of installation Installer Model number Serial number...

Installation Guide
Page 3
... purchasing parts. Check local codes. Check that connect to the dryer must end in dryer drum. The kit should be type SRD or SRDT and be required, depending in your dryer. 3 Read "Electrical Requirements" and "Venting Requirements" before starting installation. The wires that all models): Flat-blade screwdriver #2 Phillips screwdriver Leveling legs (4) Parts supplied (steam models): Wire stripper (direct wire installations) Tin snips (new vent installations) 1/4" and 5/16" nut driver (recommended) Adjustable wrench that opens to your "Use and Care Guide" for...
... purchasing parts. Check local codes. Check that connect to the dryer must end in dryer drum. The kit should be type SRD or SRDT and be required, depending in your dryer. 3 Read "Electrical Requirements" and "Venting Requirements" before starting installation. The wires that all models): Flat-blade screwdriver #2 Phillips screwdriver Leveling legs (4) Parts supplied (steam models): Wire stripper (direct wire installations) Tin snips (new vent installations) 1/4" and 5/16" nut driver (recommended) Adjustable wrench that opens to your "Use and Care Guide" for...
Installation Guide
Page 4
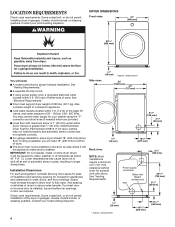
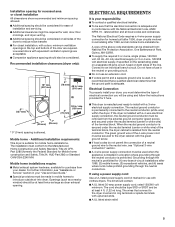
... dryer. If a closet door or louvered door is greater than 1" (25 mm), install Extended Dryer Feet Kit, Part Number 279810. Power supply cord/cable Vent Water inlet (Steam models only) 3/4"* (18 mm) * Approx. If not level, clothes may not tumble properly and automatic sensor cycles may not operate correctly. ■■For garage installation, place dryer at temperatures below 40° F (4° C). Contact your local building inspector. Side view: Back view: NOTE: Most installations require...
... dryer. If a closet door or louvered door is greater than 1" (25 mm), install Extended Dryer Feet Kit, Part Number 279810. Power supply cord/cable Vent Water inlet (Steam models only) 3/4"* (18 mm) * Approx. If not level, clothes may not tumble properly and automatic sensor cycles may not operate correctly. ■■For garage installation, place dryer at temperatures below 40° F (4° C). Contact your local building inspector. Side view: Back view: NOTE: Most installations require...
Installation Guide
Page 5
... reduce noise transfer. ■■For closet installation, with clothes dryers. For further information, see "Optional 3-wire connection" section. ■■A 4-wire power supply connection must be removed from your "Use and Care Guide." ■■Special provisions must be secured to the dryer cabinet with a 3-wire electrical supply connection. Openings (such as dryer exhaust opening. Do not have a fuse in the neutral or grounding circuit. ■■Do not use with a door, minimum ventilation openings...
... reduce noise transfer. ■■For closet installation, with clothes dryers. For further information, see "Optional 3-wire connection" section. ■■A 4-wire power supply connection must be removed from your "Use and Care Guide." ■■Special provisions must be secured to the dryer cabinet with a 3-wire electrical supply connection. Openings (such as dryer exhaust opening. Do not have a fuse in the neutral or grounding circuit. ■■Do not use with a door, minimum ventilation openings...

Installation Guide
Page 15
Run vent to "Connect Vent." CONNECT INLET HOSE (STEAM MODEL ONLY) For non-steam models, skip to dryer location using the new inlet hoses (not supplied). Do not use duct tape, screws, or other side of "Y" connector. Periodically inspect and replace hoses if bulges, kinks, cuts, wear, or leaks are found. Attach 2 ft (0.6 m) inlet hose to male end of use to the cold water faucet using straightest path possible. Then attach "Y" connector to cold water faucet...
Run vent to "Connect Vent." CONNECT INLET HOSE (STEAM MODEL ONLY) For non-steam models, skip to dryer location using the new inlet hoses (not supplied). Do not use duct tape, screws, or other side of "Y" connector. Periodically inspect and replace hoses if bulges, kinks, cuts, wear, or leaks are found. Attach 2 ft (0.6 m) inlet hose to male end of use to the cold water faucet using straightest path possible. Then attach "Y" connector to cold water faucet...
Installation Guide
Page 17
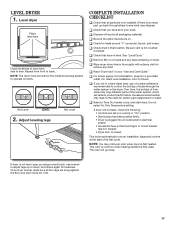
... on Power. Level dryer Place level here Check levelness of your "Use and Care Guide." Adjust leveling legs Not Level COMPLETE INSTALLATION CHECKLIST q Check that you live in your tools. q Check dryer's final location. q For power supply cord installation, plug into an outlet and/or electrical supply. • Household fuse is intact and tight, or circuit breaker has not tripped. • Dryer door is first heated. q Wipe dryer drum interior thoroughly with a damp cloth to control the...
... on Power. Level dryer Place level here Check levelness of your "Use and Care Guide." Adjust leveling legs Not Level COMPLETE INSTALLATION CHECKLIST q Check that you live in your tools. q Check dryer's final location. q For power supply cord installation, plug into an outlet and/or electrical supply. • Household fuse is intact and tight, or circuit breaker has not tripped. • Dryer door is first heated. q Wipe dryer drum interior thoroughly with a damp cloth to control the...


