
Installation Guide
Page 4
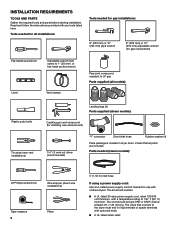
...Wire stripper (direct wire installations) Tape measure 4 Pliers 5' (1.52 m) inlet hose If using a power supply cord: Use a UL listed power supply cord kit marked for gas connections) Flat-blade screwdriver Adjustable wrench that all models): Plastic putty knife Tin snips (new vent installations) Leveling legs (4) Parts supplied (steam models): Caulking gun and compound (for installing new exhaust vent) 1/4" ( 6 mm) nut driver (recommended) "Y" connector Short inlet hose Rubber washer (4) Parts package is located in ring terminals or spade terminals with clothes dryers. Check...
...Wire stripper (direct wire installations) Tape measure 4 Pliers 5' (1.52 m) inlet hose If using a power supply cord: Use a UL listed power supply cord kit marked for gas connections) Flat-blade screwdriver Adjustable wrench that all models): Plastic putty knife Tin snips (new vent installations) Leveling legs (4) Parts supplied (steam models): Caulking gun and compound (for installing new exhaust vent) 1/4" ( 6 mm) nut driver (recommended) "Y" connector Short inlet hose Rubber washer (4) Parts package is located in ring terminals or spade terminals with clothes dryers. Check...
Installation Guide
Page 5
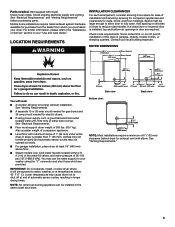
... your washer using power supply cord, a grounded electrical outlet located within 4 ft. (1.2 m) of the water fill valves, and water pressure of 20-100 psi (137.9-689.6 kPa). Bottom view: 81/2" (218 mm) 143/8" (365 mm) NOTE: Most installations require a minimum of automatic sensor cycles, resulting in door are provided. See "Venting Requirements." 5 Parts needed for exhaust vent with dryer) Check local codes. See "Venting Requirements." ■■ A separate 15 or 20-amp circuit needed for gas dryers and 30-amp circuit needed : (Not...
... your washer using power supply cord, a grounded electrical outlet located within 4 ft. (1.2 m) of the water fill valves, and water pressure of 20-100 psi (137.9-689.6 kPa). Bottom view: 81/2" (218 mm) 143/8" (365 mm) NOTE: Most installations require a minimum of automatic sensor cycles, resulting in door are provided. See "Venting Requirements." 5 Parts needed for exhaust vent with dryer) Check local codes. See "Venting Requirements." ■■ A separate 15 or 20-amp circuit needed for gas dryers and 30-amp circuit needed : (Not...
Installation Guide
Page 6
... for homes built after 1996, dryer circuits involved in your "Use and Care Guide." 6 ELECTRICAL REQUIREMENTS U.S.A. Additional installation requirements: This dryer is permanently connected to an individual branch circuit. Openings (such as dryer exhaust opening. For further information, see "Assistance or Service" section in remodeling after 1996, and all mobile home installations. When the neutral ground conductor is secured under the neutral terminal (center or white wire) of the door are required.
... for homes built after 1996, dryer circuits involved in your "Use and Care Guide." 6 ELECTRICAL REQUIREMENTS U.S.A. Additional installation requirements: This dryer is permanently connected to an individual branch circuit. Openings (such as dryer exhaust opening. For further information, see "Assistance or Service" section in remodeling after 1996, and all mobile home installations. When the neutral ground conductor is secured under the neutral terminal (center or white wire) of the door are required.
Installation Guide
Page 7
... supply the required 4-wire, single phase, 120/240 volt, 60 Hz, AC only electrical supply on a separate 30-amp circuit, fused on both sides of least resistance for electric current. Connect to an individual branch circuit. ■■ This dryer is your "Use and Care Guide." This dryer is properly installed and grounded in "Assistance or Service" section of electric shock. GROUNDING INSTRUCTIONS I For a grounded, cord-connected dryer: This dryer must...
... supply the required 4-wire, single phase, 120/240 volt, 60 Hz, AC only electrical supply on a separate 30-amp circuit, fused on both sides of least resistance for electric current. Connect to an individual branch circuit. ■■ This dryer is your "Use and Care Guide." This dryer is properly installed and grounded in "Assistance or Service" section of electric shock. GROUNDING INSTRUCTIONS I For a grounded, cord-connected dryer: This dryer must...

Installation Guide
Page 8
A time-delay fuse or circuit breaker is also recommended that is located on the model/serial rating plate for electric current. It is recommended. GROUNDING INSTRUCTIONS I For a grounded, cord-connected dryer: This dryer must be made by a qualified technician. If this dryer be provided. AND CANADA ELECTRICAL REQUIREMENTS GAS SUPPLY REQUIREMENTS ■■ 120 Volt, 60 Hz, AC only, 15- This dryer is required. No attempt shall be plugged into an appropriate outlet that...
A time-delay fuse or circuit breaker is also recommended that is located on the model/serial rating plate for electric current. It is recommended. GROUNDING INSTRUCTIONS I For a grounded, cord-connected dryer: This dryer must be made by a qualified technician. If this dryer be provided. AND CANADA ELECTRICAL REQUIREMENTS GAS SUPPLY REQUIREMENTS ■■ 120 Volt, 60 Hz, AC only, 15- This dryer is required. No attempt shall be plugged into an appropriate outlet that...
Installation Guide
Page 9
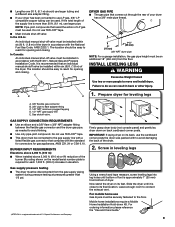
... CONNECTION REQUIREMENTS ■■ Use an elbow and a 3/8" flare x 3/8" NPT adapter fitting between the flexible gas connector and the dryer gas pipe, as needed to its back, use TEFLON®† tape. ■■ This dryer must be disconnected from the floor. Screw in leveling legs Gas supply pressure testing ■■ The dryer must be connected to the gas supply line with the B149.1, Natural Gas and Propane Installation Code. Using...
... CONNECTION REQUIREMENTS ■■ Use an elbow and a 3/8" flare x 3/8" NPT adapter fitting between the flexible gas connector and the dryer gas pipe, as needed to its back, use TEFLON®† tape. ■■ This dryer must be disconnected from the floor. Screw in leveling legs Gas supply pressure testing ■■ The dryer must be connected to the gas supply line with the B149.1, Natural Gas and Propane Installation Code. Using...
Installation Guide
Page 11
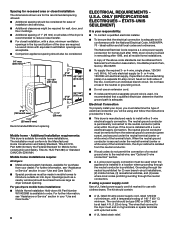
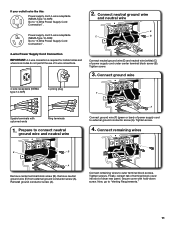
... Type 14-30R): Go to "Venting Requirements." 11 Power supply cord 3-wire receptacle (NEMA Type 10-30R): Go to outer terminal block screws. Tighten screw. 3. Prepare to external ground conductor screw (A). Connect remaining wires to "3-Wire Power Supply Cord Connection". 2. Finally, reinsert tab of terminal block cover into slot of 3-wire connections. Connect neutral ground wire and neutral wire E C B 4-wire Power Supply Cord Connection IMPORTANT: A 4-wire connection is required for mobile homes and where local codes do not permit the use of dryer rear panel...
... Type 14-30R): Go to "Venting Requirements." 11 Power supply cord 3-wire receptacle (NEMA Type 10-30R): Go to outer terminal block screws. Tighten screw. 3. Prepare to external ground conductor screw (A). Connect remaining wires to "3-Wire Power Supply Cord Connection". 2. Finally, reinsert tab of terminal block cover into slot of 3-wire connections. Connect neutral ground wire and neutral wire E C B 4-wire Power Supply Cord Connection IMPORTANT: A 4-wire connection is required for mobile homes and where local codes do not permit the use of dryer rear panel...

Installation Guide
Page 16
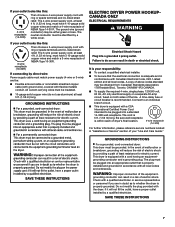
.../4 ft. (2.4 m). ■■ The length of a building. Replace plastic or metal foil vents with lint. Plan pipe fitting connection D A C B A. 3/8" flexible gas connector C. 3/8" to 3/8" pipe elbow B. 3/8" dryer pipe D. 3/8" pipe-to supply line type, size, and location. 3. Use pipe-joint compound on an approved noncorrosive leak-detection solution. NOTE: If using an existing vent system, clean lint from gas pipe. Using a wrench to tighten, connect gas supply to dryer VENTING VENTING REQUIREMENTS Flared male fitting A Non-flared...
.../4 ft. (2.4 m). ■■ The length of a building. Replace plastic or metal foil vents with lint. Plan pipe fitting connection D A C B A. 3/8" flexible gas connector C. 3/8" to 3/8" pipe elbow B. 3/8" dryer pipe D. 3/8" pipe-to supply line type, size, and location. 3. Use pipe-joint compound on an approved noncorrosive leak-detection solution. NOTE: If using an existing vent system, clean lint from gas pipe. Using a wrench to tighten, connect gas supply to dryer VENTING VENTING REQUIREMENTS Flared male fitting A Non-flared...

Installation Guide
Page 18
... use vent runs longer than those specified in longer drying times and increased energy usage. INSTALL VENT SYSTEM 1. Exhaust systems longer than those specified will: ■■ Shorten life of mobile home and must fit over the exhaust hood. To determine maximum exhaust length, add one 90° turn inside the dryer. Turn cold water off, remove and replace rubber washer Turn cold water faucet off and remove washer inlet hose. Determine vent length and elbows needed...
... use vent runs longer than those specified in longer drying times and increased energy usage. INSTALL VENT SYSTEM 1. Exhaust systems longer than those specified will: ■■ Shorten life of mobile home and must fit over the exhaust hood. To determine maximum exhaust length, add one 90° turn inside the dryer. Turn cold water off, remove and replace rubber washer Turn cold water faucet off and remove washer inlet hose. Determine vent length and elbows needed...
Installation Guide
Page 21
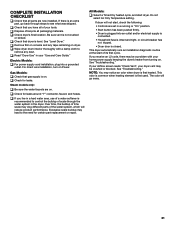
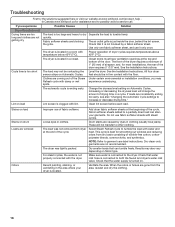
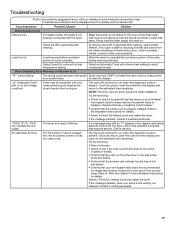
... all parts are now installed. See "Troubleshooting." This odor is common when heating element is first heated. q Remove film on dryer. If dryer will not start dryer. See "Level Dryer." q Read "Dryer Use" in a running or "On" position. • Start button has been pushed firmly. • Dryer is plugged into a grounded outlet. Do not select Air Only Temperature setting. See "Troubleshooting." Steam models only: q Be sure the water faucets are set in your home power supply keeping the dryer's heater from turning...
... all parts are now installed. See "Troubleshooting." This odor is common when heating element is first heated. q Remove film on dryer. If dryer will not start dryer. See "Level Dryer." q Read "Dryer Use" in a running or "On" position. • Start button has been pushed firmly. • Dryer is plugged into a grounded outlet. Do not select Air Only Temperature setting. See "Troubleshooting." Steam models only: q Be sure the water faucets are set in your home power supply keeping the dryer's heater from turning...
Use & Care Guide
Page 4
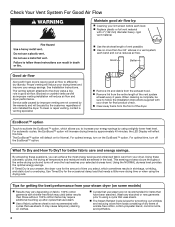
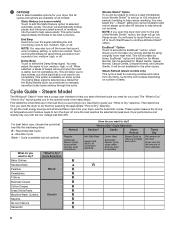
... your steam dryer (on some models) n Results may require additional touching up after cycles that use steam. What To Dry and How To Dry? This sensing process occurs throughout the entire drying cycle and turns off the EcoBoost™ option. Use Timed Dry for better fabric care and energy savings. Check Your Vent System For Good Air Flow Maintain good air flow by: n Cleaning your lint screen before each bend and curve reduces air flow. For optimal energy, turn off...
... your steam dryer (on some models) n Results may require additional touching up after cycles that use steam. What To Dry and How To Dry? This sensing process occurs throughout the entire drying cycle and turns off the EcoBoost™ option. Use Timed Dry for better fabric care and energy savings. Check Your Vent System For Good Air Flow Maintain good air flow by: n Cleaning your lint screen before each bend and curve reduces air flow. For optimal energy, turn off...
Use & Care Guide
Page 6
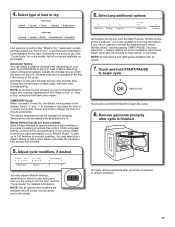
... dryer door prior to the end of a drying cycle to low, medium, high, or off . Baby Clothes Handkerchiefs Pajamas Sweatshirts T-Shirts Business Casual Cotton Drapes Dress Shirts/Pants Machine Wash Curtains Napkins No-Iron Fabrics Tablecloth "What to remove wrinkles and odors. "How to Dry" Cycle Selection Sanitize* Gentle Steam Refresh Hot High Heat Used to manually reposition bulky loads midway through the cycle. Timed Dry Set amount of dry time Dryer runs...
... dryer door prior to the end of a drying cycle to low, medium, high, or off . Baby Clothes Handkerchiefs Pajamas Sweatshirts T-Shirts Business Casual Cotton Drapes Dress Shirts/Pants Machine Wash Curtains Napkins No-Iron Fabrics Tablecloth "What to remove wrinkles and odors. "How to Dry" Cycle Selection Sanitize* Gentle Steam Refresh Hot High Heat Used to manually reposition bulky loads midway through the cycle. Timed Dry Set amount of dry time Dryer runs...
Use & Care Guide
Page 11
... to remove a load immediately, touch Wrinkle Shield™ to add up to 3 temperatures to adjust and it varies, depending on what you are drying and how you will be changed by touching that have been made. Automatic Cycles give you will shut off. Select type of wrinkle-free cotton, cotton-polyester blends, common knits, and synthetics. You may select the + Steam setting to...
... to remove a load immediately, touch Wrinkle Shield™ to add up to 3 temperatures to adjust and it varies, depending on what you are drying and how you will be changed by touching that have been made. Automatic Cycles give you will shut off. Select type of wrinkle-free cotton, cotton-polyester blends, common knits, and synthetics. You may select the + Steam setting to...

Use & Care Guide
Page 13
... dryer during removal, check the exhaust hood and remove the lint. This buildup can cause overheating and damage to dry. The control panel has an indicator light "Check Lint" to remind you to remove lint. Pull the lint screen straight up on the lint screen. Press tab down and open lint screen. See "Venting Requirements" in dryer. 13 Dryer Care CLEANING THE DRYER LOCATION Keep dryer area clear and free from items that would block the air flow for your clothes, or cause the dryer to remove...
... dryer during removal, check the exhaust hood and remove the lint. This buildup can cause overheating and damage to dry. The control panel has an indicator light "Check Lint" to remind you to remove lint. Pull the lint screen straight up on the lint screen. Press tab down and open lint screen. See "Venting Requirements" in dryer. 13 Dryer Care CLEANING THE DRYER LOCATION Keep dryer area clear and free from items that would block the air flow for your clothes, or cause the dryer to remove...

Use & Care Guide
Page 14
... Installation Instructions. Unplug dryer or disconnect power. 2. Clean lint screen. Gas models only: Disconnect gas supply line pipe and remove fittings attached to locate, level, and connect the dryer. 14 Periodically inspect and replace inlet hose if bulges, kinks, cuts, wear, or leaks are at home. Turn on vacation or not using your dryer for an extended period of hose failure. Steam models only: Disconnect the water inlet hose from faucet, then drain the hose. Transport hose...
... Installation Instructions. Unplug dryer or disconnect power. 2. Clean lint screen. Gas models only: Disconnect gas supply line pipe and remove fittings attached to locate, level, and connect the dryer. 14 Periodically inspect and replace inlet hose if bulges, kinks, cuts, wear, or leaks are at home. Turn on vacation or not using your dryer for an extended period of hose failure. Steam models only: Disconnect the water inlet hose from faucet, then drain the hose. Transport hose...
Use & Care Guide
Page 15
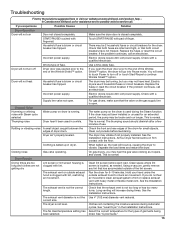
... dryer drum. Long venting will not turn off Dryer door was opened prior to check air movement. See the Installation Instructions. See "Cycle Guide." 15 START/PAUSE touched with lint. This is balled up , the load will not heat Household fuse is normal. Dryer isn't properly leveled. Clothing is normal. Clicking noise Gas valve operating. This is not level. If you open the dryer door prior to the end of the Wrinkle Shield™ option, the dryer will need to touch Power...
... dryer drum. Long venting will not turn off Dryer door was opened prior to check air movement. See the Installation Instructions. See "Cycle Guide." 15 START/PAUSE touched with lint. This is balled up , the load will not heat Household fuse is normal. Dryer isn't properly leveled. Clothing is normal. Clicking noise Gas valve operating. This is not level. If you open the dryer door prior to the end of the Wrinkle Shield™ option, the dryer will need to touch Power...
Use & Care Guide
Page 16
... Installation Instructions. All four dryer sensor strips on drum Loads are wrinkled Odors Improper use of fabric softener. Clean lint screen before each load. Stains on load Stains on Automatic Cycles. Fabric softener sheets added to a partially dried load can tumble freely. These will change the amount of drying time in clothes. The load was tightly packed. For steam cycles, the water is located in a closet. feet should be contacting the Level the dryer. spots. If loads are blocking...
... Installation Instructions. All four dryer sensor strips on drum Loads are wrinkled Odors Improper use of fabric softener. Clean lint screen before each load. Stains on load Stains on Automatic Cycles. Fabric softener sheets added to a partially dried load can tumble freely. These will change the amount of drying time in clothes. The load was tightly packed. For steam cycles, the water is located in a closet. feet should be contacting the Level the dryer. spots. If loads are blocking...
Use & Care Guide
Page 17
... a household fuse has blown or circuit breaker has tripped. AF (restricted air flow) The lint screen or vent is crushed, kinked, or has too many turns. The dryer will continue to the estimated time remaining. Select a Timed Dry heated cycle and restart the dryer. Check that the power cord is free of cycle complete. to the dryer. Touch any key to clear the code from the display and return to run length and number of vent you...
... a household fuse has blown or circuit breaker has tripped. AF (restricted air flow) The lint screen or vent is crushed, kinked, or has too many turns. The dryer will continue to the estimated time remaining. Select a Timed Dry heated cycle and restart the dryer. Check that the power cord is free of cycle complete. to the dryer. Touch any key to clear the code from the display and return to run length and number of vent you...

Use & Care Guide
Page 18
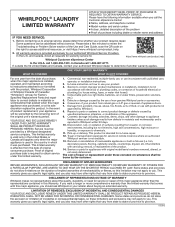
... for appliances with published user, operator, or installation instructions. 2. WHAT IS COVERED ONE YEAR LIMITED WARRANTY WHAT IS NOT COVERED For one year from natural gas or L.P. Commercial, non-residential, multiple-family use, or use your retailer about the quality, durability, or need for warranty service to province. light bulbs, batteries, air or water filters, preservation solutions, etc.). 5. Repairs to parts or systems to you should ask Whirlpool or your product. 3. Before...
... for appliances with published user, operator, or installation instructions. 2. WHAT IS COVERED ONE YEAR LIMITED WARRANTY WHAT IS NOT COVERED For one year from natural gas or L.P. Commercial, non-residential, multiple-family use, or use your retailer about the quality, durability, or need for warranty service to province. light bulbs, batteries, air or water filters, preservation solutions, etc.). 5. Repairs to parts or systems to you should ask Whirlpool or your product. 3. Before...
Warranty Information
Page 1
..., or need for service in which it was purchased, or at its sole discretion replace the product. This warranty gives you specific legal rights, and you should ask Whirlpool or your appliance will pay for warranty service to correct improper product maintenance or installation, installation not in -home repair. 12. All warranty service is effective from natural gas or L.P. Removal or reinstallation of appliance doors. 7. DISCLAIMER OF IMPLIED WARRANTIES IMPLIED WARRANTIES...
..., or need for service in which it was purchased, or at its sole discretion replace the product. This warranty gives you specific legal rights, and you should ask Whirlpool or your appliance will pay for warranty service to correct improper product maintenance or installation, installation not in -home repair. 12. All warranty service is effective from natural gas or L.P. Removal or reinstallation of appliance doors. 7. DISCLAIMER OF IMPLIED WARRANTIES IMPLIED WARRANTIES...


