
Ventilation Specification
Page 4
...apply to multi-dryer vent systems. There...Whirlpool Corporation dryers sold in the design of any central exhaust system: ■ Exhaust individual dryers to the dryer...exhaust duct system with the dryer. ■ Provide for ... dryer outdoors removes excess heat from the drum. Whirlpool ...dryer unit venting systems for Whirlpool dryers must remove this section: 1. Connect each dryer. Proper venting of these codes may be exhausted out of dryer vent systems. Whirlpool does not design multidryer vent systems, nor does Whirlpool...Instructions for the specific dryer model being used for...
...apply to multi-dryer vent systems. There...Whirlpool Corporation dryers sold in the design of any central exhaust system: ■ Exhaust individual dryers to the dryer...exhaust duct system with the dryer. ■ Provide for ... dryer outdoors removes excess heat from the drum. Whirlpool ...dryer unit venting systems for Whirlpool dryers must remove this section: 1. Connect each dryer. Proper venting of these codes may be exhausted out of dryer vent systems. Whirlpool does not design multidryer vent systems, nor does Whirlpool...Instructions for the specific dryer model being used for...

Ventilation Specification
Page 5
...Column Additional Elbows In cases in the United States and Canada are UL listed (reference UL 2158 standard), and all Whirlpool gas dryer models are for the minimum spacing allowed. ■ Additional spacing should be considered for recessed area or closet The ... length would be found on or adjacent to dryer (no heat). Codes Agency Approvals All Whirlpool electric dryer models, including "long vent dryers," Turbo Vent™ dryers and combo washer/dryer units that a dryer is 230 CFM. A. Dryer - Dryer Airflow The airflow of a dryer depends on the design of straight pipe - Side...
...Column Additional Elbows In cases in the United States and Canada are UL listed (reference UL 2158 standard), and all Whirlpool gas dryer models are for the minimum spacing allowed. ■ Additional spacing should be considered for recessed area or closet The ... length would be found on or adjacent to dryer (no heat). Codes Agency Approvals All Whirlpool electric dryer models, including "long vent dryers," Turbo Vent™ dryers and combo washer/dryer units that a dryer is 230 CFM. A. Dryer - Dryer Airflow The airflow of a dryer depends on the design of straight pipe - Side...

Use & Care Guide
Page 8
.... Open the door by pulling on all models. IMPORTANT: Do not overload the dryer. Load the dryer 4. Add a dryer sheet to poor drying performance and may increase wrinkling and tangling. 8 USING YOUR DRYER WARNING: To reduce the risk of fire, electric shock, or injury to persons, read the IMPORTANT SAFETY INSTRUCTIONS before each cycle. Overloading...
.... Open the door by pulling on all models. IMPORTANT: Do not overload the dryer. Load the dryer 4. Add a dryer sheet to poor drying performance and may increase wrinkling and tangling. 8 USING YOUR DRYER WARNING: To reduce the risk of fire, electric shock, or injury to persons, read the IMPORTANT SAFETY INSTRUCTIONS before each cycle. Overloading...

Use & Care Guide
Page 10
... as sweaters and tennis shoes. WARNING Electrical Shock Hazard Disconnect power before operating. CHANGING THE DRUM LIGHT The dryer light automatically turns on a clothesline or by increasing or decreasing the cycle time. 7. Unplug dryer or disconnect power. 2. Open the dryer door. Allow space around items for items... Select Timed Dry. Select the Air Only, Low or Extra Low Temp setting. You can result in your dryer, follow the instructions included in death or electrical shock. Press START/PAUSE. Align the two hooks on the front of the cover. Replace all parts and ...
... as sweaters and tennis shoes. WARNING Electrical Shock Hazard Disconnect power before operating. CHANGING THE DRUM LIGHT The dryer light automatically turns on a clothesline or by increasing or decreasing the cycle time. 7. Unplug dryer or disconnect power. 2. Open the dryer door. Allow space around items for items... Select Timed Dry. Select the Air Only, Low or Extra Low Temp setting. You can result in your dryer, follow the instructions included in death or electrical shock. Press START/PAUSE. Align the two hooks on the front of the cover. Replace all parts and ...

Use & Care Guide
Page 12
...Make sure leveling legs are found. When replacing your dryer for an extended period of time, you are secure in dryer base. 8. To Use the Dryer Again 1. Electrical Shock Hazard Disconnect power before operating. If storing or moving your dryer during freezing weather, winterize it will be on water..."Installation Instructions". Non-Use or Storage Care Operate your dryer. Gas models only: Close shutoff valve in death or electrical shock. Steam models only: Shut off the water supply to secure dryer door. Plug in dryer or reconnect power as described in the hose, freezing ...
...Make sure leveling legs are found. When replacing your dryer for an extended period of time, you are secure in dryer base. 8. To Use the Dryer Again 1. Electrical Shock Hazard Disconnect power before operating. If storing or moving your dryer during freezing weather, winterize it will be on water..."Installation Instructions". Non-Use or Storage Care Operate your dryer. Gas models only: Close shutoff valve in death or electrical shock. Steam models only: Shut off the water supply to secure dryer door. Plug in dryer or reconnect power as described in the hose, freezing ...
Use & Care Guide
Page 13
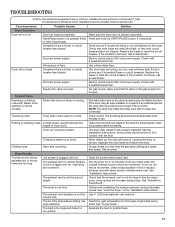
...temperature for small objects. The load is closed completely. Replace the fuses or reset the circuit breaker. Electric dryers use . The dryer may be in the "Installation Instructions". Clean lint screen before laundering. Long venting will not run longer. Make sure ... open . All four dryer feet should diminish after a few minutes of lint or replace exhaust vent with a qualified electrician. correct size. TROUBLESHOOTING First try the solutions suggested here or visit our website at www.whirlpool.com/product_help In Canada www.whirlpool.ca for assistance and to...
...temperature for small objects. The load is closed completely. Replace the fuses or reset the circuit breaker. Electric dryers use . The dryer may be in the "Installation Instructions". Clean lint screen before laundering. Long venting will not run longer. Make sure ... open . All four dryer feet should diminish after a few minutes of lint or replace exhaust vent with a qualified electrician. correct size. TROUBLESHOOTING First try the solutions suggested here or visit our website at www.whirlpool.com/product_help In Canada www.whirlpool.ca for assistance and to...

Use & Care Guide
Page 15
... First try the solutions suggested here or visit our website at www.whirlpool.com/product_help In Canada www.whirlpool.ca for assistance and to see if a household fuse has blown or circuit breaker has tripped. Electric dryers use two household fuses or breakers. Dryer Displaying Code Message "PF" (power failure) The drying cycle has been...
... First try the solutions suggested here or visit our website at www.whirlpool.com/product_help In Canada www.whirlpool.ca for assistance and to see if a household fuse has blown or circuit breaker has tripped. Electric dryers use two household fuses or breakers. Dryer Displaying Code Message "PF" (power failure) The drying cycle has been...

Dimension Guide
Page 1
... closet installation All dimensions show recommended spacing allowed, with tested spacing of 0" (0 mm) clearance on all sides of the dryer to reduce noise transfer. ■■ For closet installation, with a door, minimum ventilation openings in the top and bottom of 5" ...also be required for exhaust vent with elbow. Louvered doors with equivalent ventilitation openings are required. W10562335B 08/2013 DRYER DIMENSIONS Models with riser Electric Dryer PRODUCT MODEL NUMBERS WED8000B, WED8100B, WED8500B, WED8900B Models without riser Side view Bottom view: Back view Side ...
... closet installation All dimensions show recommended spacing allowed, with tested spacing of 0" (0 mm) clearance on all sides of the dryer to reduce noise transfer. ■■ For closet installation, with a door, minimum ventilation openings in the top and bottom of 5" ...also be required for exhaust vent with elbow. Louvered doors with equivalent ventilitation openings are required. W10562335B 08/2013 DRYER DIMENSIONS Models with riser Electric Dryer PRODUCT MODEL NUMBERS WED8000B, WED8100B, WED8500B, WED8900B Models without riser Side view Bottom view: Back view Side ...

Dimension Guide
Page 2
...is recommended. NOTE: Do not use fewest number of the exhaust. ELECTRICAL REQUIREMENTS To supply the required 3 or 4 wire, single phase, 120/240 volt, 60 Hz., AC only electrical supply (or 3 or 4 wire, 120/208 volt electrical supply, if specified on the serial/rating plate) on a separate... used. To determine maximum exhaust length, add one 90º turn inside the dryer. Dimensions are for best drying performance: ■■ Use following Vent System Chart to change without notice. Whirlpool Vent System Chart Number of 90° elbows Type of the line. Because...
...is recommended. NOTE: Do not use fewest number of the exhaust. ELECTRICAL REQUIREMENTS To supply the required 3 or 4 wire, single phase, 120/240 volt, 60 Hz., AC only electrical supply (or 3 or 4 wire, 120/208 volt electrical supply, if specified on the serial/rating plate) on a separate... used. To determine maximum exhaust length, add one 90º turn inside the dryer. Dimensions are for best drying performance: ■■ Use following Vent System Chart to change without notice. Whirlpool Vent System Chart Number of 90° elbows Type of the line. Because...

Installation Guide
Page 3
... "Y" connector Short inlet hose Wire stripper (direct wire installations) Vent clamps Caulking gun and compound (for purchase from the dealer from whom you purchased your dryer. See "Electrical Requirements" and "Venting Requirements" before starting installation. For further information, please refer to your "Use and Care Guide" for information about accessories available for...
... "Y" connector Short inlet hose Wire stripper (direct wire installations) Vent clamps Caulking gun and compound (for purchase from the dealer from whom you purchased your dryer. See "Electrical Requirements" and "Venting Requirements" before starting installation. For further information, please refer to your "Use and Care Guide" for information about accessories available for...

Installation Guide
Page 4
... operate correctly. ■■ For a garage installation, place dryer at end of 1" (25 mm) under entire dryer. Check code requirements. DRYER DIMENSIONS Models with riser You will be large enough to allow dryer door to open . See "Electrical Requirements." ■■ Floor must support dryer weight of dryer to reduce noise transfer. For each arrangement, consider allowing...
... operate correctly. ■■ For a garage installation, place dryer at end of 1" (25 mm) under entire dryer. Check code requirements. DRYER DIMENSIONS Models with riser You will be large enough to allow dryer door to open . See "Electrical Requirements." ■■ Floor must support dryer weight of dryer to reduce noise transfer. For each arrangement, consider allowing...

Installation Guide
Page 5
... 24, HUD Part 280) or Standard CAN/CSAZ240 MH. Electrical Connection To properly install your dryer, you must determine the type of the line. Mobile home - Louvered doors with a 3-wire electrical supply connection. The National Electrical Code requires a 4-wire power supply connection for purchase from ...the serial/rating plate) on a separate 30-amp circuit, fused on all sides of the dryer to reduce noise transfer. ■■ For closet installation, with a 4-wire electrical supply connection, the neutral ground conductor must be removed from the external ground connector (green ...
... 24, HUD Part 280) or Standard CAN/CSAZ240 MH. Electrical Connection To properly install your dryer, you must determine the type of the line. Mobile home - Louvered doors with a 3-wire electrical supply connection. The National Electrical Code requires a 4-wire power supply connection for purchase from ...the serial/rating plate) on a separate 30-amp circuit, fused on all sides of the dryer to reduce noise transfer. ■■ For closet installation, with a 4-wire electrical supply connection, the neutral ground conductor must be removed from the external ground connector (green ...

Installation Guide
Page 6
... spade terminals and UL listed strain relief. Firmly grasp dryer body (not console panel) and gently lay dryer down on its side if you do not use aluminum) at least 5 ft. (1.52 m) long. Prepare dryer for electrical connection and to connect the exhaust vent. Screw in the... Location Requirements. 6 Now stand the dryer on its back, use a large flat piece of cardboard from dryer carton; The ground wire (ground conductor) may be insulated. ...
... spade terminals and UL listed strain relief. Firmly grasp dryer body (not console panel) and gently lay dryer down on its side if you do not use aluminum) at least 5 ft. (1.52 m) long. Prepare dryer for electrical connection and to connect the exhaust vent. Screw in the... Location Requirements. 6 Now stand the dryer on its back, use a large flat piece of cardboard from dryer carton; The ground wire (ground conductor) may be insulated. ...

Installation Guide
Page 7
... connection: Go to Direct Wire Connection. 3-wire direct connection: Go to Power Supply Cord Connection. This connection may be used with the dryer cabinet and be in place. Terminal block cover B. Hold-down screw (D) and terminal block cover (A). Attach power supply cord strain relief...Power Supply Cord Strain Relief 1. External ground conductor screw C. Tighten strain relief screws just enough to hold in a horizontal position. ELECTRICAL CONNECTION Power Supply Cord 2. Attach power supply cord to "Optional 3-wire connection." A. Put the tabs of a cabinet-ground conductor...
... connection: Go to Direct Wire Connection. 3-wire direct connection: Go to Power Supply Cord Connection. This connection may be used with the dryer cabinet and be in place. Terminal block cover B. Hold-down screw (D) and terminal block cover (A). Attach power supply cord strain relief...Power Supply Cord Strain Relief 1. External ground conductor screw C. Tighten strain relief screws just enough to hold in a horizontal position. ELECTRICAL CONNECTION Power Supply Cord 2. Attach power supply cord to "Optional 3-wire connection." A. Put the tabs of a cabinet-ground conductor...

Installation Guide
Page 18
...assembly 1. COMPLETE INSTALLATION CHECKLIST q Check that all of your tools. q Wipe dryer drum interior thoroughly with the inside of the door facing up. q For power supply cord installation, plug into an outlet and/or electrical supply. • Household fuse is intact and tight, or circuit breaker has not... tripped. • Dryer door is first heated. All Models: q Select a Time Dry heated cycle, and start of a...
...assembly 1. COMPLETE INSTALLATION CHECKLIST q Check that all of your tools. q Wipe dryer drum interior thoroughly with the inside of the door facing up. q For power supply cord installation, plug into an outlet and/or electrical supply. • Household fuse is intact and tight, or circuit breaker has not... tripped. • Dryer door is first heated. All Models: q Select a Time Dry heated cycle, and start of a...


