

Use & Care Guide
Page 5
...and will reduce your drying times and improve your dryer for final product check. n Clear away items from loads consisting of dry items of vent possible. Use Automatic Cycles for by : n Cleaning your steam dryer (on some models) n Results may vary depending on clothes. n Cycles...-free cotton, cotton-polyester blend, common knits, and synthetics. 5 Good Better Good airflow Along with 4" (102 mm) diameter heavy, rigid vent material. n Remove lint from the exhaust hood. When cleaning is not recommended with wrinkle-free finish may yield better results than four 90°...
...and will reduce your drying times and improve your dryer for final product check. n Clear away items from loads consisting of dry items of vent possible. Use Automatic Cycles for by : n Cleaning your steam dryer (on some models) n Results may vary depending on clothes. n Cycles...-free cotton, cotton-polyester blend, common knits, and synthetics. 5 Good Better Good airflow Along with 4" (102 mm) diameter heavy, rigid vent material. n Remove lint from the exhaust hood. When cleaning is not recommended with wrinkle-free finish may yield better results than four 90°...
Use & Care Guide
Page 12
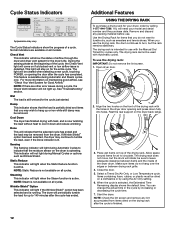
...be used with the holes in the cycle by calling 1-877-944-7566. Sensing The Sensing indicator will light during a cycle, the Check Vent indicator will periodically tumble the load for your model and serial number and the purchase date. Additional Features USING THE DRYING RACK To purchase a... started. Allow space around items for the dryer's life. Rest the rear support on the front of airflow through the dryer and dryer vent system for air to leave adequate clearance between drying rack grille. 4. The Cycle Status Indicators show the status of the drying rack with ...
...be used with the holes in the cycle by calling 1-877-944-7566. Sensing The Sensing indicator will light during a cycle, the Check Vent indicator will periodically tumble the load for your model and serial number and the purchase date. Additional Features USING THE DRYING RACK To purchase a... started. Allow space around items for the dryer's life. Rest the rear support on the front of airflow through the dryer and dryer vent system for air to leave adequate clearance between drying rack grille. 4. The Cycle Status Indicators show the status of the drying rack with ...
Use & Care Guide
Page 13
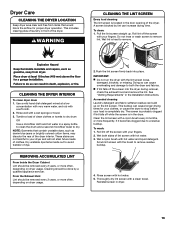
...rub with hot water. 5. Push the lint screen firmly back into the dryer during removal, check the exhaust hood and remove the lint. See "Venting Requirements" in front of laundry in the Installation Instructions. Clean the lint screen with hot water. 3. Wet both the dryer and fabrics. Wet ...clean dryer drum 1. These stains are not harmful to a residue buildup. Cleaning should be done by lint can build up . From the Exhaust Vent Lint should be removed every 2 years, or more frequently, if it becomes clogged due to your fingers. 2. Doing so can cause longer ...
...rub with hot water. 5. Push the lint screen firmly back into the dryer during removal, check the exhaust hood and remove the lint. See "Venting Requirements" in front of laundry in the Installation Instructions. Clean the lint screen with hot water. 3. Wet both the dryer and fabrics. Wet ...clean dryer drum 1. These stains are not harmful to a residue buildup. Cleaning should be done by lint can build up . From the Exhaust Vent Lint should be removed every 2 years, or more frequently, if it becomes clogged due to your fingers. 2. Doing so can cause longer ...

Use & Care Guide
Page 15
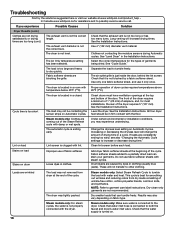
...vibrate. If you may be in a while. A small object caught between the edges of dryer drum. Load is packed tightly or exhaust vent is normal. Dryer Results Clothes are not drying satisfactorily or drying times are intact and tight, or that both circuit breakers have heat. There... may not have not tripped. This is used in firm contact with a qualified electrician. In Canada www.whirlpool.ca for the dryer. Dryer will not run longer. This is on the EcoBoost™ option. For optimal dry times, turn on . Clicking...
...vibrate. If you may be in a while. A small object caught between the edges of dryer drum. Load is packed tightly or exhaust vent is normal. Dryer Results Clothes are not drying satisfactorily or drying times are intact and tight, or that both circuit breakers have heat. There... may not have not tripped. This is used in firm contact with a qualified electrician. In Canada www.whirlpool.ca for the dryer. Dryer will not run longer. This is on the EcoBoost™ option. For optimal dry times, turn on . Clicking...
Use & Care Guide
Page 16
In Canada www.whirlpool.ca for the types of the cycle. Solution Check that the exhaust vent is just inside the door, behind the ... Clothes are not drying satisfactorily or drying times are too long (cont.) Possible Causes The exhaust vent is turned on Automatic Cycles. Drum stains are wrinkled The load was tightly packed. Dry-clean-...reducing odors from dryer at www.whirlpool.com/product_help - NOTE: Refer to tumble the load with the floor. Use 4" (102 mm) diameter vent material. See the Installation Instructions. The exhaust vent diameter is too large and ...
In Canada www.whirlpool.ca for the types of the cycle. Solution Check that the exhaust vent is just inside the door, behind the ... Clothes are not drying satisfactorily or drying times are too long (cont.) Possible Causes The exhaust vent is turned on Automatic Cycles. Drum stains are wrinkled The load was tightly packed. Dry-clean-...reducing odors from dryer at www.whirlpool.com/product_help - NOTE: Refer to tumble the load with the floor. Use 4" (102 mm) diameter vent material. See the Installation Instructions. The exhaust vent diameter is too large and ...

Use & Care Guide
Page 17
... for reducing wrinkles and odors from turning on . Replace the fuse or reset the circuit breaker. Confirm that requires service. the vent is clogged; Troubleshooting First try the solutions suggested here or visit our website at least 3 seconds. If you are using. Dryer...The dryer will continue to restart the dryer. When the Control Lock is not properly connected with a high temperature setting. In Canada www.whirlpool.ca for details. Ventilate the area. Steam models only: For steam cycles, the water is disabled, the LED Display will count down ...
... for reducing wrinkles and odors from turning on . Replace the fuse or reset the circuit breaker. Confirm that requires service. the vent is clogged; Troubleshooting First try the solutions suggested here or visit our website at least 3 seconds. If you are using. Dryer...The dryer will continue to restart the dryer. When the Control Lock is not properly connected with a high temperature setting. In Canada www.whirlpool.ca for details. Ventilate the area. Steam models only: For steam cycles, the water is disabled, the LED Display will count down ...
Installation Guide
Page 1
... LEGS 6 ELECTRICAL INSTALLATION 7 Power Supply Cord Connection 8 Direct Wire Connection 10 VENTING 12 Venting Requirements 12 Plan Vent System 13 Install Vent System 15 CONNECT INLET HOSE (STEAM MODEL ONLY 15 CONNECT VENT 16 LEVEL DRYER 17 COMPLETE INSTALLATION CHECKLIST 17 DOOR REVERSAL (OPTIONAL 18 Para una... version de estas instrucciones en español, visite www.Whirlpool.com ...
... LEGS 6 ELECTRICAL INSTALLATION 7 Power Supply Cord Connection 8 Direct Wire Connection 10 VENTING 12 Venting Requirements 12 Plan Vent System 13 Install Vent System 15 CONNECT INLET HOSE (STEAM MODEL ONLY 15 CONNECT VENT 16 LEVEL DRYER 17 COMPLETE INSTALLATION CHECKLIST 17 DOOR REVERSAL (OPTIONAL 18 Para una... version de estas instrucciones en español, visite www.Whirlpool.com ...

Installation Guide
Page 3
...dryer if installing with clothes dryers. The wires that opens to your Use and Care Guide for information about accessories available for installing new exhaust vent) 5' (1.52 m) inlet hose Additional parts may be at least 4 ft. (1.22 m) long. Tools needed : (Not supplied with ...hex-head socket wrench Rubber washer Parts package is located in ring terminals or spade terminals with dryer) ■■Vent clamps ■■Vent elbows and vent work Parts needed (steam models): Utility knife Tape measure Level Pliers Caulking gun and compound (for your installation. Check...
...dryer if installing with clothes dryers. The wires that opens to your Use and Care Guide for information about accessories available for installing new exhaust vent) 5' (1.52 m) inlet hose Additional parts may be at least 4 ft. (1.22 m) long. Tools needed : (Not supplied with ...hex-head socket wrench Rubber washer Parts package is located in ring terminals or spade terminals with dryer) ■■Vent clamps ■■Vent elbows and vent work Parts needed (steam models): Utility knife Tape measure Level Pliers Caulking gun and compound (for your installation. Check...

Installation Guide
Page 4
... 383/4" Min. (984 mm) 39" Max. (990 mm) You will be installed or stored in garages, closets, mobile homes, or sleeping quarters. See "Venting Requirements." ■■A separate 30-amp circuit. ■■If using a pedestal, you will need : ■■A location allowing for exhaust... vent with maximum slope of dryer. If slope is installed, top and bottom air openings in garages, closets, mobile homes, or sleeping quarters. ...
... 383/4" Min. (984 mm) 39" Max. (990 mm) You will be installed or stored in garages, closets, mobile homes, or sleeping quarters. See "Venting Requirements." ■■A separate 30-amp circuit. ■■If using a pedestal, you will need : ■■A location allowing for exhaust... vent with maximum slope of dryer. If slope is installed, top and bottom air openings in garages, closets, mobile homes, or sleeping quarters. ...

Installation Guide
Page 5
...that connect to the dryer must be kinked. If using and follow the instructions provided for it is allowed for straight-back venting only. When the neutral ground conductor is installed with equivalent ventilation openings are required. If the dryer is secured under the... provisions must be sure that the electrical connection is adequate and in a location where grounding through the neutral conductor is allowed for straight-back venting only. or 4-wire, single phase, 120/240 volt, 60 Hz, AC only electrical supply (or 3- Recommended installation clearances (dryer only):...
...that connect to the dryer must be kinked. If using and follow the instructions provided for it is allowed for straight-back venting only. When the neutral ground conductor is installed with equivalent ventilation openings are required. If the dryer is secured under the... provisions must be sure that the electrical connection is adequate and in a location where grounding through the neutral conductor is allowed for straight-back venting only. or 4-wire, single phase, 120/240 volt, 60 Hz, AC only electrical supply (or 3- Recommended installation clearances (dryer only):...
Installation Guide
Page 6
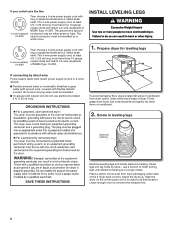
.... Firmly grasp dryer body (not console panel) and gently lay dryer down on the corner posts until diamond marking is close to connect the exhaust vent. 6 To avoid damaging floor, place a large flat piece of cardboard from dryer packaging under entire back edge of the 2 dryer back corners. Slide the dryer...
.... Firmly grasp dryer body (not console panel) and gently lay dryer down on the corner posts until diamond marking is close to connect the exhaust vent. 6 To avoid damaging floor, place a large flat piece of cardboard from dryer packaging under entire back edge of the 2 dryer back corners. Slide the dryer...
Installation Guide
Page 9
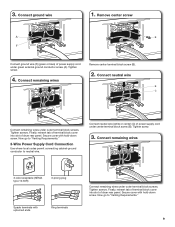
... center terminal block screw (B). 3. Tighten screw. 4. Connect remaining wires Remove center terminal block screw (B). 2. Now go to "Venting Requirements." 3-Wire Power Supply Cord Connection Use where local codes permit connecting cabinet-ground conductor to "Venting Requirements." 9 Tighten screws. Secure cover with hold -down screw. Tighten screw. 3. Tighten screws. Secure cover with hold...
... center terminal block screw (B). 3. Tighten screw. 4. Connect remaining wires Remove center terminal block screw (B). 2. Now go to "Venting Requirements." 3-Wire Power Supply Cord Connection Use where local codes permit connecting cabinet-ground conductor to "Venting Requirements." 9 Tighten screws. Secure cover with hold -down screw. Tighten screw. 3. Tighten screws. Secure cover with hold...
Installation Guide
Page 11
... of extra length so dryer may be moved if needed. Secure cover with outer covering. Now go to "Venting Requirements." 3-Wire Direct Wire Connection Use where local codes permit connecting cabinet-ground conductor to "Venting Requirements." 11 Connect remaining wires Remove center terminal block screw (B). 3. If using 3-wire cable with ground wire...
... of extra length so dryer may be moved if needed. Secure cover with outer covering. Now go to "Venting Requirements." 3-Wire Direct Wire Connection Use where local codes permit connecting cabinet-ground conductor to "Venting Requirements." 11 Connect remaining wires Remove center terminal block screw (B). 3. If using 3-wire cable with ground wire...
Installation Guide
Page 12
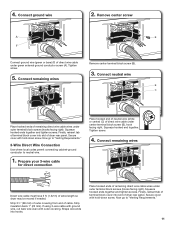
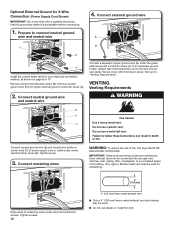
...ground wire (E) and neutral wire (white or center wire) (C) of remaining wires under outer terminal block screws. Prepare to "Venting Requirements." Connect remaining wires WARNING: To reduce the risk of fire, this grounding method is acceptable before connecting. 1. IMPORTANT: ...screw. 3. Dryer exhaust must verify with hold-down screw. Connect a separate copper ground wire (G) under center terminal block screw (B). VENTING Venting Requirements 2. Connect external ground wire A G E B A Install the correct strain relief for exhausting. Place ends of power supply cord...
...ground wire (E) and neutral wire (white or center wire) (C) of remaining wires under outer terminal block screws. Prepare to "Venting Requirements." Connect remaining wires WARNING: To reduce the risk of fire, this grounding method is acceptable before connecting. 1. IMPORTANT: ...screw. 3. Dryer exhaust must verify with hold-down screw. Connect a separate copper ground wire (G) under center terminal block screw (B). VENTING Venting Requirements 2. Connect external ground wire A G E B A Install the correct strain relief for exhausting. Place ends of power supply cord...

Installation Guide
Page 13
...reduced airflow and poor performance. ■■ Do not install in enclosed walls, ceilings, or floors. ■■ The total length should cap the vent to keep rodents and insects from entering the home. ■■ Must be at least 12" (305 mm) from entire length of duct and catch... lint. Elbow F. Rigid metal vent: ■■ Recommended for best drying performance and to avoid sagging and kinking that extend into interior of the system and make sure exhaust hood...
...reduced airflow and poor performance. ■■ Do not install in enclosed walls, ceilings, or floors. ■■ The total length should cap the vent to keep rodents and insects from entering the home. ■■ Must be at least 12" (305 mm) from entire length of duct and catch... lint. Elbow F. Rigid metal vent: ■■ Recommended for best drying performance and to avoid sagging and kinking that extend into interior of the system and make sure exhaust hood...

Installation Guide
Page 14
... (16.5 m) 2 Rigid metal 44 ft. (13.4 m) 3 Rigid metal 35 ft. (10.7 m) 4 Rigid metal 27 ft. (8.2 m) Long Vent System Chart Number of 90° elbows Type of vent Angled hoods 0 Rigid metal 160 ft. (48.8 m) 1 Rigid metal 150 ft. (45.7 m) 2 Rigid metal 140 ft. (42.7 m) 3 ...dealer to a noncombustible portion of length. 14 XXXXXXX-XXX. Left- Determine vent length and elbows needed for mobile homes: Exhaust vent must not terminate beneath the mobile home. The "Vent System Charts" provide venting requirements that will : ■■Shorten life of elbows and turns....
... (16.5 m) 2 Rigid metal 44 ft. (13.4 m) 3 Rigid metal 35 ft. (10.7 m) 4 Rigid metal 27 ft. (8.2 m) Long Vent System Chart Number of 90° elbows Type of vent Angled hoods 0 Rigid metal 160 ft. (48.8 m) 1 Rigid metal 150 ft. (45.7 m) 2 Rigid metal 140 ft. (42.7 m) 3 ...dealer to a noncombustible portion of length. 14 XXXXXXX-XXX. Left- Determine vent length and elbows needed for mobile homes: Exhaust vent must not terminate beneath the mobile home. The "Vent System Charts" provide venting requirements that will : ■■Shorten life of elbows and turns....

Installation Guide
Page 15
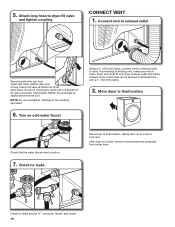
... washer cold inlet hose to male end of "Y" connector. Screw on coupling by hand until it is seated on faucet. Damage to "Connect Vent." CONNECT INLET HOSE (STEAM MODEL ONLY) For non-steam models, skip to the coupling can result. 15 Record hose installation or replacement dates ... with additional two-thirds turn . NOTE: Do not overtighten. Then attach "Y" connector to other fastening devices that extend into interior of vent to cold water faucet. Avoid 90° turns. NOTE: Do not overtighten. Using pliers, tighten the couplings an additional two-thirds turn . ...
... washer cold inlet hose to male end of "Y" connector. Screw on coupling by hand until it is seated on faucet. Damage to "Connect Vent." CONNECT INLET HOSE (STEAM MODEL ONLY) For non-steam models, skip to the coupling can result. 15 Record hose installation or replacement dates ... with additional two-thirds turn . NOTE: Do not overtighten. Then attach "Y" connector to other fastening devices that extend into interior of vent to cold water faucet. Avoid 90° turns. NOTE: Do not overtighten. Using pliers, tighten the couplings an additional two-thirds turn . ...
Installation Guide
Page 16
... in dryer. Check for leaks around "Y" connector, faucet, and hoses. 16 Turn on cold water faucet Using a 4" (102 mm) clamp, connect vent to exhaust hood with a 4" (102 mm) clamp. 2. Check that the water faucets are turned on fill valve connector. Screw on coupling by hand until it ...is secured to exhaust outlet in place, remove corner posts and cardboard from water inlet valve. NOTE: Do not overtighten. Dryer vent must fit over dryer exhaust outlet and inside exhaust hood. Move dryer to the coupling can result. 6. Damage to final location Check that...
... in dryer. Check for leaks around "Y" connector, faucet, and hoses. 16 Turn on cold water faucet Using a 4" (102 mm) clamp, connect vent to exhaust hood with a 4" (102 mm) clamp. 2. Check that the water faucets are turned on fill valve connector. Screw on coupling by hand until it ...is secured to exhaust outlet in place, remove corner posts and cardboard from water inlet valve. NOTE: Do not overtighten. Dryer vent must fit over dryer exhaust outlet and inside exhaust hood. Move dryer to the coupling can result. 6. Damage to final location Check that...
Installation Guide
Page 17
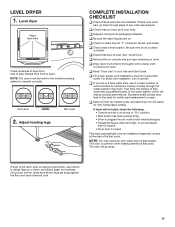
... set in a hard water area, use wrench to adjust legs up or down, and check again for the moisture sensing system to back. Be sure vent is not crushed or kinked. q Remove film on console and any dust. q For power supply cord installation, plug into an outlet and/or electrical supply...
... set in a hard water area, use wrench to adjust legs up or down, and check again for the moisture sensing system to back. Be sure vent is not crushed or kinked. q Remove film on console and any dust. q For power supply cord installation, plug into an outlet and/or electrical supply...
Dimension Guide
Page 1
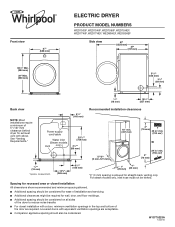
...ventilation openings in .2 min. (155 cm2) 3" (76 mm) 3/4"* (18 mm) *Approx. W10775223A 12/2015 See "Venting Requirements." 61/2" (165 mm) Recommended installation clearances Power supply cord/cable Water inlet (Steam models Vent only) 297/8"* (759 mm) 31/2"* (89 mm) 5" (102"7-5m"*m) (0 mm-127 mm) 18" min. (...mm) 48 in.2 min. (310 cm2) 24 in the top and bottom of 5" (127 mm) clearance behind dryer for straight-back venting only. For steam models only, inlet hose must not be considered. Louvered doors with elbow. Spacing for recessed area or closet installation All ...
...ventilation openings in .2 min. (155 cm2) 3" (76 mm) 3/4"* (18 mm) *Approx. W10775223A 12/2015 See "Venting Requirements." 61/2" (165 mm) Recommended installation clearances Power supply cord/cable Water inlet (Steam models Vent only) 297/8"* (759 mm) 31/2"* (89 mm) 5" (102"7-5m"*m) (0 mm-127 mm) 18" min. (...mm) 48 in.2 min. (310 cm2) 24 in the top and bottom of 5" (127 mm) clearance behind dryer for straight-back venting only. For steam models only, inlet hose must not be considered. Louvered doors with elbow. Spacing for recessed area or closet installation All ...
