
Ventilation Specification
Page 1
... "DANGER" or "WARNING." These words mean: DANGER You can be killed or seriously injured if you and others are installing a gas dryer, it is recommended that the owner post, in a prominent location, instructions for the customer's use gasoline or other flammable vapors and liquids in a prominent location. We have provided many important...
... "DANGER" or "WARNING." These words mean: DANGER You can be killed or seriously injured if you and others are installing a gas dryer, it is recommended that the owner post, in a prominent location, instructions for the customer's use gasoline or other flammable vapors and liquids in a prominent location. We have provided many important...

Ventilation Specification
Page 2
.... ■ A flexible gas connector, when used, must not exceed 3 feet. 2 do not use gasoline or other appliance. - In the State of Massachusetts, the following installation instructions apply: ■ Installations and repairs must be followed to minimize the risk of fire or explosion, or to light any appliance. • Do not touch any other...
.... ■ A flexible gas connector, when used, must not exceed 3 feet. 2 do not use gasoline or other appliance. - In the State of Massachusetts, the following installation instructions apply: ■ Installations and repairs must be followed to minimize the risk of fire or explosion, or to light any appliance. • Do not touch any other...

Ventilation Specification
Page 3
...materials. ■ Clean lint screen before using the dryer, follow basic precautions, including the following: ■ Read all instructions before or after each load. ■ Keep area around the exhaust opening and adjacent surrounding areas free from service or ... use fabric softeners or products to eliminate static unless recommended by qualified service personnel. ■ See installation instructions for grounding requirements. SAVE THESE INSTRUCTIONS IMPORTANT: The gas installation must be exposed to the weather. ■ Do not tamper with gasoline, drycleaning solvents, or ...
...materials. ■ Clean lint screen before using the dryer, follow basic precautions, including the following: ■ Read all instructions before or after each load. ■ Keep area around the exhaust opening and adjacent surrounding areas free from service or ... use fabric softeners or products to eliminate static unless recommended by qualified service personnel. ■ See installation instructions for grounding requirements. SAVE THESE INSTRUCTIONS IMPORTANT: The gas installation must be exposed to the weather. ■ Do not tamper with gasoline, drycleaning solvents, or ...

Ventilation Specification
Page 4
... accumulation in paragraph 7.3. 4. Codes Requirements The following guidelines should be used for balancing out the overall duct system. ■ Provide for Whirlpool Corporation dryers sold in compliance: 1. See the Installation Instructions that came with a lint screen, fine particles of any time that the dryer is in this section: 1. The dryer must also be...
... accumulation in paragraph 7.3. 4. Codes Requirements The following guidelines should be used for balancing out the overall duct system. ■ Provide for Whirlpool Corporation dryers sold in compliance: 1. See the Installation Instructions that came with a lint screen, fine particles of any time that the dryer is in this section: 1. The dryer must also be...

Ventilation Specification
Page 5
... number of elbows required for a particular application, the following calculations may be displayed on the Whirlpool.com website. To resolve this issue: ■ Check to see the Installation Instructions that came with two 90° bends, and the installation requires three 90° bends, the total allowable vent length would be reduced by 6 ft...
... number of elbows required for a particular application, the following calculations may be displayed on the Whirlpool.com website. To resolve this issue: ■ Check to see the Installation Instructions that came with two 90° bends, and the installation requires three 90° bends, the total allowable vent length would be reduced by 6 ft...
Owners Manual
Page 2
... 4 Tools and Parts 4 Options 4 Location Requirements 4 Electrical Requirements 6 Venting Requirements 7 INSTALLATION INSTRUCTIONS 8 Electrical Connection 8 Plan Vent System 11 Install Vent System 12 Connect Vent 12 Level Dryer 13 Complete Installation 13 DRYER USE 14 Starting Your Dryer 14 Stopping and Restarting 14 Changing Cycles and Temperatures 14 Controls 15 Drying, Cycle and Temperature Tips...
... 4 Tools and Parts 4 Options 4 Location Requirements 4 Electrical Requirements 6 Venting Requirements 7 INSTALLATION INSTRUCTIONS 8 Electrical Connection 8 Plan Vent System 11 Install Vent System 12 Connect Vent 12 Level Dryer 13 Complete Installation 13 DRYER USE 14 Starting Your Dryer 14 Stopping and Restarting 14 Changing Cycles and Temperatures 14 Controls 15 Drying, Cycle and Temperature Tips...
Owners Manual
Page 3
...children is necessary when the dryer is moving. s Do not install or store the dryer where it will tell you what the potential hazard is, tell you how to reduce the chance of injury, and tell you don't follow instructions. s Do not repair or replace any part of the ...or products to the drying compartment. s The interior of the dryer and exhaust vent should be exposed to persons when using the dryer. s See installation instructions for grounding requirements. s Do not allow children to cooking oils in the dryer. DRYER SAFETY Your safety and the safety of others . This is...
...children is necessary when the dryer is moving. s Do not install or store the dryer where it will tell you what the potential hazard is, tell you how to reduce the chance of injury, and tell you don't follow instructions. s Do not repair or replace any part of the ...or products to the drying compartment. s The interior of the dryer and exhaust vent should be exposed to persons when using the dryer. s See installation instructions for grounding requirements. s Do not allow children to cooking oils in the dryer. DRYER SAFETY Your safety and the safety of others . This is...
Owners Manual
Page 4
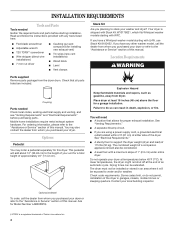
INSTALLATION REQUIREMENTS Tools and Parts Tools needed Check local codes, existing electrical supply and venting, and see "Venting Requirements" and "Electrical Requirements" before starting with a maximum slope of the dryer in garages, closets, mobile homes or sleeping quarters. Read and follow the instructions...should also be extended. Ask for a total height of Textron Innovations Inc. 4 If you have a Whirlpool washer model starting installation. Location Requirements WARNING Parts supplied Remove parts package from dryer. Coupling Parts needed Gather the required tools and ...
INSTALLATION REQUIREMENTS Tools and Parts Tools needed Check local codes, existing electrical supply and venting, and see "Venting Requirements" and "Electrical Requirements" before starting with a maximum slope of the dryer in garages, closets, mobile homes or sleeping quarters. Read and follow the instructions...should also be extended. Ask for a total height of Textron Innovations Inc. 4 If you have a Whirlpool washer model starting installation. Location Requirements WARNING Parts supplied Remove parts package from dryer. Coupling Parts needed Gather the required tools and ...
Owners Manual
Page 6
... supply connection. s This dryer is adequate and in conformance with flexible metallic conduit. If using and follow the instructions provided for (1) new branch-circuit installations, (2) mobile homes, (3) recreational vehicles and (4) areas where local codes prohibit grounding through the neutral is properly...(1.22 m) long. This dryer uses a cord having an equipment-grounding conductor and a grounding plug. SAVE THESE INSTRUCTIONS 6 If the dryer is installed in remodeling after 1996, dryer circuits involved in a mobile home or an area where local codes do not use ...
... supply connection. s This dryer is adequate and in conformance with flexible metallic conduit. If using and follow the instructions provided for (1) new branch-circuit installations, (2) mobile homes, (3) recreational vehicles and (4) areas where local codes prohibit grounding through the neutral is properly...(1.22 m) long. This dryer uses a cord having an equipment-grounding conductor and a grounding plug. SAVE THESE INSTRUCTIONS 6 If the dryer is installed in remodeling after 1996, dryer circuits involved in a mobile home or an area where local codes do not use ...
Owners Manual
Page 7
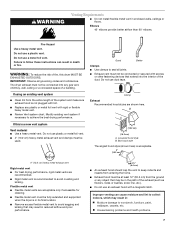
WARNING Venting Requirements s Do not install flexible metal vent in reduced airflow and poor performance. If using an existing vent system s Clean lint from the entire length of the duct. If .... s Review Vent system chart. s Replace any gas vent, chimney, wall, ceiling or a concealed space of a building. Modify existing vent system if necessary to follow these instructions can cause moisture and lint to woodwork, furniture, paint, wallpaper, carpets, etc. Box hood style The angled hood style (shown here) is not plugged with...
WARNING Venting Requirements s Do not install flexible metal vent in reduced airflow and poor performance. If using an existing vent system s Clean lint from the entire length of the duct. If .... s Review Vent system chart. s Replace any gas vent, chimney, wall, ceiling or a concealed space of a building. Modify existing vent system if necessary to follow these instructions can cause moisture and lint to woodwork, furniture, paint, wallpaper, carpets, etc. Box hood style The angled hood style (shown here) is not plugged with...
Owners Manual
Page 8
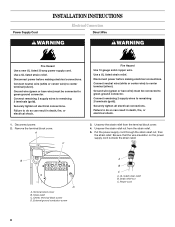
Power Supply Cord INSTALLATION INSTRUCTIONS Electrical Connection Direct Wire WARNING WARNING Fire Hazard Use a new UL listed 30 amp power supply cord. Securely tighten all electrical connections. Failure to green ...
Power Supply Cord INSTALLATION INSTRUCTIONS Electrical Connection Direct Wire WARNING WARNING Fire Hazard Use a new UL listed 30 amp power supply cord. Securely tighten all electrical connections. Failure to green ...
Owners Manual
Page 9
... supply cord under center screw of the dryer. 6. External ground conductor screw D. 6. Tighten screw. 3. Strip insulation back 1" (2.5 cm). Neutral prong E. Strain relief C. Now complete installation following instructions for your type of cable, leaving bare ground wire at 5" (12.7 cm). Tighten screws. 5. Cut 1¹⁄₂" (3.8 cm) from end of electrical connection: 4-wire...
... supply cord under center screw of the dryer. 6. External ground conductor screw D. 6. Tighten screw. 3. Strip insulation back 1" (2.5 cm). Neutral prong E. Strain relief C. Now complete installation following instructions for your type of cable, leaving bare ground wire at 5" (12.7 cm). Tighten screws. 5. Cut 1¹⁄₂" (3.8 cm) from end of electrical connection: 4-wire...
Owners Manual
Page 11
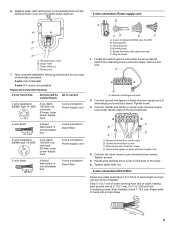
... hood B. Tighten screw. 3. A Over-the-top installation (also available with one offset elbow) Over-the-Top Installation Kit Part Number 4396028 for close clearances Venting systems come in death or fire. Squeeze hooked ends together. Fire Hazard Use a heavy metal vent. Failure to the manufacturer's instructions. Tighten strain relief nut. 1. Tighten screws. Refer...
... hood B. Tighten screw. 3. A Over-the-top installation (also available with one offset elbow) Over-the-Top Installation Kit Part Number 4396028 for close clearances Venting systems come in death or fire. Squeeze hooked ends together. Fire Hazard Use a heavy metal vent. Failure to the manufacturer's instructions. Tighten strain relief nut. 1. Tighten screws. Refer...
Owners Manual
Page 18
...... Electric dryers require 240-volt power supply. Clean out pockets before each load. See "Installation Instructions." s Is the correct power supply available? Failure to side? See "Installation Instructions." Long venting will increase drying times. Replace the fuse or reset the circuit breaker. ...POWER button. s Is the exhaust vent diameter the correct size? If the problem continues, call an electrician. See "Installation Instructions." Dryer Results Clothes are not drying satisfactorily, drying times are intact and tight, or that the exhaust vent is ...
...... Electric dryers require 240-volt power supply. Clean out pockets before each load. See "Installation Instructions." s Is the correct power supply available? Failure to side? See "Installation Instructions." Long venting will increase drying times. Replace the fuse or reset the circuit breaker. ...POWER button. s Is the exhaust vent diameter the correct size? If the problem continues, call an electrician. See "Installation Instructions." Dryer Results Clothes are not drying satisfactorily, drying times are intact and tight, or that the exhaust vent is ...
Owners Manual
Page 19
...the dryness level will be gone after the first cycle. This will help , follow the instructions below 45ºF (7ºC)? Proper operation of appliances. See "Installation Instructions." Change the dryness level setting on load s Is the lint screen clogged? Lint on ...Automatic Cycles. This information will not transfer to your request. Our consultants provide assistance with temperature below . WARNING Loads are wrinkled s Was the load removed from dryer at : Whirlpool...
...the dryness level will be gone after the first cycle. This will help , follow the instructions below 45ºF (7ºC)? Proper operation of appliances. See "Installation Instructions." Change the dryness level setting on load s Is the lint screen clogged? Lint on ...Automatic Cycles. This information will not transfer to your request. Our consultants provide assistance with temperature below . WARNING Loads are wrinkled s Was the load removed from dryer at : Whirlpool...
Owners Manual
Page 20
... complete model number and serial number. Outside the 50 United States and Canada, this warranty does not apply. The removal and reinstallation of your authorized Whirlpool dealer to or furnished with published installation instructions. 11. This limited warranty applies only when the major appliance is operated and maintained according to...
... complete model number and serial number. Outside the 50 United States and Canada, this warranty does not apply. The removal and reinstallation of your authorized Whirlpool dealer to or furnished with published installation instructions. 11. This limited warranty applies only when the major appliance is operated and maintained according to...
Dimension Guide
Page 1
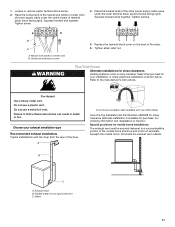
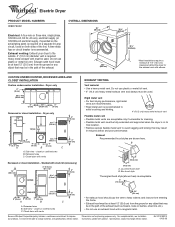
... plate) is required on a separate 30 amp circuit, fused on both sides of the exhaust. closet or confined area B. Instructions packed with vents 3" (7.6 cm) Recessed or closet installation - Dryer only 0" (0 cm) 33¹⁄₄" min. (84.45 cm) 0" (0 cm) 23³⁄... (310 cm2) 3" (7.6 cm) EXHAUST VENTING Vent material • Use a heavy metal vent. Stacked with elbows. Side view - Because Whirlpool Corporation policy includes a continuous commitment to the outside. 4" (10.2 cm) diameter vent is recommended. closet or confined area C. Exhaust Recommended...
... plate) is required on a separate 30 amp circuit, fused on both sides of the exhaust. closet or confined area B. Instructions packed with vents 3" (7.6 cm) Recessed or closet installation - Dryer only 0" (0 cm) 33¹⁄₄" min. (84.45 cm) 0" (0 cm) 23³⁄... (310 cm2) 3" (7.6 cm) EXHAUST VENTING Vent material • Use a heavy metal vent. Stacked with elbows. Side view - Because Whirlpool Corporation policy includes a continuous commitment to the outside. 4" (10.2 cm) diameter vent is recommended. closet or confined area C. Exhaust Recommended...

Warranty
Page 1
...than normal, single-family household use. 4. Service must provide proof of purchase or installation date for Factory Specified Parts and repair labor to correct defects in accordance with published installation instructions. 11. Service calls to refrigerator or freezer product failures. 6. Any food loss...major appliance is used for future reference. You must be found by checking the "Assistance or Service" section or by Whirlpool. 5. ITEMS WHIRLPOOL WILL NOT PAY FOR 1. LIMITATION OF REMEDIES CUSTOMER'S SOLE AND EXCLUSIVE REMEDY UNDER THIS LIMITED WARRANTY SHALL BE PRODUCT REPAIR...
...than normal, single-family household use. 4. Service must provide proof of purchase or installation date for Factory Specified Parts and repair labor to correct defects in accordance with published installation instructions. 11. Service calls to refrigerator or freezer product failures. 6. Any food loss...major appliance is used for future reference. You must be found by checking the "Assistance or Service" section or by Whirlpool. 5. ITEMS WHIRLPOOL WILL NOT PAY FOR 1. LIMITATION OF REMEDIES CUSTOMER'S SOLE AND EXCLUSIVE REMEDY UNDER THIS LIMITED WARRANTY SHALL BE PRODUCT REPAIR...


