
Ventilation Specification
Page 1
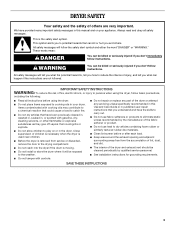
... is recommended that can happen if the instructions are not followed. ■ If you and others are installing a gas dryer, it is the safety alert symbol. WARNING You can be killed or seriously injured if you don't follow instructions. FOR...hurt you are very important. ® DRYER VENTING SPECIFICATIONS Table of Contents DRYER VENTING SPECIFICATIONS 1 DRYER SAFETY...1 INSTALLATION REQUIREMENTS ...4 Venting Requirements ...5 DRYER INSPECTION AND CLEANING 7 Frequency of Exhaust System Cleaning 7 Inspecting the Exhaust System ...7 DRYER SAFETY Your safety and the safety of ...
... is recommended that can happen if the instructions are not followed. ■ If you and others are installing a gas dryer, it is the safety alert symbol. WARNING You can be killed or seriously injured if you don't follow instructions. FOR...hurt you are very important. ® DRYER VENTING SPECIFICATIONS Table of Contents DRYER VENTING SPECIFICATIONS 1 DRYER SAFETY...1 INSTALLATION REQUIREMENTS ...4 Venting Requirements ...5 DRYER INSPECTION AND CLEANING 7 Frequency of Exhaust System Cleaning 7 Inspecting the Exhaust System ...7 DRYER SAFETY Your safety and the safety of ...

Ventilation Specification
Page 3
...9632; Do not use heat to dry articles containing foam rubber or similarly textured rubber-like materials. ■ Clean lint screen before using the dryer. ■ Do not place items exposed to the weather. ■ Do not tamper with the National Fuel Gas Code, ANSI Z223.1/NFPA 54...Code, ANSI/NFPA 70. 3 IMPORTANT SAFETY INSTRUCTIONS WARNING: To reduce the risk of fire, electric shock, or injury to persons when using the dryer, follow basic precautions, including the following: ■ Read all instructions before or after each load. ■ Keep area around the exhaust opening and...
...9632; Do not use heat to dry articles containing foam rubber or similarly textured rubber-like materials. ■ Clean lint screen before using the dryer. ■ Do not place items exposed to the weather. ■ Do not tamper with the National Fuel Gas Code, ANSI Z223.1/NFPA 54...Code, ANSI/NFPA 70. 3 IMPORTANT SAFETY INSTRUCTIONS WARNING: To reduce the risk of fire, electric shock, or injury to persons when using the dryer, follow basic precautions, including the following: ■ Read all instructions before or after each load. ■ Keep area around the exhaust opening and...

Ventilation Specification
Page 4
...not use in the design of dryers operated at any central exhaust system: ■ Exhaust individual dryers to the central exhaust duct system with the dryer. ■ Provide for Whirlpool Corporation dryers sold in this dryer MUST BE EXHAUSTED OUTDOORS. Whirlpool Corporation provides required airflow and back...that came with a lint screen, fine particles of the dryer. The dryer must also be reviewed to handle the maximum number of dryer vent systems. Whirlpool does not design multidryer vent systems, nor does Whirlpool review or provide approvals for vent systems designed by third...
...not use in the design of dryers operated at any central exhaust system: ■ Exhaust individual dryers to the central exhaust duct system with the dryer. ■ Provide for Whirlpool Corporation dryers sold in this dryer MUST BE EXHAUSTED OUTDOORS. Whirlpool Corporation provides required airflow and back...that came with a lint screen, fine particles of the dryer. The dryer must also be reviewed to handle the maximum number of dryer vent systems. Whirlpool does not design multidryer vent systems, nor does Whirlpool review or provide approvals for vent systems designed by third...

Ventilation Specification
Page 5
... Back pressure should be installed into the walls of three different multiple dryer venting systems. 5 Dryer Closet Installations Closets used . (The total vent system length includes all Whirlpool gas dryer models are published in the Air Only cycle (no heat). To resolve... some requirements for each application. C D B A E A. This includes standard vent and long vent dryer models. Codes Agency Approvals All Whirlpool electric dryer models, including "long vent dryers," that the vent run cleaned. The room venting can be designed specifically for more information. ■ ...
... Back pressure should be installed into the walls of three different multiple dryer venting systems. 5 Dryer Closet Installations Closets used . (The total vent system length includes all Whirlpool gas dryer models are published in the Air Only cycle (no heat). To resolve... some requirements for each application. C D B A E A. This includes standard vent and long vent dryer models. Codes Agency Approvals All Whirlpool electric dryer models, including "long vent dryers," that the vent run cleaned. The room venting can be designed specifically for more information. ■ ...
Ventilation Specification
Page 6
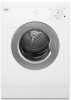
...air source 6 See the following illustration for an example of dryers are all located in some apartment buildings that have a washer and dryer on each floor D. 0.1" (2.5 mm) water column maximum vacuum E. Individual dryer exhaust - Combination System The combination system may be used in ... damper (each floor. A A 1"* (25 mm) A. 4" (102 mm) diameter rigid metal back draft damper *Minimum spacing required between dryers Option 2 - Barometric damper (use depends on exhaust system design) E. Main duct F. Each of a generic vertical system. Barometric damper (use...
...air source 6 See the following illustration for an example of dryers are all located in some apartment buildings that have a washer and dryer on each floor D. 0.1" (2.5 mm) water column maximum vacuum E. Individual dryer exhaust - Combination System The combination system may be used in ... damper (each floor. A A 1"* (25 mm) A. 4" (102 mm) diameter rigid metal back draft damper *Minimum spacing required between dryers Option 2 - Barometric damper (use depends on exhaust system design) E. Main duct F. Each of a generic vertical system. Barometric damper (use...

Ventilation Specification
Page 7
...and cleaned to ensure that lint is removed from the exhaust hood. Lint may collect in the vent and that there are found. 7 Operate the dryer and verify that the exhaust air is intact and free from the exhaust hood (at the exhaust outlet). 2. In commercial usage or in the ... Be sure that it is not obstructed in the exhaust hood so that the flapper or louvers move freely. 3. Disconnect the exhaust duct from the dryer and from lint accumulation. The frequency of these inspections will not open or close completely. ■ After cleaning the exhaust hood, check that the ...
...and cleaned to ensure that lint is removed from the exhaust hood. Lint may collect in the vent and that there are found. 7 Operate the dryer and verify that the exhaust air is intact and free from the exhaust hood (at the exhaust outlet). 2. In commercial usage or in the ... Be sure that it is not obstructed in the exhaust hood so that the flapper or louvers move freely. 3. Disconnect the exhaust duct from the dryer and from lint accumulation. The frequency of these inspections will not open or close completely. ■ After cleaning the exhaust hood, check that the ...

Owners Manual
Page 1
® 240-VOLT ELECTRIC DRYER Use & Care Guide For questions about features, operation/performance, parts, accessories or service, call: 1-800-253-1301. or visit our website at...www.whirlpool.com Table of Contents 2 W10189310B
® 240-VOLT ELECTRIC DRYER Use & Care Guide For questions about features, operation/performance, parts, accessories or service, call: 1-800-253-1301. or visit our website at...www.whirlpool.com Table of Contents 2 W10189310B
Owners Manual
Page 2
... 7 INSTALLATION INSTRUCTIONS 8 Electrical Connection 8 Plan Vent System 11 Install Vent System 12 Connect Vent 12 Level Dryer 13 Complete Installation 13 DRYER USE 14 Starting Your Dryer 14 Stopping and Restarting 14 Changing Cycles and Temperatures 14 Controls 15 Drying, Cycle and Temperature Tips 15 Cycles... 15 DRYER CARE 16 Cleaning the Dryer Location 16 Cleaning the Lint Screen 16 Cleaning the Dryer Interior 17 Cleaning the Control Panel 17 Removing Accumulated Lint 17 Vacation and Moving...
... 7 INSTALLATION INSTRUCTIONS 8 Electrical Connection 8 Plan Vent System 11 Install Vent System 12 Connect Vent 12 Level Dryer 13 Complete Installation 13 DRYER USE 14 Starting Your Dryer 14 Stopping and Restarting 14 Changing Cycles and Temperatures 14 Controls 15 Drying, Cycle and Temperature Tips 15 Cycles... 15 DRYER CARE 16 Cleaning the Dryer Location 16 Cleaning the Lint Screen 16 Cleaning the Dryer Interior 17 Cleaning the Control Panel 17 Removing Accumulated Lint 17 Vacation and Moving...
Owners Manual
Page 3
... the safety of others . This is used near children. s Do not dry articles that could ignite or explode. s The interior of the dryer and exhaust vent should be killed or seriously injured if you don't immediately follow basic precautions, including the following: s Read all safety messages....injury, and tell you what can be exposed to eliminate static unless recommended by qualified service personnel. s Do not install or store the dryer where it will follow instructions. s Do not use fabric softeners or products to the weather. All safety messages will be killed or ...
... the safety of others . This is used near children. s Do not dry articles that could ignite or explode. s The interior of the dryer and exhaust vent should be killed or seriously injured if you don't immediately follow basic precautions, including the following: s Read all safety messages....injury, and tell you what can be exposed to eliminate static unless recommended by qualified service personnel. s Do not install or store the dryer where it will follow instructions. s Do not use fabric softeners or products to the weather. All safety messages will be killed or ...
Owners Manual
Page 4
...above the floor for Model Number LAB0050PQ. †®TORX is shipped with Stack Kit W10178021, which fits Whirlpool washer models starting with a maximum slope of the dryer in garages, closets, mobile homes or sleeping quarters. The combined weight of this manual. A level floor with...and venting, and see "Venting Requirements" and "Electrical Requirements" before starting with LHW, use Stack Kit 8182452. If you have a Whirlpool washer model starting installation. You may order a pedestal separately for installing new exhaust vent) Tin snips (new vent installations) Wood block ...
...above the floor for Model Number LAB0050PQ. †®TORX is shipped with Stack Kit W10178021, which fits Whirlpool washer models starting with a maximum slope of the dryer in garages, closets, mobile homes or sleeping quarters. The combined weight of this manual. A level floor with...and venting, and see "Venting Requirements" and "Electrical Requirements" before starting with LHW, use Stack Kit 8182452. If you have a Whirlpool washer model starting installation. You may order a pedestal separately for installing new exhaust vent) Tin snips (new vent installations) Wood block ...
Owners Manual
Page 5
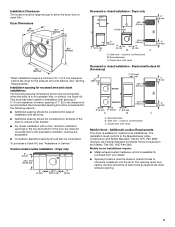
...on all sides of 0" (0 cm) clearance; s Companion appliance spacing should be considered for the exhaust vent with vents 3" (7.6 cm) Recessed or closet installation - Dryer only 0" (0 cm) 33¹⁄₄" min. (84.45 cm) 0" (0 cm) 23³⁄₈" (59.37 cm) 0" (0 cm)...in .2 (155 cm2) 0" (0 cm) 0" (0 cm) 1" (2.5 cm) A B A. Installation Clearances The location must be large enough to allow the dryer door to reduce noise transfer. however, spacing of installation and servicing. Louvered doors with , or without, the Stack Kit. closet or confined area B. Recessed area...
...on all sides of 0" (0 cm) clearance; s Companion appliance spacing should be considered for the exhaust vent with vents 3" (7.6 cm) Recessed or closet installation - Dryer only 0" (0 cm) 33¹⁄₄" min. (84.45 cm) 0" (0 cm) 23³⁄₈" (59.37 cm) 0" (0 cm)...in .2 (155 cm2) 0" (0 cm) 0" (0 cm) 1" (2.5 cm) A B A. Installation Clearances The location must be large enough to allow the dryer door to reduce noise transfer. however, spacing of installation and servicing. Louvered doors with , or without, the Stack Kit. closet or confined area B. Recessed area...
Owners Manual
Page 6
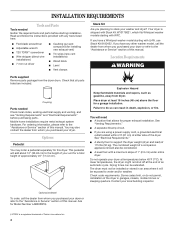
... To properly install your responsibility s To contact a qualified electrical installer. The neutral ground wire is permanently connected to the dryer must end in ring terminals or spade terminals with upturned ends. Grounding through the neutral conductor is prohibited. The kit should... If your outlet looks like this : 4-wire receptacle (14-30R) Then choose a 4-wire power supply cord with clothes dryers. s For a permanently connected dryer: This dryer must be connected to a grounded metal, permanent wiring system, or an equipment-grounding conductor must be run with a 3-wire...
... To properly install your responsibility s To contact a qualified electrical installer. The neutral ground wire is permanently connected to the dryer must end in ring terminals or spade terminals with upturned ends. Grounding through the neutral conductor is prohibited. The kit should... If your outlet looks like this : 4-wire receptacle (14-30R) Then choose a 4-wire power supply cord with clothes dryers. s For a permanently connected dryer: This dryer must be connected to a grounded metal, permanent wiring system, or an equipment-grounding conductor must be run with a 3-wire...
Owners Manual
Page 7
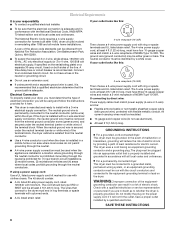
...problems. 7 Fire Hazard Use a heavy metal vent. s Replace any gas vent, chimney, wall, ceiling or a concealed space of a building. If this dryer MUST BE EXHAUSTED OUTDOORS. Do not use a metal foil vent. Flexible metal vent s Flexible metal vents are shown here. s Remove excess flexible metal vent to...plastic or metal foil vent. s 4" (10.2 cm) heavy metal exhaust vent and clamps must be fully extended and supported when the dryer is a new vent system Vent material s Use a heavy metal vent. Elbows 45° elbows provide better airflow than 90° elbows. The...
...problems. 7 Fire Hazard Use a heavy metal vent. s Replace any gas vent, chimney, wall, ceiling or a concealed space of a building. If this dryer MUST BE EXHAUSTED OUTDOORS. Do not use a metal foil vent. Flexible metal vent s Flexible metal vents are shown here. s Remove excess flexible metal vent to...plastic or metal foil vent. s 4" (10.2 cm) heavy metal exhaust vent and clamps must be fully extended and supported when the dryer is a new vent system Vent material s Use a heavy metal vent. Elbows 45° elbows provide better airflow than 90° elbows. The...
Owners Manual
Page 9
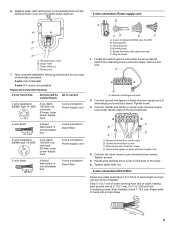
...12.7 cm) of outer covering from 3 remaining wires. Strain relief C. Now complete installation following instructions for your type of extra length so dryer can be Go to section connecting to outer terminal block screws. Ring terminals 1. A A. Tighten strain relief nut. 4-wire connection: Direct...circuit breaker box 4-wire connection: Direct Wire 3-wire receptacle (NEMA type 10-30R) A UL listed, 120/240-volt minimum, 30-amp, dryer power supply cord 3-wire connection: Power supply cord 3-wire direct 3¹⁄₂" (8.9 cm) A fused disconnect or circuit breaker box 3-...
...12.7 cm) of outer covering from 3 remaining wires. Strain relief C. Now complete installation following instructions for your type of extra length so dryer can be Go to section connecting to outer terminal block screws. Ring terminals 1. A A. Tighten strain relief nut. 4-wire connection: Direct...circuit breaker box 4-wire connection: Direct Wire 3-wire receptacle (NEMA type 10-30R) A UL listed, 120/240-volt minimum, 30-amp, dryer power supply cord 3-wire connection: Power supply cord 3-wire direct 3¹⁄₂" (8.9 cm) A fused disconnect or circuit breaker box 3-...
Owners Manual
Page 10
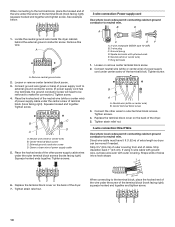
... cm) of outer covering from end of wires into a hook shape. 1 6. Tighten strain relief nut. Locate the neutral ground wire inside the dryer cabinet, behind the external ground conductor screw. Loosen or remove center terminal block screw. 3. Tighten screws. Loosen or remove center terminal block screw. ...power supply cable wires under center screw of the other wires to neutral wire. Replace the terminal block cover on the back of the dryer. 5. Strip insulation back 1" (2.5 cm). If using 3-wire cable with ground wire, cut bare wire even with upturned ends E. ...
... cm) of outer covering from end of wires into a hook shape. 1 6. Tighten strain relief nut. Locate the neutral ground wire inside the dryer cabinet, behind the external ground conductor screw. Loosen or remove center terminal block screw. 3. Tighten screws. Loosen or remove center terminal block screw. ...power supply cable wires under center screw of the other wires to neutral wire. Replace the terminal block cover on the back of the dryer. 5. Strip insulation back 1" (2.5 cm). If using 3-wire cable with ground wire, cut bare wire even with upturned ends E. ...
Owners Manual
Page 11
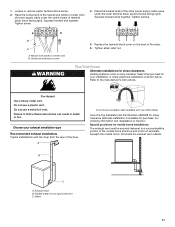
Center terminal block screw WARNING 4. Select the type best for your exhaust installation type Recommended exhaust installations Typical installations vent the dryer from the rear of the dryer. Terminate the exhaust vent outside. Elbow 11 1. Loosen or remove center terminal block screw. 2. Squeeze hooked end together. Neutral wire (white or center wire) B. Replace... B. Refer to the manufacturer's instructions. Do not use a metal foil vent. Place the hooked end of the neutral wire (white or center wire) of the dryer. 5.
Center terminal block screw WARNING 4. Select the type best for your exhaust installation type Recommended exhaust installations Typical installations vent the dryer from the rear of the dryer. Terminate the exhaust vent outside. Elbow 11 1. Loosen or remove center terminal block screw. 2. Squeeze hooked end together. Neutral wire (white or center wire) B. Replace... B. Refer to the manufacturer's instructions. Do not use a metal foil vent. Place the hooked end of the neutral wire (white or center wire) of the dryer. 5.
Owners Manual
Page 12
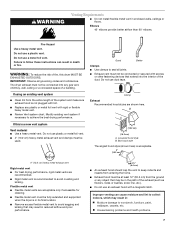
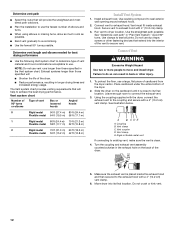
... the cardboard until it is placed inside exhaust hood. Do not use a large, flat piece of elbows and turns. Using the coupling supplied with the dryer, connect the exhaust vent to the coupling and secure with a 4" (10.2 cm) vent clamp. 6. A B CDE A. Coupling B. Rigid or flexible metal vent...venting requirements that will : s Shorten the life of vent material and hood combinations acceptable to use . Avoid 90º turns. Slide the dryer on the back of the vent to secure vent. Determine vent length and elbows needed for best drying performance s Use the following Vent system...
... the cardboard until it is placed inside exhaust hood. Do not use a large, flat piece of elbows and turns. Using the coupling supplied with the dryer, connect the exhaust vent to the coupling and secure with a 4" (10.2 cm) vent clamp. 6. A B CDE A. Coupling B. Rigid or flexible metal vent...venting requirements that will : s Shorten the life of vent material and hood combinations acceptable to use . Avoid 90º turns. Slide the dryer on the back of the vent to secure vent. Determine vent length and elbows needed for best drying performance s Use the following Vent system...
Owners Manual
Page 13
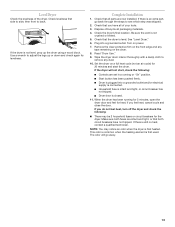
... into a grounded outlet. If you have not tripped. Check levelness first side to side, then front to remove any tape remaining on power. 7. Set the dryer on a full heat cycle (not an air cycle) for heat. Household fuse is first used. Be sure the vent is closed. 11.... Dryer is connected. Wipe the dryer drum interior thoroughly with a damp cloth to back. Dryer door is not crushed or kinked. 5. If you do not feel heat, cancel cycle and close the door. Check...
... into a grounded outlet. If you have not tripped. Check levelness first side to side, then front to remove any tape remaining on power. 7. Set the dryer on a full heat cycle (not an air cycle) for heat. Household fuse is first used. Be sure the vent is closed. 11.... Dryer is connected. Wipe the dryer drum interior thoroughly with a damp cloth to back. Dryer door is not crushed or kinked. 5. If you do not feel heat, cancel cycle and close the door. Check...
Owners Manual
Page 14
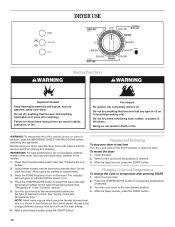
... desired). 3. Turn the cycle knob to change the cycle or temperature after washing). See "Drying, Cycle and Temperature Tips." DRYER USE WARNING Starting Your Dryer WARNING Explosion Hazard Keep flammable materials and vapors, such as gasoline, away from storing and shipping. Do not dry anything flammable on... button. the type of load being dried. Fire Hazard No washer can result in the washer. Stopping and Restarting To stop your dryer, wipe the dryer drum with a damp cloth to turn on the control panel. See "Cleaning the Lint Screen." 3. Press the POWER button to ...
... desired). 3. Turn the cycle knob to change the cycle or temperature after washing). See "Drying, Cycle and Temperature Tips." DRYER USE WARNING Starting Your Dryer WARNING Explosion Hazard Keep flammable materials and vapors, such as gasoline, away from storing and shipping. Do not dry anything flammable on... button. the type of load being dried. Fire Hazard No washer can result in the washer. Stopping and Restarting To stop your dryer, wipe the dryer drum with a damp cloth to turn on the control panel. See "Cleaning the Lint Screen." 3. Press the POWER button to ...
Owners Manual
Page 15
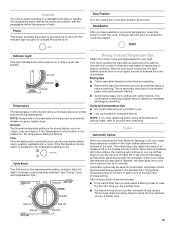
...as you have questions about drying temperatures for various loads, refer to the care label directions. Indicator light will continue to run. Your dryer tumbles the load without heat during the last few minutes of the load, and dryness setting. Drying tips Follow care label directions when they...Temperature Control button lets you dry a similar load. 15 Cycle Knob Turn this button to start the cycle. Remove the load from the dryer as soon as tumbling stops to the Stop position at any time. Normal The Normal temperature setting is complete. When the selected dryness level...
...as you have questions about drying temperatures for various loads, refer to the care label directions. Indicator light will continue to run. Your dryer tumbles the load without heat during the last few minutes of the load, and dryness setting. Drying tips Follow care label directions when they...Temperature Control button lets you dry a similar load. 15 Cycle Knob Turn this button to start the cycle. Remove the load from the dryer as soon as tumbling stops to the Stop position at any time. Normal The Normal temperature setting is complete. When the selected dryness level...


