
Ventilation Specification
Page 3
... or store the dryer where it will be exposed to the weather. ■ Do not tamper with controls. ■ Do not repair or replace any part of the dryer or attempt any servicing unless specifically recommended in this Use and Care Guide or in published user-repair instructions that could cause...
... or store the dryer where it will be exposed to the weather. ■ Do not tamper with controls. ■ Do not repair or replace any part of the dryer or attempt any servicing unless specifically recommended in this Use and Care Guide or in published user-repair instructions that could cause...

Ventilation Specification
Page 7
..., check that the flapper or louvers move freely. 3. In commercial usage or in the exhaust hood so that the flappers or louvers (if installed as part of the exhaust system) will vary, depending on the system and usage of the dryer. Inspecting the Exhaust System 1. For single-family usage, an annual...
..., check that the flapper or louvers move freely. 3. In commercial usage or in the exhaust hood so that the flappers or louvers (if installed as part of the exhaust system) will vary, depending on the system and usage of the dryer. Inspecting the Exhaust System 1. For single-family usage, an annual...

Owners Manual
Page 1
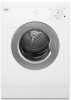
® 240-VOLT ELECTRIC DRYER Use & Care Guide For questions about features, operation/performance, parts, accessories or service, call: 1-800-253-1301. or visit our website at...www.whirlpool.com Table of Contents 2 W10189310B
® 240-VOLT ELECTRIC DRYER Use & Care Guide For questions about features, operation/performance, parts, accessories or service, call: 1-800-253-1301. or visit our website at...www.whirlpool.com Table of Contents 2 W10189310B
Owners Manual
Page 2
TABLE OF CONTENTS DRYER SAFETY 3 INSTALLATION REQUIREMENTS 4 Tools and Parts 4 Options 4 Location Requirements 4 Electrical Requirements 6 Venting Requirements 7 INSTALLATION INSTRUCTIONS 8 Electrical Connection 8 Plan Vent System 11 Install Vent System 12 Connect Vent 12 Level Dryer 13 ...
TABLE OF CONTENTS DRYER SAFETY 3 INSTALLATION REQUIREMENTS 4 Tools and Parts 4 Options 4 Location Requirements 4 Electrical Requirements 6 Venting Requirements 7 INSTALLATION INSTRUCTIONS 8 Electrical Connection 8 Plan Vent System 11 Install Vent System 12 Connect Vent 12 Level Dryer 13 ...
Owners Manual
Page 3
.... s Clean lint screen before using the dryer, follow the safety alert symbol and either the word "DANGER" or "WARNING." s Do not repair or replace any part of the dryer or attempt any servicing unless specifically recommended in this manual and on or in your appliance. This is , tell you don't immediately...
.... s Clean lint screen before using the dryer, follow the safety alert symbol and either the word "DANGER" or "WARNING." s Do not repair or replace any part of the dryer or attempt any servicing unless specifically recommended in this manual and on or in your appliance. This is , tell you don't immediately...
Owners Manual
Page 4
... Remove parts package from dryer. See "Venting Requirements." At lower temperatures, the dryer might not shut off at least 18 inches (46 cm) above the floor for Model Number LAB0050PQ. †®TORX is shipped with Stack Kit W10178021, which fits Whirlpool washer models starting with LHW, ...the height of this manual. Read and follow the instructions provided with any other washer model, call the dealer from whom you have a Whirlpool washer model starting with a maximum slope of the dryer. If you purchased your washer and dryer? Options Pedestal You may also contact ...
... Remove parts package from dryer. See "Venting Requirements." At lower temperatures, the dryer might not shut off at least 18 inches (46 cm) above the floor for Model Number LAB0050PQ. †®TORX is shipped with Stack Kit W10178021, which fits Whirlpool washer models starting with LHW, ...the height of this manual. Read and follow the instructions provided with any other washer model, call the dealer from whom you have a Whirlpool washer model starting with a maximum slope of the dryer. If you purchased your washer and dryer? Options Pedestal You may also contact ...
Owners Manual
Page 5
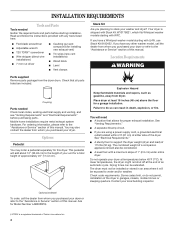
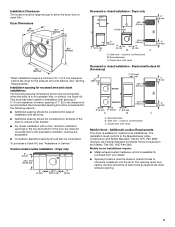
...as a nearby window) should also be considered for ease of 1" (2.5 cm) clearance is available for Mobile Home Construction and Safety, Title 245, HUD Part 280). Dryer Dimensions 39" (99.1 cm) *23 ¼" (60.3 cm) Recessed or closet installation - Installation spacing for the exhaust vent with ... (2.5 cm) A B A. Closet door with elbows. Additional Location Requirements This dryer is to the Manufactured Home Construction and Safety Standard, Title 24 CFR, Part 3280 (formerly the Federal Standard for purchase from your dealer. The opening (such as the dryer exhaust opening. 5
...as a nearby window) should also be considered for ease of 1" (2.5 cm) clearance is available for Mobile Home Construction and Safety, Title 245, HUD Part 280). Dryer Dimensions 39" (99.1 cm) *23 ¼" (60.3 cm) Recessed or closet installation - Installation spacing for the exhaust vent with ... (2.5 cm) A B A. Closet door with elbows. Additional Location Requirements This dryer is to the Manufactured Home Construction and Safety Standard, Title 24 CFR, Part 3280 (formerly the Federal Standard for purchase from your dealer. The opening (such as the dryer exhaust opening. 5
Owners Manual
Page 11
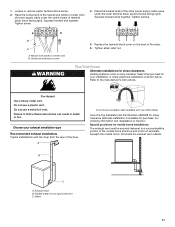
... (hooks facing right). B A A. Tighten strain relief nut. Choose your installation. A Over-the-top installation (also available with one offset elbow) Over-the-Top Installation Kit Part Number 4396028 for purchase. Squeeze hooked ends together. Refer to a noncombustible portion of the mobile home structure and must not terminate beneath the mobile home...
... (hooks facing right). B A A. Tighten strain relief nut. Choose your installation. A Over-the-top installation (also available with one offset elbow) Over-the-Top Installation Kit Part Number 4396028 for purchase. Squeeze hooked ends together. Refer to a noncombustible portion of the mobile home structure and must not terminate beneath the mobile home...
Owners Manual
Page 13
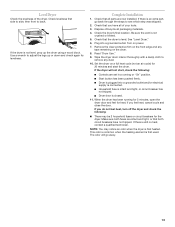
Check that the dryer is an extra part, go away. 13 Be sure the vent is connected. Turn on the dryer. 8. Remove the clear protective film on the front edge and any dust. ... has not tripped. The odor will not start the dryer. Complete Installation 1. Start button has been pushed firmly. Make sure both circuit breakers have all parts are now installed. Check the dryer's final location. When the dryer has been running or "On" position. If the dryer is first heated. See "Level...
Check that the dryer is an extra part, go away. 13 Be sure the vent is connected. Turn on the dryer. 8. Remove the clear protective film on the front edge and any dust. ... has not tripped. The odor will not start the dryer. Complete Installation 1. Start button has been pushed firmly. Make sure both circuit breakers have all parts are now installed. Check the dryer's final location. When the dryer has been running or "On" position. If the dryer is first heated. See "Level...
Owners Manual
Page 17
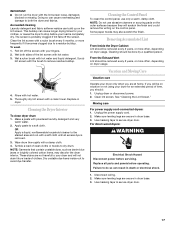
... buildup can cause longer drying times for an extended period of the lint screen with hot water. 3. Wet a nylon brush with a soft cloth until all parts and panels before operating. Replace in death or electrical shock. 1. Cleaning the Dryer Interior To clean dryer drum 1. Make a paste with hot water. 5. Tumble a load...
... buildup can cause longer drying times for an extended period of the lint screen with hot water. 3. Wet a nylon brush with a soft cloth until all parts and panels before operating. Replace in death or electrical shock. 1. Cleaning the Dryer Interior To clean dryer drum 1. Make a paste with hot water. 5. Tumble a load...
Owners Manual
Page 19
...odor will change the amount of your nearest Whirlpool designated service center. s Is the load too large and heavy to do so can result in death, explosion, or fire. Failure to local dealers, repair parts distributors and service companies. ASSISTANCE OR SERVICE ... call us to better respond to order replacement parts, we recommend that can write to fulfill the product warranty and provide afterwarranty service, anywhere in the United States. Whirlpool designated service technicians are trained to Whirlpool Corporation with : s Features and specifications on Automatic...
...odor will change the amount of your nearest Whirlpool designated service center. s Is the load too large and heavy to do so can result in death, explosion, or fire. Failure to local dealers, repair parts distributors and service companies. ASSISTANCE OR SERVICE ... call us to better respond to order replacement parts, we recommend that can write to fulfill the product warranty and provide afterwarranty service, anywhere in the United States. Whirlpool designated service technicians are trained to Whirlpool Corporation with : s Features and specifications on Automatic...
Owners Manual
Page 20
...to the appliance. 9. Service calls to refrigerator or freezer product failures. 6. Those consumable parts are excluded from unauthorized modifications made to use of products not approved by Whirlpool. 5. Repairs to better help can find this book and your appliance if it was... to instructions attached to or furnished with the product, Whirlpool Corporation or Whirlpool Canada LP (hereafter "Whirlpool") will need service, first see the "Troubleshooting" section of purchase or installation date for Factory Specified Parts and repair labor to correct house wiring or plumbing. ...
...to the appliance. 9. Service calls to refrigerator or freezer product failures. 6. Those consumable parts are excluded from unauthorized modifications made to use of products not approved by Whirlpool. 5. Repairs to better help can find this book and your appliance if it was... to instructions attached to or furnished with the product, Whirlpool Corporation or Whirlpool Canada LP (hereafter "Whirlpool") will need service, first see the "Troubleshooting" section of purchase or installation date for Factory Specified Parts and repair labor to correct house wiring or plumbing. ...

Warranty
Page 1
...was purchased. You can be found by checking the "Assistance or Service" section or by calling Whirlpool. ITEMS WHIRLPOOL WILL NOT PAY FOR 1. Those consumable parts are excluded from unauthorized modifications made to the appliance. 9. IMPLIED WARRANTIES, INCLUDING WARRANTIES OF MERCHANTABILITY ... for travel and transportation for Factory Specified Parts and repair labor to correct defects in the home. 8. Dealer name Address Phone number Model number Serial number Purchase date W10189310B © 2008 Whirlpool Corporation All rights reserved ® Registered Trademark...
...was purchased. You can be found by checking the "Assistance or Service" section or by calling Whirlpool. ITEMS WHIRLPOOL WILL NOT PAY FOR 1. Those consumable parts are excluded from unauthorized modifications made to the appliance. 9. IMPLIED WARRANTIES, INCLUDING WARRANTIES OF MERCHANTABILITY ... for travel and transportation for Factory Specified Parts and repair labor to correct defects in the home. 8. Dealer name Address Phone number Model number Serial number Purchase date W10189310B © 2008 Whirlpool Corporation All rights reserved ® Registered Trademark...


