

Ventilation Specification
Page 3
... removed from service or discarded, remove the door to the drying compartment. ■ Do not reach into the dryer if the drum is moving. ■ Do not install or store the dryer where it will be exposed to the weather. ■ Do not tamper with controls. ■ Do not repair or replace... any part of the dryer or attempt any servicing unless specifically recommended in this Use and Care Guide or in published user-repair instructions that you understand and have been ...
... removed from service or discarded, remove the door to the drying compartment. ■ Do not reach into the dryer if the drum is moving. ■ Do not install or store the dryer where it will be exposed to the weather. ■ Do not tamper with controls. ■ Do not repair or replace... any part of the dryer or attempt any servicing unless specifically recommended in this Use and Care Guide or in published user-repair instructions that you understand and have been ...

Ventilation Specification
Page 7
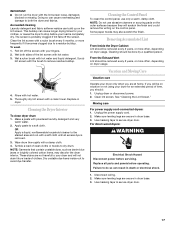
...intact and free from the exhaust hood (at the exhaust outlet). 2. Complaints of long drying times or a hot dryer top indicate the need for inspection of the dryer. DRYER INSPECTION AND CLEANING Frequency of Exhaust System Cleaning Every exhaust system must be inspected periodically and cleaned to ensure that it...Lint may collect in the vent and that the flappers or louvers (if installed as part of the exhaust system) will vary, depending on the system and usage of the exhaust system. Operate the dryer and verify that the exhaust air is not obstructed in the exhaust hood so that ...
...intact and free from the exhaust hood (at the exhaust outlet). 2. Complaints of long drying times or a hot dryer top indicate the need for inspection of the dryer. DRYER INSPECTION AND CLEANING Frequency of Exhaust System Cleaning Every exhaust system must be inspected periodically and cleaned to ensure that it...Lint may collect in the vent and that the flappers or louvers (if installed as part of the exhaust system) will vary, depending on the system and usage of the exhaust system. Operate the dryer and verify that the exhaust air is not obstructed in the exhaust hood so that ...

Owners Manual
Page 1
® 240-VOLT ELECTRIC DRYER Use & Care Guide For questions about features, operation/performance, parts, accessories or service, call: 1-800-253-1301. or visit our website at...www.whirlpool.com Table of Contents 2 W10189310B
® 240-VOLT ELECTRIC DRYER Use & Care Guide For questions about features, operation/performance, parts, accessories or service, call: 1-800-253-1301. or visit our website at...www.whirlpool.com Table of Contents 2 W10189310B
Owners Manual
Page 2
... DRYER SAFETY 3 INSTALLATION REQUIREMENTS 4 Tools and Parts 4 Options 4 Location Requirements 4 Electrical Requirements 6 Venting Requirements 7 INSTALLATION INSTRUCTIONS 8 Electrical Connection 8 Plan Vent System 11 Install Vent System 12 Connect Vent 12 Level Dryer 13 Complete Installation 13 DRYER USE 14 Starting Your Dryer 14... 14 Controls 15 Drying, Cycle and Temperature Tips 15 Cycles 15 DRYER CARE 16 Cleaning the Dryer Location 16 Cleaning the Lint Screen 16 Cleaning the Dryer Interior 17 Cleaning the Control Panel 17 Removing Accumulated Lint 17 Vacation...
... DRYER SAFETY 3 INSTALLATION REQUIREMENTS 4 Tools and Parts 4 Options 4 Location Requirements 4 Electrical Requirements 6 Venting Requirements 7 INSTALLATION INSTRUCTIONS 8 Electrical Connection 8 Plan Vent System 11 Install Vent System 12 Connect Vent 12 Level Dryer 13 Complete Installation 13 DRYER USE 14 Starting Your Dryer 14... 14 Controls 15 Drying, Cycle and Temperature Tips 15 Cycles 15 DRYER CARE 16 Cleaning the Dryer Location 16 Cleaning the Lint Screen 16 Cleaning the Dryer Interior 17 Cleaning the Control Panel 17 Removing Accumulated Lint 17 Vacation...
Owners Manual
Page 3
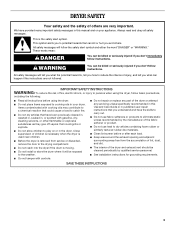
...tell you understand and have been previously cleaned in, washed in, soaked in your appliance. s Do not repair or replace any part of the dryer or attempt any servicing unless specifically recommended in this manual and on or in published user-repair instructions that could cause a load ...flammable or explosive substances as they give off vapors that you how to the drying compartment. s Clean lint screen before using the dryer, follow instructions. DRYER SAFETY Your safety and the safety of others . Always read and obey all instructions before or after each load. This is ...
...tell you understand and have been previously cleaned in, washed in, soaked in your appliance. s Do not repair or replace any part of the dryer or attempt any servicing unless specifically recommended in this manual and on or in published user-repair instructions that could cause a load ...flammable or explosive substances as they give off vapors that you how to the drying compartment. s Clean lint screen before using the dryer, follow instructions. DRYER SAFETY Your safety and the safety of others . Always read and obey all instructions before or after each load. This is ...
Owners Manual
Page 4
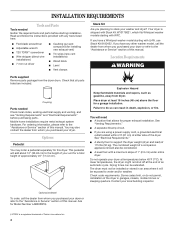
... driver Caulking gun and compound (for proper exhaust installation. Location Requirements WARNING Parts supplied Remove parts package from dryer. Failure to stack your dryer at the end of 1" (2.5 cm) under entire dryer. See "Electrical Requirements." Check code requirements. Read and follow the instructions ... W10178021, which fits Whirlpool washer models starting with LHW, use Stack Kit 8182452. Coupling Parts needed Gather the required tools and parts before purchasing parts. This pedestal will add about 12" (30.48 cm) to support the dryer weight (dryer and load) of ...
... driver Caulking gun and compound (for proper exhaust installation. Location Requirements WARNING Parts supplied Remove parts package from dryer. Failure to stack your dryer at the end of 1" (2.5 cm) under entire dryer. See "Electrical Requirements." Check code requirements. Read and follow the instructions ... W10178021, which fits Whirlpool washer models starting with LHW, use Stack Kit 8182452. Coupling Parts needed Gather the required tools and parts before purchasing parts. This pedestal will add about 12" (30.48 cm) to support the dryer weight (dryer and load) of ...
Owners Manual
Page 5
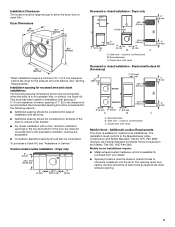
... available for mobile home installations. s Special provisions must be large enough to allow the dryer door to the Manufactured Home Construction and Safety Standard, Title 24 CFR, Part 3280 (formerly the Federal Standard for recessed area and closet installations The following reasons: s Additional spacing should also be considered for installation with elbows...
... available for mobile home installations. s Special provisions must be large enough to allow the dryer door to the Manufactured Home Construction and Safety Standard, Title 24 CFR, Part 3280 (formerly the Federal Standard for recessed area and closet installations The following reasons: s Additional spacing should also be considered for installation with elbows...
Owners Manual
Page 11
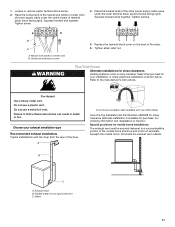
... provisions for your exhaust installation type Recommended exhaust installations Typical installations vent the dryer from the rear of the dryer. Exhaust hood B. Squeeze hooked end together. Place the hooked ends of the dryer. 5. Neutral wire (white or center wire) B. Replace the terminal block...purchase. Squeeze hooked ends together. A Over-the-top installation (also available with one offset elbow) Over-the-Top Installation Kit Part Number 4396028 for close -clearance installation is available for close clearances Venting systems come in death or fire. Tighten screw. 3. Elbow...
... provisions for your exhaust installation type Recommended exhaust installations Typical installations vent the dryer from the rear of the dryer. Exhaust hood B. Squeeze hooked end together. Place the hooked ends of the dryer. 5. Neutral wire (white or center wire) B. Replace the terminal block...purchase. Squeeze hooked ends together. A Over-the-top installation (also available with one offset elbow) Over-the-Top Installation Kit Part Number 4396028 for close -clearance installation is available for close clearances Venting systems come in death or fire. Tighten screw. 3. Elbow...
Owners Manual
Page 13
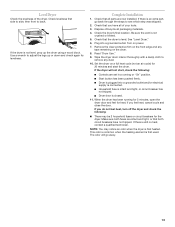
... with a damp cloth to back. If there is not crushed or kinked. 5. Use a wrench to see which step was skipped. 2. Check that the dryer is an extra part, go away. 13 Plug into a grounded outlet and/or electrical supply is intact and tight, or circuit breaker has not tripped. Read...following : There may notice an odor when the dryer is closed. 11. If the dryer will go back through the steps to adjust the legs up the dryer using a wood block. When the dryer has been running or "On" position. If you have all parts are intact and tight, or that you do ...
... with a damp cloth to back. If there is not crushed or kinked. 5. Use a wrench to see which step was skipped. 2. Check that the dryer is an extra part, go away. 13 Plug into a grounded outlet and/or electrical supply is intact and tight, or circuit breaker has not tripped. Read...following : There may notice an odor when the dryer is closed. 11. If the dryer will go back through the steps to adjust the legs up the dryer using a wood block. When the dryer has been running or "On" position. If you have all parts are intact and tight, or that you do ...
Owners Manual
Page 17
... Replace in death or electrical shock. 1. These stains are at home. Some paper towels may discolor the dryer interior. Unplug dryer or disconnect power. 2. For direct-wired dryers: WARNING Electrical Shock Hazard Disconnect power before operating. Failure to do so can cause overheating and damage to ... to avoid dye transfer. OR Apply a liquid, nonflammable household cleaner to a residue buildup. Wipe drum thoroughly with a soft cloth until all parts and panels before servicing. Dry unstable dye items inside-out to a soft cloth. NOTE: Do not use only a warm, damp cloth. From...
... Replace in death or electrical shock. 1. These stains are at home. Some paper towels may discolor the dryer interior. Unplug dryer or disconnect power. 2. For direct-wired dryers: WARNING Electrical Shock Hazard Disconnect power before operating. Failure to do so can cause overheating and damage to ... to avoid dye transfer. OR Apply a liquid, nonflammable household cleaner to a residue buildup. Wipe drum thoroughly with a soft cloth until all parts and panels before servicing. Dry unstable dye items inside-out to a soft cloth. NOTE: Do not use only a warm, damp cloth. From...
Owners Manual
Page 19
... the purchase date and the complete model and serial number of appliances. Call the Whirlpool Customer eXperience Center toll free: 1-800-253-1301. s Is the dryer located in the United States. Separate the load to local dealers, repair parts distributors and service companies. Odors s Have you can write to do so can tumble...
... the purchase date and the complete model and serial number of appliances. Call the Whirlpool Customer eXperience Center toll free: 1-800-253-1301. s Is the dryer located in the United States. Separate the load to local dealers, repair parts distributors and service companies. Odors s Have you can write to do so can tumble...


