
Owners Manual
Page 11
...water faucet. 3. Disconnect water inlet hose from faucet, then drain the hose. Turn on vacation or not using your dryer for Steam Models Water Inlet Hoses Replace inlet hoses and hose screen after 5 years of hose failure. Remove the cover. Disconnect wiring. 3. Transport hose separately. 5. Make sure leveling ... Electrical Shock Hazard Disconnect power before operating. Gas Models: Close shutoff valve in dryer or reconnect power. Steam models only: Disconnect the water inlet hose from faucet, then drain the hose. Replace the cover and secure with a 10-watt appliance bulb only. Flush...
...water faucet. 3. Disconnect water inlet hose from faucet, then drain the hose. Turn on vacation or not using your dryer for Steam Models Water Inlet Hoses Replace inlet hoses and hose screen after 5 years of hose failure. Remove the cover. Disconnect wiring. 3. Transport hose separately. 5. Make sure leveling ... Electrical Shock Hazard Disconnect power before operating. Gas Models: Close shutoff valve in dryer or reconnect power. Steam models only: Disconnect the water inlet hose from faucet, then drain the hose. Replace the cover and secure with a 10-watt appliance bulb only. Flush...
Owners Manual
Page 14
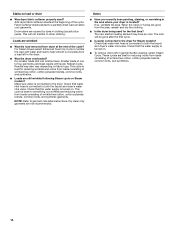
... wrinkle-free cotton, cotton polyester blends, common knits, and synthetics. 14 Check that water inlet hose is best for reducing wrinkles and odors from loads consisting of the cycle. Add dryer fabric softener sheets at the end of one to four garments yield best results with water and ... clothing (usually blue jeans). These cycles are best for Steam models? Make sure water is connected to the dryer. Check that water inlet hose is connected to both the faucet and dryer's water inlet valve. Fabric softener sheets added to help smooth out wrinkles from the area, rewash and dry...
... wrinkle-free cotton, cotton polyester blends, common knits, and synthetics. 14 Check that water inlet hose is best for reducing wrinkles and odors from loads consisting of the cycle. Add dryer fabric softener sheets at the end of one to four garments yield best results with water and ... clothing (usually blue jeans). These cycles are best for Steam models? Make sure water is connected to the dryer. Check that water inlet hose is connected to both the faucet and dryer's water inlet valve. Fabric softener sheets added to help smooth out wrinkles from the area, rewash and dry...
Installation Instructions
Page 3
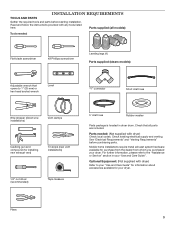
...(25 mm) or hex-head socket wrench Level "Y" connector Short inlet hose Wire stripper (direct wire installations) Vent clamps Caulking gun and compound (for your dryer. Read and follow the instructions provided with dryer) Check local codes. See "Electrical Requirements" and "Venting Requirements" before... new exhaust vent) Tin snips (new vent installations) 1/4" nut driver (recommended) Tape measure 5' inlet hose Rubber washer Parts package is located in your dryer. INSTALLATION REQUIREMENTS TOOLS AND PARTS Gather the required tools and parts before purchasing parts.
...(25 mm) or hex-head socket wrench Level "Y" connector Short inlet hose Wire stripper (direct wire installations) Vent clamps Caulking gun and compound (for your dryer. Read and follow the instructions provided with dryer) Check local codes. See "Electrical Requirements" and "Venting Requirements" before... new exhaust vent) Tin snips (new vent installations) 1/4" nut driver (recommended) Tape measure 5' inlet hose Rubber washer Parts package is located in your dryer. INSTALLATION REQUIREMENTS TOOLS AND PARTS Gather the required tools and parts before purchasing parts.
Installation Instructions
Page 4
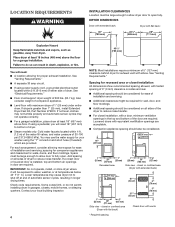
... openings in garages, closets, mobile homes, or sleeping quarters. closet or confined area (Dryer with elbow. Contact your washer using the "Y" connector and short hose (if needed) which are required. DRYER DIMENSIONS Dryer with extended back: Dryer with flat back: 30" (783 mm) 221/4" (565 mm) 28" (711 ...mm) 431/2" (783 mm) You will be large enough to allow dryer door to water, weather, or at ...
... openings in garages, closets, mobile homes, or sleeping quarters. closet or confined area (Dryer with elbow. Contact your washer using the "Y" connector and short hose (if needed) which are required. DRYER DIMENSIONS Dryer with extended back: Dryer with flat back: 30" (783 mm) 221/4" (565 mm) 28" (711 ...mm) 431/2" (783 mm) You will be large enough to allow dryer door to water, weather, or at ...
Installation Instructions
Page 14
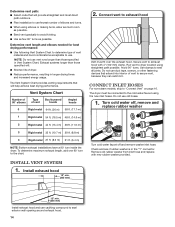
... of vent to the chart. Install exhaust hood 12" min. (305 mm) 2. NOTE: Do not use caulking compound to dryer location using the new inlet hoses. Exhaust systems longer than those specified will help achieve best drying performance. Run vent to seal exterior wall opening around exhaust hood.... 14 Remove old rubber washer from inlet hose and replace with 4" (102 mm) clamp. Avoid 90° turns. Do not use old hoses. 1. The dryer must fit over the exhaust hood. Check and see if rubber washer is in Vent ...
... of vent to the chart. Install exhaust hood 12" min. (305 mm) 2. NOTE: Do not use caulking compound to dryer location using the new inlet hoses. Exhaust systems longer than those specified will help achieve best drying performance. Run vent to seal exterior wall opening around exhaust hood.... 14 Remove old rubber washer from inlet hose and replace with 4" (102 mm) clamp. Avoid 90° turns. Do not use old hoses. 1. The dryer must fit over the exhaust hood. Check and see if rubber washer is in Vent ...
Installation Instructions
Page 15
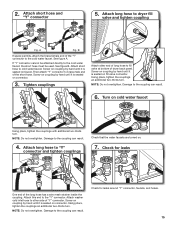
...: Do not overtighten. See figure A. A Fig. See figure B. Attach long hose to the cold water faucet. Tighten couplings Attach other side of dryer back panel. Check for leaks around "Y" connector, faucets, and hoses. 15 B If space permits, attach the brass female end of the long... hose has a wire mesh strainer inside the coupling. Check for leaks One end...
...: Do not overtighten. See figure A. A Fig. See figure B. Attach long hose to the cold water faucet. Tighten couplings Attach other side of dryer back panel. Check for leaks around "Y" connector, faucets, and hoses. 15 B If space permits, attach the brass female end of the long... hose has a wire mesh strainer inside the coupling. Check for leaks One end...

Installation Instructions
Page 17
... interior thoroughly with you live in Step 4. 17 Lay the door on top of dryer or work space to the need for leaks around "Y" connector, faucet, and hoses. If there is level. Do not select Air Only Temperature setting. Complete Installation CHECKLIST q Check that you have all of your tools. q Check that...
... interior thoroughly with you live in Step 4. 17 Lay the door on top of dryer or work space to the need for leaks around "Y" connector, faucet, and hoses. If there is level. Do not select Air Only Temperature setting. Complete Installation CHECKLIST q Check that you have all of your tools. q Check that...


