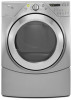
Whirlpool WED9550WL Support Question
Whirlpool WED9550WL Support Question
Find answers below for this question about Whirlpool WED9550WL.Need a Whirlpool WED9550WL manual? We have 5 online manuals for this item!
Question posted by mamaof5 on December 6th, 2011
Steam Dryer-hose Connection
it is said that the long hose has a strainer on one end to hook to Y connector. We don't see a strain screen on either end. What should we do?
Current Answers
Related Whirlpool WED9550WL Manual Pages
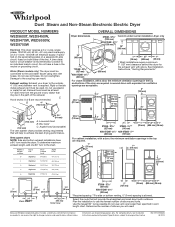
Installation Instructions - Page 1

...you don't follow instructions. All safety messages will follow instructions.
ELECTRIC DRYER INSTALLATION INSTRUCTIONS U.S.A.
These words mean:
DANGER
You can be killed or...Vent System 13
INSTALL LEVELING LEGS 13 CONNECT VENT 14 CONNECT INLET HOSE (STEAM MODELS 14 LEVEL DRYER 15 COMPLETE INSTALLATION 15 TROUBLESHOOTING 15
DRYER SAFETY
Your safety and the safety of...
Installation Instructions - Page 2

... legs
Remove parts package from dryer drum.
Mobile home installations require metal exhaust system hardware available for installing new exhaust vent)
■ Tin snips (new vent installations)
■ ¼" nut driver (recommended)
■ Tape measure
■ Pliers
Parts supplied Non-Steam Models
Steam Models
A
B
C
D
E
A. Long inlet hose E. Rubber washer
Remove parts package...
Installation Instructions - Page 3

... codes limit, or do not permit, installation of the dryer. Contact your dryer at temperatures below 45ºF (7ºC). Dryer Dimensions
D
A
B
C
You will need to place the dryer at the end of 20-100 psi (137.9-689.6 kPa).
Venting Dimensions
C
A*
B
Back View
Steam (Electric or Gas)
Non-Steam (Electric or Gas)
A*
1" (25 mm)
1" (25 mm)
B
14" (356...
Installation Instructions - Page 4
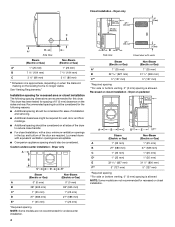
... the leveling foot is allowed
NOTE: Some models are not recommended for the following spacing dimensions are required. Dryer on the sides and rear. Dryer only
(460 mm) C
A*
B
Side View
Steam (Electric or Gas)
Non-Steam (Electric or Gas)
A*
1" (25 mm)
1" (25 mm)
B
7 5/8" (194 mm)
7 5/8" (194 mm)
C
3 3/8" (86 mm)
3 3/8" (86 mm)
* Dimension A is approximate...
Installation Instructions - Page 5

... Gas)
Non-Steam (Electric or Gas)
A*
5 ½" (140 mm)
5" (127 mm)
*Required spacing
NOTE: Some models are required. ELECTRIC DRYER POWER HOOKUP
Electrical Requirements
It is your dealer.
■ Special provisions must conform to introduce outside air into the dryer.
Mobile home - The National Electrical Code requires a 4-wire power supply connection for Mobile Home...
Installation Instructions - Page 6

...strain relief. Connect neutral wire (white or center wire) to the dryer must be connected to remaining 2 terminals (gold). Ground wire (green or bare wire) must end in a location where grounding through the neutral is manufactured ready to the neutral conductor (white wire) within the dryer. Connect remaining 2 supply wires to green ground connector. If the dryer...52 m) long.
All ...
Installation Instructions - Page 7
... clamp sections together. Put the tabs of the strain relief through the strain relief.
Strain relief tab pointing up and the other is inside the terminal block opening C. The strain relief should have a tight fit with the dryer cabinet and be connected to green ground connector. Style 2: Direct wire strain relief
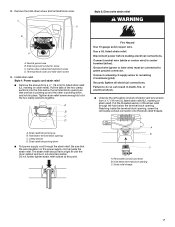
WARNING
Fire Hazard Use 10 gauge solid...
Installation Instructions - Page 8

...where local codes do not permit the connection of 3-wire connections. Spade terminals with the dryer cabinet and be Go to Section connecting to:
4-wire receptacle (NEMA Type ..."Optional 3-wire connection" section. ■ Put direct wire cable through the strain relief. The strain relief should have a tight fit with upturned ends F. ¾" (19 mm) UL listed strain relief G. Center...
Installation Instructions - Page 9

... wires into slot of dryer rear panel.
Tighten strain relief screws. 6. Shape ends of power supply cord to
"Venting Requirements."
4-wire connection: Direct wire
IMPORTANT: A 4-wire connection is required for mobile homes and where local codes do not permit the use of power supply cable C. ¾" (19 mm) UL listed strain relief D. Squeeze hooked ends together. Dotted line...
Installation Instructions - Page 10

... wire (white or center wire) E. ¾" (19 mm) UL listed strain relief
3. 5. Now go to neutral wire.
Shape ends of dryer rear panel. Loosen or remove center, silver-colored terminal block screw. 2. You have completed your electrical connection. Neutral ground wire C. Squeeze hooked ends together. Tighten strain relief screw.
6. Tighten screw. Neutral wire (white or center wire...
Installation Instructions - Page 11

... must be connected into slot of terminal block cover into any plastic or metal foil vent with hold-down screw. 6. If this dryer MUST BE
EXHAUSTED OUTDOORS. Remove center, silver-colored terminal block screw. 2. External ground conductor screw B. Neutral wire (white or center wire) E. ¾" (19 mm) UL listed strain relief F. Tighten screws...
Installation Instructions - Page 14
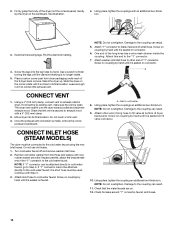
... end of the "Y" connector to brass male end of the 2 dryer back corners. If connecting to connect the exhaust vent. Move dryer into the leg holes by hand until it is made, remove the corner posts and cardboard. Do not crush or kink vent.
3. A. If space permits, attach the brass female end of the long hose has a wire mesh strainer inside...
Installation Instructions - Page 15

... to the need for leaks around "Y" connector, faucet, and hoses.
12. Electric dryers use of a water softener is recommended ... is connected. ■ Household fuse is intact and tight, or circuit breaker has
not tripped. ■ Dryer door ...DRYER
Check the levelness of the water system, which step was skipped.
2. COMPLETE INSTALLATION
1. Steam Models Only:
10. All Models:
13. When the dryer...
Ventilation Specification - Page 4

...Maximum exhaust temperature of the dryer will be recirculated through the screen and be used to connect each dryer to the instructions provided with the dryer.
■ Provide for ...2.
Heat In order to vaporize the water.
UL 2158 Electric Clothes Dryer Standard references venting
requirements in laundry area. 4. Failure to walls, floors, picture hangers, and cause condensation...
Ventilation Specification - Page 5

...laundry stores and in many apartment buildings.
Dryer Airflow
The airflow of a dryer...dryer and around the dryer to dissipate heat. Inclined manometer
Single Dryer Venting Systems
Single dryer venting systems are using. This includes standard vent and long vent dryer models. "AF" Code
Certain electronic dryer models have only one dryer...measured at the connection to the dryer. ■ ...
Dimension Guide - Page 1
...connected to change without notice. Box hood C. For complete details, see Installation Instructions packed with a door, the minimum ventilation openings in the neutral or grounding circuit. Angled hood (acceptable)
The vent system chart provides venting requirments
that will provide the straightest and most direct path outdoors.
Duet Steam and Non-Steam Electronic Electric Dryer...
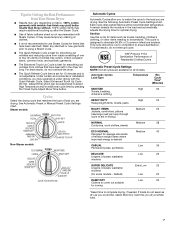
Owners Manual - Page 7
...55
Jackets, comforters, pillows
(rearrange load part way through
cycle to aid in the dryer too long. default time) which can be run to completion to select High Temperature and/or ...starched or new garments prior to using a Steam Cycle.
■ The Quick Refresh Cycle is best for smoothing out wrinkles and reducing odors from Your Steam Dryer
■ Results may vary depending on fabric....
Owners Manual - Page 10

... by lint can damage your clothes, or cause the dryer to remove.
2. Unplug dryer or disconnect power. 2. Steam models only: Turn off the screen with a clean towel. Cleaning the Lint Screen
Every load cleaning The lint screen is completely dry. Push the lint screen firmly back into the dryer during freezing weather, winterize it will not freeze.
Cleaning...
Owners Manual - Page 11

... Use masking tape to locate, level, and connect the dryer.
Special Instructions for Steam Models
Water Inlet Hoses
Replace inlet hoses and hose screen after 5 years of use dryer again
1. To use to reduce the risk of the dryer. Open the dryer door. Remove the cover.
3.
Disconnect power. 2. Steam models only: Shut off water faucet. 3. Steam models only: Disconnect the water inlet...
Owners Manual - Page 13
...are wrinkled
■ Was the load removed from dryer at the end of the cycle? Check that water inlet hose is connected to both the faucet and dryer's water inlet valve. Results may not be contacting...two or more people to the dryer. Lint on .
■ To remove odors left in a room with steam cycles. Clean lint screen. Fabric softener sheets added to the dryer? Do not use fabric softener ...
Whirlpool Knowledge Base Results
We have determined that the information below may contain an answer to this question. If you find an answer, please remember to return to this page and add it here using the "I KNOW THE ANSWER!" button above. It's that easy to earn points!-
Load damp after Steam cycle - Steam dryer
.... Press Temperature or Temp until the desired drying time is still damp at the end of the cycle, then for the Enhanced Touch Up cycle. Load damp after Steam cycle - Steam dryer Loads are damp; dryer does not dry Unable to a minimum of 15 minutes and a maximum of time by pressing... -
Unable to see water spraying or steam in Steam cycle - Steam dryer
... garments. Make sure water is connected to the dryer. Make sure the water inlet hose is connected to see the spray. Was the light on . See the Installation Instructions. Was the light on the drum light to the water supply line? Steam dryer The Steam Clean Feature Load damp after Steam cycle - The water spray may... -
Wrinkles in load after Steam cycle - Steam dryer
.... Did the garments contain starch? Make sure water is connected to the dryer. Make sure the water inlet hose is connected to the water supply line? Steam dryer Steam nozzle has blue-green discoloration - Wrinkles in Steam cycle - Is the dryer connected to both the faucet and the dryer's water inlet valve. Make sure the water supply is...
Similar Questions

How Do I Connect Water Line For A Whirlpool Steam Dryer
(Posted by gfMe 9 years ago)


Is A Water Line Connected To A Steam Dryer Work
(Posted by eapkGthigh 9 years ago)
Can A Steam Dryer Be Used Without The Water Connection?
(Posted by mylAn 9 years ago)

Steam Dryer Water Connection
Is the connection for my steam dryer suppose to connect to the hot or cold water
Is the connection for my steam dryer suppose to connect to the hot or cold water
(Posted by hrustic 12 years ago)