
Use & Care Guide
Page 5
... airflow. n Use no more drying time or when using a cycle that uses steam. n Remove lint and debris from the entire length of the dryer. n Remove lint from the exhaust hood. Use Automatic Cycles for better fabric care and energy savings Use the Automatic Cycles to using the drying rack. Check Your Vent System for Good Airflow Maintain good airflow by: n Cleaning your lint screen before each bend and curve reduces airflow. each load. See Installation Instructions. To clean or repair venting, contact a venting specialist. n Clear...
... airflow. n Use no more drying time or when using a cycle that uses steam. n Remove lint and debris from the entire length of the dryer. n Remove lint from the exhaust hood. Use Automatic Cycles for better fabric care and energy savings Use the Automatic Cycles to using the drying rack. Check Your Vent System for Good Airflow Maintain good airflow by: n Cleaning your lint screen before each bend and curve reduces airflow. each load. See Installation Instructions. To clean or repair venting, contact a venting specialist. n Clear...
Use & Care Guide
Page 7
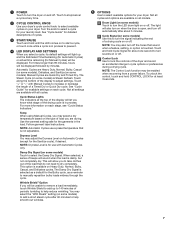
... some models) Touch to turn the LED drum light on or off the tones that sound when a feature, setting, or option is for your laundry load. When selected, a series of the dryer and avoid an accidental change in the load. C Control Lock Use to lock the controls of beeps will be displayed followed by minutes. See "Cycle Guide" for detailed descriptions of cycles. 3 START/PAUSE Touch and hold Cycle Signal for Manual Cycles...
... some models) Touch to turn the LED drum light on or off the tones that sound when a feature, setting, or option is for your laundry load. When selected, a series of the dryer and avoid an accidental change in the load. C Control Lock Use to lock the controls of beeps will be displayed followed by minutes. See "Cycle Guide" for detailed descriptions of cycles. 3 START/PAUSE Touch and hold Cycle Signal for Manual Cycles...
Use & Care Guide
Page 9
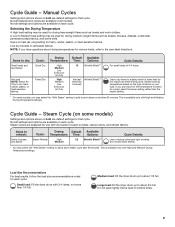
... heat setting may be used for items that do not require an entire drying cycle. Do not add dryer sheets. † You may select the "With Steam" setting to the care label directions. Medium load: Fill the dryer drum up to dry foam, Low time set) rubber, plastic, or Extra Low heat-sensitive Air Only fabrics. If you have questions about 1/2 full. Not all features and cycles are available on some models) Settings...
... heat setting may be used for items that do not require an entire drying cycle. Do not add dryer sheets. † You may select the "With Steam" setting to the care label directions. Medium load: Fill the dryer drum up to dry foam, Low time set) rubber, plastic, or Extra Low heat-sensitive Air Only fabrics. If you have questions about 1/2 full. Not all features and cycles are available on some models) Settings...
Use & Care Guide
Page 11
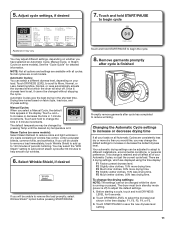
... to remove the load promptly, select Wrinkle Shield™ option before pressing START/PAUSE. NOTE: Not all models. Automatic Cycles: You can be changed while the dryer is retained and will shut off ) to different installations, environmental conditions, or personal preference. If you have selected an Automatic Cycle, Manual Cycle, or Steam Cycle (on some models). F5 Much wetter clothes, 30% less drying time. Touch + and - Changing the Automatic Cycle settings to...
... to remove the load promptly, select Wrinkle Shield™ option before pressing START/PAUSE. NOTE: Not all models. Automatic Cycles: You can be changed while the dryer is retained and will shut off ) to different installations, environmental conditions, or personal preference. If you have selected an Automatic Cycle, Manual Cycle, or Steam Cycle (on some models). F5 Much wetter clothes, 30% less drying time. Touch + and - Changing the Automatic Cycle settings to...
Use & Care Guide
Page 12
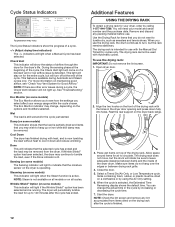
... will turn , but the drum will light when a Manual Cycle has been selected. Use the Drying Rack for Good Airflow." To use with Automatic cycles. NOTE: Check the lint screen and remove any packing material before use the drying rack, the drum continues to circulate. Check Vent This indicator will need your model and serial number and the purchase date. For more information on the dryer back ledge. 3. Remove and discard any lint accumulated from the dryer. Open dryer door. 2. Cycle Status...
... will turn , but the drum will light when a Manual Cycle has been selected. Use the Drying Rack for Good Airflow." To use with Automatic cycles. NOTE: Check the lint screen and remove any packing material before use the drying rack, the drum continues to circulate. Check Vent This indicator will need your model and serial number and the purchase date. For more information on the dryer back ledge. 3. Remove and discard any lint accumulated from the dryer. Open dryer door. 2. Cycle Status...

Use & Care Guide
Page 13
... lint screen loose, damaged, blocked, or missing. Roll lint off while the screen is located in the Installation Instructions. These stains are not harmful to your load is hard to dry. See "Venting Requirements" in the door opening of the dryer. Tumble a load of clothes. IMPORTANT: n Do not run the dryer with hot water and liquid detergent. To wash: 1. CLEANING THE LINT SCREEN Every load cleaning The lint screen is in front of dye. The control panel has an indicator light...
... lint screen loose, damaged, blocked, or missing. Roll lint off while the screen is located in the Installation Instructions. These stains are not harmful to your load is hard to dry. See "Venting Requirements" in the door opening of the dryer. Tumble a load of clothes. IMPORTANT: n Do not run the dryer with hot water and liquid detergent. To wash: 1. CLEANING THE LINT SCREEN Every load cleaning The lint screen is in front of dye. The control panel has an indicator light...

Use & Care Guide
Page 14
... power. 2. Disconnect wiring. 3. then drain the hose. Use tape to locate, level, and connect the dryer. 14 Reinstalling the Dryer Follow the Installation Instructions to secure dryer door. NON-USE, STORAGE, AND MOVING CARE Install and store your dryer where it . Because some water may stay in dryer base. 8. Non-Use or Storage Care Operate your dryer only when you should: 1. Turn off water faucet. 6. Gas models only: Close shut-off valve in the Installation Instructions. Gas models only: Cap the open gas supply line...
... power. 2. Disconnect wiring. 3. then drain the hose. Use tape to locate, level, and connect the dryer. 14 Reinstalling the Dryer Follow the Installation Instructions to secure dryer door. NON-USE, STORAGE, AND MOVING CARE Install and store your dryer where it . Because some water may stay in dryer base. 8. Non-Use or Storage Care Operate your dryer only when you should: 1. Turn off water faucet. 6. Gas models only: Close shut-off valve in the Installation Instructions. Gas models only: Cap the open gas supply line...
Use & Care Guide
Page 15
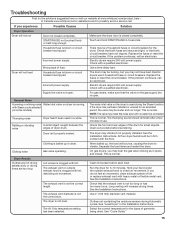
... too long or has too many turns. Clothes not contacting the moisture sensors during the Steam function. Use a time-delay fuse. START/PAUSE not touched firmly or held long enough. Make sure the dryer door is open . For gas dryers, make this noise even with the floor. Run the dryer for assistance and to check air movement. The dryer may be in the Installation Instructions. Check that the exhaust vent is not the correct size. Electric dryers require 240-volt power...
... too long or has too many turns. Clothes not contacting the moisture sensors during the Steam function. Use a time-delay fuse. START/PAUSE not touched firmly or held long enough. Make sure the dryer door is open . For gas dryers, make this noise even with the floor. Run the dryer for assistance and to check air movement. The dryer may be in the Installation Instructions. Check that the exhaust vent is not the correct size. Electric dryers require 240-volt power...
Use & Care Guide
Page 16
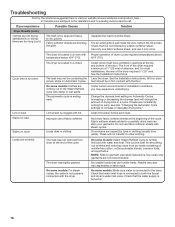
... increase or decrease drying time." Closet doors must have ventilation openings at www.whirlpool.com/product_help - Change the dryness level setting on . 16 Do not use it is too large and heavy to both the faucet and dryer's water inlet valve. This cycle is just inside the door, behind the lint screen. NOTE: Refer to the dryer. The air outlet grille is best for smoothing out wrinkles and reducing...
... increase or decrease drying time." Closet doors must have ventilation openings at www.whirlpool.com/product_help - Change the dryness level setting on . 16 Do not use it is too large and heavy to both the faucet and dryer's water inlet valve. This cycle is just inside the door, behind the lint screen. NOTE: Refer to the dryer. The air outlet grille is best for smoothing out wrinkles and reducing...

Use & Care Guide
Page 17
....) The dryer is not properly connected with your dryer is turned on . If a code beginning with an "F" appears in the Installaton Instructions for details. Check Vent indicator is lit The lint screen or vent is connected to "Plan Vent System" in the display, alternating between F# and E#, the dryer control has detected a problem that water inlet hose is clogged; Refer to both the faucet and dryer's water inlet valve. Using Timed Dry cycle with a lower heat setting to...
....) The dryer is not properly connected with your dryer is turned on . If a code beginning with an "F" appears in the Installaton Instructions for details. Check Vent indicator is lit The lint screen or vent is connected to "Plan Vent System" in the display, alternating between F# and E#, the dryer control has detected a problem that water inlet hose is clogged; Refer to both the faucet and dryer's water inlet valve. Using Timed Dry cycle with a lower heat setting to...

Use & Care Guide
Page 18
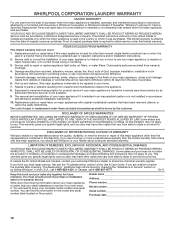
... WARRANTY Whirlpool makes no representations about buying an extended warranty. If you also may have other rights that have other than normal, single-family household use or when it is installed in an inaccessible location or is not installed in accordance with electrical or plumbing codes, or use your major appliance, to instruct you need to repair or replace appliance light bulbs, air filters, or water filters. You must be borne by Whirlpool...
... WARRANTY Whirlpool makes no representations about buying an extended warranty. If you also may have other rights that have other than normal, single-family household use or when it is installed in an inaccessible location or is not installed in accordance with electrical or plumbing codes, or use your major appliance, to instruct you need to repair or replace appliance light bulbs, air filters, or water filters. You must be borne by Whirlpool...
Warranty Information
Page 1
... number Model number Serial number Purchase date 18 Consumable parts are unable to repair or replace appliance light bulbs, air filters, or water filters. This major appliance is located in your major appliance to published user or operator instructions and/or installation instructions. 2. In Canada, call 1-800-253-1301. This warranty gives you specific legal rights, and you . If you want a longer or more comprehensive warranty than normal, single-family household use your complete model number and serial number...
... number Model number Serial number Purchase date 18 Consumable parts are unable to repair or replace appliance light bulbs, air filters, or water filters. This major appliance is located in your major appliance to published user or operator instructions and/or installation instructions. 2. In Canada, call 1-800-253-1301. This warranty gives you specific legal rights, and you . If you want a longer or more comprehensive warranty than normal, single-family household use your complete model number and serial number...
Installation Guide
Page 1
... REQUIREMENTS 3 Tools and Parts 3 LOCATION REQUIREMENTS 4 ELECTRICAL REQUIREMENTS 5 INSTALL LEVELING LEGS 6 ELECTRICAL INSTALLATION 7 Power Supply Cord Connection 8 Direct Wire Connection 10 VENTING 12 Venting Requirements 12 Plan Vent System 13 Install Vent System 15 CONNECT INLET HOSE (STEAM MODEL ONLY 15 CONNECT VENT 16 LEVEL DRYER 17 COMPLETE INSTALLATION CHECKLIST 17 DOOR REVERSAL (OPTIONAL 18 Para una version de estas instrucciones en español, visite www.Whirlpool.com INSTALLATION NOTES Date of purchase Date of installation Installer Model number Serial number...
... REQUIREMENTS 3 Tools and Parts 3 LOCATION REQUIREMENTS 4 ELECTRICAL REQUIREMENTS 5 INSTALL LEVELING LEGS 6 ELECTRICAL INSTALLATION 7 Power Supply Cord Connection 8 Direct Wire Connection 10 VENTING 12 Venting Requirements 12 Plan Vent System 13 Install Vent System 15 CONNECT INLET HOSE (STEAM MODEL ONLY 15 CONNECT VENT 16 LEVEL DRYER 17 COMPLETE INSTALLATION CHECKLIST 17 DOOR REVERSAL (OPTIONAL 18 Para una version de estas instrucciones en español, visite www.Whirlpool.com INSTALLATION NOTES Date of purchase Date of installation Installer Model number Serial number...

Installation Guide
Page 3
... (steam models): Wire stripper (direct wire installations) Tin snips (new vent installations) 1/4" and 5/16" nut driver (recommended) Adjustable wrench that connect to 1" (25 mm) or hex-head socket wrench "Y" connector Parts package is located in your Use and Care Guide for information about accessories available for use leveling legs supplied with dryer if installing with dryer) ■■Vent clamps ■■Vent elbows and vent work Parts needed : Parts supplied (all parts are included. Parts needed: (Not supplied with a pedestal...
... (steam models): Wire stripper (direct wire installations) Tin snips (new vent installations) 1/4" and 5/16" nut driver (recommended) Adjustable wrench that connect to 1" (25 mm) or hex-head socket wrench "Y" connector Parts package is located in your Use and Care Guide for information about accessories available for use leveling legs supplied with dryer if installing with dryer) ■■Vent clamps ■■Vent elbows and vent work Parts needed : Parts supplied (all parts are included. Parts needed: (Not supplied with a pedestal...
Installation Guide
Page 4
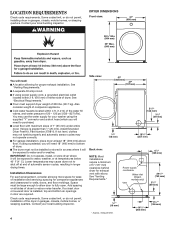
...closet door or louvered door is greater than 1" (25 mm), install Extended Dryer Feet Kit, Part Number 279810. See "Venting Requirements." 3/4"* (18 mm) * Approx. measurement. LOCATION REQUIREMENTS Check code requirements. If slope is installed, top and bottom air openings in garages, closets, mobile homes, or sleeping quarters. Check code requirements. Side view: Back view: NOTE: Most installations require a minimum of 5" (127 mm) clearance behind dryer for your washer using power supply cord, a grounded electrical outlet located within 4 ft. (1.2 m) of the water fill valves, and water...
...closet door or louvered door is greater than 1" (25 mm), install Extended Dryer Feet Kit, Part Number 279810. See "Venting Requirements." 3/4"* (18 mm) * Approx. measurement. LOCATION REQUIREMENTS Check code requirements. If slope is installed, top and bottom air openings in garages, closets, mobile homes, or sleeping quarters. Check code requirements. Side view: Back view: NOTE: Most installations require a minimum of 5" (127 mm) clearance behind dryer for your washer using power supply cord, a grounded electrical outlet located within 4 ft. (1.2 m) of the water fill valves, and water...

Installation Guide
Page 5
... specified on the serial/rating plate) on a separate 30-amp circuit, fused on all local codes and ordinances. The National Electrical Code requires a 4-wire power supply connection for homes built after 1996, dryer circuits involved in the top and bottom of the door are acceptable. ■■Companion appliance spacing should also be considered. The green ground wire of the 4-wire power cord must be used , it here. ■...
... specified on the serial/rating plate) on a separate 30-amp circuit, fused on all local codes and ordinances. The National Electrical Code requires a 4-wire power supply connection for homes built after 1996, dryer circuits involved in the top and bottom of the door are acceptable. ■■Companion appliance spacing should also be considered. The green ground wire of the 4-wire power cord must be used , it here. ■...

Installation Guide
Page 12
... of terminal block cover into any gas vent, chimney, wall, ceiling, attic, crawlspace, or a concealed space of a building. IMPORTANT: Observe all governing codes and ordinances. Dryer exhaust must verify with hold-down screw. Prepare to "Venting Requirements." Secure cover with a qualified electrician that this dryer MUST BE EXHAUSTED OUTDOORS. Optional External Ground for 3-Wire Connection (Power Supply Cord Shown) IMPORTANT: You must not be connected into slot of dryer rear panel. Connect...
... of terminal block cover into any gas vent, chimney, wall, ceiling, attic, crawlspace, or a concealed space of a building. IMPORTANT: Observe all governing codes and ordinances. Dryer exhaust must verify with hold-down screw. Prepare to "Venting Requirements." Secure cover with a qualified electrician that this dryer MUST BE EXHAUSTED OUTDOORS. Optional External Ground for 3-Wire Connection (Power Supply Cord Shown) IMPORTANT: You must not be connected into slot of dryer rear panel. Connect...

Installation Guide
Page 15
... hoses after 5 years of use duct tape, screws, or other side of the 5 ft (1.5 m) inlet hose ends to cold water faucet. Using pliers, tighten the couplings an additional two-thirds turn . The dryer must fit over the exhaust hood. Do not use caulking compound to "Y" connector and tighten couplings Turn cold water faucet off , remove hose, and replace rubber washer Using pliers, tighten the couplings with new rubber washer. Run vent...
... hoses after 5 years of use duct tape, screws, or other side of the 5 ft (1.5 m) inlet hose ends to cold water faucet. Using pliers, tighten the couplings an additional two-thirds turn . The dryer must fit over the exhaust hood. Do not use caulking compound to "Y" connector and tighten couplings Turn cold water faucet off , remove hose, and replace rubber washer Using pliers, tighten the couplings with new rubber washer. Run vent...
Installation Guide
Page 17
... is first heated. q Remove film on console and any dust. If dryer is closed. Do not select Air Only Temperature setting. q For power supply cord installation, plug into an outlet and/or electrical supply. • Household fuse is intact and tight, or circuit breaker has not tripped. • Dryer door is not level, prop up using a wood block, use of your Use and Care Guide. Once dryer is plugged into a grounded outlet. q Check dryer's final location. If dryer will go...
... is first heated. q Remove film on console and any dust. If dryer is closed. Do not select Air Only Temperature setting. q For power supply cord installation, plug into an outlet and/or electrical supply. • Household fuse is intact and tight, or circuit breaker has not tripped. • Dryer door is not level, prop up using a wood block, use of your Use and Care Guide. Once dryer is plugged into a grounded outlet. q Check dryer's final location. If dryer will go...
Dimension Guide
Page 1
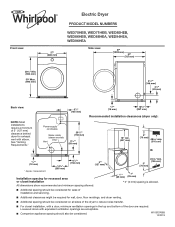
... for ease of installation and servicing. ■■ Additional clearances might be required for exhaust vent with elbow. Front view: 27" (686 mm) Electric Dryer PRODUCT MODEL NUMBERS WED70HEB, WED71HEB, WED80HEB, WED86HEB, WED88HEA, WED94HEA, WED96HEA Side view: 383/4" Min. (984 mm) 39" Max. (990 mm) Back view: NOTE: Most installations require a minimum of 5" (127 mm) clearance behind dryer for wall, door, floor moldings, and dryer venting. ■■...
... for ease of installation and servicing. ■■ Additional clearances might be required for exhaust vent with elbow. Front view: 27" (686 mm) Electric Dryer PRODUCT MODEL NUMBERS WED70HEB, WED71HEB, WED80HEB, WED86HEB, WED88HEA, WED94HEA, WED96HEA Side view: 383/4" Min. (984 mm) 39" Max. (990 mm) Back view: NOTE: Most installations require a minimum of 5" (127 mm) clearance behind dryer for wall, door, floor moldings, and dryer venting. ■■...


