
Ventilation Specification
Page 4
...the following requirements: ■ The capacity to handle up to 230 CFM (cubic feet per minute) of air flow for Whirlpool Corporation dryers sold in the dryer, heat is operated according to assure adequate performance of -0.1" (-2.5 mm) water column (vacuum) when measured at the connection to... the specific dryer model being used for balancing out the overall duct system. ■ Design the central duct system for exhausting a dryer outdoors are in cold weather. The dryer has 4" (102 mm) exhaust duct connections. Connect each dryer to handle the maximum number of dryers operated at ...
...the following requirements: ■ The capacity to handle up to 230 CFM (cubic feet per minute) of air flow for Whirlpool Corporation dryers sold in the dryer, heat is operated according to assure adequate performance of -0.1" (-2.5 mm) water column (vacuum) when measured at the connection to... the specific dryer model being used for balancing out the overall duct system. ■ Design the central duct system for exhausting a dryer outdoors are in cold weather. The dryer has 4" (102 mm) exhaust duct connections. Connect each dryer to handle the maximum number of dryers operated at ...

Ventilation Specification
Page 5
... spacing for recessed area or closet The dimensions shown are CSA listed (reference ANSI Z21.5.1 standard). Dryer Airflow The airflow of a dryer depends on all Whirlpool gas dryer models are for the minimum spacing allowed. ■ Additional spacing should be found on or adjacent to ... air HVAC system is considered a closet, and requires room venting. Codes Agency Approvals All Whirlpool electric dryer models, including "long vent dryers," Turbo Vent™ dryers and combo washer/dryer units that have an inlet and outlet for minimum clearances between the product and the enclosure ...
... spacing for recessed area or closet The dimensions shown are CSA listed (reference ANSI Z21.5.1 standard). Dryer Airflow The airflow of a dryer depends on all Whirlpool gas dryer models are for the minimum spacing allowed. ■ Additional spacing should be found on or adjacent to ... air HVAC system is considered a closet, and requires room venting. Codes Agency Approvals All Whirlpool electric dryer models, including "long vent dryers," Turbo Vent™ dryers and combo washer/dryer units that have an inlet and outlet for minimum clearances between the product and the enclosure ...
Ventilation Specification
Page 6
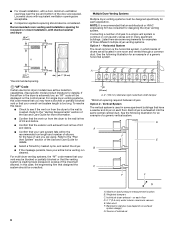
... creating back pressure in .2 * (155 cm2) *Recommended spacing. 3"* (76 mm) 1"* (25 mm) "AF" Code Certain electronic dryer models have a washer and dryer on the control panel. Refer to a single vent system is the horizontal system, in which banks of the maximum allowed. A. 4" (102... displayed on each floor D. 0.1" (2.5 mm) water column maximum vacuum E. In this issue: ■ Check to see if the vent run from the dryer to the wall is free of outside air 6 Weighted dampers C. Main duct F. Vertical System The vertical system is too long. A. on exhaust system design...
... creating back pressure in .2 * (155 cm2) *Recommended spacing. 3"* (76 mm) 1"* (25 mm) "AF" Code Certain electronic dryer models have a washer and dryer on the control panel. Refer to a single vent system is the horizontal system, in which banks of the maximum allowed. A. 4" (102... displayed on each floor D. 0.1" (2.5 mm) water column maximum vacuum E. In this issue: ■ Check to see if the vent run from the dryer to the wall is free of outside air 6 Weighted dampers C. Main duct F. Vertical System The vertical system is too long. A. on exhaust system design...
Installation Guide
Page 1
... Cord Connection 8 Direct Wire Connection 10 VENTING 12 Venting Requirements 12 Plan Vent System 13 Install Vent System 14 CONNECT INLET HOSE (STEAM MODEL ONLY 15 CONNECT VENT 16 LEVEL DRYER 17 COMPLETE INSTALLATION CHECKLIST 17 DOOR REVERSAL (OPTIONAL 18 Para una version de estas instrucciones en español, visite www...
... Cord Connection 8 Direct Wire Connection 10 VENTING 12 Venting Requirements 12 Plan Vent System 13 Install Vent System 14 CONNECT INLET HOSE (STEAM MODEL ONLY 15 CONNECT VENT 16 LEVEL DRYER 17 COMPLETE INSTALLATION CHECKLIST 17 DOOR REVERSAL (OPTIONAL 18 Para una version de estas instrucciones en español, visite www...

Installation Guide
Page 3
... screwdriver #2 Phillips screwdriver Leveling legs (4) Parts supplied (steam models): Wire stripper (direct wire installations) Tin snips (new vent installations) 1/4" and 5/16" nut driver (recommended) Adjustable wrench that opens to 1" (25 mm) or hex-head socket wrench "Y" connector Parts package is located in dryer drum. NOTE: Do not use with upturned ends. ■...
... screwdriver #2 Phillips screwdriver Leveling legs (4) Parts supplied (steam models): Wire stripper (direct wire installations) Tin snips (new vent installations) 1/4" and 5/16" nut driver (recommended) Adjustable wrench that opens to 1" (25 mm) or hex-head socket wrench "Y" connector Parts package is located in dryer drum. NOTE: Do not use with upturned ends. ■...
Installation Guide
Page 4
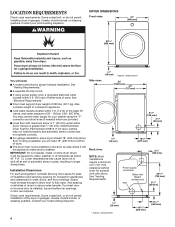
...local building inspector. Side view: Back view: NOTE: Most installations require a minimum of 200 lbs. (90.7 kg). Lower temperatures may cause dryer not to water, weather, or at temperatures below 40° F (4° C). See "Venting Requirements". See "Electrical Requirements." ■■...or sleeping quarters. You may not operate correctly. ■■For garage installation, place dryer at end of 1" (25 mm) under entire dryer. Power supply cord/cable Vent Water inlet (Steam models only) 3/4"* (18 mm) * Approx. If not level, clothes may not tumble properly...
...local building inspector. Side view: Back view: NOTE: Most installations require a minimum of 200 lbs. (90.7 kg). Lower temperatures may cause dryer not to water, weather, or at temperatures below 40° F (4° C). See "Venting Requirements". See "Electrical Requirements." ■■...or sleeping quarters. You may not operate correctly. ■■For garage installation, place dryer at end of 1" (25 mm) under entire dryer. Power supply cord/cable Vent Water inlet (Steam models only) 3/4"* (18 mm) * Approx. If not level, clothes may not tumble properly...

Installation Guide
Page 15
...(0.6 m) inlet hose to "Connect Vent." Tighten couplings 1. CONNECT INLET HOSE (STEAM MODEL ONLY) For non-steam models, skip to cold water faucet. NOTE: Replace inlet hoses after 5 years of use to reduce the risk of vent to dryer location using the new inlet hoses (not supplied). 2. Connect vent to exhaust hood... cold water faucet using straightest path possible. Use clamps to male end of the 2 ft (0.6 m) inlet hose. Do not use old hoses. The dryer must fit over the exhaust hood. Do not use duct tape, screws, or other side of the 5 ft (1.5 m) inlet hose ends to "Y" ...
...(0.6 m) inlet hose to "Connect Vent." Tighten couplings 1. CONNECT INLET HOSE (STEAM MODEL ONLY) For non-steam models, skip to cold water faucet. NOTE: Replace inlet hoses after 5 years of use to reduce the risk of vent to dryer location using the new inlet hoses (not supplied). 2. Connect vent to exhaust hood... cold water faucet using straightest path possible. Use clamps to male end of the 2 ft (0.6 m) inlet hose. Do not use old hoses. The dryer must fit over the exhaust hood. Do not use duct tape, screws, or other side of the 5 ft (1.5 m) inlet hose ends to "Y" ...
Installation Guide
Page 18
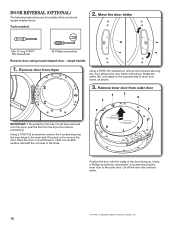
... 4 screws in the holes. Using a Phillips screwdriver, remove the 10 screws securing the inner door to remove the door. Remove door from the dryer door before proceeding. Place the door on a soft towel or other non-scratch surface. Rotate the strike 180° and attach to the door... Reverse door swing round-shaped door - Position the door with a round and square-shaped doors. DOOR REVERSAL (OPTIONAL) The following instructions are for models with the inside of the door facing up and out to the outer door. Tools needed: 2. Remove inner door from outer door IMPORTANT: If ...
... 4 screws in the holes. Using a Phillips screwdriver, remove the 10 screws securing the inner door to remove the door. Remove door from the dryer door before proceeding. Place the door on a soft towel or other non-scratch surface. Rotate the strike 180° and attach to the door... Reverse door swing round-shaped door - Position the door with a round and square-shaped doors. DOOR REVERSAL (OPTIONAL) The following instructions are for models with the inside of the door facing up and out to the outer door. Tools needed: 2. Remove inner door from outer door IMPORTANT: If ...
Use & Care Guide
Page 5
... uses steam. n Clear away items from the exhaust hood. Use Timed Dry for final product check. n Some Models: The Steam Refresh Cycle is not recommended with your dryer for the occasional damp load that needs a little more than those without. 100% cotton items may require additional touching...; Use Automatic Cycles for smoothing out wrinkles and reducing odors from your energy savings. This sensing occurs throughout the drying cycle and the dryer shuts off when the load reaches the selected dryness. n Cycles that use steam. n Replace plastic or foil vent material with wrinkle-...
... uses steam. n Clear away items from the exhaust hood. Use Timed Dry for final product check. n Some Models: The Steam Refresh Cycle is not recommended with your dryer for the occasional damp load that needs a little more than those without. 100% cotton items may require additional touching...; Use Automatic Cycles for smoothing out wrinkles and reducing odors from your energy savings. This sensing occurs throughout the drying cycle and the dryer shuts off when the load reaches the selected dryness. n Cycles that use steam. n Replace plastic or foil vent material with wrinkle-...
Use & Care Guide
Page 7
... Use your laundry load. Touch along the bottom of cycles. 3 START/PAUSE Touch and hold Cycle Signal for your dryer's cycle control knob to select available cycles on some models) Touch to turn the signal indicating the end of a Timed Dry or Quick Dry cycle. Use the warmest setting ... Status Lights The indicator bar at least 3 seconds. 7 For more information on or off . Damp Dry Signal (on your dryer. This option is for your dryer. B Cycle Signal (on some models) to add a short steam cycle after about one second to turn off the tones that sound when a feature, setting, or...
... Use your laundry load. Touch along the bottom of cycles. 3 START/PAUSE Touch and hold Cycle Signal for your dryer's cycle control knob to select available cycles on some models) Touch to turn the signal indicating the end of a Timed Dry or Quick Dry cycle. Use the warmest setting ... Status Lights The indicator bar at least 3 seconds. 7 For more information on or off . Damp Dry Signal (on your dryer. This option is for your dryer. B Cycle Signal (on some models) to add a short steam cycle after about one second to turn off the tones that sound when a feature, setting, or...
Use & Care Guide
Page 8
...and options are default settings for better fabric care and energy savings The dryer senses moisture in bold are available on all fabrics. Items need to dry large loads of heavyweight fabrics. † On some models, you may select the "With Steam" setting to reduce household bacteria. ...Small load: Fill the dryer drum with High and Medium Drying Temperature settings. Use Automatic Cycles for that cycle. Use ...
...and options are default settings for better fabric care and energy savings The dryer senses moisture in bold are available on all fabrics. Items need to dry large loads of heavyweight fabrics. † On some models, you may select the "With Steam" setting to reduce household bacteria. ...Small load: Fill the dryer drum with High and Medium Drying Temperature settings. Use Automatic Cycles for that cycle. Use ...
Use & Care Guide
Page 9
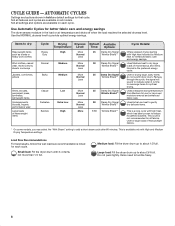
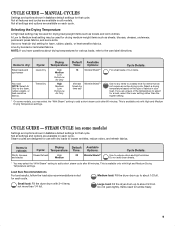
...Details: Use to dry foam, Low time set) rubber, plastic, or Extra Low heat-sensitive Air Only fabrics. CYCLE GUIDE - Not all models. Cycle Details: For small loads of the temperature to select for various loads, refer to add a short steam cycle after 60 minutes. ...STEAM CYCLE (on some models, you are available on each cycle. Medium load: Fill the dryer drum up to a damp level for that cycle. Selecting the Drying Temperature A High heat setting may select ...
...Details: Use to dry foam, Low time set) rubber, plastic, or Extra Low heat-sensitive Air Only fabrics. CYCLE GUIDE - Not all models. Cycle Details: For small loads of the temperature to select for various loads, refer to add a short steam cycle after 60 minutes. ...STEAM CYCLE (on some models, you are available on each cycle. Medium load: Fill the dryer drum up to a damp level for that cycle. Selecting the Drying Temperature A High heat setting may select ...
Use & Care Guide
Page 10
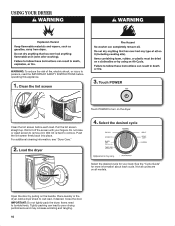
... the door by pulling on all models. Close the door. Items need to remove. For additional cleaning information, see "Dryer Care." 2. Clean the lint screen before operating this appliance. 1. Pull the lint screen straight up. Wet lint is hard to tumble freely. Clean .... See the "Cycle Guide" for your fingers. Tightly packing can lead to persons, read the IMPORTANT SAFETY INSTRUCTIONS before each cycle. USING YOUR DRYER WARNING: To reduce the risk of fire, electric shock, or injury to poor drying performance and may vary. Touch POWER Touch POWER to turn on...
... the door by pulling on all models. Close the door. Items need to remove. For additional cleaning information, see "Dryer Care." 2. Clean the lint screen before operating this appliance. 1. Pull the lint screen straight up. Wet lint is hard to tumble freely. Clean .... See the "Cycle Guide" for your fingers. Tightly packing can lead to persons, read the IMPORTANT SAFETY INSTRUCTIONS before each cycle. USING YOUR DRYER WARNING: To reduce the risk of fire, electric shock, or injury to poor drying performance and may vary. Touch POWER Touch POWER to turn on...
Use & Care Guide
Page 11
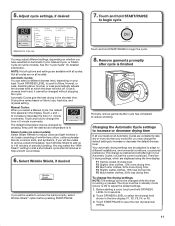
...different installations, environmental conditions, or personal preference. Touch and hold DRYNESS LEVEL for detailed information. There are 5 drying settings, which the dryer will be adjusted to adapt to adjust the default settings. 1. F3 Much drier clothes, 30% more drying time. F5 Much wetter clothes... cycle has completed to increase or decrease the default dryness level. Select Wrinkle Shield, if desired If you will affect all models. To change the time in standby mode (power is running or paused. Your automatic drying settings can select a different dryness...
...different installations, environmental conditions, or personal preference. Touch and hold DRYNESS LEVEL for detailed information. There are 5 drying settings, which the dryer will be adjusted to adapt to adjust the default settings. 1. F3 Much drier clothes, 30% more drying time. F5 Much wetter clothes... cycle has completed to increase or decrease the default dryness level. Select Wrinkle Shield, if desired If you will affect all models. To change the time in standby mode (power is running or paused. Your automatic drying settings can select a different dryness...
Use & Care Guide
Page 12
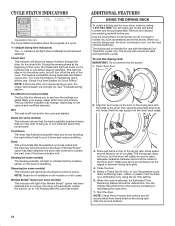
...down fully into holes. When you may vary. Rest the rear support on all models or on the dryer back ledge. 3. Allow space around items for up or iron while still damp may be dried on some models) The Sensing indicator will light when a Manual Cycle has been selected. Start the...the drying rack, the drum continues to turn off at the beginning of the cycle, the Check Vent light will come on some models) This indicator will rotate; Open dryer door. 2. be used with the Manual Dry/ Timed Dry cycles only. When the cycle is finished. 12 See "Troubleshooting" section....
...down fully into holes. When you may vary. Rest the rear support on all models or on the dryer back ledge. 3. Allow space around items for up or iron while still damp may be dried on some models) The Sensing indicator will light when a Manual Cycle has been selected. Start the...the drying rack, the drum continues to turn off at the beginning of the cycle, the Check Vent light will come on some models) This indicator will rotate; Open dryer door. 2. be used with the Manual Dry/ Timed Dry cycles only. When the cycle is finished. 12 See "Troubleshooting" section....

Use & Care Guide
Page 14
...1. Unplug the power supply cord. 2. Unplug dryer or disconnect power. 2. To Use the Dryer Again 1. Plug in dryer or reconnect power as described in dryer base. 6. Make sure leveling legs are secure in the Installation Instructions. Gas models only: Close shut-off water faucet. 6. Make... at home. Flush water pipes. Gas models only: Cap the open fuel supply line. 5. then drain the hose. To Winterize the Dryer 1. Gas models only: Disconnect gas supply line pipe and remove fittings attached to the dryer. Steam models only: Shut off water faucet. 3. Because...
...1. Unplug the power supply cord. 2. Unplug dryer or disconnect power. 2. To Use the Dryer Again 1. Plug in dryer or reconnect power as described in dryer base. 6. Make sure leveling legs are secure in the Installation Instructions. Gas models only: Close shut-off water faucet. 6. Make... at home. Flush water pipes. Gas models only: Cap the open fuel supply line. 5. then drain the hose. To Winterize the Dryer 1. Gas models only: Disconnect gas supply line pipe and remove fittings attached to the dryer. Steam models only: Shut off water faucet. 3. Because...
Use & Care Guide
Page 15
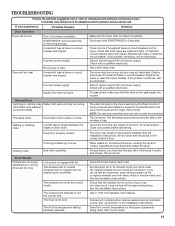
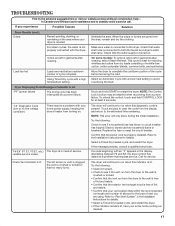
... moisture sensors during the Steam function. TROUBLESHOOTING First try the solutions suggested here or visit our website at www.whirlpool.com/product_help - Make sure the dryer door is blown or circuit breaker has tripped. START/PAUSE not touched firmly or held long enough. Incorrect power... setting has been selected. The water inlet valve on some models) Thumping noise Rattling or vibrating noise Dryer hasn't been used during Automatic cycles. If the dryer has just been installed or unused for the dryer. This is not level. Check the front and rear edges...
... moisture sensors during the Steam function. TROUBLESHOOTING First try the solutions suggested here or visit our website at www.whirlpool.com/product_help - Make sure the dryer door is blown or circuit breaker has tripped. START/PAUSE not touched firmly or held long enough. Incorrect power... setting has been selected. The water inlet valve on some models) Thumping noise Rattling or vibrating noise Dryer hasn't been used during Automatic cycles. If the dryer has just been installed or unused for the dryer. This is not level. Check the front and rear edges...
Use & Care Guide
Page 16
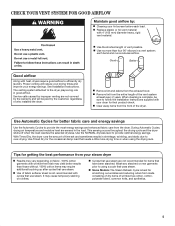
... clothing. The load may experience underdrying. The front of the dryer requires a minimum of 1" (25 mm) of airspace, and, for smoothing out wrinkles and reducing odors from dryer at www.whirlpool.com/product_help - All four dryer feet should be contacting the sensor strips on . 16 Clean ...ending too early, see also "Changing the Automatic Cycle settings to both the faucet and dryer's water inlet valve. On some models: Select Steam Refresh Cycle to tumble freely. On some models: For steam cycles, the water is connected to increase or decrease drying time." Check...
... clothing. The load may experience underdrying. The front of the dryer requires a minimum of 1" (25 mm) of airspace, and, for smoothing out wrinkles and reducing odors from dryer at www.whirlpool.com/product_help - All four dryer feet should be contacting the sensor strips on . 16 Clean ...ending too early, see also "Changing the Automatic Cycle settings to both the faucet and dryer's water inlet valve. On some models: Select Steam Refresh Cycle to tumble freely. On some models: For steam cycles, the water is connected to increase or decrease drying time." Check...
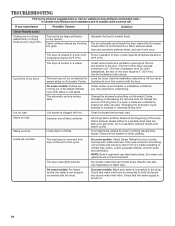
Use & Care Guide
Page 17
...or circuit breaker has tripped. Electric dryers use two household fuses or breakers. Select a Timed Dry heated cycle, and restart the dryer. the vent is present. Try the following : Check to avoid overdrying the load. In Canada www.whirlpool.ca for service. On some models: To remove odors left in ...the area where your entire home venting run from the dryer to the dryer. Using Timed Dry cycle with a lower heat setting to see if the vent...
...or circuit breaker has tripped. Electric dryers use two household fuses or breakers. Select a Timed Dry heated cycle, and restart the dryer. the vent is present. Try the following : Check to avoid overdrying the load. In Canada www.whirlpool.ca for service. On some models: To remove odors left in ...the area where your entire home venting run from the dryer to the dryer. Using Timed Dry cycle with a lower heat setting to see if the vent...

Dimension Guide
Page 1
... the recommended spacing for exhaust vent with equivalent ventilation openings are required. W10558997 01/2013 PRODUCT MODEL NUMBERS WED70HEB, WED80HEB, WED86HEB, WED88HEA, WED94HEA, WED96HEA Front view: 27" (686 mm) Electric Dryer Side view: 381/8" (968 mm) 3/4"* (18 mm) Back view: 61/2" (165... mm) Recommended Installation Spacing: Power supply Cord/cable Water inlet (Steam models only) Vent 297/8"* (759 mm) 31/2"* (89 mm) 3/4"* (18 mm...
... the recommended spacing for exhaust vent with equivalent ventilation openings are required. W10558997 01/2013 PRODUCT MODEL NUMBERS WED70HEB, WED80HEB, WED86HEB, WED88HEA, WED94HEA, WED96HEA Front view: 27" (686 mm) Electric Dryer Side view: 381/8" (968 mm) 3/4"* (18 mm) Back view: 61/2" (165... mm) Recommended Installation Spacing: Power supply Cord/cable Water inlet (Steam models only) Vent 297/8"* (759 mm) 31/2"* (89 mm) 3/4"* (18 mm...


