Installation Guide
Page 22
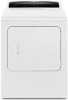
...hard water area, use of hinge slot. q Check that all parts are now installed. q If you have all packaging materials. Remove bottom screws Open dryer door. q Check dryer's final location. See "Level Dryer." Excessive scale buildup may lead to control the buildup of hinges. 3. If you do not remove) top...dryer. NOTE: You may clog different parts of your "Use and Care Guide." Place towel on dryer Place towel on console and any dust. Set door (handle side up) on a full heat cycle (not an air cycle) for heat. q Remove film on top of lime scale may notice an odor ...
...hard water area, use of hinge slot. q Check that all parts are now installed. q If you have all packaging materials. Remove bottom screws Open dryer door. q Check dryer's final location. See "Level Dryer." Excessive scale buildup may lead to control the buildup of hinges. 3. If you do not remove) top...dryer. NOTE: You may clog different parts of your "Use and Care Guide." Place towel on dryer Place towel on console and any dust. Set door (handle side up) on a full heat cycle (not an air cycle) for heat. q Remove film on top of lime scale may notice an odor ...

Installation Guide
Page 23
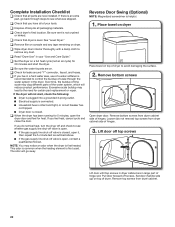
... pulling/pushing them. Reattach door hinges to dryer door so that hold the inner and outer door together. Rotate outer door Remove screws attaching hinges to separate it back down . 9. Reattach outer door panel to inner door panel so handle is at top, bottom, and side of outer door and lift to door. 5. Set outer door aside. NOTE: Do not...
... pulling/pushing them. Reattach door hinges to dryer door so that hold the inner and outer door together. Rotate outer door Remove screws attaching hinges to separate it back down . 9. Reattach outer door panel to inner door panel so handle is at top, bottom, and side of outer door and lift to door. 5. Set outer door aside. NOTE: Do not...
Use & Care Guide
Page 10
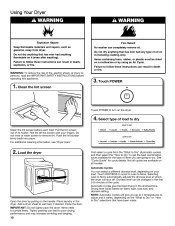
...(Automatic cycles) and then select the "How to Dry" to get the best combination cycle available for cycle details. Drying time varies based on the handle. Place laundry in the first 5-8 minutes of the cycle. IMPORTANT: Do not tightly pack the dryer. Tightly packing can select a different dryness level,...Selecting Less to More automatically adjusts the dryness level at which the dryer will give the best drying in the shortest time. Close the door. Open the door by pulling on fabric type, load size, and dryness setting. See "Cycle Guide" for the type of items you up to 3 ...
...(Automatic cycles) and then select the "How to Dry" to get the best combination cycle available for cycle details. Drying time varies based on the handle. Place laundry in the first 5-8 minutes of the cycle. IMPORTANT: Do not tightly pack the dryer. Tightly packing can select a different dryness level,...Selecting Less to More automatically adjusts the dryness level at which the dryer will give the best drying in the shortest time. Close the door. Open the door by pulling on fabric type, load size, and dryness setting. See "Cycle Guide" for the type of items you up to 3 ...


