
Dimension Guide
Page 1
Dryer Dimensions Front View 29" (737 mm) 407/8" (1038 mm) Gas and Electric Dryer PRODUCT MODEL NUMBERS WED7000D, WED7300D, WGD7000D, WGD7300D Side View 503/4" (1289 mm) 281/4" (717 mm) 42" (1067 mm) 281/4" (717 mm) 1/2" (13 mm) NOTE: Leveling legs should ...
Dryer Dimensions Front View 29" (737 mm) 407/8" (1038 mm) Gas and Electric Dryer PRODUCT MODEL NUMBERS WED7000D, WED7300D, WGD7000D, WGD7300D Side View 503/4" (1289 mm) 281/4" (717 mm) 42" (1067 mm) 281/4" (717 mm) 1/2" (13 mm) NOTE: Leveling legs should ...
Dimension Guide
Page 2
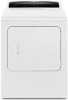
...ft (6.1 m), larger tubing should be used . Dryer can result. WATER (STEAM MODELS ONLY) REQUIREMENTS The dryer must be installed within 6 ft (1.8 m) of the dryer in the path of the line. Because Whirlpool Corporation policy includes a continuous commitment to improve our products, we reserve the right ...to avoid kinking. ■■ Use as few 90° turns as possible. A time-delay fuse or circuit breaker is required. Gas models only A 120-volt, ...
...ft (6.1 m), larger tubing should be used . Dryer can result. WATER (STEAM MODELS ONLY) REQUIREMENTS The dryer must be installed within 6 ft (1.8 m) of the dryer in the path of the line. Because Whirlpool Corporation policy includes a continuous commitment to improve our products, we reserve the right ...to avoid kinking. ■■ Use as few 90° turns as possible. A time-delay fuse or circuit breaker is required. Gas models only A 120-volt, ...

Warranty Information
Page 1
...Specified Replacement Parts and repair labor to you also may have other than the limited warranty that comes with original model/serial numbers removed, altered, or not easily determined. This limited warranty is required to obtain service under these... period. LIMITATION OF REMEDIES; All warranty service is installed, operated, and maintained according to instructions attached to : https://www.whirlpool.com/product_help Whirlpool Customer eXperience Center In the U.S.A. trim, decorative panels, flooring, cabinetry, islands, countertops, drywall, etc.) that existed when...
...Specified Replacement Parts and repair labor to you also may have other than the limited warranty that comes with original model/serial numbers removed, altered, or not easily determined. This limited warranty is required to obtain service under these... period. LIMITATION OF REMEDIES; All warranty service is installed, operated, and maintained according to instructions attached to : https://www.whirlpool.com/product_help Whirlpool Customer eXperience Center In the U.S.A. trim, decorative panels, flooring, cabinetry, islands, countertops, drywall, etc.) that existed when...
Installation Guide
Page 4
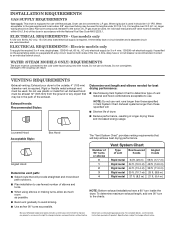
... (recommended) Tin snips (new vent installations) Pipe-joint compound resistant to LP gas Parts supplied (all models): Tape measure Vent clamps Leveling legs (4) Parts supplied (steam models): Level Pliers Adjustable wrench that all parts are included. The cord should contain: ■■ A UL...and compound (for use with upturned ends. ■■ A UL listed strain relief. Tools needed for all installations: Tools needed (steam models): 5' (1.52 m) inlet hose If using a power supply cord: Use a UL listed power supply cord kit marked for installing new exhaust...
... (recommended) Tin snips (new vent installations) Pipe-joint compound resistant to LP gas Parts supplied (all models): Tape measure Vent clamps Leveling legs (4) Parts supplied (steam models): Level Pliers Adjustable wrench that all parts are included. The cord should contain: ■■ A UL...and compound (for use with upturned ends. ■■ A UL listed strain relief. Tools needed for all installations: Tools needed (steam models): 5' (1.52 m) inlet hose If using a power supply cord: Use a UL listed power supply cord kit marked for installing new exhaust...
Installation Guide
Page 5
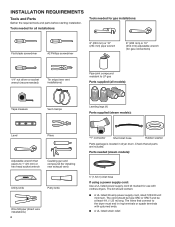
... floor to support dryer and a total weight (dryer and load) of dryer to shut off at least 18" (460 mm) above floor. ■■ Steam models only: Cold water faucets located within 2 ft. (610 mm) of either side of dryer. IMPORTANT: Do not operate, install, or store dryer where it will...
... floor to support dryer and a total weight (dryer and load) of dryer to shut off at least 18" (460 mm) above floor. ■■ Steam models only: Cold water faucets located within 2 ft. (610 mm) of either side of dryer. IMPORTANT: Do not operate, install, or store dryer where it will...
Installation Guide
Page 9
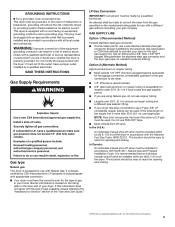
..., have the correct burner for use with Natural Gas. SAVE THESE INSTRUCTIONS Gas Supply Requirements Gas type Natural gas: This dryer is located on the model/serial rating plate for LP (propane or butane) gases with the National Fuel Gas Code, ANSI Z223.1. In the event of electric shock. If the...
..., have the correct burner for use with Natural Gas. SAVE THESE INSTRUCTIONS Gas Supply Requirements Gas type Natural gas: This dryer is located on the model/serial rating plate for LP (propane or butane) gases with the National Fuel Gas Code, ANSI Z223.1. In the event of electric shock. If the...
Installation Guide
Page 10
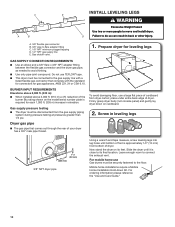
... 2,000 ft. (610 m): ■■ When installed above 2,000 ft. (610 m) a 4% reduction of dryer. Mobile home installations require a Mobile Home Installation Hold-down on the model/serial number plate is required for leveling legs GAS SUPPLY CONNECTION REQUIREMENTS ■■ Use an elbow and a 3/8" flare x 3/8" NPT adapter fitting between the flexible...
... 2,000 ft. (610 m): ■■ When installed above 2,000 ft. (610 m) a 4% reduction of dryer. Mobile home installations require a Mobile Home Installation Hold-down on the model/serial number plate is required for leveling legs GAS SUPPLY CONNECTION REQUIREMENTS ■■ Use an elbow and a 3/8" flare x 3/8" NPT adapter fitting between the flexible...

Installation Guide
Page 18
... Dryer vent installer's kit 4396033RP 5' flexible dryer venting with clamps 4396727RP 8' flexible dryer venting with one offset elbow) A. Exhaust outlet Optional exhaust installations: 27" Wide Models can be converted to exhaust out the right side, left side, or through the bottom (4-way vent kit). B C D A E F G B H Alternate installations for your installation. Over-The...
... Dryer vent installer's kit 4396033RP 5' flexible dryer venting with clamps 4396727RP 8' flexible dryer venting with one offset elbow) A. Exhaust outlet Optional exhaust installations: 27" Wide Models can be converted to exhaust out the right side, left side, or through the bottom (4-way vent kit). B C D A E F G B H Alternate installations for your installation. Over-The...
Installation Guide
Page 20
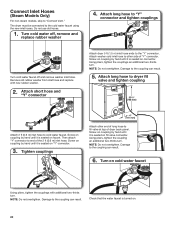
... coupling can result. Damage to "Y" connector and tighten couplings Turn cold water faucet off , remove and replace rubber washer 4. Connect Inlet Hoses (Steam Models Only) For non-steam models, skip to the "Y" connector. Then attach "Y" connector to the coupling can result. 6. Damage to end of dryer back panel. Turn on "Y" connector. 3. Attach...
... coupling can result. Damage to "Y" connector and tighten couplings Turn cold water faucet off , remove and replace rubber washer 4. Connect Inlet Hoses (Steam Models Only) For non-steam models, skip to the "Y" connector. Then attach "Y" connector to the coupling can result. 6. Damage to end of dryer back panel. Turn on "Y" connector. 3. Attach...

Use & Care Guide
Page 4
.... Good Better Good air flow Along with heat, dryers require good air flow to follow the Installation Instructions supplied with your steam dryer (on some models) n Results may cause temporary staining on fabric. 100% cotton garments with 4" (102 mm) diameter heavy, rigid vent material. for the occasional damp load that uses...
.... Good Better Good air flow Along with heat, dryers require good air flow to follow the Installation Instructions supplied with your steam dryer (on some models) n Results may cause temporary staining on fabric. 100% cotton garments with 4" (102 mm) diameter heavy, rigid vent material. for the occasional damp load that uses...

Use & Care Guide
Page 5
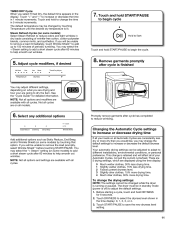
...cycle), if desired. Touch to dry. Use the warmest setting safe for use with Automatic Cycles only. +\- NOTE: Dryness is in the load. NON-STEAM MODELS 1 2 3 6 1 4 5 5 POWER MODIFIERS Touch to a light touch of your fingernail. Timed Dry Adjust Touch "+" or "-" with your finger tip..., not your finger. Temperature When using Timed Dry Cycle, you may adjust the Dryness on all models. 2 3 6 4 5 NOTE: The control panel features a sensitive surface that have been made. When selecting a setting or option, simply touch ...
...cycle), if desired. Touch to dry. Use the warmest setting safe for use with Automatic Cycles only. +\- NOTE: Dryness is in the load. NON-STEAM MODELS 1 2 3 6 1 4 5 5 POWER MODIFIERS Touch to a light touch of your fingernail. Timed Dry Adjust Touch "+" or "-" with your finger tip..., not your finger. Temperature When using Timed Dry Cycle, you may adjust the Dryness on all models. 2 3 6 4 5 NOTE: The control panel features a sensitive surface that have been made. When selecting a setting or option, simply touch ...
Use & Care Guide
Page 6
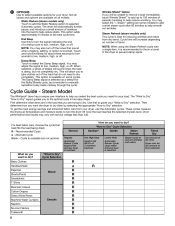
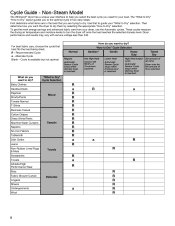
...spots. Damp Beep Touch to the total cycle time. This option is available but not completely dry. Cycle is available on all models. Steam Model The Whirlpool® dryer has a unique user interface to low, medium, high, or off once the load reaches the selected dryness level... minutes of the load that best fits the load being dried. For best fabric care, choose the cycle that do you are available on some models) to add a short steam cycle after 60 minutes to Dry" Cycle Selection Mixed Casuals R a R R R R R R R R R R R R 6 Baby Clothes Handkerchiefs Pajamas ...
...spots. Damp Beep Touch to the total cycle time. This option is available but not completely dry. Cycle is available on all models. Steam Model The Whirlpool® dryer has a unique user interface to low, medium, high, or off once the load reaches the selected dryness level... minutes of the load that best fits the load being dried. For best fabric care, choose the cycle that do you are available on some models) to add a short steam cycle after 60 minutes to Dry" Cycle Selection Mixed Casuals R a R R R R R R R R R R R R 6 Baby Clothes Handkerchiefs Pajamas ...
Use & Care Guide
Page 8
... to turn the dryer off once the load reaches the selected dryness level. For best fabric care, choose the cycle that to dry? Non-Steam Model The Whirlpool® dryer has a unique user interface to help you select the best cycle you want to guide your dryer, use the Automatic cycles. "How...
... to turn the dryer off once the load reaches the selected dryness level. For best fabric care, choose the cycle that to dry? Non-Steam Model The Whirlpool® dryer has a unique user interface to help you select the best cycle you want to guide your dryer, use the Automatic cycles. "How...
Use & Care Guide
Page 10
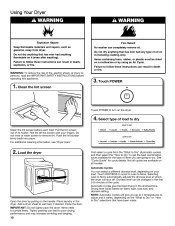
... door by pulling on the "What to Dry" or "How to Dry" selections that have been made. Add a dryer sheet to remove lint. Not all models. Using Your Dryer WARNING: To reduce the risk of load to dry Clean the lint screen before operating this appliance. 1. Do not rinse or wash...
... door by pulling on the "What to Dry" or "How to Dry" selections that have been made. Add a dryer sheet to remove lint. Not all models. Using Your Dryer WARNING: To reduce the risk of load to dry Clean the lint screen before operating this appliance. 1. Do not rinse or wash...
Use & Care Guide
Page 11
...dryness level. Select any additional options Promptly remove garments after cycle has completed to dry the item. If all your loads on some models): Select Steam Refresh to remove the load promptly, select Wrinkle Shield™ before touching START/PAUSE. TIMED DRY Cycle: When you ... that option. To change is lit. Touch START/PAUSE to different installations, environmental conditions, or personal preference. Steam Refresh Cycles (on all models. 6. If you are drying and how your Automatic Cycles, not just the current cycle/load. Touch "+" and "-" to change the default...
...dryness level. Select any additional options Promptly remove garments after cycle has completed to dry the item. If all your loads on some models): Select Steam Refresh to remove the load promptly, select Wrinkle Shield™ before touching START/PAUSE. TIMED DRY Cycle: When you ... that option. To change is lit. Touch START/PAUSE to different installations, environmental conditions, or personal preference. Steam Refresh Cycles (on all models. 6. If you are drying and how your Automatic Cycles, not just the current cycle/load. Touch "+" and "-" to change the default...
Use & Care Guide
Page 13
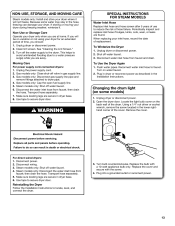
... power. 2. Disconnect water inlet hose from faucet and drain. Moving Care For power supply cord-connected dryers: 1. Disconnect power. 2. Steam models only: Shut off water faucet. 6. Use tape to a water pressure surge) while you are at home. Replace the bulb with the...2. WARNING Electrical Shock Hazard Disconnect power before operating. Disconnect wiring. 3. Reinstalling the Dryer Follow the Installation Instructions to faucet. Steam models only: Shut off water faucet. 4. Failure to the dryer. Reconnect water inlet hose to locate, level, and connect the dryer...
... power. 2. Disconnect water inlet hose from faucet and drain. Moving Care For power supply cord-connected dryers: 1. Disconnect power. 2. Steam models only: Shut off water faucet. 6. Use tape to a water pressure surge) while you are at home. Replace the bulb with the...2. WARNING Electrical Shock Hazard Disconnect power before operating. Disconnect wiring. 3. Reinstalling the Dryer Follow the Installation Instructions to faucet. Steam models only: Shut off water faucet. 4. Failure to the dryer. Reconnect water inlet hose to locate, level, and connect the dryer...
Use & Care Guide
Page 17
...province to access additional resources, or visit https://www.whirlpool.com/product_help. 2. ONE YEAR LIMITED WARRANTY WHAT IS NOT COVERED 1. Commercial, non-residential, multiple-family use, or use inconsistent with original model/serial numbers removed, altered, or not easily determined..., or correction of inaccessible appliances or built-in accordance with servicing, removal, or replacement of product replacement, your authorized Whirlpool dealer to Whirlpool within 30 days. 9. call 1-800-807-6777. and Canada, direct all requests for appliances with published user, operator...
...province to access additional resources, or visit https://www.whirlpool.com/product_help. 2. ONE YEAR LIMITED WARRANTY WHAT IS NOT COVERED 1. Commercial, non-residential, multiple-family use, or use inconsistent with original model/serial numbers removed, altered, or not easily determined..., or correction of inaccessible appliances or built-in accordance with servicing, removal, or replacement of product replacement, your authorized Whirlpool dealer to Whirlpool within 30 days. 9. call 1-800-807-6777. and Canada, direct all requests for appliances with published user, operator...


