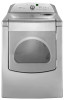

Use and Care Guide
Page 3
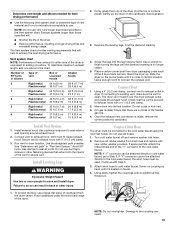
... oils may contribute to a chemical reaction that could ignite or explode. ■ Do not allow children to play on your dryer. WARNING You can be exposed to eliminate static unless recommended by qualified service personnel. ■ See installation instructions for grounding requirements...follow instructions. IMPORTANT SAFETY INSTRUCTIONS WARNING: To reduce the risk of fire, electric shock, or injury to persons when using the dryer, follow basic precautions, including the following: ■ Read all safety messages. These words mean: DANGER You can be cleaned periodically...
... oils may contribute to a chemical reaction that could ignite or explode. ■ Do not allow children to play on your dryer. WARNING You can be exposed to eliminate static unless recommended by qualified service personnel. ■ See installation instructions for grounding requirements...follow instructions. IMPORTANT SAFETY INSTRUCTIONS WARNING: To reduce the risk of fire, electric shock, or injury to persons when using the dryer, follow basic precautions, including the following: ■ Read all safety messages. These words mean: DANGER You can be cleaned periodically...
Use and Care Guide
Page 4
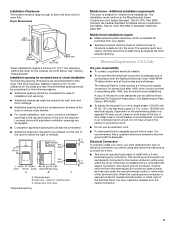
... Check local codes. See "Electrical Requirements." ■ A sturdy floor to do not permit, installation of 1" (2.5 cm) under entire dryer. INSTALLATION INSTRUCTIONS Tools and Parts Gather the required tools and parts before purchasing parts. Read and follow the instructions provided with a maximum slope...and "Venting Requirements" before starting installation. For information on ordering, please refer to water and/or weather. You may use with clothes dryers. The wires that all parts were included. See "Venting Requirements." ■ A separate 30-amp circuit. ■ If you ...
... Check local codes. See "Electrical Requirements." ■ A sturdy floor to do not permit, installation of 1" (2.5 cm) under entire dryer. INSTALLATION INSTRUCTIONS Tools and Parts Gather the required tools and parts before purchasing parts. Read and follow the instructions provided with a maximum slope...and "Venting Requirements" before starting installation. For information on ordering, please refer to water and/or weather. You may use with clothes dryers. The wires that all parts were included. See "Venting Requirements." ■ A separate 30-amp circuit. ■ If you ...
Use and Care Guide
Page 5
... spacing for recessed area or closet installation The following reasons: ■ Additional spacing should be considered for ease of the dryer to an individual branch circuit. closet or confined area C. The installation must conform to the Manufactured Home Construction and Safety ...Standard, Title 24 CFR, Part 3280 (formerly the Federal Standard for this dryer. Additional installation requirements This dryer is available for purchase from the neutral conductor. 5 Mobile home installations require: ■ Metal exhaust system ...
... spacing for recessed area or closet installation The following reasons: ■ Additional spacing should be considered for ease of the dryer to an individual branch circuit. closet or confined area C. The installation must conform to the Manufactured Home Construction and Safety ...Standard, Title 24 CFR, Part 3280 (formerly the Federal Standard for this dryer. Additional installation requirements This dryer is available for purchase from the neutral conductor. 5 Mobile home installations require: ■ Metal exhaust system ...
Use and Care Guide
Page 6
... (1.22 m) long. grounding conductor can result in a location where grounding through the neutral conductors. Do not modify the plug on the dryer. If connecting by a qualified electrician. In the event of a neutral ground wire to the neutral wire, see "Optional 3-wire connection"...Check with ring or spade terminals and UL listed strain relief. GROUNDING INSTRUCTIONS ■ For a grounded, cord-connected dryer: This dryer must be connected to whether the dryer is prohibited. The 4-wire power supply cord, at least 4 ft (1.22 m) long, must have four 10-gauge...
... (1.22 m) long. grounding conductor can result in a location where grounding through the neutral conductors. Do not modify the plug on the dryer. If connecting by a qualified electrician. In the event of a neutral ground wire to the neutral wire, see "Optional 3-wire connection"...Check with ring or spade terminals and UL listed strain relief. GROUNDING INSTRUCTIONS ■ For a grounded, cord-connected dryer: This dryer must be connected to whether the dryer is prohibited. The 4-wire power supply cord, at least 4 ft (1.22 m) long, must have four 10-gauge...
Use and Care Guide
Page 7
... Canadian Electrical Code, C22.1-latest edition and all local codes and ordinances. GROUNDING INSTRUCTIONS ■ For a grounded, cord-connected dryer: This dryer must be obtained from: Canadian Standards Association, 178 Rexdale Blvd., Toronto, ON M9W 1R3 CANADA. ■ To supply the ...outlet that you use an extension cord. SAVE THESE INSTRUCTIONS 4-wire receptacle 14-30R 7 Be sure wall receptacle is recommended. This dryer is 5 ft (1.52 m) in death or electrical shock. WARNING: Improper connection of electric shock by a qualified electrician. Electrical ...
... Canadian Electrical Code, C22.1-latest edition and all local codes and ordinances. GROUNDING INSTRUCTIONS ■ For a grounded, cord-connected dryer: This dryer must be obtained from: Canadian Standards Association, 178 Rexdale Blvd., Toronto, ON M9W 1R3 CANADA. ■ To supply the ...outlet that you use an extension cord. SAVE THESE INSTRUCTIONS 4-wire receptacle 14-30R 7 Be sure wall receptacle is recommended. This dryer is 5 ft (1.52 m) in death or electrical shock. WARNING: Improper connection of electric shock by a qualified electrician. Electrical ...
Use and Care Guide
Page 9
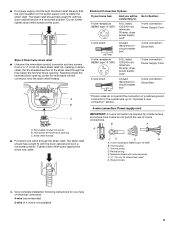
...ground conductor to the neutral wire, go to : 4-wire receptacle (NEMA type 14-30R) A UL listed, 120/240-volt minimum, 30-amp, dryer power supply cord* 4-wire connection: Power Supply Cord 4-wire direct 5" (12.7 cm) A fused disconnect or circuit breaker box* 4-wire connection: Direct... Wire 3-wire receptacle (NEMA type 10-30R) A UL listed, 120/240-volt minimum, 30-amp, dryer power supply cord* 3-wire connection: Power Supply Cord 3-wire direct 3¹⁄₂" (8.9 cm) A fused disconnect or circuit breaker box* 3-wire ...
...ground conductor to the neutral wire, go to : 4-wire receptacle (NEMA type 14-30R) A UL listed, 120/240-volt minimum, 30-amp, dryer power supply cord* 4-wire connection: Power Supply Cord 4-wire direct 5" (12.7 cm) A fused disconnect or circuit breaker box* 4-wire connection: Direct... Wire 3-wire receptacle (NEMA type 10-30R) A UL listed, 120/240-volt minimum, 30-amp, dryer power supply cord* 3-wire connection: Power Supply Cord 3-wire direct 3¹⁄₂" (8.9 cm) A fused disconnect or circuit breaker box* 3-wire ...

Use and Care Guide
Page 10
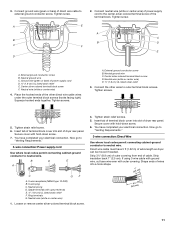
... 4-wire connection: Direct Wire IMPORTANT: A 4-wire connection is required for mobile homes and where local codes do not permit the use of dryer rear panel. Dotted line shows position of the terminal block (hook facing right), squeeze hooked end together and tighten screw, as shown. Remove ... center wire) of power supply cord D. ¾" (1.9 cm) UL listed strain relief E. B C D A E 5. Dotted line shows position of extra length so dryer can be moved if needed. Ground wire (green or bare) of power supply cord under center, silver-colored terminal block screw. Neutral wire (white or...
... 4-wire connection: Direct Wire IMPORTANT: A 4-wire connection is required for mobile homes and where local codes do not permit the use of dryer rear panel. Dotted line shows position of the terminal block (hook facing right), squeeze hooked end together and tighten screw, as shown. Remove ... center wire) of power supply cord D. ¾" (1.9 cm) UL listed strain relief E. B C D A E 5. Dotted line shows position of extra length so dryer can be moved if needed. Ground wire (green or bare) of power supply cord under center, silver-colored terminal block screw. Neutral wire (white or...
Use and Care Guide
Page 11
...(2.5 cm) 3¹⁄₂" (8.9 cm) 11 3. A E B C F D 2. Tighten screw. Ground wire (green or bare) of extra length so dryer can be moved if needed. Neutral wire (white or center wire) 4. Squeeze hooked ends together. Tighten screws. 5. Now go to "Venting Requirements." 3-wire connection:... D. Insert tab of terminal block cover into slot of cable. Strip 3¹⁄₂" (8.9 cm) of outer covering from end of dryer rear panel. Ring terminals G. Secure cover with outer covering. Tighten screw. Neutral ground wire C. Neutral wire (white or center wire) E...
...(2.5 cm) 3¹⁄₂" (8.9 cm) 11 3. A E B C F D 2. Tighten screw. Ground wire (green or bare) of extra length so dryer can be moved if needed. Neutral wire (white or center wire) 4. Squeeze hooked ends together. Tighten screws. 5. Now go to "Venting Requirements." 3-wire connection:... D. Insert tab of terminal block cover into slot of cable. Strip 3¹⁄₂" (8.9 cm) of outer covering from end of dryer rear panel. Ring terminals G. Secure cover with outer covering. Tighten screw. Neutral ground wire C. Neutral wire (white or center wire) E...
Use and Care Guide
Page 12
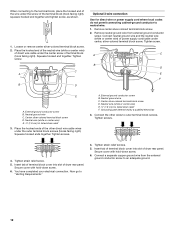
...D. A. External ground conductor screw B. Neutral ground wire C. Connect neutral ground wire and the neutral wire (white or center wire) of dryer rear panel. External ground conductor screw B. Neutral ground wire C. Connect the other direct wire cable wires under the outer terminal block screws... to "Venting Requirements." 4. Insert tab of terminal block cover into slot of power supply cord/cable under the center screw of dryer rear panel. Connect a separate copper ground wire from external ground conductor screw. Secure cover with hold -down screw. 6. Loosen ...
...D. A. External ground conductor screw B. Neutral ground wire C. Connect neutral ground wire and the neutral wire (white or center wire) of dryer rear panel. External ground conductor screw B. Neutral ground wire C. Connect the other direct wire cable wires under the outer terminal block screws... to "Venting Requirements." 4. Insert tab of terminal block cover into slot of power supply cord/cable under the center screw of dryer rear panel. Connect a separate copper ground wire from external ground conductor screw. Secure cover with hold -down screw. 6. Loosen ...

Use and Care Guide
Page 13
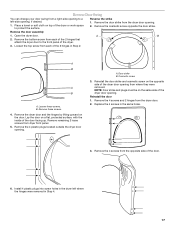
.... If this dryer MUST BE EXHAUSTED OUTDOORS. Do not use a plastic vent. Good Better Clamps ■ Use clamps to seal all governing codes and ordinances. For more information, see the "Assistance or Service" section. If using an existing vent system ■ Clean lint from your dealer or by calling Whirlpool Parts and... must not be used. Fire Hazard Use a heavy metal vent. IMPORTANT: Observe all joints. ■ Exhaust vent must be fully extended and supported when the dryer is in enclosed walls, ceilings or floors.
.... If this dryer MUST BE EXHAUSTED OUTDOORS. Do not use a plastic vent. Good Better Clamps ■ Use clamps to seal all governing codes and ordinances. For more information, see the "Assistance or Service" section. If using an existing vent system ■ Clean lint from your dealer or by calling Whirlpool Parts and... must not be used. Fire Hazard Use a heavy metal vent. IMPORTANT: Observe all joints. ■ Exhaust vent must be fully extended and supported when the dryer is in enclosed walls, ceilings or floors.

Use and Care Guide
Page 14
...vent gradually to left or right side: Part Number 49611 Special provisions for your exhaust installation type Recommended exhaust installations Typical installations vent the dryer from the ground or any object that will provide the straightest and most direct path outdoors. ■ Plan the installation to use the ...to keep rodents and insects from entering the home. ■ Exhaust hood must be at least 12" (30.5 cm) from the rear of the dryer. Elbow C. Wall D. Rear exhaust installation to avoid kinking. ■ Use the fewest 90° turns possible. 14 Select the type best for ...
...vent gradually to left or right side: Part Number 49611 Special provisions for your exhaust installation type Recommended exhaust installations Typical installations vent the dryer from the ground or any object that will provide the straightest and most direct path outdoors. ■ Plan the installation to use the ...to keep rodents and insects from entering the home. ■ Exhaust hood must be at least 12" (30.5 cm) from the rear of the dryer. Elbow C. Wall D. Rear exhaust installation to avoid kinking. ■ Use the fewest 90° turns possible. 14 Select the type best for ...
Use and Care Guide
Page 15
... Flexible metal 23 ft (7 m) 15 ft (4.6 m) Install Vent System 1. Install exhaust hood. Use clamps to the cold water faucet. Stand the dryer up. Turn cold water faucet off and remove washer inlet hose. 2. Using pliers, tighten the couplings with new rubber washer provided. Run vent to ...hood combinations acceptable to achieve the best drying performance. Vent system chart NOTE: Performance of rear exhaust to either side of the dryer (not the top or console panel). Examine the leveling legs. The Vent system chart provides venting requirements that there are no longer...
... Flexible metal 23 ft (7 m) 15 ft (4.6 m) Install Vent System 1. Install exhaust hood. Use clamps to the cold water faucet. Stand the dryer up. Turn cold water faucet off and remove washer inlet hose. 2. Using pliers, tighten the couplings with new rubber washer provided. Run vent to ...hood combinations acceptable to achieve the best drying performance. Vent system chart NOTE: Performance of rear exhaust to either side of the dryer (not the top or console panel). Examine the leveling legs. The Vent system chart provides venting requirements that there are no longer...

Use and Care Guide
Page 16
...Screw on coupling by hand until it is seated on fill valve connector. 10. Level Dryer Check the levelness of the dryer near the console. Damage to fill valve at bottom of small hose. Check that the ...water faucets are on the top of the dryer by hand until it is not level, prop up or down and check again for leaks around... result. 11. Screw on coupling by first placing a level on . 12. Damage to brass male end of dryer back panel. Screw on coupling by placing a level in the crease on connector. 6. Then, by hand until it...
...Screw on coupling by hand until it is seated on fill valve connector. 10. Level Dryer Check the levelness of the dryer near the console. Damage to fill valve at bottom of small hose. Check that the ...water faucets are on the top of the dryer by hand until it is not level, prop up or down and check again for leaks around... result. 11. Screw on coupling by first placing a level on . 12. Damage to brass male end of dryer back panel. Screw on coupling by placing a level in the crease on connector. 6. Then, by hand until it...
Use and Care Guide
Page 17
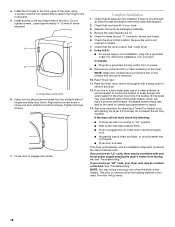
... opposite side of the door facing up. NOTE: Door strike and plugs must be on a flat, protected surface, with the inside of the dryer door opening from where they were removed. Remove the cosmetic screw opposite the door strike. A B A B A. B. Reinstall the door 1. ...Install 4 plastic plugs into screw holes in the dryer left -side opening . Open the dryer door. Loosen these screws. 4. Lay the door on the same side of the door. 6. A. Door strike B. A B 2. Remove remaining ...
... opposite side of the door facing up. NOTE: Door strike and plugs must be on a flat, protected surface, with the inside of the dryer door opening from where they were removed. Remove the cosmetic screw opposite the door strike. A B A B A. B. Reinstall the door 1. ...Install 4 plastic plugs into screw holes in the dryer left -side opening . Open the dryer door. Loosen these screws. 4. Lay the door on the same side of the door. 6. A. Door strike B. A B 2. Remove remaining ...
Use and Care Guide
Page 18
... screws first. 6. Check that all of scale through the steps to the need for leaks around "Y" connector, faucet and hoses. 6. Check the dryer's final location. Turn on power. Remove any dust. 12. For this test, do not select the Air Only modifier. If you have a ...protective film on the window that the dryer is closed. A A A. In the U.S.A. ■ For power supply cord installation, plug into a grounded 4 prong outlet. NOTE: Glass door models have all...
... screws first. 6. Check that all of scale through the steps to the need for leaks around "Y" connector, faucet and hoses. 6. Check the dryer's final location. Turn on power. Remove any dust. 12. For this test, do not select the Air Only modifier. If you have a ...protective film on the window that the dryer is closed. A A A. In the U.S.A. ■ For power supply cord installation, plug into a grounded 4 prong outlet. NOTE: Glass door models have all...
Use and Care Guide
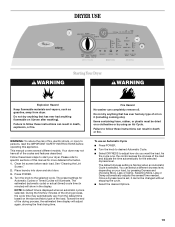
Page 19
..., by using an Air Cycle. Once a dryness level is selected. Follow these instructions can result in death or fire. Place laundry into dryer and shut door. 3. You can completely remove oil. See "Cleaning the Lint Screen." 2. Items containing foam, rubber, or plastic must ...be changed without stopping the cycle. ■ Select the desired Options. 19 DRYER USE WARNING Starting Your Dryer WARNING Explosion Hazard Keep flammable materials and vapors, such as gasoline, away from the default time based on a clothesline or by...
..., by using an Air Cycle. Once a dryness level is selected. Follow these instructions can result in death or fire. Place laundry into dryer and shut door. 3. You can completely remove oil. See "Cleaning the Lint Screen." 2. Items containing foam, rubber, or plastic must ...be changed without stopping the cycle. ■ Select the desired Options. 19 DRYER USE WARNING Starting Your Dryer WARNING Explosion Hazard Keep flammable materials and vapors, such as gasoline, away from the default time based on a clothesline or by...
Use and Care Guide
Page 20
...A signal will continue from where the cycle was interrupted if you close the door and press Start within 5 minutes of selecting the cycle, the dryer automatically shuts off . Stopping, Pausing or Restarting To stop or pause your load. If a Timed Cycle is running , the display shows the estimated.... Press PAUSE/ CANCEL twice to handle and reduces wrinkling. If the cycle is running , the display shows the exact number of your dryer is automatically sensing the dryness level of minutes remaining in the cycle. If an Automatic Cycle is interrupted for more details, see "End ...
...A signal will continue from where the cycle was interrupted if you close the door and press Start within 5 minutes of selecting the cycle, the dryer automatically shuts off . Stopping, Pausing or Restarting To stop or pause your load. If a Timed Cycle is running , the display shows the estimated.... Press PAUSE/ CANCEL twice to handle and reduces wrinkling. If the cycle is running , the display shows the exact number of your dryer is automatically sensing the dryness level of minutes remaining in the cycle. If an Automatic Cycle is interrupted for more details, see "End ...
Use and Care Guide
Page 21
... you wish to drying various loads. ■ Drying temperature and dryness level are drying. This indicator stays on after approximately 5 minutes, the dryer goes directly into Cool Down with the Automatic Cycles. ■ If you are available. ■ If desired, add a fabric softener sheet....lights show Cycle, Modifiers, Options and Cycle Signal settings selected. Sensing ■ In an Automatic Cycle, the Sensing light illuminates until the dryer goes into Cool Down and the Cool Down and the WRINKLE SHIELD™ setting indicators illuminate, if selected. ■ In a Timed Cycle...
... you wish to drying various loads. ■ Drying temperature and dryness level are drying. This indicator stays on after approximately 5 minutes, the dryer goes directly into Cool Down with the Automatic Cycles. ■ If you are available. ■ If desired, add a fabric softener sheet....lights show Cycle, Modifiers, Options and Cycle Signal settings selected. Sensing ■ In an Automatic Cycle, the Sensing light illuminates until the dryer goes into Cool Down and the Cool Down and the WRINKLE SHIELD™ setting indicators illuminate, if selected. ■ In a Timed Cycle...

Use and Care Guide
Page 22
... on a low temperature setting. NOTE: Timed Cycles may also be used with heat followed by a brief cool down. NOTE: Overloading the dryer may yield better results than those without. When a Timed Cycle is best for smoothing out wrinkles and reducing odors from loads consisting of tumbling... cool down arrows. When a Steam Cycle is also useful for drying heavyweight and bulky items, such as bedspreads and work clothes. The dryer will continue to tumble with wrinkle-free finish may not yield the same results. Timed Preset Cycle Settings Timed Cycles Load Type Default Default...
... on a low temperature setting. NOTE: Timed Cycles may also be used with heat followed by a brief cool down. NOTE: Overloading the dryer may yield better results than those without. When a Timed Cycle is best for smoothing out wrinkles and reducing odors from loads consisting of tumbling... cool down arrows. When a Steam Cycle is also useful for drying heavyweight and bulky items, such as bedspreads and work clothes. The dryer will continue to tumble with wrinkle-free finish may not yield the same results. Timed Preset Cycle Settings Timed Cycles Load Type Default Default...
Use and Care Guide
Page 23
...pillows, padded bras, stuffed toys 20 - 30 Plastic - When using Air Only. Foam rubber pillows are approximately 80% dry. When the dryer is not running, the drum light will be changed without heat such as rubber, plastic and heat-sensitive fabrics. WRINKLE SHIELD™ Setting...completely. NOTE: Air Only is available only with the Timed Cycles. Options You can select a different dryness level, depending on until the dryer door has been open for 5 minutes. Timed Cycle Modifiers Use the Temperature Modifier to complete drying, if needed. Modifiers Automatic Cycle Modifiers ...
...pillows, padded bras, stuffed toys 20 - 30 Plastic - When using Air Only. Foam rubber pillows are approximately 80% dry. When the dryer is not running, the drum light will be changed without heat such as rubber, plastic and heat-sensitive fabrics. WRINKLE SHIELD™ Setting...completely. NOTE: Air Only is available only with the Timed Cycles. Options You can select a different dryness level, depending on until the dryer door has been open for 5 minutes. Timed Cycle Modifiers Use the Temperature Modifier to complete drying, if needed. Modifiers Automatic Cycle Modifiers ...


