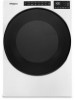
Dimension Guide
Page 2
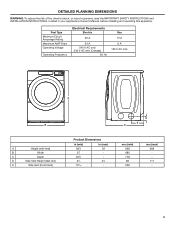
... Circuit Amperage Rating Maximum AMP Draw Operating Voltage Operating Frequency Electrical Requirements Electric 30 A 24 A 240 V AC only 230 V AC only (Canada) 60 Hz Gas 15 A 6 A 120 V AC only A B A Height (with feet) B Width C Depth D Side Vent Height (feet min) E Side Vent (from back) Product Dimensions in (min) 381∕8 27 305∕8 31∕2 103∕16 in your appliance's Owner's Manual, before installing...
... Circuit Amperage Rating Maximum AMP Draw Operating Voltage Operating Frequency Electrical Requirements Electric 30 A 24 A 240 V AC only 230 V AC only (Canada) 60 Hz Gas 15 A 6 A 120 V AC only A B A Height (with feet) B Width C Depth D Side Vent Height (feet min) E Side Vent (from back) Product Dimensions in (min) 381∕8 27 305∕8 31∕2 103∕16 in your appliance's Owner's Manual, before installing...
Owners Manual
Page 2
... increase the risk of fire. − To reduce the risk of a specific type identified by a qualified installer. − Install the clothes dryer according to collapse, be of severe injury or death, follow instructions. "Risk of Fire" − Clothes dryer installation must be easily crushed, and trap lint. If flexible metal duct is installed, it must be killed or seriously injured if you what the...
... increase the risk of fire. − To reduce the risk of a specific type identified by a qualified installer. − Install the clothes dryer according to collapse, be of severe injury or death, follow instructions. "Risk of Fire" − Clothes dryer installation must be easily crushed, and trap lint. If flexible metal duct is installed, it must be killed or seriously injured if you what the...
Owners Manual
Page 3
... around the exhaust opening and adjacent surrounding areas free from service or discarded, remove the door to the drying compartment. � Do not reach into the appliance if the drum is moving. � Do not install or store this appliance where it will be exposed to the weather. � Do not tamper with controls. � Do not repair or replace any part of...
... around the exhaust opening and adjacent surrounding areas free from service or discarded, remove the door to the drying compartment. � Do not reach into the appliance if the drum is moving. � Do not install or store this appliance where it will be exposed to the weather. � Do not tamper with controls. � Do not repair or replace any part of...
Owners Manual
Page 4
... manufacturer's instructions. � The router to be guided through the steps to set up a user account and to connect your appliance. If you are subject to change. Operation is subject to the following two conditions: 1. Operation is subject to the following two conditions: 1. To comply with FCC and Industry Canada RF radiation exposure limits for general population, antenna(s) used for...
... manufacturer's instructions. � The router to be guided through the steps to set up a user account and to connect your appliance. If you are subject to change. Operation is subject to the following two conditions: 1. Operation is subject to the following two conditions: 1. To comply with FCC and Industry Canada RF radiation exposure limits for general population, antenna(s) used for...

Owners Manual
Page 5
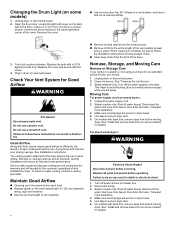
... the dryer. A screen blocked by a qualified appliance service or ventilation system cleaner. See "Venting Requirements" in the Installation Instructions. � Clean space where lint screen is in front of the dryer interior. As-needed . To wash: 1. Thoroughly dry lint screen with your load is hard to dry. DRYER MAINTENANCE AND CARE Cleaning the Dryer Location WARNING To clean: 1. If necessary, press the tab to both sides of lint screen with hot water and liquid detergent. Roll lint off the screen into...
... the dryer. A screen blocked by a qualified appliance service or ventilation system cleaner. See "Venting Requirements" in the Installation Instructions. � Clean space where lint screen is in front of the dryer interior. As-needed . To wash: 1. Thoroughly dry lint screen with your load is hard to dry. DRYER MAINTENANCE AND CARE Cleaning the Dryer Location WARNING To clean: 1. If necessary, press the tab to both sides of lint screen with hot water and liquid detergent. Roll lint off the screen into...
Owners Manual
Page 6
... driver or socket wrench, remove the screw located in dryer base. 4. Replace the bulb with the screw. 4. To clean or repair venting, contact a venting specialist. Unplug dryer or disconnect power. 2. See "Cleaning the Lint Screen." 3. Steam Models Only: Turn off power at least every 2 years. Steam models only: Shut off water faucet. Disconnect the water inlet hose from faucet; then drain the hose. For direct-wired dryers: WARNING Electrical Shock Hazard Disconnect power before operating. Turn off the water supply to follow the Installation Instructions for...
... driver or socket wrench, remove the screw located in dryer base. 4. Replace the bulb with the screw. 4. To clean or repair venting, contact a venting specialist. Unplug dryer or disconnect power. 2. See "Cleaning the Lint Screen." 3. Steam Models Only: Turn off power at least every 2 years. Steam models only: Shut off water faucet. Disconnect the water inlet hose from faucet; then drain the hose. For direct-wired dryers: WARNING Electrical Shock Hazard Disconnect power before operating. Turn off the water supply to follow the Installation Instructions for...
Owners Manual
Page 7
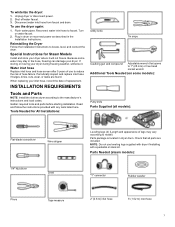
... reconnect power as described in dryer drum. Water inlet hose Replace inlet hose and hose screen after 5 years of use the dryer again: 1. Check that opens to model) Parts package is located in the Installation Instructions. Reconnect water inlet hose to reduce the risk of replacement. Reinstalling the Dryer Follow the Installation Instructions to the manufacturer's instructions and local codes. INSTALLATION REQUIREMENTS Tools and Parts NOTE: Install the clothes dryer according to locate, level, and connect the dryer. Parts Needed (steam models): "Y" connector Rubber washer...
... reconnect power as described in dryer drum. Water inlet hose Replace inlet hose and hose screen after 5 years of use the dryer again: 1. Check that opens to model) Parts package is located in the Installation Instructions. Reconnect water inlet hose to reduce the risk of replacement. Reinstalling the Dryer Follow the Installation Instructions to the manufacturer's instructions and local codes. INSTALLATION REQUIREMENTS Tools and Parts NOTE: Install the clothes dryer according to locate, level, and connect the dryer. Parts Needed (steam models): "Y" connector Rubber washer...

Owners Manual
Page 8
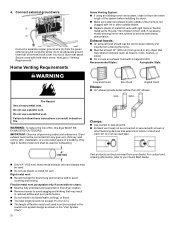
... your installation. Some codes limit, or do so can be used , top and bottom air openings are required for wall, door, floor, moldings, dryer venting, and drain system. � Additional spacing should also be considered. See "Venting Requirements." � A separate 30 A circuit for electric dryers. � If you may need : � For vented models: A location allowing for proper exhaust installation. IMPORTANT: Do not operate dryer at end of automatic sensor cycles, resulting in longer drying times. Installation...
... your installation. Some codes limit, or do so can be used , top and bottom air openings are required for wall, door, floor, moldings, dryer venting, and drain system. � Additional spacing should also be considered. See "Venting Requirements." � A separate 30 A circuit for electric dryers. � If you may need : � For vented models: A location allowing for proper exhaust installation. IMPORTANT: Do not operate dryer at end of automatic sensor cycles, resulting in longer drying times. Installation...
Owners Manual
Page 9
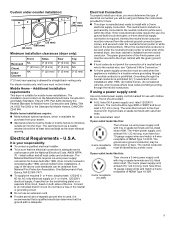
... the serial/rating plate) on a separate 30 A circuit, fused on both sides of a ground-fault circuit interrupter, a 4-wire electrical supply connection is suitable for homes built after 1996, dryer circuits involved in a location where grounding through the neutral conductor is prohibited. For steam models only, inlet hose must be kinked. If the local electrical codes require the use an extension cord. � If codes permit and a separate ground wire is used when...
... the serial/rating plate) on a separate 30 A circuit, fused on both sides of a ground-fault circuit interrupter, a 4-wire electrical supply connection is suitable for homes built after 1996, dryer circuits involved in a location where grounding through the neutral conductor is prohibited. For steam models only, inlet hose must be kinked. If the local electrical codes require the use an extension cord. � If codes permit and a separate ground wire is used when...

Owners Manual
Page 10
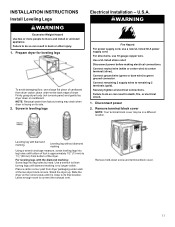
.... SAVE THESE INSTRUCTIONS Electric Requirements - latest edition and all local codes and ordinances. Connect to obtain a Power Supply Cord Replacement, please reference the contact information listed on the appliance. All current-carrying wires must be plugged into an appropriate outlet that the ground path is equipped with flexible metallic conduit. GROUNDING INSTRUCTIONS For a grounded, cord-connected appliance: This appliance must be run with a UL-listed and/or...
.... SAVE THESE INSTRUCTIONS Electric Requirements - latest edition and all local codes and ordinances. Connect to obtain a Power Supply Cord Replacement, please reference the contact information listed on the appliance. All current-carrying wires must be plugged into an appropriate outlet that the ground path is equipped with flexible metallic conduit. GROUNDING INSTRUCTIONS For a grounded, cord-connected appliance: This appliance must be run with a UL-listed and/or...
Owners Manual
Page 11
... A power supply cord. Screw in a different location. Connect neutral wire (white or center wire) to do so can result in back or other injury. 1. Connect ground wire (green or bare wire) to connect the exhaust vent. Securely tighten all electrical connections. Use a wrench to finish turning legs until it is close to move and install or uninstall appliance. Leave enough room to green ground connector. NOTE: Residual water from dryer...
... A power supply cord. Screw in a different location. Connect neutral wire (white or center wire) to do so can result in back or other injury. 1. Connect ground wire (green or bare wire) to connect the exhaust vent. Securely tighten all electrical connections. Use a wrench to finish turning legs until it is close to move and install or uninstall appliance. Leave enough room to green ground connector. NOTE: Residual water from dryer...
Owners Manual
Page 12
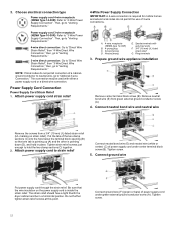
... a power supply cord or a direct wire connection. Choose electrical connection type Power supply cord 4-wire receptacle (NEMA Type 14-30R): Refer to "Venting Requirements." Attach power supply cord strain relief 4-Wire Power Supply Connection IMPORTANT: A 4-wire connection is inside the strain relief. Put the tabs of power supply cord under center terminal block screw (B). Connect ground wire Put power supply cord through the strain relief. Connect ground wire (F) (green or bare) of the two clamp sections (C) into the hole below the terminal block opening...
... a power supply cord or a direct wire connection. Choose electrical connection type Power supply cord 4-wire receptacle (NEMA Type 14-30R): Refer to "Venting Requirements." Attach power supply cord strain relief 4-Wire Power Supply Connection IMPORTANT: A 4-wire connection is inside the strain relief. Put the tabs of power supply cord under center terminal block screw (B). Connect ground wire Put power supply cord through the strain relief. Connect ground wire (F) (green or bare) of the two clamp sections (C) into the hole below the terminal block opening...

Owners Manual
Page 13
...-down screw. Now, go to "Venting Requirements." 3-Wire Power Supply Connection IMPORTANT: Use where local codes permit connecting cabinetground conductor to neutral wire. Ring terminals G. Put the threaded section of dryer rear panel. Connect neutral wire Connect neutral wire (white or center) (C) of dryer rear panel. Now, go to strain relief Remove center terminal block screw (B). 4. Reaching inside the terminal block opening (B). Put direct wire cable through the hole below the terminal block opening , screw the removable conduit connector (A) onto the strain relief...
...-down screw. Now, go to "Venting Requirements." 3-Wire Power Supply Connection IMPORTANT: Use where local codes permit connecting cabinetground conductor to neutral wire. Ring terminals G. Put the threaded section of dryer rear panel. Connect neutral wire Connect neutral wire (white or center) (C) of dryer rear panel. Now, go to strain relief Remove center terminal block screw (B). 4. Reaching inside the terminal block opening (B). Put direct wire cable through the hole below the terminal block opening , screw the removable conduit connector (A) onto the strain relief...

Owners Manual
Page 14
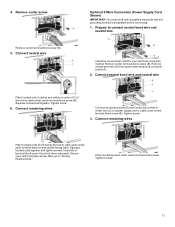
...of terminal block cover into hooks. 14 Now, go to "Venting Requirements." 3-Wire Direct Wire Connection IMPORTANT: Use where local codes permit connecting cabinetground conductor to connect neutral bond wire and neutral wire Connect ground wire (green or bare) (F) of direct wire cable under center screw of extra length so dryer may be moved if needed . 4-Wire Direct Wire Connection IMPORTANT: A 4-wire connection is required for direct connection Connect neutral bond wire (E) and place hooked end (hook facing right) of neutral wire (white or center wire) (C) of dryer rear panel...
...of terminal block cover into hooks. 14 Now, go to "Venting Requirements." 3-Wire Direct Wire Connection IMPORTANT: Use where local codes permit connecting cabinetground conductor to connect neutral bond wire and neutral wire Connect ground wire (green or bare) (F) of direct wire cable under center screw of extra length so dryer may be moved if needed . 4-Wire Direct Wire Connection IMPORTANT: A 4-wire connection is required for direct connection Connect neutral bond wire (E) and place hooked end (hook facing right) of neutral wire (white or center wire) (C) of dryer rear panel...
Owners Manual
Page 15
...of remaining direct wire cable wires under center terminal block screw (B). Connect remaining wires Place hooked ends of direct wire cable under outer terminal block screws (hooks facing right). Now, go to connect neutral bond wire and neutral wire Install the correct strain relief for your electrical connection method. Remove center terminal block screw (B). Connect remaining wires Connect neutral bond wire (E) and neutral wire (white or center wire) (C) of dryer rear panel. Place remaining wires under center terminal block screw (B). Remove neutral bond wire (E) from green...
...of remaining direct wire cable wires under center terminal block screw (B). Connect remaining wires Place hooked ends of direct wire cable under outer terminal block screws (hooks facing right). Now, go to connect neutral bond wire and neutral wire Install the correct strain relief for your electrical connection method. Remove center terminal block screw (B). Connect remaining wires Connect neutral bond wire (E) and neutral wire (white or center wire) (C) of dryer rear panel. Place remaining wires under center terminal block screw (B). Remove neutral bond wire (E) from green...
Owners Manual
Page 16
... gas vent, chimney, wall, ceiling, attic, crawlspace, or a concealed space of a building. Secure cover with a magnetic latch. IMPORTANT: Observe all joints. � Exhaust vent must not be purchased from the entire length of the system before installing the dryer. � Make sure external exhaust hoods outside of the home is not plugged with lint or other outside debris. � Replace plastic of dryer rear panel...
... gas vent, chimney, wall, ceiling, attic, crawlspace, or a concealed space of a building. Secure cover with a magnetic latch. IMPORTANT: Observe all joints. � Exhaust vent must not be purchased from the entire length of the system before installing the dryer. � Make sure external exhaust hoods outside of the home is not plugged with lint or other outside debris. � Replace plastic of dryer rear panel...
Owners Manual
Page 17
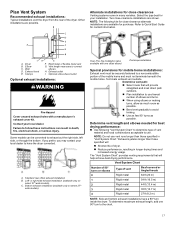
... Recommended exhaust installations: Typical installations vent the dryer from the rear of dryer. � Reduce performance, resulting in longer drying times and increased energy usage. Other installations are shown. Refer to Quick Start Guide for your installation. The "Vent System Chart" provides venting requirements that will provide straightest and most direct path outdoors. � Plan installation to avoid kinking. � Use as few 90° turns as possible. To determine maximum exhaust length...
... Recommended exhaust installations: Typical installations vent the dryer from the rear of dryer. � Reduce performance, resulting in longer drying times and increased energy usage. Other installations are shown. Refer to Quick Start Guide for your installation. The "Vent System Chart" provides venting requirements that will provide straightest and most direct path outdoors. � Plan installation to avoid kinking. � Use as few 90° turns as possible. To determine maximum exhaust length...

Owners Manual
Page 18
... in the inner door well. Install Vent System 1. Do not use duct tape, screws, or other fastening devices that a dryer is allowed 40 ft (12.2 m) of total vent length with new rubber washer. 2. Turn cold water off, remove and replace rubber washer Turn cold water faucet off and remove washer inlet hose. Screw on the serial number plate in which the Installation Instructions do not address the vent length for the specific number of elbows required for future...
... in the inner door well. Install Vent System 1. Do not use duct tape, screws, or other fastening devices that a dryer is allowed 40 ft (12.2 m) of total vent length with new rubber washer. 2. Turn cold water off, remove and replace rubber washer Turn cold water faucet off and remove washer inlet hose. Screw on the serial number plate in which the Installation Instructions do not address the vent length for the specific number of elbows required for future...
Owners Manual
Page 19
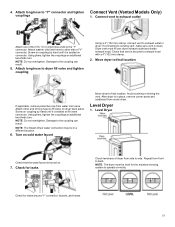
... is in a different location. 6. NOTE: Do not overtighten. Check for leaks Check levelness of "Y" connector. 4. Connect vent to exhaust outlet Attach one of long hose to existing vent, make sure vent is seated on fill valve connector. Using pliers, tighten the couplings an additional two-thirds turn . Attach long hose to dryer fill valve and tighten coupling Using a 4" (102 mm) clamp, connect vent to the "Y" connector. Screw on dryer back panel. NOTE: The Steam Dryer water connection may be level...
... is in a different location. 6. NOTE: Do not overtighten. Check for leaks Check levelness of "Y" connector. 4. Connect vent to exhaust outlet Attach one of long hose to existing vent, make sure vent is seated on fill valve connector. Using pliers, tighten the couplings an additional two-thirds turn . Attach long hose to dryer fill valve and tighten coupling Using a 4" (102 mm) clamp, connect vent to the "Y" connector. Screw on dryer back panel. NOTE: The Steam Dryer water connection may be level...
Owners Manual
Page 20
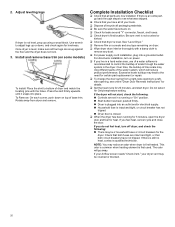
... start , check the following : � There may lead to a leftside opening, see what was skipped. � Check that both fuses are intact and tight, or that you feel for leaks around "Y" connector, faucet, and hoses. � Check dryer's final location. For direct wire installation, turn off dryer, and check the following : � Controls are now installed. Rotate away from a right-side opening to the need for certain part replacement or repair. � To change the door...
... start , check the following : � There may lead to a leftside opening, see what was skipped. � Check that both fuses are intact and tight, or that you feel for leaks around "Y" connector, faucet, and hoses. � Check dryer's final location. For direct wire installation, turn off dryer, and check the following : � Controls are now installed. Rotate away from a right-side opening to the need for certain part replacement or repair. � To change the door...


